BSBuDeJie_01
一. 基本配置
1 项目图标
将图片直接拖入Assets-AppIcon
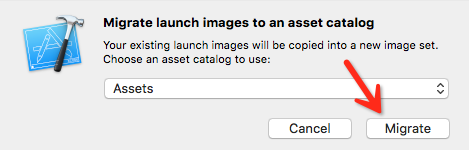
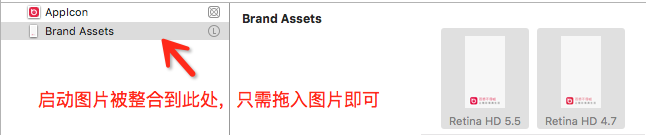
2 启动图片
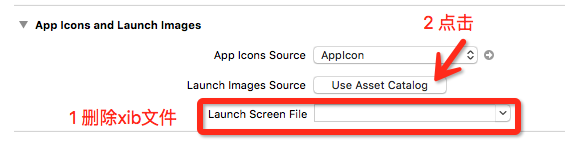
3 软件名称

4 删除Main.stroryboard
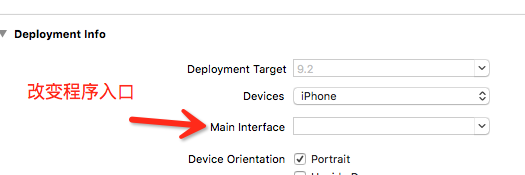
5 设置窗口的根控制器
- (BOOL)application:(UIApplication *)application didFinishLaunchingWithOptions:(NSDictionary *)launchOptions {

    //创建一个窗口

    self.window = [[UIWindow alloc] init];

    self.window.frame = [UIScreen mainScreen].bounds;

    //设置窗口的根控制器

    self.window.rootViewController = [[ViewController alloc] init];

    //显示窗口

    [self.window makeKeyAndVisible];

    return YES;

}
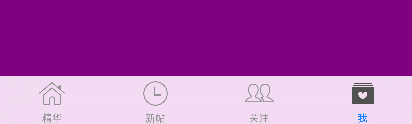
二 配置TabBar切换控制器
先把项目的骨架搭起来,即底部的TabBar控制器
1 基本UITabBarController设置(将tabBar的基本设置封装到自己的tabBar中)
    UITabBarController *tabBarController = [[UITabBarController alloc] init];

    UIViewController *vc1 = [[UIViewController alloc] init];

    vc1.view.backgroundColor = [UIColor redColor];

    vc1.tabBarItem.title = @"精华";

    vc1.tabBarItem.image = [UIImage imageNamed:@"tabBar_essence_icon"];

    vc1.tabBarItem.selectedImage = [UIImage imageNamed:@"tabBar_essence_click_icon"];

    [tabBarController addChildViewController:vc1];

    UIViewController *vc2 = [[UIViewController alloc] init];

    vc2.view.backgroundColor = [UIColor grayColor];

    vc2.tabBarItem.title = @"新帖";

    vc2.tabBarItem.image = [UIImage imageNamed:@"tabBar_new_icon"];

    vc2.tabBarItem.selectedImage = [UIImage imageNamed:@"tabBar_new_click_icon"];

    [tabBarController addChildViewController:vc2];

    UIViewController *vc3 = [[UIViewController alloc] init];

    vc3.view.backgroundColor = [UIColor blueColor];

    vc3.tabBarItem.title = @"关注";

    vc3.tabBarItem.image = [UIImage imageNamed:@"tabBar_friendTrends_icon"];

    vc3.tabBarItem.selectedImage = [UIImage imageNamed:@"tabBar_friendTrends_click_icon"];

    [tabBarController addChildViewController:vc3];

    UIViewController *vc4 = [[UIViewController alloc] init];

    vc4.view.backgroundColor = [UIColor purpleColor];

    vc4.tabBarItem.title = @"我";

    vc4.tabBarItem.image = [UIImage imageNamed:@"tabBar_me_icon"];

    vc4.tabBarItem.selectedImage = [UIImage imageNamed:@"tabBar_me_click_icon"];

    [tabBarController addChildViewController:vc4];

    //设置窗口的根控制器

    self.window.rootViewController = tabBarController;
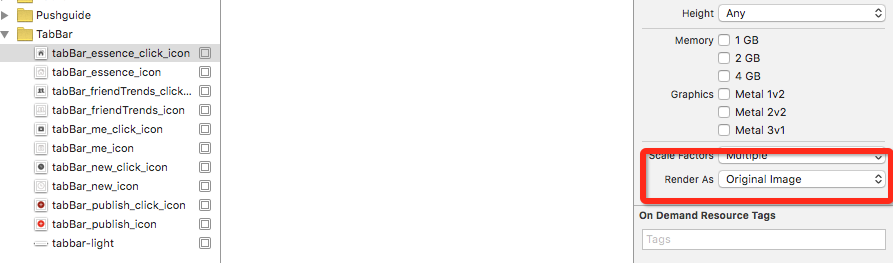
2 选中图片会默认做一个自动渲染
UIImage *image = [UIImage imageNamed:@"tabBar_essence_click_icon"];

//设置图片不会被渲染

image = [image imageWithRenderingMode:UIImageRenderingModeAlwaysOriginal];
3 设置字体
    NSMutableDictionary *attrs = [NSMutableDictionary dictionary];

    attrs[NSFontAttributeName] = [UIFont systemFontOfSize:];

    attrs[NSForegroundColorAttributeName] = [UIColor lightGrayColor];

    [vc1.tabBarItem setTitleTextAttributes:attrs forState:UIControlStateNormal];

    NSMutableDictionary *selectedAttrs = [NSMutableDictionary dictionary];

    selectedAttrs[NSFontAttributeName] = [UIFont systemFontOfSize:];

    selectedAttrs[NSForegroundColorAttributeName] = [UIColor darkGrayColor];

    [vc1.tabBarItem setTitleTextAttributes:selectedAttrs forState:UIControlStateSelected];


三 appearance的使用
通过appearance统一设置所有UITabBarItem的属性,后面带有UI_APPEARANCE_SELECTOR的方法,都可以通过appearance对象来统一设置
    NSMutableDictionary *attrs = [NSMutableDictionary dictionary];

    attrs[NSFontAttributeName] = [UIFont systemFontOfSize:];

    attrs[NSForegroundColorAttributeName] = [UIColor lightGrayColor];

    NSMutableDictionary *selectedAttrs = [NSMutableDictionary dictionary];

    selectedAttrs[NSFontAttributeName] = [UIFont systemFontOfSize:];

    selectedAttrs[NSForegroundColorAttributeName] = [UIColor darkGrayColor];

    UITabBarItem *item = [UITabBarItem appearance];

    [item setTitleTextAttributes:attrs forState:UIControlStateNormal];

    [item setTitleTextAttributes:selectedAttrs forState:UIControlStateSelected];
四 自定义子控制器
将需要修改的属性作为变量,将代码的相同部分提取出来,可提高代码的可读性
在修改某些模块的时候,只需要在相应的子控制器中设置即可
/**

 * 初始化子控制器

 */

- (void)setupChildVC:(UIViewController *)vc title:(NSString *)title image:(NSString *)image selectedImage:(NSString *)selectedImage

{

    //设置文字和图片

    vc.view.backgroundColor = [UIColor colorWithRed:arc4random_uniform()/100.0 green:arc4random_uniform()/100.0 blue:arc4random_uniform()/100.0 alpha:];

    vc.tabBarItem.title = title;

    vc.tabBarItem.image = [UIImage imageNamed:image];

    vc.tabBarItem.selectedImage = [UIImage imageNamed:selectedImage];

    //添加子控制器

    [self addChildViewController:vc];

}
[self setupChildVC:[[UIViewController alloc] init] title:@"精华" image:@"tabBar_essence_icon" selectedImage:@"tabBar_essence_click_icon"];
五 自定义tabbar
1 直接在tabbar中添加项
    UIButton *publishButton = [UIButton buttonWithType:UIButtonTypeCustom];

    [publishButton setBackgroundImage:[UIImage imageNamed:@"tabBar_publish_icon"] forState:UIControlStateNormal];

    [publishButton setBackgroundImage:[UIImage imageNamed:@"tabBar_publish_click_icon"] forState:UIControlStateHighlighted];

    publishButton.frame = CGRectMake(, , publishButton.currentBackgroundImage.size.width, publishButton.currentBackgroundImage.size.height);

    publishButton.center = CGPointMake(self.tabBar.frame.size.width / , self.tabBar.frame.size.height / );

    [self.tabBar addSubview:publishButton];
2 拿到tabbar的子控件
    for (UIView * button in self.tabBar.subviews){

        button.frame = CGRectMake(, , , );

    }

3 当控制器的view布局完之后再布局一次
- (void)viewDidLayoutSubviews{

    for (UIView * button in self.tabBar.subviews){

        button.frame = CGRectMake(, , , );

    }

}

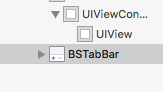
4 当把子控件拿出来也无法改变属性时,需要自定义tabbar
tabbar是只读属性,可以通过KVC,可以直接访问成员变量,自动赋值
    //更换tabbar

    [self setValue:[[BSTabBar alloc] init] forKey:@"tabBar"];
已替换成功:
5 重新布局子控件 - (void)layoutSubviews{
    [super layoutSubviews];

    //设置发布按钮的frame

     self.publishButton.frame = CGRectMake(, , self.publishButton.currentBackgroundImage.size.width, self.publishButton.currentBackgroundImage.size.height);

     self.publishButton.center = CGPointMake(self.frame.size.width / , self.frame.size.height / );

    //设置其他UITabBarButton的frame

    CGFloat buttonY = ;

    CGFloat buttonW = self.frame.size.width / ;

    CGFloat buttonH = self.frame.size.height;

    NSInteger index = ;


    for (UIView * button in self.subviews) {

        if (![button isKindOfClass:NSClassFromString(@"UITabBarButton")]) continue;

        CGFloat buttonX = buttonW * ((index > 1) ? (index + 1) : index);

        button.frame = CGRectMake(buttonX, buttonY, buttonW, buttonH);

        index ++;

    }

}

六 封装frame的修改
1 使用分类
在分类中声明@propery,只会生成方法的声明,不会生成方法的实现和带有_的成员变量
@interface UIView (BSExtension)

@property (nonatomic, assign) CGFloat width;

@property (nonatomic, assign) CGFloat height;

@property (nonatomic, assign) CGFloat x;

@property (nonatomic, assign) CGFloat y;

@end
@implementation UIView (BSExtension)

- (void)setWidth:(CGFloat)width{

    CGRect frame = self.frame;

    frame.size.width = width;

    self.frame = frame;

}

- (void)setHeight:(CGFloat)height{

    CGRect frame = self.frame;

    frame.size.height = height;

    self.frame = frame;

}

- (void)setX:(CGFloat)x{

    CGRect frame = self.frame;

    frame.origin.x = x;

    self.frame = frame;

}

- (void)setY:(CGFloat)y{

    CGRect frame = self.frame;

    frame.origin.y = y;

    self.frame = frame;

}

- (CGFloat)width

{

    return self.frame.size.width;

}

- (CGFloat)height

{

    return self.frame.size.height;

}

- (CGFloat)x

{

    return self.frame.origin.x;

}

- (CGFloat)y

{

    return self.frame.origin.y;

}

@end
2 使用pch文件

七 设置导航栏
1 包装一个导航栏控制器,添加导航栏控制器为tabbarcontroller的子控制器
    UINavigationController *nav = [[UINavigationController alloc] initWithRootViewController:vc];

    [self addChildViewController:nav];
2 设置导航栏内容
    //设置导航栏内容

    self.navigationItem.titleView = [[UIImageView alloc] initWithImage:[UIImage imageNamed:@"MainTitle"]];

    UIButton *tagButton = [UIButton buttonWithType:UIButtonTypeCustom];

    [tagButton setBackgroundImage:[UIImage imageNamed:@"MainTagSubIcon"] forState:UIControlStateNormal];

    [tagButton setBackgroundImage:[UIImage imageNamed:@"MainTagSubIconClick"] forState:UIControlStateHighlighted];

    tagButton.size = tagButton.currentBackgroundImage.size;

    self.navigationItem.leftBarButtonItem = [[UIBarButtonItem alloc] initWithCustomView:tagButton];

3 使用自定义的NSLog,在调试的时候自动隐藏
#ifdef DEBUG

#define BSLog(...) NSLog(__VA_ARGS__)

#else

#define BSLog(...)

#endif
4 打印当前调用的函数
#define BSLogFun BSLog(@"%s",__func__)
八 封装UIBarButtonItem
1 使用扩展类给UIBarButtonItem添加一个方法
@interface UIBarButtonItem (BSExtension)

+ (instancetype)itemWithImage:(NSString *)image highImage:(NSString *)highImage target:(id)target action:(SEL)action;

@end
@implementation UIBarButtonItem (BSExtension)

+ (instancetype)itemWithImage:(NSString *)image highImage:(NSString *)highImage target:(id)target action:(SEL)action{

    UIButton *button = [UIButton buttonWithType:UIButtonTypeCustom];

    [button setBackgroundImage:[UIImage imageNamed:image] forState:UIControlStateNormal];

    [button setBackgroundImage:[UIImage imageNamed:highImage] forState:UIControlStateHighlighted];

    button.size = button.currentBackgroundImage.size;

    [button addTarget:target action:action forControlEvents:UIControlEventTouchUpInside];

    return [[self alloc] initWithCustomView:button];

}

@end
self.navigationItem.leftBarButtonItem = [UIBarButtonItem itemWithImage:@"MainTagSubIcon" highImage:@"MainTagSubIconClick" target:self action:@selector(tagClick)];
九 调整项目文件结构
设置全局背景色
#define BSRGBColor(r, g, b) [UIColor colorWithRed:(r)/255.0  green:(g)/255.0 blue:(b)/255.0 alpha:1.0];

#define BSGlobalBg BSRGBColor(223, 223, 223)
十 自定义导航栏控制器
1 可以重写push方法来拦截所有push进来的控制器
/**

 * 可以在这个方法中拦截所有push进来的控制器

 */

- (void)pushViewController:(UIViewController *)viewController animated:(BOOL)animated

{

    [super pushViewController:viewController animated:animated];

    viewController.navigationItem.backBarButtonItem = [[UIBarButtonItem alloc] initWithTitle:@"返回" style:UIBarButtonItemStyleDone target:nil action:nil];

    NSLog(@"%@",viewController);

}
2 改变导航栏的返回按钮的颜色(默认为黑, 点击为红)和位置
- (void)pushViewController:(UIViewController *)viewController animated:(BOOL)animated

{

    if (self.childViewControllers.count > ) {//如果push进来的不是第一个控制器

        UIButton *button = [UIButton buttonWithType:UIButtonTypeCustom];

        [button setTitle:@"返回" forState:UIControlStateNormal];

        [button setTitleColor:[UIColor blackColor] forState:UIControlStateNormal];

        [button setTitleColor:[UIColor redColor] forState:UIControlStateHighlighted];

        [button setImage:[UIImage imageNamed:@"navigationButtonReturn"] forState:UIControlStateNormal];

        [button setImage:[UIImage imageNamed:@"navigationButtonReturnClick"] forState:UIControlStateHighlighted];

        button.size = CGSizeMake(, );

        //让按钮内部的所有内容左对齐

        button.contentHorizontalAlignment = UIControlContentHorizontalAlignmentLeft;

        //按钮的外边距

        button.contentEdgeInsets = UIEdgeInsetsMake(, -, , );

        [button addTarget:self action:@selector(back) forControlEvents:UIControlEventTouchUpInside];

        viewController.navigationItem.leftBarButtonItem = [[UIBarButtonItem alloc] initWithCustomView:button];

    }

    //让viewController可以覆盖上面设置的leftBarButtonItem

    [super pushViewController:viewController animated:animated];

}
3 设置tabbar隐藏
        //隐藏tabbar

        viewController.hidesBottomBarWhenPushed = YES;
十一 调整初始化代码
当第一次使用某个类时调用一次,在使用appearance时可以放入
/**

 * 当第一次使用这个类时调用一次

 */

+ (void)initialize

{

    //当导航栏用在BSNavigationController中,appearence设置才会生效

    UINavigationBar *bar = [UINavigationBar appearance];

    [bar setBackgroundImage:[UIImage imageNamed:@"navigationbarBackgroundWhite"] forBarMetrics:UIBarMetricsDefault];

}
十二 颜色说明
1 24bit颜色: R G B
ff0000: 红色
00ff00: 绿色
0000ff: 蓝色
000000: 黑色
ffffff: 白色
灰色特点:RGB一样
2 32bit颜色: R G B A
ff0000ff
十三 关注模块
1 自动换行
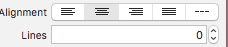
2 label文字换行
alt+enter
十四 显示推荐关注
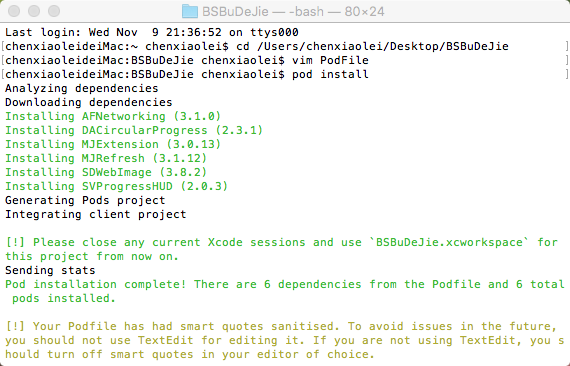
1 添加第三方框架
cd + 项目路径
vim PodFile
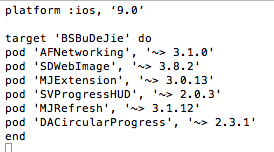
pod install
2 发送请求 <AFNetworking>
    //发送请求

    NSMutableDictionary *params = [NSMutableDictionary dictionary];

    params[@"a"] = @"category";

    params[@"c"] = @"subscribe";

    [[AFHTTPSessionManager manager] GET:@"http://api.budejie.com/api/api_open.php" parameters:params progress:nil success:^(NSURLSessionDataTask * _Nonnull task, id  _Nullable responseObject) {

        NSLog(@"%@",responseObject);

    } failure:^(NSURLSessionDataTask * _Nullable task, NSError * _Nonnull error) {

    }];
3 显示指示器 <SVProgressHUD>
/** 简单的等待提示

    开始: [SVProgressHUD show];

    结束: [SVProgressHUD dismiss];

    提示内容: [SVProgressHUD showSuccessWithStatus:@"加载中..."];

*/

/** 显示HUD以及指示任务的状态

     + (void)show;

     + (void)showWithStatus:(NSString*)string;

*/

/** 在HUD指示任务的进度

     + (void)showProgress:(CGFloat)progress;

     + (void)showProgress:(CGFloat)progress status:(NSString*)status;

*/

/** 隐藏HUD

     + (void)dismiss;

     + (void)dismissWithDelay:(NSTimeInterval)delay;

*/

/** 显示多个HUD 该HUD将自动消失,popActivity将与显示的次数匹配

     + (void)popActivity;

*/
BSBuDeJie_01的更多相关文章
随机推荐
- Go - 路径、目录名、包名、文件名
先看一个示例: 1.目录结构 bin pkg src pk1 pk2 function1.go function2.go index.go 2.function1.go 文件内容: package p ...
- extractor
package scrollable.excel.reader; import java.io.IOException; import java.io.InputStream; import java ...
- 批处理命令——call 和 start
一.call命令总结 [1]call命令简介 学过汇编或C的朋友,肯定都知道call指令表示什么意思.其实,在这里它的意思也是一样的.在批处理脚本中,call命令用来从一个批处理脚本中调用另一个批处理 ...
- iOS开发 iOS10推送必看(基础篇)
iOS10更新之后,推送也是做了一些小小的修改,下面我就给大家仔细说说.希望看完我的这篇文章,对大家有所帮助. 原文链接 一.简单入门篇---看完就可以简单适配完了相对简单的推送证书以及环境的 ...
- C的数值取反操作
今儿在代码中发现一句"return x? ~0 : 0;"对~0这个取反操作相关的知识又还给老师了.一查,查到下面一道题,弄过来贴上. //-------------------- ...
- 如何解决自动加载与模板中(如Smarty)的自动加载冲突的问题
function aotuman($class){ include('./'.$class.'.class.php'); } spl_autoload_register('automan'); / ...
- Struts2 动态方法调用
01.Struts 2基本结构 使用Struts2框架实现用登录的功能,使用struts2标签和ognl表达式简化了试图的开发,并且利用struts2提供的特性对输入的数据进行验证,以及访问Servl ...
- CookieManager
CookieSyncManager.createInstance(context); CookieManager cookieManager = CookieManager.getInstance() ...
- 【CentOS】虚拟机网络配置与远程登录
////////////////////////////////////11月16日更新////////////////////////////////////////////////////// 一 ...
- [工作中的设计模式]迭代子模式Iterator
一.模式解析 迭代子模式又叫游标(Cursor)模式,是对象的行为模式.迭代子模式可以顺序地访问一个聚集中的元素而不必暴露聚集的内部表象 1.迭代子模式一般用于对集合框架的访问,常用的集合框架为lis ...