使用Python基于TensorFlow的CIFAR-10分类训练
TensorFlow Models
GitHub:https://github.com/tensorflow/models
Document:https://github.com/jikexueyuanwiki/tensorflow-zh
CIFAR-10 数据集
Web:http://www.cs.toronto.edu/~kriz/cifar.html
目标:(建立一个用于识别图像的相对较小的卷积神经网络)对一组32x32RGB的图像进行分类
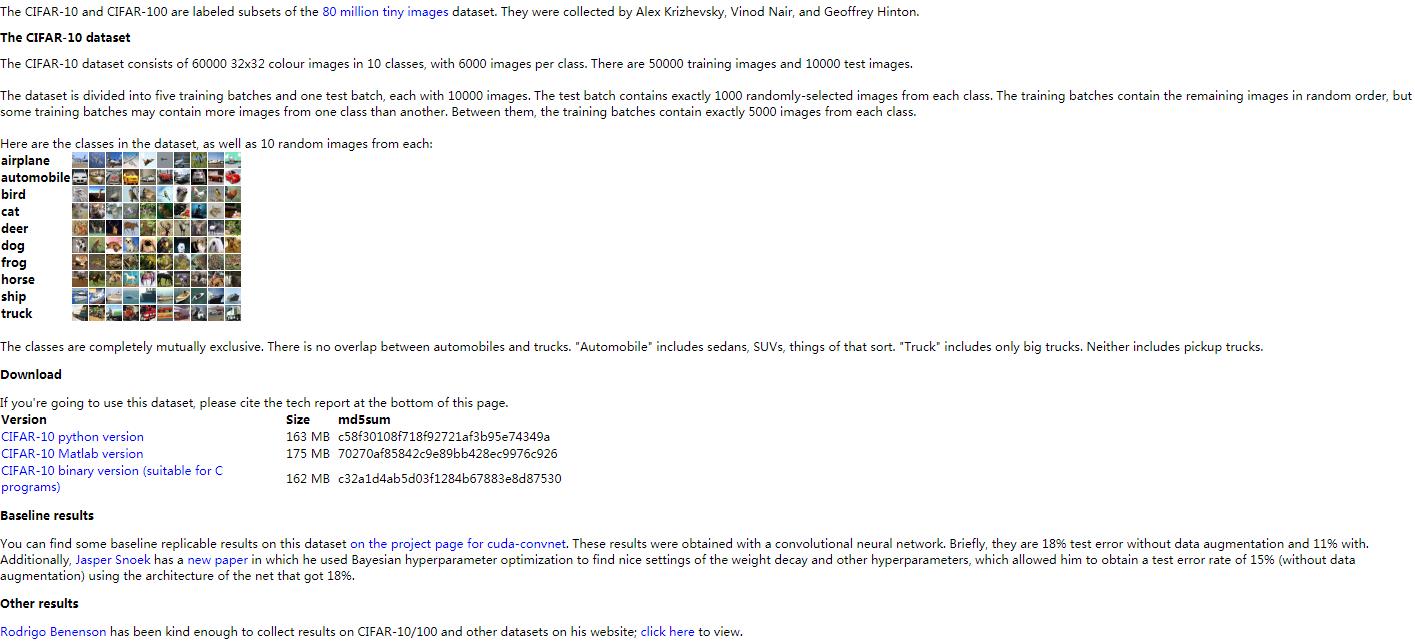
数据集:60000张32*32*3的彩色图片,其中50000张训练集,10000张测试集,涵盖10个类别:飞机, 汽车, 鸟, 猫, 鹿, 狗, 青蛙, 马, 船以及卡车
CIFAR-10 模型训练
GitHub:https://github.com/tensorflow/models/tree/master/tutorials/image/cifar10

流程:首先读取图片,对图片预处理,进行数据增强,然后将图片存放到队列中打乱之后用于网络输入。其次构造模型,损失函数计算,学习率指数衰减,计算梯度,用梯度来求解最优值。最后开始训练。
1)导入库
# cifar10_train.py
from __future__ import absolute_import
from __future__ import division
from __future__ import print_function
from datetime import datetime
import time
import tensorflow as tf
import cifar10

# cifar10.py
from __future__ import absolute_import
from __future__ import division
from __future__ import print_function
import re
import tensorflow as tf
import cifar10_input
import os
import sys
import urllib
import tarfile

# cifar10_input.py
from __future__ import absolute_import
from __future__ import division
from __future__ import print_function
import tensorflow as tf
import tensorflow_datasets as tfds
2)使用FLAGS设置参数
# cifar10_train.py
# 定义全局变量
FLAGS = tf.app.flags.FLAGS # 初始化
# 定义参数:tf.app.flags.DEFINE_xxx(参数1,参数2,参数3),xxx为参数类型
参数1为变量名,如train_dir,可通过FLAGS.train_dir取得该变量的值参数2为默认值参数3为说明内容,当不设置该变量的值时,通过FLAGS.train_dir取到的是其默认值(/tmp/cifar10_train),若要设置该变量的值,可通过运行时写参数--train_dir '路径'来设置(python cifar10_train.py --train_dir '路径') - 键入-h/--help,则打印说明内容
tf.app.flags.DEFINE_string('train_dir', './tmp/cifar10_train', """Directory where to write event logs """"""and checkpoint.""")
tf.app.flags.DEFINE_integer('max_steps', 1000000, """Number of batches to run.""")
tf.app.flags.DEFINE_boolean('log_device_placement', False, """Whether to log device placement.""")

# cifar10.py'
# 基本模型参数
tf.app.flags.DEFINE_integer('batch_size', 128, """Number of images to process in a batch.""")
tf.app.flags.DEFINE_boolean('use_fp16', True, """Train the model using fp16.""")
tf.app.flags.DEFINE_string('data_dir', './tmp/cifar10_data', """Path to the CIFAR-10 data directory.""")
tf.app.flags.DEFINE_integer('log_frequency', 10, """How often to log results to the console.""")
DATA_URL = 'http://www.cs.toronto.edu/~kriz/cifar-10-binary.tar.gz'
3)下载数据集
国内网络环境的原因,源码中下载数据集代码可能执行不成功,可以去官网下载好数据集,然后放置在FLAGS.data_dir路径下即可(需要设置FLAGS.data_dir路径)
下载:cifar-10-binary.tar.gz
下载至:*\tutorials\image\cifar10\tmp\cifar10_data(FLAGS.data_dir ='./tmp/cifar10_data')
# cifar10.py
# 检测本地是否有数据集
def maybe_download_and_extract():
    """Download and extract the tarball from Alex's website."""
    dest_directory = FLAGS.data_dir # /tmp/cifar10_data
    # 判断文件夹是否存在,不存在则创建
    if not os.path.exists(dest_directory):
        os.makedirs(dest_directory)
    # 从URL中获得文件名:DATA_URL定义为cifar10数据集下载地址,这里将URL最后一个斜杠后面的内容作为文件名
    filename = DATA_URL.split('/')[-1]
    # 合并文件路径:将文件名与数据文件夹结合得到下载文件存放的路径
    filepath = os.path.join(dest_directory, filename)
    # 判断文件是否存在,如果存在,表明数据集已经下载,就无需再下载,如果还没下载,则通过urllib.request.urlretrieve直接下载文件
    if not os.path.exists(filepath):
        # 定义下载过程中打印日志的回调函数:回调函数用于显示下载进度,下载进度为当前下载量除以总下载量
        def _progress(count, block_size, total_size):
            sys.stdout.write('\r>> Downloading %s %.1f%%' % (filename, float(count * block_size) / float(total_size) * 100.0))
            sys.stdout.flush()
        # 下载数据集
        filepath, _ = urllib.request.urlretrieve(DATA_URL, filepath,reporthook=_progress)
        print()
        # 获得文件信息
        statinfo = os.stat(filepath)
        print('Successfully downloaded', filename, statinfo.st_size, 'bytes.')
# 定义解压路径
extracted_dir_path = os.path.join(dest_directory, 'cifar-10-batches-bin')
# 解压缩:判断解压文件夹是否存在,若存在表明数据集已经下载并解压了,就不需要操作
if not os.path.exists(extracted_dir_path):
        tarfile.open(filepath, 'r:gz').extractall(dest_directory)
4)导入数据和标签
# cifar10_train.py
def train():
  """Train CIFAR-10 for a number of steps."""
  with tf.Graph().as_default():
    # 定义记录训练步数的变量
    global_step = tf.train.get_or_create_global_step()

    # Get images and labels for CIFAR-10.
    # Force input pipeline to CPU:0 to avoid operations sometimes ending up on
    # GPU and resulting in a slow down.
    with tf.device('/cpu:0'):
      # 从CIFAR-10中导入数据和标签
      images, labels = cifar10.distorted_inputs()
# cifar10.py
def distorted_inputs():
  """Construct distorted input for CIFAR training using the Reader ops.

  Returns:
    images: Images. 4D tensor of [batch_size, IMAGE_SIZE, IMAGE_SIZE, 3] size.
    labels: Labels. 1D tensor of [batch_size] size.
  """
  images, labels = cifar10_input.distorted_inputs(batch_size=FLAGS.batch_size)

  if FLAGS.use_fp16:
    images = tf.cast(images, tf.float16)
    labels = tf.cast(labels, tf.float16)
  return images, labels
# cifar10_input.py
# Process images of this size. Note that this differs from the original CIFAR
# image size of 32 x 32. If one alters this number, then the entire model
# architecture will change and any model would need to be retrained.
IMAGE_SIZE = 24

# Global constants describing the CIFAR-10 data set.
NUM_CLASSES = 10
NUM_EXAMPLES_PER_EPOCH_FOR_TRAIN = 50000
NUM_EXAMPLES_PER_EPOCH_FOR_EVAL = 10000

def distorted_inputs(batch_size):
  """Construct distorted input for CIFAR training using the Reader ops.

  Args:
    batch_size: Number of images per batch.

  Returns:
    images: Images. 4D tensor of [batch_size, IMAGE_SIZE, IMAGE_SIZE, 3] size.
    labels: Labels. 1D tensor of [batch_size] size.
  """
  # 要读入的数据文件
  filenames = [os.path.join('./tmp/cifar10_data/cifar-10-batches-bin/', 'data_batch_%d.bin' % i)
               for i in range(1, 6)]
  # 如果有数据文件缺失,抛出异常
  for f in filenames:
    # print(f)
    if not tf.gfile.Exists(f):
      raise ValueError('Failed to find file: ' + f)
  # 把要读取的全部文件打包为一个tf内部的queue类型,之后tf开文件就从这个queue中取目录
  filename_queue = tf.train.string_input_producer(filenames)
  with tf.name_scope('data_augmentation'):
    # Read examples from files in the filename queue.
    # 读取文件队列中文件的样本
    read_input = read_cifar10(filename_queue)
    reshaped_image = tf.cast(read_input.uint8image, tf.float32)

    height = IMAGE_SIZE
    width = IMAGE_SIZE

    # 用于训练网络的图像处理,请注意应用于图像的许多随机失真
    # 随机裁剪图像的[height, width]部分
    distorted_image = tf.random_crop(reshaped_image, [height, width, 3])

    # 随机水平翻转图像
    distorted_image = tf.image.random_flip_left_right(distorted_image)

    # 由于这些操作是不可交换的,因此可以考虑随机化和调整操作的顺序
    # 在某范围随机调整图片亮度
    distorted_image = tf.image.random_brightness(distorted_image,
                                                 max_delta=63)
    # 在某范围随机调整图片对比度
    distorted_image = tf.image.random_contrast(distorted_image,
                                               lower=0.2, upper=1.8)

    # 减去平均值并除以像素的方差,白化操作:均值变为0,方差变为1
    float_image = tf.image.per_image_standardization(distorted_image)

    # 设置张量的形状.
    float_image.set_shape([height, width, 3])
    read_input.label.set_shape([1])

    # 确保随机shuffling有好的混合性质
    min_fraction_of_examples_in_queue = 0.4
    min_queue_examples = int(NUM_EXAMPLES_PER_EPOCH_FOR_TRAIN * min_fraction_of_examples_in_queue)

    print('Filling queue with %d CIFAR images before starting to train. '
          'This will take a few minutes.' % min_queue_examples)

    # 通过建立一个样本队列来生成一批image和label
    return _generate_image_and_label_batch(float_image, read_input.label,min_queue_examples, batch_size)

def read_cifar10(filename_queue):
  """
      读取和解析来自CIFAR10数据文件的样本
      建议:如果您想要N路并行读取,请调用此函数N次
      这会给你N个独立的Readers,阅读那些文件中不同的文件和位置,这将提供更好的混合例子

      ARGS:
      filename_queue:具有要读取的文件名的字符串队列。

      返回:
      表示单个样本的对象,包含以下字段:
      height:结果中的行数(32)
      width:结果中的列数(32)
      depth:结果中的颜色通道数量(3)
      key:描述这个例子文件名和记录号的标量字符串张量
      label:一个int32张量,带有范围为0..9的标签
      uint8image:一个图像数据的[height, width, depth] uint8 张量
      """

  # 定义返回的结果对象类
  class CIFAR10Record(object):
    pass

  result = CIFAR10Record()
  # 只有10个类别
  label_bytes = 1  # 2 for CIFAR-100
  # 32x32 RGB 的图像
  result.height = 32
  result.width = 32
  result.depth = 3

  image_bytes = result.height * result.width * result.depth
  # 每条记录的格式固定:label+image,因此长度固定
  record_bytes = label_bytes + image_bytes

  # 采用固定长度的阅读器,CIFAR-10格式没有文件头或文件尾,将header_bytes和footer_bytes保留为默认值0
  reader = tf.FixedLengthRecordReader(record_bytes=record_bytes)

  # 打开filename_queue中的文件,读取一条记录
  result.key, value = reader.read(filename_queue)
  # 阅读器的read方法会输出一个key来表征输入的文件和其中的纪录(对于调试非常有用)
  # 同时得到一个字符串标量,这个字符串标量可以被一个或多个解析器,或者转换操作将其解码为张量并且构造成为样本。

  # 将字符串标量转换为长度为record_bytes的uint8张量
  record_bytes = tf.decode_raw(value, tf.uint8)

  # 第一个字节代表了label,类型转换uint8->int32,与一般的切片操作不同,tf.slice的第三个参数是切片的长度
  result.label = tf.cast(tf.slice(record_bytes, [0], [label_bytes]), tf.int32)

  # 标签之后的剩余字节表示图像,reshape [depth * height * width] => [depth,height,width]
  depth_major = tf.reshape(tf.slice(record_bytes, [label_bytes], [image_bytes]),
                           [result.depth, result.height, result.width])
  # 交换输入张量的不同维度 [depth, height, width] => [height, width, depth].
  result.uint8image = tf.transpose(depth_major, [1, 2, 0])

  return result

def _generate_image_and_label_batch(image, label, min_queue_examples, batch_size):
  """
      构建排队的一批图像和标签
      ARGS:
       image:type.float32的[height,width,3]的3-D张量
       label:type.int32的1-D张量
       min_queue_examples:int32,在队列中保留的最小样本数量,可提供多批样本
       batch_size:每批次的图像数量

       返回:
       images: Images. 4D张量 [batch_size,height,width,3]
       labels: Labels. 1D张量 [batch_size]
      """
  # 创建一个混合样本的队列,然后从样本队列中读取batch_size的图像+标签
  num_preprocess_threads = 16
  images, label_batch = tf.train.shuffle_batch([image, label], batch_size=batch_size,
                                               num_threads=num_preprocess_threads,
                                               capacity=min_queue_examples + 3 * batch_size,
                                               min_after_dequeue=min_queue_examples)
  # 在数据输入管线的末端,我们需要有另一个队列来执行输入样本的训练(train),评价(loss)和推理(inference)
  # 因此我们使用tf.train.shuffle_batch函数来对队列中的样本进行乱序处理

  # 在可视化器中显示训练图像
  tf.summary.image('images', images)

  return images, tf.reshape(label_batch, [batch_size])
5)构建图
# cifar10_train.py
# Build a Graph that computes the logits predictions from the
    # inference model.
    logits = cifar10.inference(images)
# cifar10.py
# 尽可能地构建好图表,满足促使神经网络向前反馈并做出预测的要求
TOWER_NAME = 'tower'

def inference(images):
    """
    构建CIFAR-10模型
    ARGS:
     images:从distorted_inputs()或inputs()返回的图像
    返回:
     Logits
    """
    # 我们使用tf.get_variable()而不是tf.Variable()来实例化所有变量,以便跨多个GPU训练时能共享变量
    # 如果我们只在单个GPU上运行此模型,我们可以通过用tf.Variable()替换tf.get_variable()的所有实例来简化此功能

    # conv1-第一层卷积
    with tf.variable_scope('conv1') as scope: #每一层都创建于一个唯一的tf.name_scope之下,创建于该作用域之下的所有元素都将带有其前缀
        # 5*5 的卷积核,64个
        kernel = _variable_with_weight_decay('weights', shape=[5, 5, 3, 64],
                                         stddev=1e-4, wd=0.0)
        # 卷积操作,步长为1,0padding SAME,不改变宽高,通道数变为64
        conv = tf.nn.conv2d(images, kernel, [1, 1, 1, 1], padding='SAME')
        # 在CPU上创建第一层卷积操作的偏置变量
        biases = _variable_on_cpu('biases', [64], tf.constant_initializer(0.0))
        # 加上偏置
        bias = tf.nn.bias_add(conv, biases)
        # relu非线性激活
        conv1 = tf.nn.relu(bias, name=scope.name)
        # 创建激活显示图的summary
        _activation_summary(conv1)

    # pool1-第一层pooling
    # 3*3 最大池化,步长为2
    pool1 = tf.nn.max_pool(conv1, ksize=[1, 3, 3, 1], strides=[1, 2, 2, 1],
                         padding='SAME', name='pool1')
    # norm1-局部响应归一化
    # LRN层,对局部神经元的活动创建竞争机制,使得其中响应比较大的值变得相对更大,并抑制其他反馈较小的神经元,增强了模型的泛化能力
    norm1 = tf.nn.lrn(pool1, 4, bias=1.0, alpha=0.001 / 9.0, beta=0.75,
                    name='norm1')

    # conv2-第二层卷积
    with tf.variable_scope('conv2') as scope:
        # 卷积核:5*5 ,64个
        kernel = _variable_with_weight_decay('weights', shape=[5, 5, 64, 64],
                                         stddev=1e-4, wd=0.0)
        conv = tf.nn.conv2d(norm1, kernel, [1, 1, 1, 1], padding='SAME')
        biases = _variable_on_cpu('biases', [64], tf.constant_initializer(0.1))
        bias = tf.nn.bias_add(conv, biases)
        conv2 = tf.nn.relu(bias, name=scope.name)
        _activation_summary(conv2)

    # norm2-局部响应归一化
    norm2 = tf.nn.lrn(conv2, 4, bias=1.0, alpha=0.001 / 9.0, beta=0.75,
                    name='norm2')
    # pool2-第二层最大池化
    pool2 = tf.nn.max_pool(norm2, ksize=[1, 3, 3, 1],
                         strides=[1, 2, 2, 1], padding='SAME', name='pool2')

    # local3-全连接层,384个节点
    with tf.variable_scope('local3') as scope:
        # 把单个样本的特征拼成一个大的列向量,以便我们可以执行单个矩阵乘法
        dim = 1
        for d in pool2.get_shape()[1:].as_list():
             dim *= d
        reshape = tf.reshape(pool2, [FLAGS.batch_size, dim])

        # 权重
        weights = _variable_with_weight_decay('weights', shape=[dim, 384],
                                          stddev=0.04, wd=0.004)
        # 偏置
        biases = _variable_on_cpu('biases', [384], tf.constant_initializer(0.1))
        # relu激活
        local3 = tf.nn.relu(tf.matmul(reshape, weights) + biases, name=scope.name)
        #生成summary
        _activation_summary(local3)

    # local4-全连接层,192个节点
    with tf.variable_scope('local4') as scope:
        weights = _variable_with_weight_decay('weights', shape=[384, 192],
                                          stddev=0.04, wd=0.004)
        biases = _variable_on_cpu('biases', [192], tf.constant_initializer(0.1))
        local4 = tf.nn.relu(tf.matmul(local3, weights) + biases, name=scope.name)
        _activation_summary(local4)

    # softmax, i.e. softmax(WX + b)
    # 输出层
    with tf.variable_scope('softmax_linear') as scope:
        # 权重
        weights = _variable_with_weight_decay('weights', [192, NUM_CLASSES],
                                          stddev=1/192.0, wd=0.0)
        # 偏置
        biases = _variable_on_cpu('biases', [NUM_CLASSES],
                              tf.constant_initializer(0.0))
        # 输出层的线性操作
        softmax_linear = tf.add(tf.matmul(local4, weights), biases, name=scope.name)
        # 生成summary
        _activation_summary(softmax_linear)
    return softmax_linear

def _variable_with_weight_decay(name, shape, stddev, wd):
    '''
    帮助创建一个权重衰减的初始化变量

    请注意,变量是用截断的正态分布初始化的
    只有在指定了权重衰减时才会添加权重衰减

    Args:
    name: 变量的名称
    shape: 整数列表
    stddev: 截断高斯的标准差
    wd: 加L2Loss权重衰减乘以这个浮点数.如果没有,此变量不会添加权重衰减.

    Returns:
    变量张量
    '''
    var = _variable_on_cpu(name, shape,
                         tf.truncated_normal_initializer(stddev=stddev))
    if wd is not None:
        weight_decay = tf.multiply(tf.nn.l2_loss(var), wd, name='weight_loss')
        tf.add_to_collection('losses', weight_decay)
    return var

def _variable_on_cpu(name, shape, initializer):
    '''
    帮助创建存储在CPU内存上的变量
    ARGS:
     name:变量的名称
     shape:整数列表
     initializer:变量的初始化操作
    返回:
     变量张量
    '''
    with tf.device('/cpu:0'): #用 with tf.device 创建一个设备环境, 这个环境下的 operation 都统一运行在环境指定的设备上.
        var = tf.get_variable(name, shape, initializer=initializer)
    return var

def _activation_summary(x):
    '''
    为激活创建summary

    添加一个激活直方图的summary
    添加一个测量激活稀疏度的summary

    ARGS:
     x:张量
    返回:
     没有
    '''
    # 如果这是多GPU训练,请从名称中删除'tower_ [0-9] /'.这有助于张量板上显示的清晰度.
    tensor_name = re.sub('%s_[0-9]*/' % TOWER_NAME, '', x.op.name)
    tf.summary.histogram(tensor_name + '/activations', x)
    tf.summary.scalar(tensor_name + '/sparsity',tf.nn.zero_fraction(x))
6)Inference图构造损失函数
# cifar10_train.py
# Calculate loss.
    loss = cifar10.loss(logits, labels)
# cifar10.py
# 描述损失函数,往inference图中添加生成损失(loss)所需要的操作(ops)
def loss(logits, labels):
    '''
    将L2Loss添加到所有可训练变量
    添加"Loss" and "Loss/avg"的summary
    ARGS:
    logits:来自inference()的Logits
    labels:来自distorted_inputs或输入()的标签.一维张量形状[batch_size]

    返回:
    float类型的损失张量
    '''

    labels = tf.cast(labels, tf.int64)
    # 计算这个batch的平均交叉熵损失
    # 添加一个tf.nn.softmax_cross_entropy_with_logits操作,用来比较inference()函数所输出的logits Tensor与labels
    cross_entropy = tf.nn.sparse_softmax_cross_entropy_with_logits(labels=labels, logits=logits, name='cross_entropy_per_example')
    cross_entropy_mean = tf.reduce_mean(cross_entropy, name='cross_entropy')
    tf.add_to_collection('losses', cross_entropy_mean)

    # 总损失定义为交叉熵损失加上所有的权重衰减项(L2损失)
    return tf.add_n(tf.get_collection('losses'), name='total_loss')
7)构造模型训练(梯度下降算法)
# cifar10_train.py
# Build a Graph that trains the model with one batch of examples and
    # updates the model parameters.
    train_op = cifar10.train(loss, global_step)
# cifar10.py
# Constants describing the training process.
# 描述模型的训练
MOVING_AVERAGE_DECAY = 0.9999     # The decay to use for the moving average.
NUM_EPOCHS_PER_DECAY = 350.0      # Epochs after which learning rate decays.
LEARNING_RATE_DECAY_FACTOR = 0.1  # Learning rate decay factor.
INITIAL_LEARNING_RATE = 0.1       # Initial learning rate.

def train(total_loss, global_step):
    '''
    训练 CIFAR-10模型

    创建一个optimizer并应用于所有可训练变量. 为所有可训练变量添加移动平均值.
    ARGS:
     total_loss:loss()的全部损失
     global_step:记录训练步数的整数变量
    返回:
     train_op:训练的op
    '''
    # 影响学习率的变量
    num_batches_per_epoch = NUM_EXAMPLES_PER_EPOCH_FOR_TRAIN / FLAGS.batch_size
    decay_steps = int(num_batches_per_epoch * NUM_EPOCHS_PER_DECAY)

    # 根据步骤数以指数方式衰减学习率
    lr = tf.train.exponential_decay(INITIAL_LEARNING_RATE,
                                  global_step,
                                  decay_steps,
                                  LEARNING_RATE_DECAY_FACTOR,
                                  staircase=True)
    # Summary是对网络中Tensor取值进行监测的一种Operation.这些操作在图中是“外围”操作,不影响数据流本身.
    # 把lr添加到观测中
    tf.summary.scalar('learning_rate', lr)

    # 生成所有损失和相关和的移动平均值的summary
    loss_averages_op = _add_loss_summaries(total_loss)

    # 计算梯度
    with tf.control_dependencies([loss_averages_op]):
        opt = tf.train.GradientDescentOptimizer(lr)
        grads = opt.compute_gradients(total_loss)

    # 应用梯度.
    apply_gradient_op = opt.apply_gradients(grads, global_step=global_step)

    # 为可训练变量添加直方图summary.
    for var in tf.trainable_variables():
        tf.summary.histogram(var.op.name, var)

    # 为梯度添加直方图summary
    for grad, var in grads:
        if grad is not None:
            tf.summary.histogram(var.op.name + '/gradients', grad)

    # 跟踪所有可训练变量的移动平均值
    variable_averages = tf.train.ExponentialMovingAverage(MOVING_AVERAGE_DECAY, global_step)
    with tf.control_dependencies([apply_gradient_op]):
        variables_averages_op = variable_averages.apply(tf.trainable_variables())

    return variables_averages_op

def _add_loss_summaries(total_loss):

    '''
    往CIFAR-10模型中添加损失summary
    为所有损失和相关summary生成移动平均值,以便可视化网络的性能

    ARGS:
     total_loss:loss()的全部损失
    返回:
     loss_averages_op:用于生成移动平均的损失
    '''
    # 计算所有单个损失和总损失的移动平均
    loss_averages = tf.train.ExponentialMovingAverage(0.9, name='avg')
    losses = tf.get_collection('losses')
    loss_averages_op = loss_averages.apply(losses + [total_loss])

    # 把所有的单个损失和总损失添加到summary观测中,平均损失也添加观测
    for l in losses + [total_loss]:
        # 将每个损失命名为损失的原始名称+“(raw)”,并将损失的移动平均版本命名为损失的原始名称
        # 这一行代码应该已经过时了,执行时提醒:
        # INFO:tensorflow:Summary name conv1/weight_loss (raw) is illegal; using conv1/weight_loss__raw_ instead.
        tf.summary.scalar(l.op.name + ' (raw)', l)
        tf.summary.scalar(l.op.name, loss_averages.average(l))

    return loss_averages_op
8)在会话中启动图,开始执行训练
- 在构建阶段,op的执行步骤被描述成一个图
- 在执行阶段,使用会话执行执行图中的op
通常在构建阶段创建一个图来表示和训练神经网络,前面三个环节即完成该任务,然后在执行阶段反复执行图中的训练op
# cifar10_train.pydef main(argv=None):  # pylint: disable=unused-argument
    # 执行下载和解压数据集
    cifar10.maybe_download_and_extract()
    # 删除之前训练过程中产生的一些临时文件,并重新生成目录
    if tf.gfile.Exists(FLAGS.train_dir):
        tf.gfile.DeleteRecursively(FLAGS.train_dir)
    tf.gfile.MakeDirs(FLAGS.train_dir)
    # 执行训练
    train()

if __name__ == '__main__':    # tf.app.run()若未传入参数,则执行main(argv=...)函数,该函数同时会解析FLAGS,若不执行tf.app.run(),FLAGS不能正常使用
    tf.app.run()
# cifar10_train.py
def train():
    ……
    class _LoggerHook(tf.train.SessionRunHook):
      """Logs loss and runtime."""

      # begin方法初始化训练步数和起始时间
      def begin(self):
        self._step = -1
        self._start_time = time.time()

      # before_run方法用于运行之前返回loss的值,同时计数训练步数
      def before_run(self, run_context):
        self._step += 1
        return tf.train.SessionRunArgs(loss)  # Asks for loss value.

      # after_run方法用于打印相关信息
      def after_run(self, run_context, run_values):
        if self._step % FLAGS.log_frequency == 0:
          current_time = time.time()
          duration = current_time - self._start_time
          self._start_time = current_time

          loss_value = run_values.results
          examples_per_sec = FLAGS.log_frequency * FLAGS.batch_size / duration
          sec_per_batch = float(duration / FLAGS.log_frequency)

          format_str = ('%s: step %d, loss = %.2f (%.1f examples/sec; %.3f '
                        'sec/batch)')
          print (format_str % (datetime.now(), self._step, loss_value,
                               examples_per_sec, sec_per_batch))

    # tf.train.MonitoredTrainingSession 为监督训练的会话
    with tf.train.MonitoredTrainingSession(
        # checkpoint_dir 恢复checkpoint的文件夹
        checkpoint_dir=FLAGS.train_dir,
        # tf.train.StopAtStepHook 到达last_step时发起停止的信号
        hooks=[tf.train.StopAtStepHook(last_step=FLAGS.max_steps),
               # tf.train.NanTensorHook 用于监督loss是否为nan,如果没有收到停止信息就训练
               tf.train.NanTensorHook(loss),
               _LoggerHook()],
        config=tf.ConfigProto(
            log_device_placement=FLAGS.log_device_placement)) as mon_sess:
      while not mon_sess.should_stop():
        mon_sess.run(train_op)
训练损失 | 随机抽取10个Test数据集中的数据统计准确率:


使用Python基于TensorFlow的CIFAR-10分类训练的更多相关文章
- DL Practice:Cifar 10分类
Step 1:数据加载和处理 一般使用深度学习框架会经过下面几个流程: 模型定义(包括损失函数的选择)——>数据处理和加载——>训练(可能包括训练过程可视化)——>测试 所以自己写代 ...
- TensorFlow—CNN—CIFAR数据集分类
- 基于tensorflow的文本分类总结(数据集是复旦中文语料)
代码已上传到github:https://github.com/taishan1994/tensorflow-text-classification 往期精彩: 利用TfidfVectorizer进行 ...
- 基于TensorFlow的图片识别服务
1.使用TensorFlow Retrain进行图片分类训练 https://www.tensorflow.org/versions/master/how_tos/image_retraining/i ...
- Chinese-Text-Classification,用卷积神经网络基于 Tensorflow 实现的中文文本分类。
用卷积神经网络基于 Tensorflow 实现的中文文本分类 项目地址: https://github.com/fendouai/Chinese-Text-Classification 欢迎提问:ht ...
- 【翻译】TensorFlow卷积神经网络识别CIFAR 10Convolutional Neural Network (CNN)| CIFAR 10 TensorFlow
原网址:https://data-flair.training/blogs/cnn-tensorflow-cifar-10/ by DataFlair Team · Published May 21, ...
- 手写数字识别 ----在已经训练好的数据上根据28*28的图片获取识别概率(基于Tensorflow,Python)
通过: 手写数字识别 ----卷积神经网络模型官方案例详解(基于Tensorflow,Python) 手写数字识别 ----Softmax回归模型官方案例详解(基于Tensorflow,Pytho ...
- 基于tensorflow的MNIST手写数字识别(二)--入门篇
http://www.jianshu.com/p/4195577585e6 基于tensorflow的MNIST手写字识别(一)--白话卷积神经网络模型 基于tensorflow的MNIST手写数字识 ...
- 基于Bert的文本情感分类
详细代码已上传到github: click me Abstract: Sentiment classification is the process of analyzing and reaso ...
随机推荐
- liunx 一些文件下载上传的命令
xshell 上传 rz sftp 语法: put path/filename.txt Put -r path/文件夹 或者 put “path/filename.txt” Put -r “path/ ...
- linux 分区管理
1. 查看系统中硬盘的设备 [root@centos6 ~]# ls /dev/sd* /dev/sda /dev/sda1 /dev/sda2 /dev/sda3 /dev/sdb 可以看出,系统有 ...
- 线程系列1--Java创建线程的几种方式及源码分析
线程--创建线程的几种方式及源码分析 开始整理下线程的知识,感觉这块一直是盲区,工作中这些东西一直没有实际使用过,感觉也只是停留在初步的认识.前段时间一个内推的面试被问到,感觉一脸懵逼.面试官说,我的 ...
- 3 Java 冒泡排序法
冒泡排序( Bubble Sort)是一种简单的排序算法.它重复访问要数列, 一次比较两个元素,如果他们的顺序错误就把交换过来.访问数列工作是 一次比较两个元素,如果他们的顺序错误就把交换过来.访问数 ...
- 基本CSS布局二
基本CSS布局二------基本页面布局二 /*主面板样式*/ #container { width:100%; margin:0px auto;/*主面板DIV居中*/ } /*顶部面板样式*/ # ...
- IDEA怎么开启终端Terminal
方法一:在IDEA中点击view→tool window→Terminal即可开启 方法二:按住ALT+F12(如果是笔记本按不出来的话再加个Fn键)
- LC 470. Implement Rand10() Using Rand7()
Given a function rand7 which generates a uniform random integer in the range 1 to 7, write a functio ...
- 什么是 AIDL 以及如何使用
①aidl 是 Android interface definition Language 的英文缩写,意思 Android 接口定义语言.②使用 aidl 可以帮助我们发布以及调用远程服务,实现跨进 ...
- 【转】hbase meta表修复
[From]https://www.iteye.com/blog/blackproof-2052898 meta表修复一 查看hbasemeta情况 hbase hbck .重新修复hbase met ...
- ubuntu安装软件失败,出现404错误,更新软件源
更新源方法 备份原来的源 首先备份原来的源,用来出错后进行恢复 sudo cp /etc/apt/sources.list/etc/apt/sources.list_backup 1 如果更新源后出错 ...