
The Amazing ProgressBar Control(转)
好久没写博客了,今天就先转一篇,随后可以再写些~~~
直接把原文粘过来,就不再进行翻译和个人说明了,因为效果很COOL~
The Amazing ProgressBar Control
A progress bar which displays progress as passage through a simple maze.
- Download AmazingProgressBar_111_Demo.zip
- Download AmazingProgressBar_111_Library.zip
- Download AmazingProgressBar_111_Source.zip
Introduction
This is release 1.1.1 of the library. The .csproj files were converted for use in Visual Studio 2013, and the help files were updated to work with the latest release of Sandcastle Help File Builder (2014.5.31.0).
The AmazingProgressBar class is a drop-in replacement for the .NET 2.0 ProgressBar control, which displays progress as passage through a simple maze.
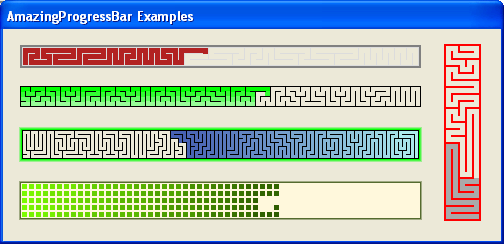
All public and protected classes, methods, and properties are fully documented using standard C# XML documentation comments. The project includes an HTML help file. Refer to the Overview section in the help file for more details on using the class.
The library download includes:
| AmazingProgressBar.dll | Class library |
| AmazingProgressBar.chm | Help file |
The demo download includes the above files, as well as:
| AmazingExplorer.exe | Sample program for experimenting with the various properties of the control. |
| AmazingExamples.exe | Sample program displaying a variety of AmazingProgressBar examples. |
The source download includes the source for all of the above programs, as well as the necessary files for building the help file.
Compatibility with Other .NET Framework Versions
The AmazingProgressBar library is compiled using .NET Framework version 2.0. To confirm that there were no issues with other framework versions, the compiled library was used by an application which was compiled, in turn, under .NET Framework versions 3.0, 3.5, 4.0, and 4.5. The AmazingProgressBar functioned properly with all of them.
Background
One day, while waiting for a long computational task to complete, I realized just how uninteresting the standard progress bar is. There had to be something more entertaining than a colored bar creeping slowly across the screen. After thinking about the problem for a while, I hit upon the idea of a progress bar which winds through a maze. And hence was born, the AmazingProgressBar control.
The AmazingProgressBar is pure eye candy. It won't make the task run any faster, but it might make the wait a bit less boring!
Using the Code
To use the AmazingProgressBar class, simply add it on an existing form:
AmazingProgressBar amaze = new AmazingProgressBar();

amaze.Location = new System.Drawing.Point(, );

amaze.Size = new System.Drawing.Size(, );

form.Controls.Add(amaze);
You can also replace any existing ProgressBar with AmazingProgressBar.
The progress direction and general style of the maze is determined by the MazeStyle property:
SingleRight |
Maze with a single path progressing left to right. |
SingleLeft |
Maze with a single path progressing right to left. |
SingleUp |
Maze with a single path progressing up. |
SingleDown |
Maze with a single path progressing down. |
SplitConvergeHorizontal |
Maze with two paths starting at the left and right ends, converging in the middle. |
SplitConvergeVertical |
Maze with two paths starting at the top and bottom, converging in the middle. |
SplitDivergeHorizontal |
Maze with two paths starting in the middle, ending at the left and right ends. |
SplitDivergeVertical |
Maze with two paths starting in the middle, ending at the top and bottom. |
The mazes generally have one route over which they can be traversed, but a small amount of branching may occur if RowCount is greater than 3. The maze direction(s) is/are the general direction(s), though there will always be twists and turns and some doubling back.
The size and complexity of the maze generally depends on the RowCount parameter. Set this parameter to fix the number of rows in the maze. A value of 1 results in a maze which looks just like a standard progress bar. A value of 2 results in a distinctly uninteresting maze. A value of 3 or more is strongly recommended.
The number of columns in the maze is the largest value given the size of the control, the current values of RowCount, WallSize, and BorderSize, and the rule that all cells in the maze must be square.
The ProgressBar.Style property can still be set. The Marquee style works as expected, but if the maze length is excessive, it may not work as fast as expected. The Blocks style is generally not as visually appealing as Continuous, though an interesting effect is to be had combining Blocks with a zero WallSize.
The following code segment shows how to set the Style, MazeStyle, and the number of rows.
// Assumes "AmazingProgressBar amaze" already declared and initialized

amaze.Style = ProgressBarStyle.Continous;

amaze.MazeStyle = MazeStyleType.SingleLeft;

amaze.RowCount = ;
If the control cannot generate a maze, then the control is filled with a pink - on - black ripple pattern. This is usually the result of RowCount being too high or too low.

The filled cells inside the maze can either all be the same fixed color, or follow a color gradient. This is determined by the Gradient property:
None |
No gradient coloring. All filled cells are ForeColor. |
Rows |
Each row in the maze is a different color, spanning a gradient with the first row being GradientStartColor, and the last row being GradientEndColor. |
Columns |
Each column in the maze is a different color, spanning a gradient with the first column being GradientStartColor, and the last column being GradientEndColor. |
Flow |
Each cell in the maze is a different color, spanning a gradient with the first cell being GradientStartColor, and the last cell being GradientEndColor. |
All unfilled cells are always BackColor.
The maze walls are visible if WallSize is greater than zero. The walls can only be one fixed color, as indicated by the WallColor property.
The maze border can either be one fixed color, or a gradient from that fixed color to the default control color. The maze border can also have round corners.
The following code segment shows how to set the various color properties.
// Assumes "AmazingProgressBar amaze" already declared and initialized

amaze.Gradient = GradientType.Rows;

amaze.GradientStartColor = Color.LightBlue;

amaze.GradientEndColor = Color.DarkBlue;

amaze.BorderSize = ;

amaze.BorderColor = Color.LightGreen;

amaze.BorderGradient = false;

amaze.BorderRoundCorners = true;

amaze.BackColor = Color.White;
How the Maze is Generated
There are many ways to generate a maze. This control required an algorithm to generate a maze which flowed in a particular direction with minimal branching, and to do so quickly and with limited memory overhead.
The SimpleMap class does the job. It is a static class for generating mazes with but one route in a specified direction. It works well most of the time, but for values of RowCount greater than 3, it occasionally does miss some cells, resulting in branches in the maze.
Following are the instructions for generating a single path maze. The directions used - forward, backward, and sideways - depend on the direction parameter. For example, if direction is Dir.E, then forward is East, backward is West, and sideways is North or South.
Start at one of the most backward corner cells. Repeatedly follow these rules (in order) to determine the next cell. Stop when all directions are blocked.
- If only one direction is possible, go in that direction.
- If you can go backwards, go that direction.
- If there is only one empty cell in a sideways direction, go in that direction.
- If there is more than one empty cell in both of the sideways directions, randomly pick one of those directions.
- Pick a random direction from the ones available; but you are only allowed to go forward if:
- at a sideways edge, and
- more than two steps from the forward most end, and
- back most filled column is not more than three steps backward.
Rules #2 and #5 are there to ensure that the maze does not get too far ahead before winding back.
Once a cell is reached where all the directions are blocked, the above rules no longer work. At this point, for each unused cell: randomly pick one direction and make the direction passable. This will result in branches within the maze, but it ensures that there are no skipped or unused cells.
History
- September 7, 2014 - Release 1.1.1
- Converted .csproj files to Visual Studio 2013 format.
- Converted help files to work with SandCastle Help File Builder 2014.5.31.0.
- May 3, 2011 - Release 1.1
- Added
Split...maze styles. - Added
AmazingProgressBar.BorderRoundCornersmember.
- Added
- April 17, 2011 - First release
License
This article, along with any associated source code and files, is licensed under The Code Project Open License (CPOL)
About the Author
Canada

感谢原作者的无私分享~~~
The Amazing ProgressBar Control(转)的更多相关文章
- A CIRCULAR PROGRESSBAR STYLE USING AN ATTACHED VIEWMODEL
This blog post describes how to re-template the Silverlight ProgressBar control to render a circular ...
- WPF多线程下载文件,有进度条
//打开对话框选择文件 private void OpenDialogBox_Click(object sender, RoutedEventArgs e) { ...
- IE中的activex控件
1.tree控件 DOCTYPE HTML PUBLIC "-//W3C//DTD HTML 4.0 Transitional//EN"><HTML><HE ...
- C#中的线程三 (结合ProgressBar学习Control.BeginInvoke)
C#中的线程三(结合ProgressBar学习Control.BeginInvoke) 本篇继上篇转载的关于Control.BeginInvoke的论述之后,再结合一个实例来说明Cotrol.Begi ...
- 背水一战 Windows 10 (34) - 控件(进度类): RangeBase, Slider, ProgressBar, ProgressRing
[源码下载] 背水一战 Windows 10 (34) - 控件(进度类): RangeBase, Slider, ProgressBar, ProgressRing 作者:webabcd 介绍背水一 ...
- C# 多线程详解 Part.02(UI 线程和子线程的互动、ProgressBar 的异步调用)
我们先来看一段运行时会抛出 InvalidOperationException 异常的代码段: private void btnThreadA_Click(object sender, ...
- 控件(进度类): RangeBase, Slider, ProgressBar, ProgressRing
1.RangeBase(基类) 的示例Controls/ProgressControl/RangeBaseDemo.xaml <Page x:Class="Windows10.Cont ...
- div滚动条弹出层效果 (所需要的css文件和js文件,都已经上传到文件里面了progressbar.rar)
<%--总的弹出层--%> <div class="tcck" id="joinclub" style="display:none& ...
- 多线程/进度条应用(progressbar)
使用Control Sets 下的 ProgressBar - Responsive Loop控件 ProcessBar 或者 CancelBar 都可以被设置为 invisible 代码如下(分享自 ...
随机推荐
- Senparc.Weixin.MP SDK 微信公众平台开发教程(十五):消息加密
前不久,微信的企业号使用了强制的消息加密方式,随后公众号也加入了可选的消息加密选项.目前企业号和公众号的加密方式是一致的(格式会有少许差别). 加密设置 进入公众号后台的“开发者中心”,我们可以看到U ...
- java指定路径写、读文件
package com.util; import java.io.BufferedReader; import java.io.BufferedWriter; import java.io.File; ...
- IOS UIView 03- 自定义 Collection View 布局
注:本人是翻译过来,并且加上本人的一点见解. 前言 UICollectionView 在 iOS6 中第一次被引入,也是 UIKit 视图类中的一颗新星.它和 UITableView 共享一套 API ...
- MVVM架构~knockoutjs系列之从Knockout.Validation.js源码中学习它的用法
返回目录 说在前 有时,我们在使用一个插件时,在网上即找不到它的相关API,这时,我们会很抓狂的,与其抓狂,还不如踏下心来,分析一下它的源码,事实上,对于JS这种开发语言来说,它开发的插件的使用方法都 ...
- 06- Shell脚本学习--其它
Shell输入输出重定向 Unix 命令默认从标准输入设备(stdin)获取输入,将结果输出到标准输出设备(stdout)显示.一般情况下,标准输入设备就是键盘,标准输出设备就是终端,即显示器. 输出 ...
- struts2学习笔记之七:Result类型
一:关于Struts2的type类型,也就是Result类型,他们都实现了共同的接口Result,都实现了execute方法 他们体现了策略模式,具体Result类型参见:struts-default ...
- How to select Multiple images from UIImagePickerController [duplicate]
accepted You have to use custom imagepicker. And I think ELCImagePickerController is the best option ...
- CSS学习目录
前面的话 CSS是前端工程师的基本功,但好多执迷于学习javascript的人的基本功并不扎实.可能一些人从w3school网站匆匆过了一遍,只是对CSS常用概念有一些表面上的理解,就一头扎进java ...
- java中对象多态时成员变量,普通成员函数及静态成员函数的调用情况
/* 样例1: class Parent{ int num = 3; } class Child extends Parent{ int num = 4; } */ /* 样例2: class Par ...
- 【原创】.NET读写Excel工具Spire.Xls使用(2)Excel文件的控制
本博客所有文章分类的总目录:http://www.cnblogs.com/asxinyu/p/4288836.html .NET读写Excel工具Spire.Xls使用文章 ...