用SignalR实现实时查看WebAPI请求日志
实现的原理比较直接,定义一个MessageHandler记录WebAPI的请求记录,然后将这些请求日志推送到客户端,客户端就是一个查看日志的页面,实时将请求日志展示在页面中。
这个例子的目的是演示如何在PersistentConnection类外部给Clients推送消息
实现过程
一、服务端
服务端同时具备SignalR和WebAPI的功能,通过定义一个记录日志的MessageHandler实现对WebAPI请求的拦截,并生成请求记录,然后推送到客户端
step 1
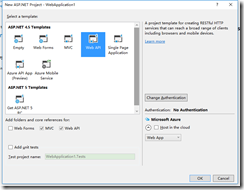
创建一个具备WebAPI功能的站点,为了简化起见,设置Authentication为No Authentication
step 2
创建一个DelegatingHandler,用于记录WebAPI日志,代码如下
下面代码没有涉及到SignalR的功能,日志展示是通过ILoggingDisplay接口传入
public class LoggingHandler : DelegatingHandler

    {

        private static readonly string _loggingInfoKey = "loggingInfo";

        private ILoggingDisplay _loggingDisplay;

        public LoggingHandler(ILoggingDisplay loggingDisplay)

        {

            _loggingDisplay = loggingDisplay;

        }

        public LoggingHandler(HttpMessageHandler innerHandler, ILoggingDisplay loggingDisplay)

            : base(innerHandler)

        {

            _loggingDisplay = loggingDisplay;

        }

        protected override Task<HttpResponseMessage> SendAsync(HttpRequestMessage request, CancellationToken cancellationToken)

        {

            LogRequestLoggingInfo(request);

            return base.SendAsync(request, cancellationToken).ContinueWith(task =>

            {

                var response = task.Result;

                LogResponseLoggingInfo(response);

                return response;

            });

        }

        private void LogRequestLoggingInfo(HttpRequestMessage request)

        {

            var info = new ApiLoggingInfo();

            info.HttpMethod = request.Method.Method;

            info.UriAccessed = request.RequestUri.AbsoluteUri;

            info.IpAddress = HttpContext.Current != null ? HttpContext.Current.Request.UserHostAddress : "0.0.0.0";

            info.StartTime = DateTime.Now;

            ExtractMessageHeadersIntoLoggingInfo(info, request.Headers.ToList());

            request.Properties.Add(_loggingInfoKey, info);

        }

        private void LogResponseLoggingInfo(HttpResponseMessage response)

        {

            object loggingInfoObject = null;

            if (!response.RequestMessage.Properties.TryGetValue(_loggingInfoKey, out loggingInfoObject))

            {

                return;

            }

            var info = loggingInfoObject as ApiLoggingInfo;

            if (info == null)

            {

                return;

            }

            info.HttpMethod = response.RequestMessage.Method.ToString();

            info.ResponseStatusCode = response.StatusCode;

            info.ResponseStatusMessage = response.ReasonPhrase;

            info.UriAccessed = response.RequestMessage.RequestUri.AbsoluteUri;

            info.IpAddress = HttpContext.Current != null ? HttpContext.Current.Request.UserHostAddress : "0.0.0.0";

            info.EndTime = DateTime.Now;

            info.TotalTime = (info.EndTime - info.StartTime).TotalMilliseconds;

            _loggingDisplay.Display(info);

        }

        private void ExtractMessageHeadersIntoLoggingInfo(ApiLoggingInfo info, List<KeyValuePair<string, IEnumerable<string>>> headers)

        {

            headers.ForEach(h =>

            {

                var headerValues = new StringBuilder();

                if (h.Value != null)

                {

                    foreach (var hv in h.Value)

                    {

                        if (headerValues.Length > )

                        {

                            headerValues.Append(", ");

                        }

                        headerValues.Append(hv);

                    }

                }

                info.Headers.Add(string.Format("{0}: {1}", h.Key, headerValues.ToString()));

            });

        }

    }
LoggingHandler
step 3
引入SignalR相关packages
Install-Package Microsoft.AspNet.SignalR
新建一个PersistentConnection,代码为空即可(因为不涉及到客户端调用,推送也是在类的外部执行)
public class RequestMonitor : PersistentConnection
{
}
添加一个Startup类
public void Configuration(IAppBuilder app)
{
app.MapSignalR<RequestMonitor>("/monitor");
}
step 4
创建一个类实现ILoggingDisplay接口,用SignalR推送的方式实现这个接口
代码比较关键的部分就是通过GlobalHost.ConnectionManager获取当前应用程序的connectionContext,得到这个context就可以类似在PersistentConnection内部给clients推送消息
public class SignalRLoggingDisplay : ILoggingDisplay
{
/// <summary>
/// PersistentConnection上下文
/// </summary>
private static IPersistentConnectionContext connectionContext = GlobalHost.ConnectionManager.GetConnectionContext<RequestMonitor>(); public void Display(ApiLoggingInfo loggingInfo)
{
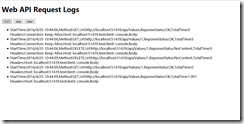
var message = new StringBuilder();
message.AppendFormat("StartTime:{0},Method:{1},Url:{2},ReponseStatus:{3},TotalTime:{4}"
, loggingInfo.StartTime, loggingInfo.HttpMethod, loggingInfo.UriAccessed, loggingInfo.ResponseStatusCode, loggingInfo.TotalTime);
message.AppendLine();
message.AppendFormat("Headers:{0},Body:{1}", string.Join(",", loggingInfo.Headers), loggingInfo.BodyContent);
connectionContext.Connection.Broadcast(message.ToString());
}
SignalRLoggingDisplay
step 5
在WebApiConfig的Register方法中添加自定义的handler
public static void Register(HttpConfiguration config)

       {

           config.MapHttpAttributeRoutes();

           config.Routes.MapHttpRoute(

               name: "DefaultApi",

               routeTemplate: "api/{controller}/{id}",

               defaults: new { id = RouteParameter.Optional }

           );

           config.MessageHandlers.Add(new LoggingHandler(new SignalRLoggingDisplay()));

       }
RegisterHandler
到此完成服务端的功能实现
二、客户端
客户端只需要一个监控页面,html页面足矣,其主要功能是提供开始监控、停止监控功能,其他都是接收服务端的推送并展示功能代码。
<!DOCTYPE html>

<html>

<head>

    <title>Web API页面实时请求监控</title>

    <meta charset="utf-8" />

</head>

<body>

    <h1>Web API Request Logs</h1>

    <div>

        <input type="button" value="start" id="btnStart"/>

        <input type="button" value="stop" id="btnStop"/>

        <input type="button" value="clear" id="btnClear"/>

    </div>

    <ul id="requests"></ul>

    <script src="/Scripts/jquery-1.10.2.min.js"></script>

    <script src="/Scripts/jquery.signalR-2.2.0.min.js"></script>

    <script>

        $(function () {

            var requests = $("#requests");

            var startButton = $("#btnStart");

            var stopButton = $("#btnStop");

            var connection = null;

            enable(stopButton, false);

            enable(startButton, true);

            startButton.click(function () {

                startConnection();

                enable(stopButton, true);

                enable(startButton, false);

            });

            $("#btnClear").click(function () {

                $("#requests").children().remove();

            });

            stopButton.click(function () {

                stopConnection();

                enable(stopButton, false);

                enable(startButton, true);

            });

            function startConnection() {

                stopConnection();

                connection = $.connection("/monitor");

                connection.start()

                    .fail(function () {

                        console.log("connect failed");

                    });

                connection.received(function (data) {

                    data = data.replace(/\r\n/g, "<br/>")

                    data = data.replace(/\n/g, "<br/>");

                    requests.append("<li>" + data + "</li>");

                });

            }

            function stopConnection() {

                if (connection != null){

                    connection.stop();

                }

            }

            function enable(button, enabled) {

                if (enabled) {

                    button.removeAttr("disabled");

                }

                else {

                    button.attr("disabled", "disabled");

                }

            }

        });

    </script>

</body>

</html>
Monitor
示例代码下载
用SignalR实现实时查看WebAPI请求日志的更多相关文章
- 实时查看docker容器日志
实时查看docker容器日志 $ sudo docker logs -f -t --tail 行数 容器名 例:实时查看docker容器名为s12的最后10行日志 $ sudo docker logs ...
- linux下打开、关闭tomcat,实时查看tomcat执行日志
启动:通常是运行sh tomcat/bin/startup.sh 停止:通常是运行sh tomcat/bin/shutdown.sh脚本命令 查看:运行ps -ef |grep tomc ...
- 查看 redis 请求日志
转: 查看 redis 请求日志 2019-05-29 15:34:41 打卤 阅读数 1980更多 分类专栏: other 版权声明:本文为博主原创文章,遵循CC 4.0 BY-SA版权协议,转 ...
- 如何实时查看Linux下日志
以下以Tomcat为例子,其他WEB服务器目录自己灵活修改即可: 1.先切换到:cd usr/local/tomcat5/logs2.tail -f catalina.out3.这样运行时就可以实时查 ...
- 【linux】linux重启tomcat + 实时查看tomcat启动日志
linux重启tomcat命令: http://www.cnblogs.com/plus301/p/6237468.html linux查看toncat实时的启动日志: https://www.cnb ...
- nginx查看post请求日志
在http段加上 log_format access '$remote_addr - $remote_user [$time_local] "$request" $status $ ...
- ASP.NET Web API 2系列(三):查看WebAPI接口的详细说明及测试接口
引言 前边两篇博客介绍了Web API的基本框架以及路由配置,这篇博客主要解决在前后端分离项目中,为前端人员提供详细接口说明的问题,主要是通过修改WebApi HelpPage相关代码和添加WebAp ...
- linux下查看tomcat的日志
工作期间有碰到服务器日志相关的,需要看tomcat运行日志,简单搜了下,摘为随笔,以供参考 一种是利用docker查看 1.使用dockerdocker logs -f -t --since=&quo ...
- SignalR实现实时日志监控
.net SignalR实现实时日志监控 摘要 昨天吃饭的时候,突然想起来一个好玩的事,如果能有个页面可以实时的监控网站或者其他类型的程序的日志,其实也不错.当然,网上也有很多成熟的类似的监控系统 ...
随机推荐
- python入门到精通[二]:基础学习(1)
摘要:Python基础学习: 注释.字符串操作.用户交互.流程控制.导入模块.文件操作.目录操作. 上一节讲了分别在windows下和linux下的环境配置,这节以linux为例学习基本语法.代码部分 ...
- Liunx下的系统负荷
uptime命令回显中的load average所表示的意思和w命令相似,都是表示过去的1分钟.5分钟和15分钟内进程队列中的平均进程数量. 这里需要注意的是load aver ...
- Android 屏幕适配
前言 手机的屏幕适配一直是非常麻烦的,现在我就以做笔记的方式来简单梳理下 单位理解 首先让我们先来看看关于手机所用到的单位 真实物理尺寸单位: mm:表示毫米,是屏幕的物理尺寸. in:表示英寸,是屏 ...
- python求解ax² + bx + c = 0
系数需满足条件: a,b不能同时为0 b2-4ac≠0 代码如下def quadratic(a, b, c): """ 返回ax² + bx + c = 0的 " ...
- [转]在 Web 项目中应用 Apache Shiro
目录[-] 用户权限模型 图 1. 用户权限模型 认证与授权 Shiro 认证与授权处理过程 Shiro Realm 清单 1. 实现自己的 JDBC Realm 为何对 Shiro 情有独钟 与 S ...
- wex5 实战 框架拓展之2 事件派发与data刷新
一 前言 讲完公共data,相信大家对框架级的data组件级绑定有了更新的认识,接下来我们继续深入,以求研究明白wex5的框架能力. 在一个web项目中,其实有一个data, 是基础框架必须的data ...
- 使用Astah制作UML时序图
Astah制作UML图--详解 时序图的制作 开篇语: 本文为光荣之路原创文章,欢迎转载,但请注明出处. 做测试的难免看到开发画出各种设计图,都很羡慕,比如: 帅么,漂亮么,其实我们测试人员也可以轻松 ...
- XPlane android 2D手游开发实战
android 飞行射击游戏类 采用 xamarin 跨平台开发技术 纯C#语言编写 操作简单 1.手指拖动飞机 躲避敌机 2.通过吃敌机爆炸后遗落的物品增加各种属性 3.双击战机放大技能 4.目前 ...
- sql 查询表中所有字段的名称
最近工作用到SQL语句查询表中所有字段的名称,网上查询,发现不同数据库的查询方法不同,例如: SQL server 查询表的所有字段名称:Select name from syscolumns Whe ...
- Java Web学习路线
2016-08-22的早上,本是一个很平静的早上,坐在去往公司的公交车上想到了很多之前上学时的点点滴滴,回想起来还真的是耐人寻味啊,当初青春的懵懂,当初的冲动,当初的做事不考虑后果! 也正是这耐人寻味 ...