
使用vs2010创建MFC C++ Ribbon程序
Your First MFC C++ Ribbon Application with Visual Studio 2010
Earlier this month, I put together my first C++ sample in about a hundred years. I did that using win32 and Visual Studio 2010. Why? Well, a surprising number of folks are doing real work on impressive applications in C++, and not just inside Microsoft. Some are even working on refacing C++ applications with WPF.
Besides, it's good to learn, or re-learn, new things. It often gives you a different perspective on how to solve problems. Plus, since I'll be doing some intro videos in C++, I figured it would be good to get back into it.
So, continuing in the same theme, I decided to try out MFC for the first time ... ever. I wrote some Borland OWL code back in the early 90s, but I'm sure there are more differences than just TEverything vs. CEverything.
For the examples here, you'll need Visual Studio 2010 (I used the RC) and Windows 7. You can run it on older versions of Windows, but the Win7 ribbon style likely won't look the same.
In this sample we'll:
- Create an MFC Document/View application with a ribbon control
- Create a custom ribbon category
- Add ribbon buttons
- Change the application theme
- Change the MDI tab container theme
Let's go!
Creating the Project
In Visual Studio 2010, pick the Visual C++ language. For many of us with language-specific IDE preferences, it's down under "Other Languages". Select MFC and then the MFC Application option.

Give your project a name and hit OK. As was the case in the Win32 project, you'll get an application Wizard that walks you through the startup steps.
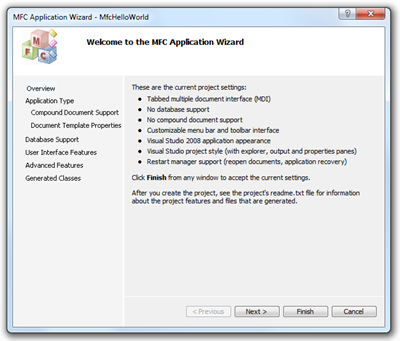

The second page of the wizard has all the Application Type options. As someone who usually works inWPF and Silverlight, I am totally jealous! The wizard offers you options for Basic apps, Windows Explorer type apps, Office type apps and even Visual Studio type applications. You can even pick the styles and colors you want, right from this page:

For this sample, I picked the following options:
- Multiple Documents (Tabbed)
- Document/view architecture support (default)
- English language (default)
- Use Unicode Libraries (default)
- Office project style
- Office 2007 (Blue theme) visual style
- Enable visual style switching (default)
- Use MFC in a shared DLL (default)
The next page of the wizard offers you the ability to support compound documents / OLE embedding
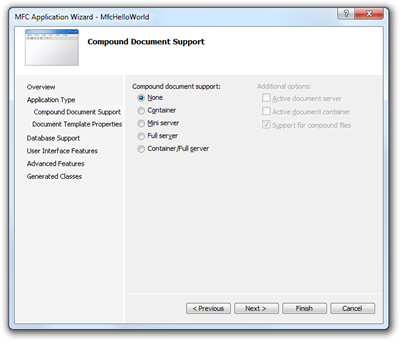
I decided not to bother with that for this sample. Leave it at "none"
The next wizard page is for Document Template Properties. This allows you to create all the metadata for your document type. On this page, I typed in "hello" for the file extension

Next, we move on to Database support. If you're going to make calls into OLE DB or ODBC, you can set the right options here. I decided not to complicate things and instead just leave it at the default of "none"

Next stop, "User Interface Features." Are you kidding me? This is awesome. From this one step, you can stick with classic menus, menu bar and toolbar, or a ribbon. You can also set the style of your main window and, if traditional MDI, the child windows. Excellent! I left the defaults on, using a ribbon as the commandbar/menu choice.

The next tab is for advanced features. From here you can choose support for activeX controls, integration with MAPI (outlook/exchange), sockets and more. I left all the defaults in place

The final page shows you the classes that will be generated

Hit "Finish" and look at the generated project:
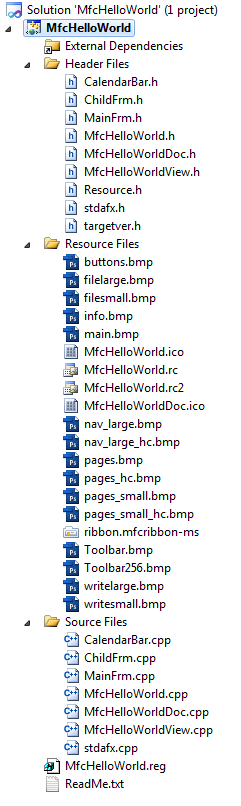
Nice! You get classes for your application and the windows, as well as for your document and document view. You also get a bunch of resources for the ribbon icons. Let's run this baby and see what it looks like.

Wow. Just...wow. Sure, that's a pretty busy app (selected a bunch of options), but that is a great structure coming right out of the wizard. Sure beats the blank slate we usually see. Here's a some close-ups
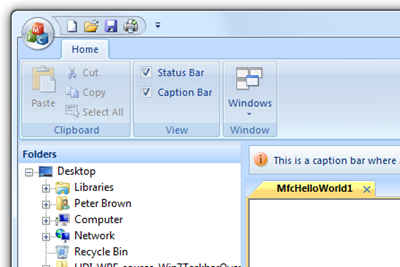
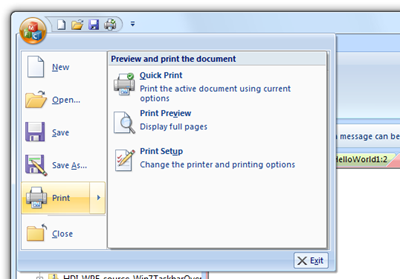

Ok, maybe I should have picked the Dialog project to do my first Hello World. There's a lot here! :) Nah. Let's have at this.
Modifying the Ribbon
One thing you noticed is that the design of the application is more Office 2007 and less Windows 7. That's ok. During the app wizard, had I chosen "Windows 7" instead of "Office 2007", I would have gotten the win7 style ribbons and UI.
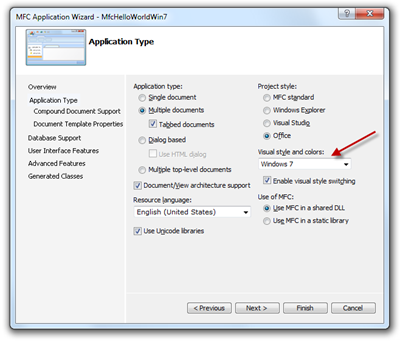
The end result of combining "Office" with "Windows 7" looks a little hokey. Perhaps other combinations would work better.
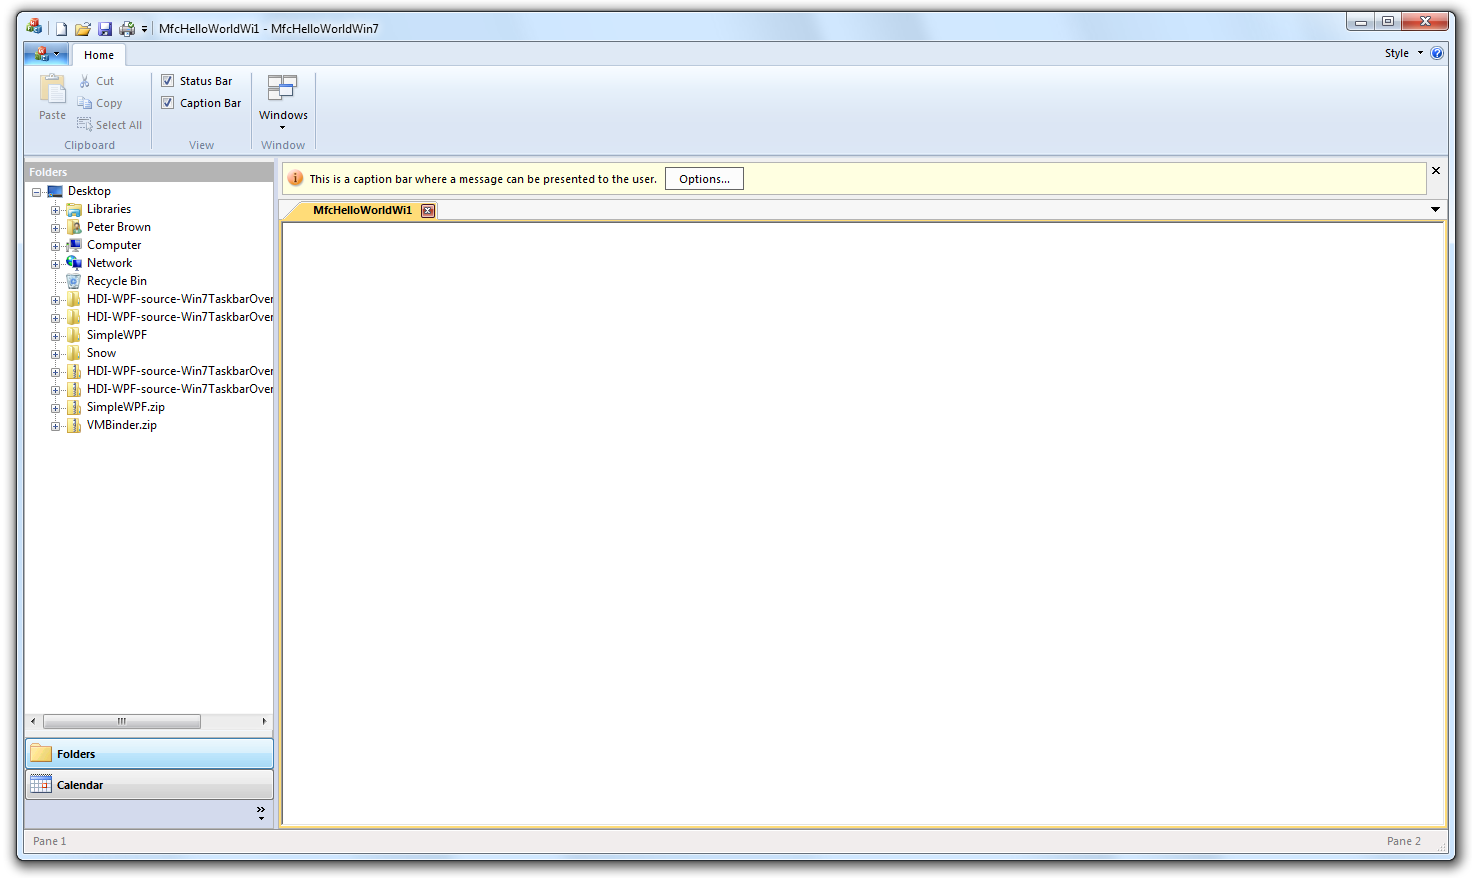
So, we'll stick to the Office 2007 theme for this example. However, if you want to change it, since we support changing the overall theme and code was generated to handle that, all you need to change is the parameter that sets the "App Look":
// Office 2007 style

CMainFrame::CMainFrame()

{

    // TODO: add member initialization code here

    theApp.m_nAppLook = theApp.GetInt(_T("ApplicationLook"),

        ID_VIEW_APPLOOK_OFF_2007_BLUE);

}

// Change to this for Windows 7 style

CMainFrame::CMainFrame()

{

    // TODO: add member initialization code here

    theApp.m_nAppLook = theApp.GetInt(_T("ApplicationLook"),

        ID_VIEW_APPLOOK_WINDOWS_7);

}
Opening the Ribbon Resource Editor
Visual Studio includes a designer for the Ribbon. To use it, double click the MfcHelloWorld.rc file in the Resource Files folder. Your file may be named differently, but will have a "rc" extension. Then, find the Ribbon folder and double-click the IDR_RIBBON resource folder
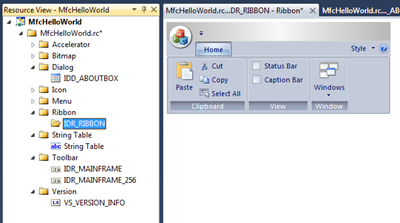
Once you see the ribbon displayed, click on the toolbox to display the ribbon controls
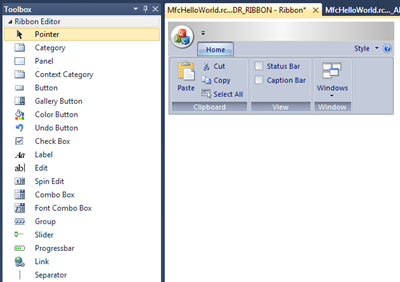
Adding a Ribbon Category with Buttons
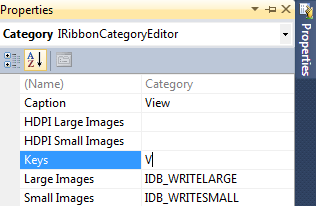
Drag a category from the Ribbon Editor toolbox next to the Home category on the ribbon resource editor. Give the category the caption "View" by right-clicking and selecting properties. Also set the keys property to "V" (for the accelerator key) and the large and small images the same as those used by "Home". If you were to use a different image set, you'd put those keys here.
In the new "View" category, right-click the default panel and set its caption to "Theme". Then drag two buttons on to the Theme panel.
The first button has the following properties:
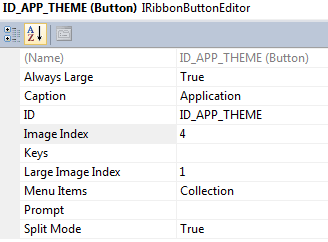
I picked some pre-existing images just to give the button something to size around. You'd want to load in new images in a real application.
And a menu items collection with these items. We're reusing IDs from an existing function, so the IDs are important.
| Windows 2000 | ID_VIEW_APPLOOK_WIN_2000 |
| Office XP | ID_VIEW_APPLOOK_OFF_XP |
| Windows XP | ID_VIEW_APPLOOK_WIN_XP |
| Windows 7 | ID_VIEW_APPLOOK_WINDOWS_7 |
| Visual Studio 2005 | ID_VIEW_APPLOOK_VS_2005 |
| Visual Studio 2008 | ID_VIEW_APPLOOK_VS_2008 |
| Office 2007 Blue | ID_VIEW_APPLOOK_OFF_2007_BLUE |
| Office 2007 Black | ID_VIEW_APPLOOK_OFF_2007_BLACK |
| Office 2007 Silver | ID_VIEW_APPLOOK_OFF_2007_SILVER |
The second button has these properties:
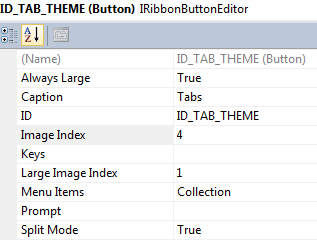
And a menu items collection with these items:
| 3D | ID_TAB_THEME_3D |
| 3D OneNote | ID_TAB_THEME_3D_ONENOTE |
| 3D Rounded | ID_TAB_THEME_3D_ROUNDED |
| 3D Visual Studio | ID_TAB_THEME_3D_VISUAL_STUDIO |
| Flat | ID_TAB_THEME_FLAT |
The View category should look something like this when complete
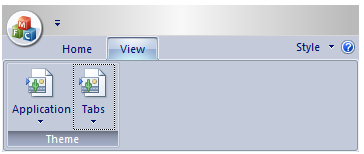
If you run the application now, the theme buttons will be disabled.
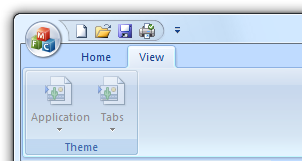
Wiring up the Ribbon Buttons
Now to wire it all up.
In the MainFrm.h header file, add a prototype for OnAppTheme():
afx_msg void OnAppTheme();
In the code in MainFrm.cpp, around CMainFrame::OnApplicationLook, add the following empty function:
void CMainFrame::OnAppTheme()

{

}
Finally, inside the message map block in MainFrm.cpp, add the highlighted line (handler for ID_APP_THEME):
BEGIN_MESSAGE_MAP(CMainFrame, CMDIFrameWndEx)

    ON_WM_CREATE()

    ON_COMMAND(ID_APP_THEME, &CMainFrame::OnAppTheme)

    ON_COMMAND(ID_WINDOW_MANAGER, &CMainFrame::OnWindowManager)

    ON_COMMAND_RANGE(ID_VIEW_APPLOOK_WIN_2000, ID_VIEW_APPLOOK_WINDOWS_7, &CMainFrame::OnApplicationLook)

    ON_UPDATE_COMMAND_UI_RANGE(ID_VIEW_APPLOOK_WIN_2000, ID_VIEW_APPLOOK_WINDOWS_7, &CMainFrame::OnUpdateApplicationLook)

    ON_COMMAND(ID_VIEW_CAPTION_BAR, &CMainFrame::OnViewCaptionBar)

    ON_UPDATE_COMMAND_UI(ID_VIEW_CAPTION_BAR, &CMainFrame::OnUpdateViewCaptionBar)

    ON_COMMAND(ID_TOOLS_OPTIONS, &CMainFrame::OnOptions)

END_MESSAGE_MAP()
If you don't take those three steps, the ribbon button will not be enabled. The handlers for the menu options themselves are already set, as they fall under the ON_COMMAND_RANGE(ID_VIEW_APPLOOK_WIN_2000 ... ) block.
Now run the application and switch between the various application themes using the new ribbon button. Pretty nice, eh? :)
Aside: Where the ribbon data is Stored
You may wonder where all that ribbon config information is stored. If you look under your resource files, you'll see a ribbon.mfcribbon-ms file. Double-click that and it will open in the XML editor so you can see the contents. The ribbon resource editor overwrites/modifies this file, so don't hand-edit it unless you know what to expect.
Changing the Document Tab Style
The previous example worked so well because we simply provided another UI entry point into existing code. What about brand new code? For this part, we'll implement an option to change the document tab style.
Create the Function Prototypes
In MainFrm.h, add our three prototype functions. The first is for the drop-down button, the second is for the menu options inside the button. The third is called by the button that sets the look.
afx_msg void OnTabTheme();

afx_msg void OnTabLook(UINT id);

afx_msg void OnUpdateTabLook(CCmdUI* pCmdUI);
Create the Functions
Next, create the actual functions in MainFrm.cpp. We'll add the implementation code shortly.
void CMainFrame::OnTabTheme()

{

}

void CMainFrame::OnTabLook(UINT id)

{

}

void CMainFrame::OnUpdateTabLook(CCmdUI* pCmdUI)

{

}
Add the Message Map
Inside the Message Map block in MainFrm.cpp, add the following three lines
ON_COMMAND(ID_TAB_THEME, &CMainFrame::OnTabTheme)

ON_COMMAND_RANGE(ID_TAB_THEME_3D, ID_TAB_THEME_FLAT, &CMainFrame::OnTabLook)

ON_UPDATE_COMMAND_UI_RANGE(ID_TAB_THEME_3D, ID_TAB_THEME_FLAT, &CMainFrame::OnUpdateTabLook)
Compile and run to make sure the app compiles and the tab theme button is enabled.
Add Application Field to Hold Tab Style
Open up MfcHelloWorld.h and add in the following:
public:

    virtual BOOL InitInstance();

    virtual int ExitInstance();

// Implementation

    UINT  m_nAppLook;

    UINT  m_nTabLook;

    BOOL  m_bHiColorIcons;
The new line is line 6, m_nTabLook. Like m_nAppLook, this is going to hold an ID that specifies the look for the tab controls in the app.
Inside the constructor CMainFrame::CMainFrame in MainFrm.cpp, add the TabLook line right under the AppLook line. This will initialize the value from stored settings (or the default specified)
theApp.m_nAppLook = theApp.GetInt(_T("ApplicationLook"), ID_VIEW_APPLOOK_OFF_2007_BLUE);

theApp.m_nTabLook = theApp.GetInt(_T("TabLook"), ID_TAB_THEME_3D_ONENOTE);
Inside CMainFrame::OnCreate in MainFrm.cpp, add in a new line for OnTabLook right under the call to OnApplicationLook. This will call our function to update the look.
OnApplicationLook(theApp.m_nAppLook);

OnTabLook(theApp.m_nTabLook);
Inside the same function, remove the lines that sets the Tab Control style. We're going to move these to another function, so you may want to just cut and paste them or comment them out for now. In any case, make sure they aren't present in the OnCreate function.
CMDITabInfo mdiTabParams;

mdiTabParams.m_style = CMFCTabCtrl::STYLE_3D_ONENOTE; // other styles available...

mdiTabParams.m_bActiveTabCloseButton = TRUE;      // set to FALSE to place close button at right of tab area

mdiTabParams.m_bTabIcons = FALSE;    // set to TRUE to enable document icons on MDI taba

mdiTabParams.m_bAutoColor = TRUE;    // set to FALSE to disable auto-coloring of MDI tabs

mdiTabParams.m_bDocumentMenu = TRUE; // enable the document menu at the right edge of the tab area

EnableMDITabbedGroups(TRUE, mdiTabParams);
Handle the Menu Button Click and Set the Field
OnUpdateTabLook takes an instance of a UI control. OnTabLook takes the command ID for a control. Following the pattern used by the application look, we'll set the radio button on our menu to indicate the current tab style.
void CMainFrame::OnTabLook(UINT id)

{

    theApp.m_nTabLook = id;

    theApp.WriteInt(_T("TabLook"), theApp.m_nTabLook);

}

void CMainFrame::OnUpdateTabLook(CCmdUI* pCmdUI)

{

    pCmdUI->SetRadio(theApp.m_nTabLook == pCmdUI->m_nID);

}
Now is a good time to save, build and run. When you select the menu to change the tab style, you should see the radio button change along with it. The tab theme won't change, but the menu will otherwise work. If you close and re-open the application, your selected theme should have the radio button next to it.
Actually Change the Tab Theme
Next we'll add in the switch statement to actually change the tab theme. open up some space in between the two lines in OnTabLook and add in the switch statement that handles all the tab looks we defined.
void CMainFrame::OnTabLook(UINT id)

{

    theApp.m_nTabLook = id;

    CMDITabInfo mdiTabParams;

    mdiTabParams.m_bActiveTabCloseButton = TRUE;      // set to FALSE to place close button at right of tab area

    mdiTabParams.m_bTabIcons = FALSE;    // set to TRUE to enable document icons on MDI taba

    mdiTabParams.m_bAutoColor = TRUE;    // set to FALSE to disable auto-coloring of MDI tabs

    mdiTabParams.m_bDocumentMenu = TRUE; // enable the document menu at the right edge of the tab area

    switch (theApp.m_nTabLook)

    {

    case ID_TAB_THEME_3D:

        mdiTabParams.m_style = CMFCTabCtrl::STYLE_3D;

        break;

    case ID_TAB_THEME_3D_ONENOTE:

        mdiTabParams.m_style = CMFCTabCtrl::STYLE_3D_ONENOTE;

        break;

    case ID_TAB_THEME_3D_ROUNDED:

        mdiTabParams.m_style = CMFCTabCtrl::STYLE_3D_ROUNDED;

        break;

    case ID_TAB_THEME_3D_VISUAL_STUDIO:

        mdiTabParams.m_style = CMFCTabCtrl::STYLE_3D_VS2005;

        break;

    case ID_TAB_THEME_FLAT:

        mdiTabParams.m_style = CMFCTabCtrl::STYLE_FLAT_SHARED_HORZ_SCROLL;

        break;

    }

    EnableMDITabbedGroups(TRUE, mdiTabParams);

    theApp.WriteInt(_T("TabLook"), theApp.m_nTabLook);

}
All we're doing in this function is mapping from the menu options to the built-in tab themes, and building a parameter set containing that style information as well as a few other options.
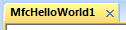

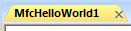
When you run the app, change the tab themes around and take a look at how the MDI tabs switch with them. Close and open the app, and notice that the settings are saved.
Feel free to play with the other tab parameter settings. For example, you can put the close button on the far right, you can stop the auto-coloring of the tabs, add or remove the document menu and even add icons. All very nice.
Conclusion
I'm impressed. I have a feeling that, given the need, I could get up to speed in MFC in a reasonably short amount of time (not saying it would be good code, but it would work <g>). It helps that I did do windows programming in C++ a zillion years ago, so the concepts were familiar. It also helps that the MFC application wizard generates so much structure for your right out of the bad.
Ok MFC gurus. What did I do wrong in the above code? Any anti-patterns? Suggestions for improvement? I especially wonder about the empty functions in the message map just to enable the menu buttons.
http://10rem.net/blog/2010/03/25/your-first-mfc-cplusplus-ribbon-application-with-visual-studio-2010
使用vs2010创建MFC C++ Ribbon程序的更多相关文章
- [ActiveX]使用VS2010创建MFC ActiveX工程项目
ActiveX的基本概念 ActiveX控件可以看作是一个极小的服务器应用程序,它不能队列运行,必须嵌入到某个容器程序中,与该容器一起运行.这个容器包括web网页,应用程序窗体等等. ActiveX控 ...
- C++ 使用VS2010创建MFC ActiveX工程项目
1.ActiveX的基本概念 ActiveX控件可以看作是一个极小的服务器应用程序,它不能独立运行,必须嵌入到某个容器程序中,与该容器一起运行.这个容器包括WEB网页,应用程序窗体等... Activ ...
- c++ ActiveX基础1:使用VS2010创建MFC ActiveX工程项目
1.ActiveX的基本概念 ActiveX控件可以看作是一个极小的服务器应用程序,它不能独立运行,必须嵌入到某个容器程序中,与该容器一起运行.这个容器包括WEB网页,应用程序窗体等... Activ ...
- 【VS开发】使用VS2010创建MFC ActiveX工程项目
1.ActiveX的基本概念 ActiveX控件可以看作是一个极小的服务器应用程序,它不能独立运行,必须嵌入到某个容器程序中,与该容器一起运行.这个容器包括WEB网页,应用程序窗体等... Activ ...
- VS2010开发MFC ActiveX,摄像头拍照上传Webservice(1)
最近工作项目,BS中需要用到摄像头拍照,需要存储本地,同时上传到服务器,尝试使用vc++做ActiveX来实现. 完全没有使用过vc,上网搜索各种知识,初步完成.在这里记录下有帮助的资料. 第一步:编 ...
- VS 2008 创建MFC程序对话框的步骤
用过不少编程语言,可是刚开始学的时候最容易忘记一些简单的流程或者生疏了.那么这里就说说VS 2008 创建MFC程序对话框的步骤.我主要是android开发方面的.平时使用jni调用不少c++代码.所 ...
- MFC中SDI程序创建流程的回顾
SDI程序创建流程的回顾 从CWinApp.InitialInstance()开始, 1.首先应用程序对象创建文档模板; CSingleDocTemplate* pDocTemplate; pDocT ...
- VS2012与VS2015同时安装用VS2012创建MFC程序时弹出编译错误”fatal error C1083: 无法打开包括文件:“mprapidef.h”: No such file or directory”的解决办法
在WIndows 7操作系统上同时安装VS2012与VS2015并用VS2012创建MFC程序时弹出编译错误”fatal error C1083: 无法打开包括文件:“mprapidef.h”: No ...
- C++MFC编程笔记day01 MFC介绍、创建MFC程序和重写消息处理
一.MFC概念和作用 1.全称Microsoft Foundation Class Library,我们称为微软基础类库,封闭了绝大部分的win32 Api函数,C++语法中的数据结构,程序的运行流程 ...
随机推荐
- SQLServer字符操作
1.CHARINDEX('A',‘VALUE’) result:2 style:PATINDEX(varchar,varchar) 解释:A在字符串VALUE的位置次序. 2.PATINDEX( ...
- python——django的post请求
两次被同一块石头绊倒简直不可原谅!第一次写django程序的时候,就因为ajax post请求折腾了整整一天,时隔两个多月昨天又被虐一整晚.叔可忍婶儿也不能忍了!!!重要的事情写下来,为以后轻松碾压p ...
- Python学习笔记之字典
一.创建和使用字典 1.创建字典 phonebook={'Alice':'2341','Beth':'9102','Cecil':'3258'} 2.dict,通过映射创建字典 >>> ...
- C++11 智能指针
C++ 11标准库引入了几种智能指针 unique_ptr shared_ptr weak_ptr C++内存管理机制是当一个变量或对象从作用域过期的时候就会从内存中将他干掉.但是如果变量只是一个指针 ...
- 无废话SharePoint入门教程五[创建SharePoint页面布局]
一.前言 文章成体系,如果有不明白的地方请查看前面的文章. 二.目录 1.创建页面布局 2.首次使用页面布局 3.修改页面布局 4.使用页面布局 5.最终效果 1.创建页面布局 (1)打开设计管理器, ...
- EF6 CodeFirst+Repository+Ninject+MVC4+EasyUI实践(四)
前言 这一篇,我们终于到了讲解Entity Framework CodeFirst 的时刻了,首先创建实体对象模型,然后会通过配置Fluent API的方式来对实体对象模型进行完整的数据库映射操作. ...
- sql2008r2数据库附加的问题
sql2008r2数据库附加,一般都没有问题,但是偶尔也会出错,无法附加,一般的原因都是权限不够,主要是:Authenticated Users要开通完全控制功能,选中该用户(如果没有该用户,就添加) ...
- mysql数据库使用
C#操作Mysql数据库的存储过程,网址 DATEDIFF() 函数返回两个日期之间的天数. 语法 DATEDIFF(date1,date2) date1 和 date2 参数是合法的日期或日期/时间 ...
- javascript运算符与表达式
表达式 表达式是关键字.运算符.变量以及文字的组合,用来生成字符串.数字或对象.一个表达式可以完成计算.处理字符.调用函数.或者验证数据等操作. 表达式的值是表达式运算的结果,常量表达式的值就是常量本 ...
- UML 类图常用表示方法.
UML中类图实例 接口:空心圆+直线(唐老鸭类实现了‘讲人话’): 依赖:虚线+箭头(动物和空气的关系): 关联:实线+箭头(企鹅需要知道气候才迁移): 聚合:空心四边形+实线+箭头(雁群和大雁的关系 ...