Maven管理多模块应用
穿越至目录:
对于概念的一些理解
Maven的作用
管理模块之间的依赖:根据业务需求,系统会划分很多模块,这些模块彼此之间存在着依赖关系。比如系统管理模块依赖着文件上传模块,来实现用户头像上传的功能。maven通过配置模块之间的pom依赖
生命周期管理:在web应用中,我们常要进行编译、打包、测试这些环节。在maven的世界里,将这些过程定义为生命周期。maven将这些复杂的过程进行了封装,使用者只需要简单的用鼠标点几下就可以完成项目的构建工作
强大的插件:举一个很常用的插件tomcat7-maven-plugin,在老老年间,我们发布应用的方式是,将web应用打包成war->手动拷贝到tomcat的webapp目录下->启动tomcat。现在有了Maven以上过程我们只需要点击一下鼠标即可完成。是不是很方便?
仓库式管理:曾经为了找一个jar包费劲周折,曾经因为jar包冲突、版本产生莫名其妙的问题困扰我们好久。Maven提供的公用仓库http://mvnrepository.com/,只要输入jar包的坐标即可查找到想要的资源,将模块的坐标加入到自己的pom中就可以快乐的使用了,真的觉得很方便。同时由于依赖的概念,与其相关的jar包也会引入到项目环境中,并且不会产生版本的问题
Nexus作用
节省流量:Nexus作为私有库部署在局域网内部,比如10个人协同开发,开发人员A需要一个log4j的jar来实现系统日志功能,A将log4j的坐标添加到自己模块的pom文件中,maven会向公共仓库发送请求,下载log4j的jar包。下载的过程中,Nexus也偷偷的保存了一份log4j在私有的仓库。那么以后再有开发人员需要log4j的时候,请求是直接发送到Nexus上请求资源的。就不需要访问外网了,否则每个人都需要访问公共Maven库下载资源。这样节省了流量,同时内网的网速一般也比公网快。也提高了工作效率
协同开发:多人协同开发,A开发系统管理、B开发考勤模块。考勤模块依赖了系统管理的员工接口,那么B需要手动拷贝A打包的jar到自己的工程中。当A改动了系统管理的接口,B完全不知情,等出现问题了还需要联调,很麻烦!有了Nexus A就可以将系统管理打包发布到Nexus的私有仓库中,B添加系统管理的坐标即可完成依赖,以后A再有改动,只要发布到Nexus上就可以了。减少了沟通成本
场景描述
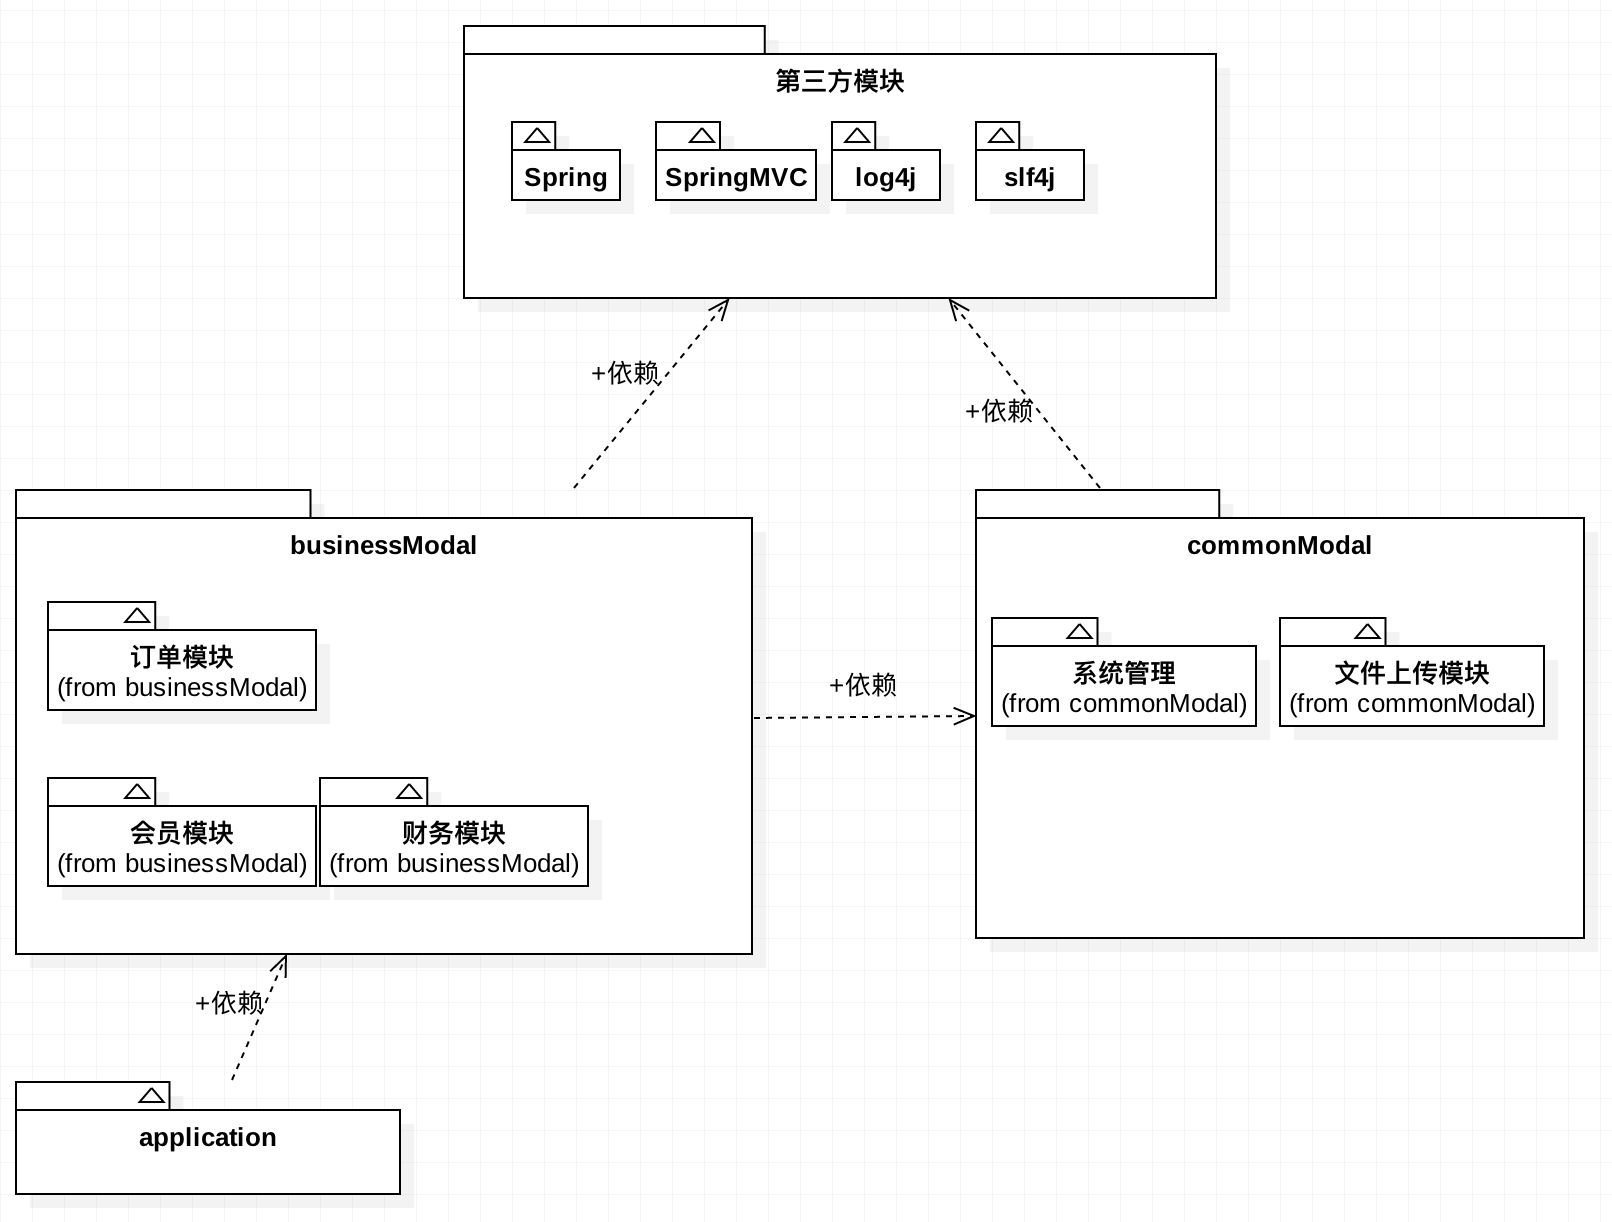
项目的模块结构
大概是这个样子
commonModal:提供公共的基础服务,比如文件上传、邮件发送、权限管理等等
businessModal:业务模块,是系统真正要实现的业务。依赖于commonModal,比如订单管理、财务统计、会员管理等
application:可发布的web应用,由各个businessModal组成,最终满足项目的整体需求
第三方模块:包括各类框架,spring、mybatis、日志等。整个应用都是依赖它们完成开发的
如何使用Maven管理以上的结构呢?
首先要弄清楚Maven的两个重要的概念,依赖和继承。举例说明:
场景:
1、有A、B、C三个模块是用Maven进行管理的,它们之间的关系:C依赖B、B依赖A
2、有D、E、F三个模块是用Maven进行管理的。它们之间的关系:F继承自E,也就是F的parent是E。E依赖D
结果:
依赖:对于场景1,由于依赖的传递性,C模块中,除了能使用B的接口外,同时也能使用A的接口。但是在C模块中,无法继承到B模块的一些POM配置(比如<properties>定义的版本信息,<build>中定义构建信息等)
继承:对于场景2,F是能够继承到E的Pom的配置的,比如对E对D的依赖,在F中是能够使用D中定义的接口的。还有其他的Pom配置,比如<properties>、<build>、<distributionManagement>
回到主题,对于上述的模块结构,如果使用maven管理应该考虑的问题有哪些呢?
1、随着项目的进展,模块的数量不断增长。maven对于模块的管理包含着版本的概念,只有正确的管理版本,才不至于在工作中造成版本的混乱。
是否应该有一个地方统一对版本进行管理?
2、对于所有的模块,是都需要发布到nexus上进行管理的,那么是否代表着,没一个模块都要配置<distributionManagement>来对发布过程进行管理呢?如果nexus服务器ip换了怎么办?每个模块去修改?
应该有一个地方统一管理整个项目的发布配置
3、对于依赖的管理,通过模块结构图可以想象,模块之间的依赖是很复杂的,比如很多模块都依赖于log4j,是否每个模块都要使用<dependency>一次Log4j
实战
基于以上的问题,将Maven的管理结构定义如下,有maven模块之间的关系和类之间的关系非常接近,因此使用类图表示
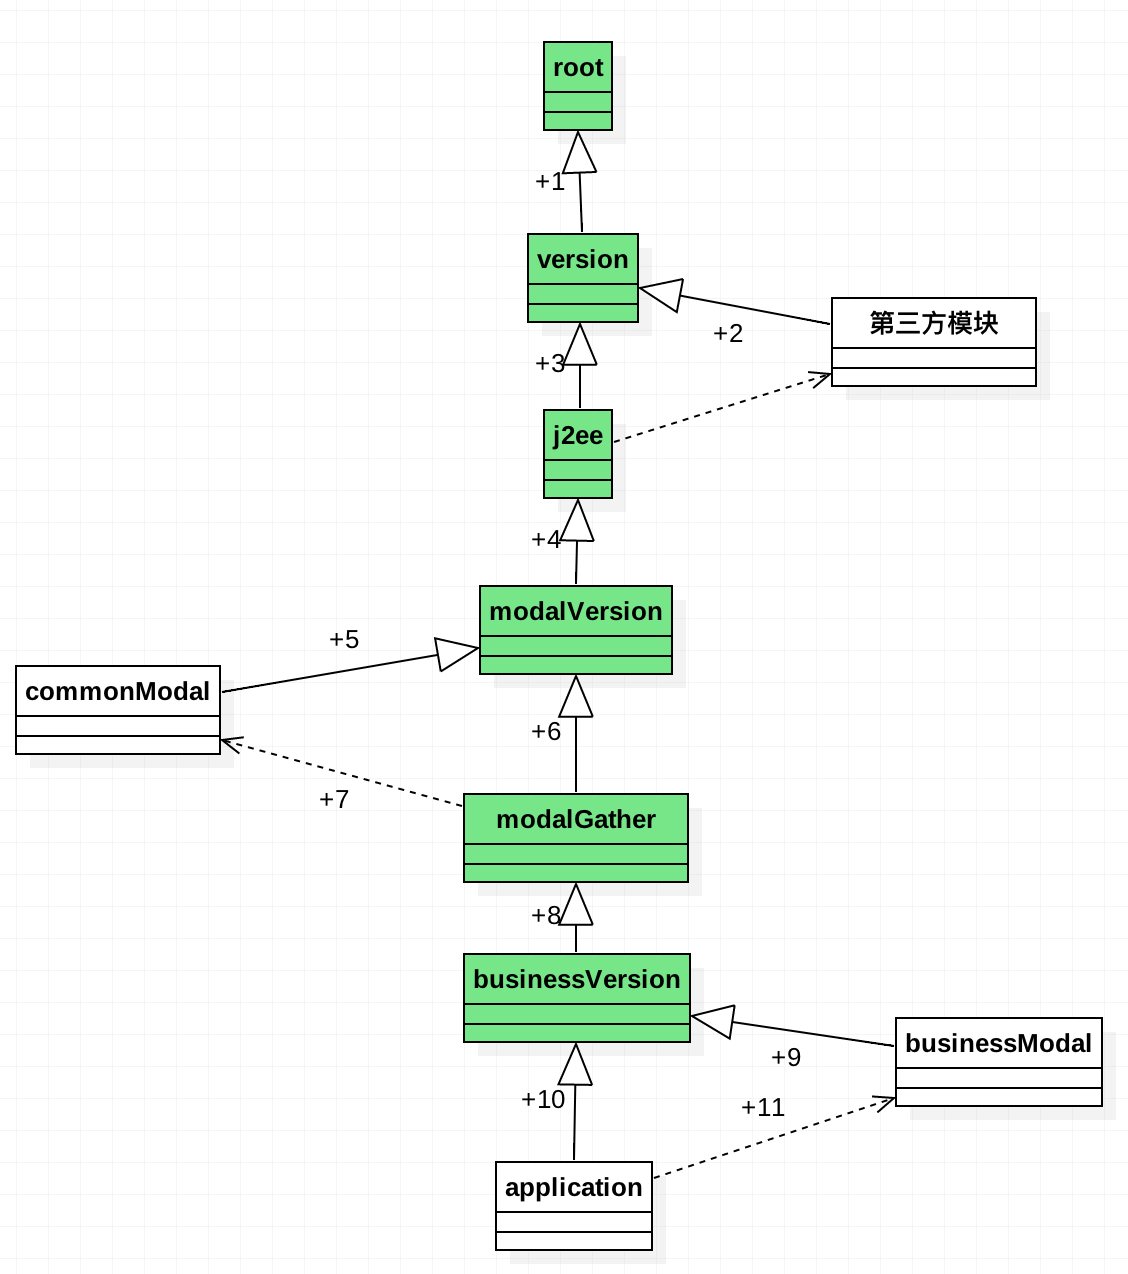
图解:
上图中绿色部分为Maven管理模块,打包类型为pom。
root:抽象层级最高的模块,应该配置公用级别最高的配置。也就是所有模块都需要用到的发布到nexus上的配置。那么其他所有层级的模块就可以共享这一配置,比如commonModal就可以通过路径5-4-3-1继承到<distributionManagement>配置。这样问题2就得到了解决
version、modalVersion、businessVersion:为版本定义模块,分别定义了第三方模块、commonModal、businessModal的版本信息。这样就解决了问题1
j2ee、modalGather:分别持有对第三方模块、commonModal的依赖。application、businessModal、commonModal都可以通过继承路径,获取到上层的资源。也就不必要在所有的模块中都重复的进行引用操作
具体配置
root模块的pom.xml配置:
<?xml version="1.0" encoding="UTF-8"?>

<project xmlns="http://maven.apache.org/POM/4.0.0" xmlns:xsi="http://www.w3.org/2001/XMLSchema-instance"

         xsi:schemaLocation="http://maven.apache.org/POM/4.0.0 http://maven.apache.org/xsd/maven-4.0.0.xsd">

    <modelVersion>4.0.0</modelVersion>

    <groupId>com.wt.common</groupId>

    <artifactId>root</artifactId>

    <version>1.0-SNAPSHOT</version>

    <packaging>pom</packaging>

    <name>root</name>

    <developers>

        <developer>

            <name>lichking</name>

            <email>lichking2017@aliyun.com</email>

        </developer>

    </developers>

    <properties>

        <project.build.sourceEncoding>1.8</project.build.sourceEncoding>

        <version.j2ee>1.0-SNAPSHOT</version.j2ee>

    </properties>

    <!--构建设置-->

    <build>

        <outputDirectory>${basedir}/target/${project.build.finalName}/WEB-INF/classes</outputDirectory>

        <plugins>

            <!--设置编译的jdk版本还有编码格式-->

            <plugin>

                <groupId>org.apache.maven.plugins</groupId>

                <artifactId>maven-compiler-plugin</artifactId>

                <version>3.7.0</version>

                <configuration>

                    <encoding>UTF-8</encoding>

                    <source>1.8</source>

                    <target>1.8</target>

                </configuration>

            </plugin>

            <!--设置资源文件读取编码格式-->

            <plugin>

                <groupId>org.apache.maven.plugins</groupId>

                <artifactId>maven-resources-plugin</artifactId>

                <version>3.0.2</version>

                <configuration>

                    <encoding>${project.build.sourceEncoding}</encoding>

                </configuration>

            </plugin>

            <!--源码打包-->

            <plugin>

                <groupId>org.apache.maven.plugins</groupId>

                <artifactId>maven-source-plugin</artifactId>

                <version>2.4</version>

                <executions>

                    <execution>

                        <phase>package</phase>

                        <goals>

                            <goal>jar-no-fork</goal>

                        </goals>

                    </execution>

                </executions>

            </plugin>

        </plugins>

    </build>

    <!--配置发布信息-->

    <distributionManagement>

        <repository>

            <id>releases</id>

            <url>http://192.168.0.110:8081/repository/maven-releases/</url>

        </repository>

        <snapshotRepository>

            <id>snapshots</id>

            <url>http://192.168.0.110:8081/repository/maven-snapshots/</url>

        </snapshotRepository>

    </distributionManagement>

</project>
version模块的pom.xml配置
<?xml version="1.0" encoding="UTF-8"?>

<project xmlns="http://maven.apache.org/POM/4.0.0"

         xmlns:xsi="http://www.w3.org/2001/XMLSchema-instance"

         xsi:schemaLocation="http://maven.apache.org/POM/4.0.0 http://maven.apache.org/xsd/maven-4.0.0.xsd">

    <parent>

        <artifactId>root</artifactId>

        <groupId>com.wt.common</groupId>

        <version>1.0-SNAPSHOT</version>

        <relativePath>../root/pom.xml</relativePath>

    </parent>

    <modelVersion>4.0.0</modelVersion>

    <groupId>com.wt.common</groupId>

    <artifactId>version</artifactId>

    <packaging>pom</packaging>

    <properties>

        <project.build.sourceEncoding>UTF-8</project.build.sourceEncoding>

        <version.spring>5.0.2.RELEASE</version.spring>

        <version.com.google.code.gson>2.8.2</version.com.google.code.gson>

        <version.commons-lang3>3.7</version.commons-lang3>

        <version.druid>1.1.9</version.druid>

        <version.mybatis>3.4.6</version.mybatis>

        <version.mybatis-spring>1.3.2</version.mybatis-spring>

        <version.mybatis-generator>1.0SNAPSHOT</version.mybatis-generator>

        <version.core>1.0-SNAPSHOT</version.core>

        <version.mysql.driver>6.0.6</version.mysql.driver>

        <version.gson>2.8.2</version.gson>

        <version.junit>4.12</version.junit>

        <version.testng>6.14.3</version.testng>

        <slf4j.version>1.7.25</slf4j.version>

        <log4j.version>2.8.2</log4j.version>

    </properties>

</project>
j2ee模块的配置:
<?xml version="1.0" encoding="UTF-8"?> <project xmlns="http://maven.apache.org/POM/4.0.0" xmlns:xsi="http://www.w3.org/2001/XMLSchema-instance"
xsi:schemaLocation="http://maven.apache.org/POM/4.0.0 http://maven.apache.org/xsd/maven-4.0.0.xsd">
<parent>
<artifactId>version</artifactId>
<groupId>com.wt.common</groupId>
<version>1.0-SNAPSHOT</version>
<relativePath>../version/pom.xml</relativePath>
</parent>
<modelVersion>4.0.0</modelVersion> <groupId>com.wt.common</groupId>
<artifactId>j2ee</artifactId>
<packaging>pom</packaging>
<name>j2ee</name> <dependencies>
<dependency>
<groupId>javax</groupId>
<artifactId>javaee-api</artifactId>
<version>7.0</version>
<scope>compile</scope>
</dependency> <!--通过传递依赖,已经将spring-core、context、aop、beans模块加入到了依赖树中-->
<dependency>
<groupId>org.springframework</groupId>
<artifactId>spring-webmvc</artifactId>
<version>${version.spring}</version>
</dependency>
<!-- spring事物模块 -->
<dependency>
<groupId>org.springframework</groupId>
<artifactId>spring-tx</artifactId>
<version>${version.spring}</version>
</dependency>
<dependency>
<groupId>org.springframework</groupId>
<artifactId>spring-jdbc</artifactId>
<version>${version.spring}</version>
</dependency>
<!--apache工具包-->
<dependency>
<groupId>org.apache.commons</groupId>
<artifactId>commons-lang3</artifactId>
<version>${version.commons-lang3}</version>
</dependency>
<!--前后端通过json通信-->
<dependency>
<groupId>com.google.code.gson</groupId>
<artifactId>gson</artifactId>
<version>${version.com.google.code.gson}</version>
</dependency>
<!--数据库连接池-->
<dependency>
<groupId>com.alibaba</groupId>
<artifactId>druid</artifactId>
<version>${version.druid}</version>
</dependency>
<!--mysql数据库连接驱动-->
<dependency>
<groupId>mysql</groupId>
<artifactId>mysql-connector-java</artifactId>
<version>${version.mysql.driver}</version>
</dependency>
<!-- controller向客户端返回数据的时候,表述形式为JSON时,需要的依赖(google的gson工具) -->
<dependency>
<groupId>com.google.code.gson</groupId>
<artifactId>gson</artifactId>
<version>${version.gson}</version>
</dependency>
<!--mybatis依赖begin-->
<dependency>
<groupId>org.mybatis</groupId>
<artifactId>mybatis</artifactId>
<version>${version.mybatis}</version>
</dependency>
<!--mybatis与spring整合-->
<dependency>
<groupId>org.mybatis</groupId>
<artifactId>mybatis-spring</artifactId>
<version>${version.mybatis-spring}</version>
</dependency>
<!--<!–mybatis 代码生成器–>-->
<!--<dependency>-->
<!--<groupId>org.mybatis.generator</groupId>-->
<!--<artifactId>mybatis-generator-core</artifactId>-->
<!--<version>${version.mybatis-generator}</version>-->
<!--</dependency>-->
<!--框架依赖-->
<dependency>
<groupId>com.wt.common</groupId>
<artifactId>core</artifactId>
<version>${version.core}</version>
</dependency>
<!--日志处理-->
<dependency>
<groupId>org.slf4j</groupId>
<artifactId>slf4j-api</artifactId>
<version>${slf4j.version}</version>
</dependency>
<dependency>
<groupId>org.slf4j</groupId>
<artifactId>jcl-over-slf4j</artifactId>
<version>${slf4j.version}</version>
<scope>runtime</scope>
</dependency>
<dependency>
<groupId>org.apache.logging.log4j</groupId>
<artifactId>log4j-api</artifactId>
<version>${log4j.version}</version>
</dependency>
<dependency>
<groupId>org.apache.logging.log4j</groupId>
<artifactId>log4j-core</artifactId>
<version>${log4j.version}</version>
</dependency>
<!--用于与sfl4j保持桥接-->
<dependency>
<groupId>org.apache.logging.log4j</groupId>
<artifactId>log4j-slf4j-impl</artifactId>
<version>${log4j.version}</version>
</dependency>
<dependency>
<groupId>org.apache.logging.log4j</groupId>
<artifactId>log4j-web</artifactId>
<version>${log4j.version}</version>
<scope>runtime</scope>
</dependency> <!--测试框架-->
<dependency>
<groupId>org.testng</groupId>
<artifactId>testng</artifactId>
<version>${version.testng}</version>
<scope>test</scope>
</dependency>
<dependency>
<groupId>junit</groupId>
<artifactId>junit</artifactId>
<version>${version.junit}</version>
<scope>test</scope>
</dependency>
<dependency>
<groupId>org.springframework</groupId>
<artifactId>spring-test</artifactId>
<version>${version.spring}</version>
<scope>test</scope>
</dependency>
</dependencies> <!--<build>-->
<!--<plugins>-->
<!--<plugin>-->
<!--<groupId>org.mybatis.generator</groupId>-->
<!--<artifactId>mybatis-generator-maven-plugin</artifactId>-->
<!--<version>${version.mybatis-generator}</version>-->
<!--</plugin>-->
<!--</plugins>-->
<!--</build>-->
</project>
moduleVersion模块的配置
<?xml version="1.0" encoding="UTF-8"?>

<project xmlns="http://maven.apache.org/POM/4.0.0"

         xmlns:xsi="http://www.w3.org/2001/XMLSchema-instance"

         xsi:schemaLocation="http://maven.apache.org/POM/4.0.0 http://maven.apache.org/xsd/maven-4.0.0.xsd">

    <parent>

        <artifactId>j2ee</artifactId>

        <groupId>com.wt.common</groupId>

        <version>1.0-SNAPSHOT</version>

        <relativePath>../j2ee/pom.xml</relativePath>

    </parent>

    <modelVersion>4.0.0</modelVersion>

    <groupId>com.wt.common</groupId>

    <artifactId>moduleVersion</artifactId>

    <version>1.0-SNAPSHOT</version>

    <packaging>pom</packaging>

    <properties>

        <version.security>1.0-SNAPSHOT</version.security>

        <version.upload>1.0-SNAPSHOT</version.upload>

        <version.core>1.0-SNAPSHOT</version.core>

    </properties>

</project>
modalGather模块的配置
<?xml version="1.0" encoding="UTF-8"?>

<project xmlns="http://maven.apache.org/POM/4.0.0"

         xmlns:xsi="http://www.w3.org/2001/XMLSchema-instance"

         xsi:schemaLocation="http://maven.apache.org/POM/4.0.0 http://maven.apache.org/xsd/maven-4.0.0.xsd">

    <parent>

        <artifactId>moduleVersion</artifactId>

        <groupId>com.wt.common</groupId>

        <version>1.0-SNAPSHOT</version>

        <relativePath>../moduleVersion/pom.xml</relativePath>

    </parent>

    <modelVersion>4.0.0</modelVersion>

    <groupId>com.wt.common</groupId>

    <artifactId>modalGather</artifactId>

    <packaging>pom</packaging>

    <dependencies>

        <dependency>

            <groupId>com.wt.common</groupId>

            <artifactId>security</artifactId>

            <version>${version.security}</version>

        </dependency>

        <dependency>

            <groupId>com.wt.common</groupId>

            <artifactId>upload</artifactId>

            <version>${version.upload}</version>

        </dependency>

        <dependency>

            <groupId>com.wt.common</groupId>

            <artifactId>core</artifactId>

            <version>${version.core}</version>

        </dependency>

    </dependencies>

</project>
以上就是个人的一些见解
其他
关于Maven与nexus的结合使用,搞清楚几点就可以:
1、在项目中配置模块的发布路径,如上文提到的root的配置
其中的<repository>和<snapshotRepository>是固定写法,分别对应snapshot版本和release版本
<id>是要注意的,一定要与你本地的setting中的<server>中的id对应上,Maven才能通过id对应的用户名和密码连接到nexus
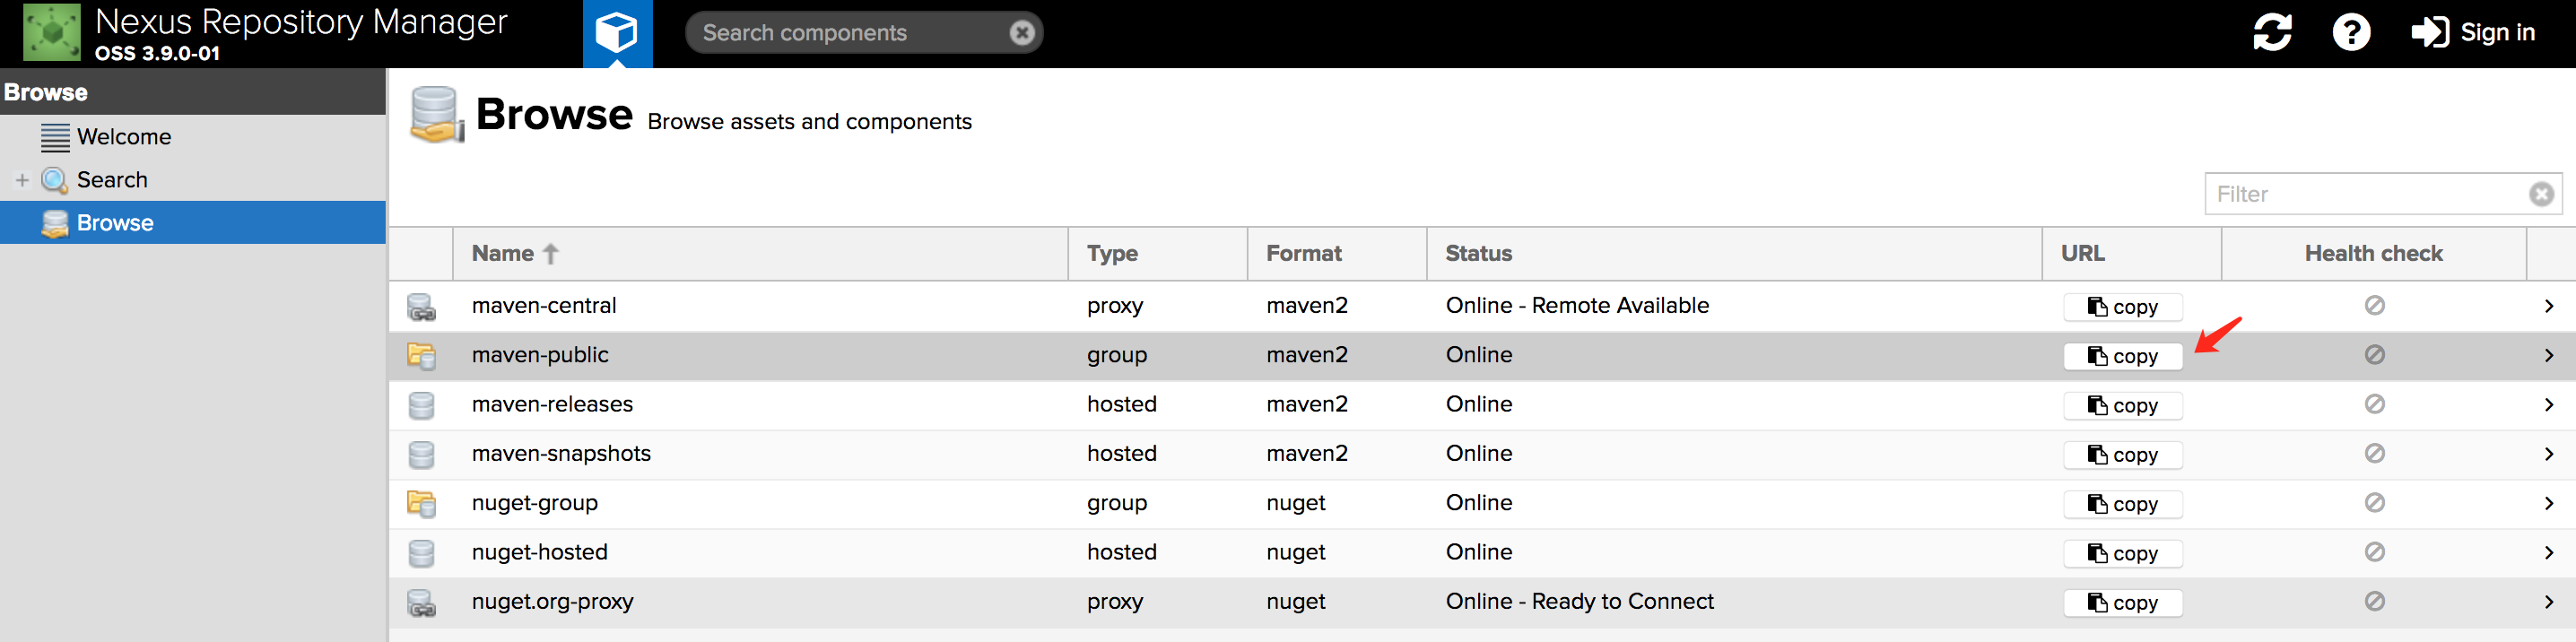
2、<url>中的内容是哪来的?
它对应着nexus仓库中的配置,见下图nexus中的红箭头,点击一下就可以拷贝对应的地址了
<distributionManagement>

        <repository>

            <id>releases</id>

            <url>http://192.168.0.110:8081/repository/maven-releases/</url>

        </repository>

        <snapshotRepository>

            <id>snapshots</id>

            <url>http://192.168.0.110:8081/repository/maven-snapshots/</url>

        </snapshotRepository>

    </distributionManagement>
以下是本机settings.xml配置
<?xml version="1.0" encoding="UTF-8"?>

<settings xmlns="http://maven.apache.org/SETTINGS/1.0.0"

          xmlns:xsi="http://www.w3.org/2001/XMLSchema-instance"

          xsi:schemaLocation="http://maven.apache.org/SETTINGS/1.0.0 http://maven.apache.org/xsd/settings-1.0.0.xsd">

  <servers>

    <server>

      <id>nexus</id>

      <username>admin</username>

      <password>admin123</password>

    </server>

    <server>

      <id>snapshots</id>

      <username>admin</username>

      <password>admin123</password>

    </server>

    <server>

      <id>tomcat8</id>

      <username>admin</username>

      <password>admin</password>

    </server>

  </servers>

  <mirrors>

    <!-- 本地nexus私服

    <mirror>

      <id>nexus</id>

      <mirrorOf>*</mirrorOf>

      <url>http://192.168.0.240:8081/nexus/content/groups/public/</url>

    </mirror>

    -->

    <!-- 阿里云仓库

        <mirror>

            <id>alimaven</id>

            <mirrorOf>*</mirrorOf>

            <name>aliyun maven</name>

            <url>http://maven.aliyun.com/nexus/content/repositories/central/</url>

        </mirror>

    -->

    <mirror>

      <id>nexus</id>

      <mirrorOf>*</mirrorOf>

      <url>http://192.168.0.110:8081/repository/maven-public/</url>

    </mirror>

  </mirrors>

  <profiles>

<profile>

      <id>nexus</id>

      <repositories>

        <repository>

          <id>nexus</id>

          <name>Nexus</name>

          <!--

          <url>http://192.168.0.240:8081/nexus/content/groups/public/</url>

          -->

          <url>http://192.168.0.110:8081/repository/maven-public/</url>

          <releases><enabled>true</enabled><updatePolicy>always</updatePolicy></releases>

          <snapshots><enabled>true</enabled><updatePolicy>always</updatePolicy></snapshots>

        </repository>

      </repositories>

      <pluginRepositories>

        <pluginRepository>

          <id>nexus</id>

          <name>Nexus</name>

      <!--

          <url>http://192.168.0.240:8081/nexus/content/groups/public/</url>

          -->

      <url>http://192.168.0.110:8081/repository/maven-public/</url>

      <releases><enabled>true</enabled><updatePolicy>always</updatePolicy></releases>

          <snapshots><enabled>true</enabled><updatePolicy>always</updatePolicy></snapshots>

        </pluginRepository>

      </pluginRepositories>

</profile>

  </profiles>

<activeProfiles>

    <activeProfile>nexus</activeProfile>

  </activeProfiles>

</settings>
另外Nexus3相对2改进还是很多的,界面也很炫酷,可以尝试一下
Maven管理多模块应用的更多相关文章
- Maven管理 划分模块
转载地址:juvenshun.iteye.com/blog/305865 “分天下为三十六郡,郡置守,尉,监” —— <史记·秦始皇本纪> 所有用Maven管理的真实的项目都应该是分模块的 ...
- Maven管理多模块项目
首先,我们要明确的多模块项目的含义,它是指一个应用中包含多个module.一般来说,一个应用单独部署成服务,只是打包的时候,maven会把各个module组合在一起.各模块一般单独打成jar放到lib ...
- maven管理多模块
创建parent项目: 1.打开IDEA,注意这里不要勾选模板,用模板创建过maven项目的小伙伴都知道模板创建项目非常慢,所以这里不要选模板,需要的文件夹我们后面自己来创建就可以了.所以这个页面直接 ...
- maven管理多模块系统
1.创建mydemo项目cd d:\myworkmvn archetype:create -DgroupId=com.example.mydemo -DartifactId=mydemo 生成myde ...
- SSH框架之一详解maven搭建多模块项目
闲来无事,思量着自己搭建一个ssh框架,一来回顾熟悉一下ssh的内容,hibernate还就没用过了,生疏了都.二来整合一下,将其他掌握的和正在学习的框架核技术糅合到一起,就当是做一个demo练手了. ...
- 使用maven构建多模块项目,分块开发
在多人使用Maven协作开发项目时,尤其是稍微上点规模的项目,每个RD的工作都细分到具体功能和模块,有些模块甚至还要单独部署. 我们假设有这样一个商城项目,包括以下几个模块: 商城前台(shop) 管 ...
- maven 配置多模块项目 pom modules
所有用Maven管理的真实的项目都应该是分模块的,每个模块都对应着一个pom.xml.它们之间通过继承和聚合(也称作多模块,multi-module)相互关联.那么,为什么要这么做呢?我们明明在开发一 ...
- 【建项目】eclipse maven建立多模块工程
在工作的时候,大多时候都是用Maven来管理项目,可是一般我们都知道怎么用maven管理工程,却不知道通过Maven自己来建立多模块工程.于是自己抽时间,在网上找些资料,做了起来. 建立简单的Mave ...
- 使用 Maven 管理项目
最近的练手项目使用的是 Maven 在管理项目,在使用 Maven 管理项目时,三层的开发时分模块开发的,parent-dao-service-web,所有的spring+struts + Hiber ...
随机推荐
- STL:STL各种容器的使用时机详解
C++标准程序库提供了各具特长的不同容器.现在的问题是:该如何选择最佳的容器类别?下表给出了概述. 但是其中有些描述可能不一定实际.例如:如果你需呀处理的元素数量很少,可以虎落复杂度,因为线性算法通常 ...
- java Domj4读取xml文件
先概括,再以代码形式给出. 获取节点: Iterator Element.nodeIterator(); //获取当前标签节点下的所有子节点 获取 标签: Element Document.get ...
- WebView 简介
WebView 简介 日期: 2013年10月29日 注意: API可能有演进,所以需要看当前时间决定是否有用 继承结构: public class WebView extends AbsoluteL ...
- 详解ebs接口之客户配置文件导入(二)
------------------------------------ -- 1a. Setup the Org_id ------------------------------------ ex ...
- 【嵌入式开发】gcc 学习笔记(一) - 编译C程序 及 编译过程
一. C程序编译过程 编译过程简介 : C语言的源文件 编译成 可执行文件需要四个步骤, 预处理 (Preprocessing) 扩展宏, 编译 (compilation) 得到汇编语言, 汇编 (a ...
- 一堆C++人找不出内存泄露
一堆C++人找不出内存泄露 内存泄露就像痔疮对于男人,对于C/C++程序员来说,是顽疾.尤其一堆C++人聚集在一起,准备把程序深处的虫子抓出来的时候,那景象是热火朝天,不亦乐乎. 突然,小白甲发布了一 ...
- Android APP新的“优雅”退出方式--EventBus大显身手
最近在研究eventBus..很多小伙伴不知道他有什么用.. 前篇介绍了EventBus的基本使用 这里简单举一个例子,就是退出APP 转载请注明出处:http://blog.csdn.net/win ...
- Ceres-Solver库入门
示例1:求极值 首先我们以Ceres库官网中的Hello World例子来进行说明.这里例子的目的是为了计算方程取得最小值时x的值.从这个方程很容易看出来当x=10时,f(x)取得最小值0.这个方程虽 ...
- 对Linux0.11 中 进程0 和 进程1分析
1. 背景 进程的创建过程无疑是最重要的操作系统处理过程之一,很多书和教材上说的最多的还是一些原理的部分,忽略了很多细节.比如,子进程复制父进程所拥有的资源,或者子进程和父进程共享相同的物理页面,拥有 ...
- UML之概述
UML,英文名曰:Unified Modeling Language,她还有个中文名字叫统一建模语言,简单的来说,她就是一种绘制软件蓝图的标准语言.她的表达能力特别强,可以描述开 ...