Spring Boot Web 自定义注解篇(注解很简单很好用)
自从spring 4.0 开放以后,可以添加很多新特性的注解了。使用系统定义好的注解可以大大方便的提高开发的效率。
下面我贴一段代码来讲解注解:
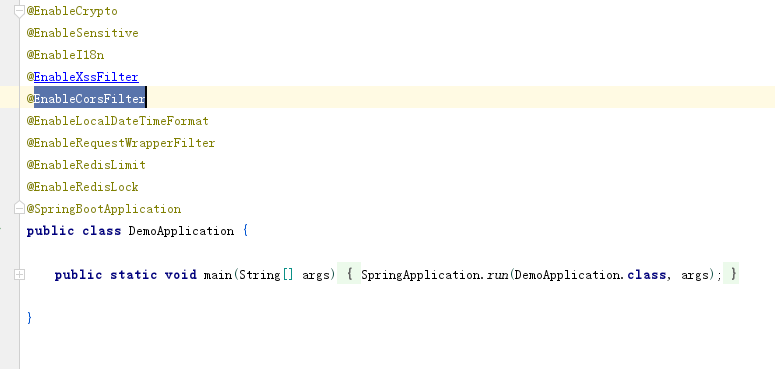
通过小小的注解我们支持了以下功能:
- 使
spring.jackson.date-format属性支持JDK8日期格式化 - 解决
request.getInputStream()一次读取后失效痛点 - 国际化支持
- 全局跨域支持
- 接口加密/解密
- 防XSS攻击
- 分布式限流/分布式锁支持
我们通过自定义@EnableCorsFilter 来看一下跨域是如何支持的:
package com.battcn.boot.request.annotation;

import com.battcn.boot.request.configuration.cors.CorsFilterAutoConfiguration;

import org.springframework.context.annotation.Import;

import java.lang.annotation.*;

/**

 * 开启跨域支持

 *

 * @author Levin

 * @since 2019-01-01

 */

@Target({ElementType.TYPE})

@Retention(RetentionPolicy.RUNTIME)

@Documented

@Inherited

@Import({CorsFilterAutoConfiguration.class})

public @interface EnableCorsFilter {

}
@Inherited 元注解是一个标记注解,@Inherited阐述了某个被标注的类型是被继承的。
如果一个使用了@Inherited修饰的annotation类型被用于一个class,则这个annotation将被用于该class的子类。
CorsFilterAutoConfiguration类(具体实现)
package com.battcn.boot.request.configuration.cors;

import org.springframework.beans.factory.annotation.Autowired;

import org.springframework.boot.autoconfigure.condition.ConditionalOnMissingBean;

import org.springframework.boot.context.properties.EnableConfigurationProperties;

import org.springframework.context.annotation.Bean;

import org.springframework.context.annotation.Configuration;

import org.springframework.web.cors.CorsConfiguration;

import org.springframework.web.cors.UrlBasedCorsConfigurationSource;

import org.springframework.web.filter.CorsFilter;

import static com.battcn.boot.request.utils.StringUtils.defaultString;

/**

 * Cors 跨域支持

 *

 * @author Levin

 * @since 2017/12/5 0005

 */

@Configuration

@EnableConfigurationProperties(value = {CorsFilterProperties.class})

public class CorsFilterAutoConfiguration {

    private static final String PATH = "/**";

    private final CorsFilterProperties properties;

    @Autowired

    public CorsFilterAutoConfiguration(CorsFilterProperties properties) {

        this.properties = properties;

    }

    private CorsConfiguration buildConfig() {

        CorsConfiguration corsConfiguration = new CorsConfiguration();

        corsConfiguration.addAllowedOrigin(defaultString(properties.getOrigin(), CorsConfiguration.ALL));

        corsConfiguration.addAllowedHeader(defaultString(properties.getAllowedHeader(), CorsConfiguration.ALL));

        corsConfiguration.addAllowedMethod(defaultString(properties.getMethod(), CorsConfiguration.ALL));

        // 是否发送 Cookie 信息

        corsConfiguration.setAllowCredentials(properties.getAllowCredentials());

        if (properties.getMaxAge() != null) {

            corsConfiguration.setMaxAge(properties.getMaxAge());

        }

        if (properties.getExposedHeader() != null) {

            corsConfiguration.addExposedHeader(properties.getExposedHeader());

        }

        return corsConfiguration;

    }

    /**

     * 跨域过滤器

     *

     * @return Cors过滤器

     */

    @Bean

    @ConditionalOnMissingBean

    public CorsFilter corsFilter() {

        UrlBasedCorsConfigurationSource source = new UrlBasedCorsConfigurationSource();

        source.registerCorsConfiguration(defaultString(properties.getPath(), PATH), buildConfig());

        return new CorsFilter(source);

    }

}
@ConditionalOnMissingBean 属性相同,自动生成加载

@Configuration   Ioc加载到bean里

@EnableConfigurationProperties   加载class配置项
@ConfigurationProperties  加载具体的配置参数

CorsFilterProperties配置类
package com.battcn.boot.request.configuration.cors;

import lombok.Data;

import org.springframework.boot.context.properties.ConfigurationProperties;

import org.springframework.lang.Nullable;

/**

 * Core 跨域相关配置

 *

 * @author Levin

 * @since 2017/12/5 0005

 */

@Data

@ConfigurationProperties("request.cors")

public class CorsFilterProperties {

    private Boolean enabled;

    private String path;

    private String origin;

    private String allowedHeader;

    private String method;

    private String exposedHeader;

    @Nullable

    private Boolean allowCredentials;

    @Nullable

    private Long maxAge;

}
application.properties配置项
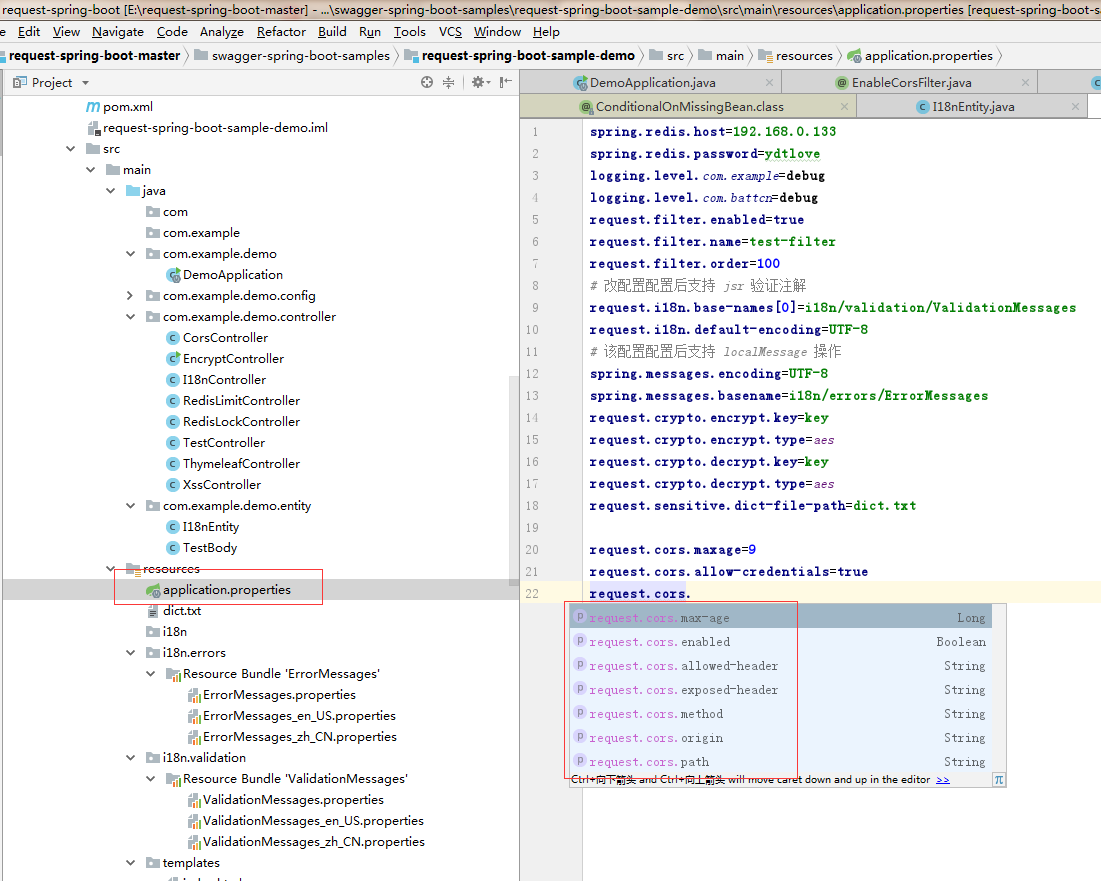
我在类属性里定义的maxAge,但是application里面显示的是max-age,会自动帮做转换,如果使用maxAge属性参数也是可以取到值的(是不是spring帮做了匹配查找)。
完成以上操作,只要在SpringApplication 启动加上@EnableCorsFilter 就可以实现跨域了。
maven调用以下是快速使用方法:
<dependency>

    <groupId>com.battcn</groupId>

    <artifactId>request-spring-boot-starter</artifactId>

    <version>1.0.8-RELEASE</version>

</dependency>
感谢唐亚峰提供的工具类。
Spring Boot Web 自定义注解篇(注解很简单很好用)的更多相关文章
- Spring Boot Web 自定义返回值(通用)
在项目下新建common.entity包,包中包含两个文件Result数据类,ResultCode接口文件 Result.class @Data @NoArgsConstructor public c ...
- Spring Boot 2.0 教程 | @ModelAttribute 注解
欢迎关注微信公众号: 小哈学Java 文章首发于个人网站: https://www.exception.site/springboot/spring-boot-model-attribute Spri ...
- Spring Boot 入门之基础篇(一)
原文地址:Spring Boot 入门之基础篇(一) 博客地址:http://www.extlight.com 一.前言 Spring Boot 是由 Pivotal 团队提供的全新框架,其设计目的是 ...
- spring boot(一):入门篇
构建微服务:Spring boot 入门篇 什么是spring boot Spring Boot是由Pivotal团队提供的全新框架,其设计目的是用来简化新Spring应用的初始搭建以及开发过程.该框 ...
- spring boot实战(第十三篇)自动配置原理分析
前言 spring Boot中引入了自动配置,让开发者利用起来更加的简便.快捷,本篇讲利用RabbitMQ的自动配置为例讲分析下Spring Boot中的自动配置原理. 在上一篇末尾讲述了Spring ...
- Springboot 系列(七)Spring Boot web 开发之异常错误处理机制剖析
前言 相信大家在刚开始体验 Springboot 的时候一定会经常碰到这个页面,也就是访问一个不存在的页面的默认返回页面. 如果是其他客户端请求,如接口测试工具,会默认返回JSON数据. { &quo ...
- Spring Boot(一):入门篇+前端访问后端
转自:Spring Boot(一):入门篇 什么是Spring Boot Spring Boot 是由 Pivotal 团队提供的全新框架,其设计目的是用来简化新 Spring 应用的初始搭建以及开发 ...
- Spring Boot2 系列教程(十八)Spring Boot 中自定义 SpringMVC 配置
用过 Spring Boot 的小伙伴都知道,我们只需要在项目中引入 spring-boot-starter-web 依赖,SpringMVC 的一整套东西就会自动给我们配置好,但是,真实的项目环境比 ...
- Springboot 系列(六)Spring Boot web 开发之拦截器和三大组件
1. 拦截器 Springboot 中的 Interceptor 拦截器也就是 mvc 中的拦截器,只是省去了 xml 配置部分.并没有本质的不同,都是通过实现 HandlerInterceptor ...
随机推荐
- python笔记:#014#综合应用
综合应用 -- 名片管理系统 目标 综合应用已经学习过的知识点: 变量 流程控制 函数 模块 开发 名片管理系统 系统需求 程序启动,显示名片管理系统欢迎界面,并显示功能菜单 ************ ...
- Linux(二十一)Shell编程
21.1 为什么要学习Shell编程 (1)Linux运维工程师在进行服务器集群管理时,需要编写Shell程序来进行服务器管理. (2)对于JavaEE和Python程序员来说,工作的需要,你的老大会 ...
- GitHub学习笔记:分支管理
GitHub对于每个开发版本都需要有一个分支,默认的分支是master往往被大家保留下来作为主分支,分支类似于进程的一个指针,往往在master这个稳定的主干版本上分出一个或多个正在开发的分支版本,开 ...
- windows下virtualenv中安装MySQL-python
先在正常的环境下安装 MySQL-python-1.2.3.win-amd64-py2.7.exe (用everything搜索一下就出来) 然后到 C:\Python27\Lib\site-pack ...
- memset库函数
头文件:#include <string.h> 定义函数:void * memset(void *s, int c, size_t n); 函数说明:memset()会将参数s 所 ...
- Java结合SpringBoot拦截器实现简单的登录认证模块
Java结合SpringBoot拦截器实现简单的登录认证模块 之前在做项目时需要实现一个简单的登录认证的功能,就寻思着使用Spring Boot的拦截器来实现,在此记录一下我的整个实现过程,源码见文章 ...
- C++相关:部分标准库特殊设施
C++ tuple(元组) tuple是C++11新标准里的类型.它是一个类似pair类型的模板.pair类型是每个成员变量各自可以是任意类型,但是只能有俩个成员,而tuple与pair不同的是它可以 ...
- java并发包java.util.concurrent详解
线程池ThreadPoolExecutor的使用 并发容器之CopyOnWriteArrayList 并发容器之CopyOnWriteArraySet 数据结构之ConcurrentHashMap,区 ...
- Java bean和json互转时,屏蔽某个属性
有的时候我们把java bean 转换成json的时候,希望屏蔽掉某个属性,这时可以在java bean的属性上加上@JsonIgnore注解,在com.fasterxml.jackson.annot ...
- Centos7搭建hadoop完全分布式
虽然说是完全分布式,但三个节点也都是在一台机器上.拿来练手也只能这样咯,将就下.效果是一样滴.这个我自己都忘了步骤,一起来回顾下吧. 必备知识: Linux基本命令 vim基本命令 准备软件: VMw ...