.Net Core配置文件介绍
Net Core中的配置文件介绍
1 简单回顾.Net Framework配置文件
.Net Core中的配置文件操作较.Net Framework有了很大的改动。介绍.Net Core中配置文件操作前,我们先回顾下.Net Framework中配置文件的操作。在.Net Framework中应用程序的配置文件只支持XML形式,应用程序的配置文件一般是App.Config或者Web.Config,添加配置文件最常用的方法是:在appSettings和ConnectionString节点下添加子节点,简单看一个栗子
配置文件下添加子节点:
<appSettings>

    <add key="mykey" value="myvalue"/>

</appSettings>

<connectionStrings>

    <add name="connstr" connectionString="server=.;uid=sa;pwd=xxxx;database=mydbname"/>

</connectionStrings>
获取配置文件中的值:
//MVC中读取配置文件

ViewBag.value = WebConfigurationManager.AppSettings["mykey"];

ViewBag.connstr = WebConfigurationManager.ConnectionStrings["connstr"].ConnectionString;

//Webapi,Console,Winform应用读取配置文件

string s1 = ConfigurationManager.AppSettings["mykey"];

string s2 = ConfigurationManager.ConnectionStrings["connstr"].ConnectionString;
.Net Core的配置文件相比于.Net Framework最大的特点是其不仅仅支持XML格式的配置文件,还支持Json,Ini,memory,command,env(环境变量)。首先看一个Json配置文件的栗子。
2 Json配置文件的操作
这里采用一个控制台项目作为栗子,Asp.NET Core中配置文件的操作基本一致。首先添加两个包
Install-Package Microsoft.Extensions.Configuration

Install-Package Microsoft.Extensions.Configuration.Json
添加配置文件,文件名可以任意指定,这里使用appsettings.json,设置属性为【始终复制】
{

  "isRight": true,

  "myArray": [ , , ,  ],

  "myJson": {

    "key1": "json中的value1",

    "key2": "json中的value2"

  }

}
读取配置文件中数据,代码如下:
    class Program

    {

        static void Main(string[] args)

        {

            IConfiguration configuration = new ConfigurationBuilder()

                    //设置配置文件基本路径

                    .SetBasePath(Environment.CurrentDirectory)

                    //添加json配置。参数:optional配置文件是否为可选的,reloadOnChange是否热加载

                    .AddJsonFile("appsettings.json", optional: true, reloadOnChange: true)

                    .Build();

            Console.WriteLine(configuration["isRight"]);

            Console.WriteLine(configuration["myArray:0"]);//输出myArray[0],     【:】表示下一级节点

            Console.WriteLine(configuration["myJson:key1"]);//输出myJson->key1   【:】表示下一级节点

            Console.ReadKey();

        }

    }
在.Net Core中使用ConfigurationBuilder对象的 SetBasePath(strPath) 设置配置文件的基本路径, AddJsonFile("filePath") 方法添加配置文件,Build方法创建配置对象。
运行结果为

3 其他类型的配置文件
上边提到.Net Core的配置文件支持多种类型,Configuration的数据源可以来自Json,XML,环境变量,Ini,Memory等,下边我们看一下怎么去操作其他类型配置文件。
首先添加几个Package
//xml配置文件

Install-Package Microsoft.Extensions.Configuration.Xml

//ini配置文件

Install-Package Microsoft.Extensions.Configuration.Ini

//环境变量

Install-Package Microsoft.Extensions.Configuration.EnvironmentVariables

//支持强类型读取,扩展了IConfiguration的方法

Install-Package Microsoft.Extensions.Configuration.Binder
添加XML配置文件,文件名为appsettings.xml,属性设置为【始终复制】
<appsettings>

  <mykey>myvalue</mykey>

  <mysql>

    <server>192.168.11.11</server>

    <port>3306</port>

  </mysql>

</appsettings>
一个简单的栗子
    class Program

    {

        static void Main(string[] args)

        {

            //memory配置数据

            var initData = new List<KeyValuePair<string, string>>()

            {

                new KeyValuePair<string, string>("initKey1", "初始配置数据1"),

                new KeyValuePair<string, string>("initKey2", "初始配置数据2"),

            };

            IConfiguration configuration = new ConfigurationBuilder()

                    //设置根目录

                    .SetBasePath(Environment.CurrentDirectory)

                    //添加json配置。参数:optional配置文件是否为可选的,reloadOnChange是否热加载

                    .AddJsonFile("appsettings.json", optional: true, reloadOnChange: true)

                    //添加xml文件配置

                    .AddXmlFile("appsettings.xml")

                    //添加memory中的配置

                    .AddInMemoryCollection(initData)

                    //将环境变量添加到配置

                    .AddEnvironmentVariables()

                    .Build();

            //方式1:弱类型读取

            string str1 = configuration["initKey1"];

            string str2 = configuration["isRight"];

            string str3 = configuration["myArray:0"];

            string str4 = configuration["myJson:key1"];

            //我电脑上配置的NPM_HOME环境变量

            string str5 = configuration["NPM_HOME"];

            string str6 = configuration["mysql:server"];

            Console.WriteLine($"{str1}--{str2}--{str3}--{str4}--{str5}--{str6}");

            //方式2:强类型

            //Microsoft.Extensions.Configuration.Binder扩展了Configuration的方法

            string strA = configuration.GetValue<string>("initKey1");

            bool boolB = configuration.GetValue<bool>("isRight");

            int intC = configuration.GetValue<int>("myArray:0");

            string strD = configuration.GetValue<string>("myJson:key1");

            //我电脑上配置的NPM_HOME环境变量

            string strE = configuration.GetValue<string>("NPM_HOME");

            string strF = configuration.GetValue<string>("mysql:server");

            Console.WriteLine($"{strA}--{boolB}--{intC}--{strD}--{strE}--{strF}");

            Console.ReadKey();

        }

    }
运行结果

我们看一下Configuration对象是怎么存储配置的,每一个配置源的数据都单独存放在一个Provider中,存储的方式如下图所示,无论是json/xml还是其他类型的配置源,配置最终都以Key-Value的形式存储在所对应的Provider中。
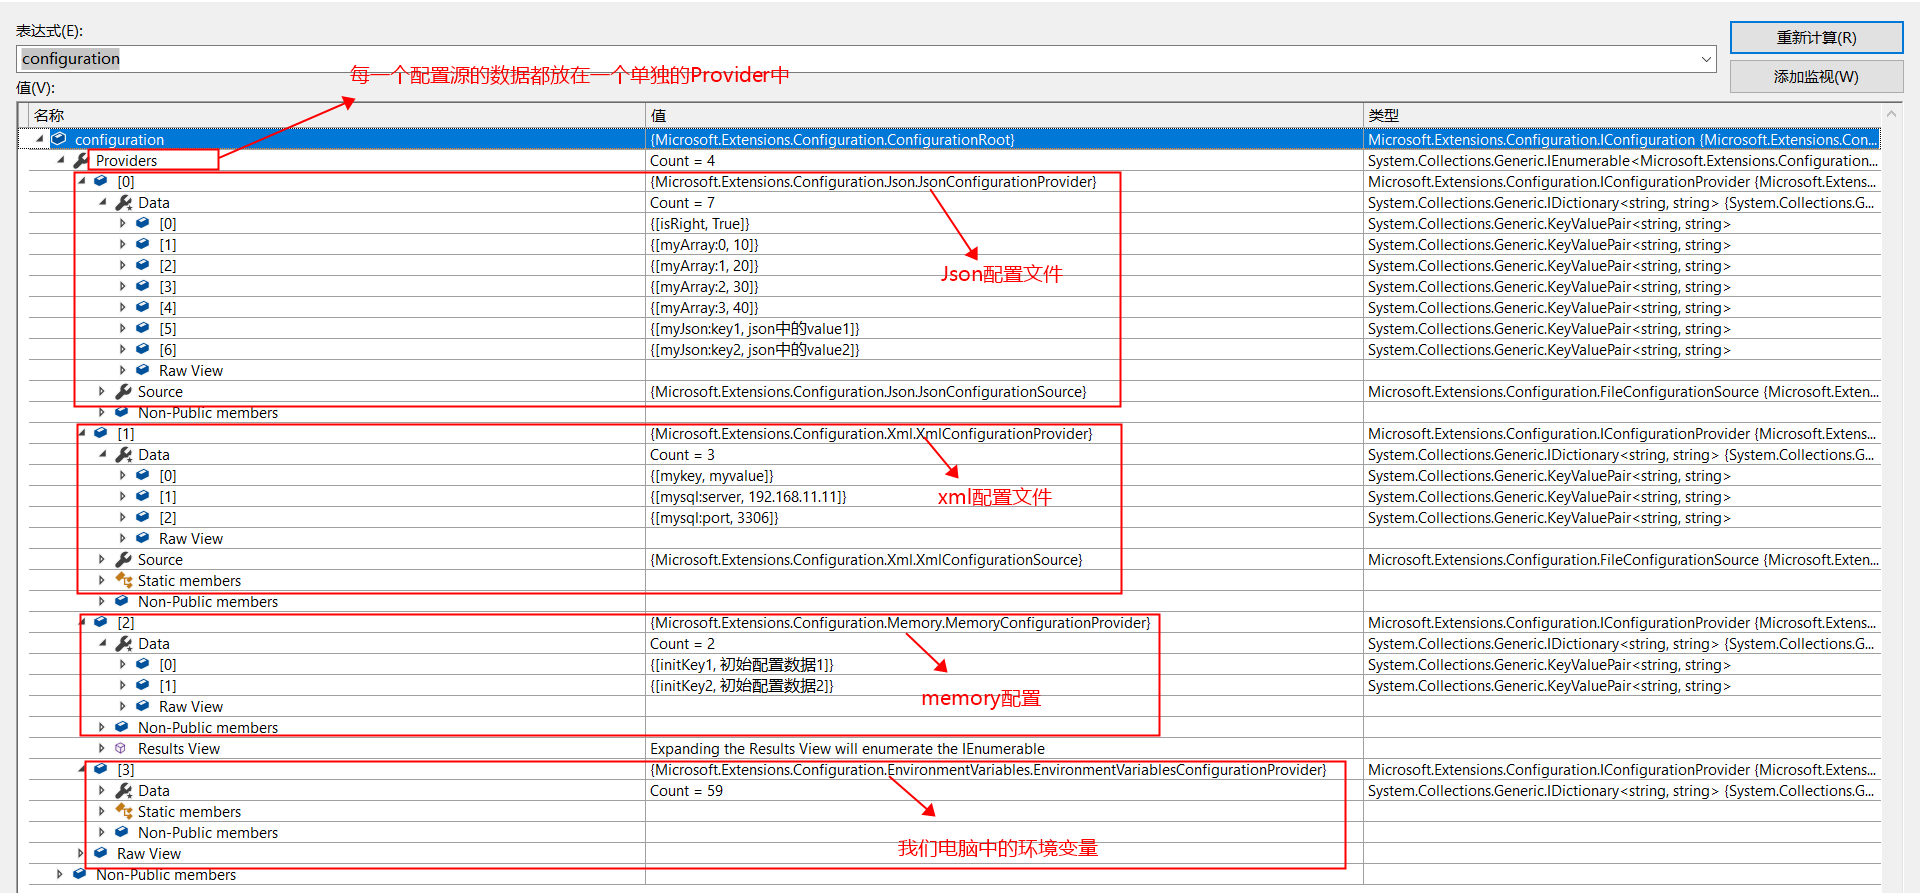
一点重要的补充:如果多个配置文件中都配置了同一个Key值,那么以后面添加的准。如先添加XML配置文件,然后添加Json配置文件,Json配置文件会覆盖Xml配置文件中重复的配置。
4 通过对象方式读取配置文件
通过上边的介绍我们已经知道怎么去添加和读取配置文件,但是读取时都是用Key来获取Configuraion对象中的值,如果能以对象的形式(如:configuration.mykey形式)来读取configuration就会更方便了。 Microsoft.Extensions.Configuration.Binder 包为我们提供了这种方法。以Json配置文件为例,配置文件appsettings的内容如下:
{

  "isRight": true,

  "myArray": [ , , ,  ],

  "myJson": {

    "key1": "json中的value1",

    "key2": "json中的value2"

  }

}
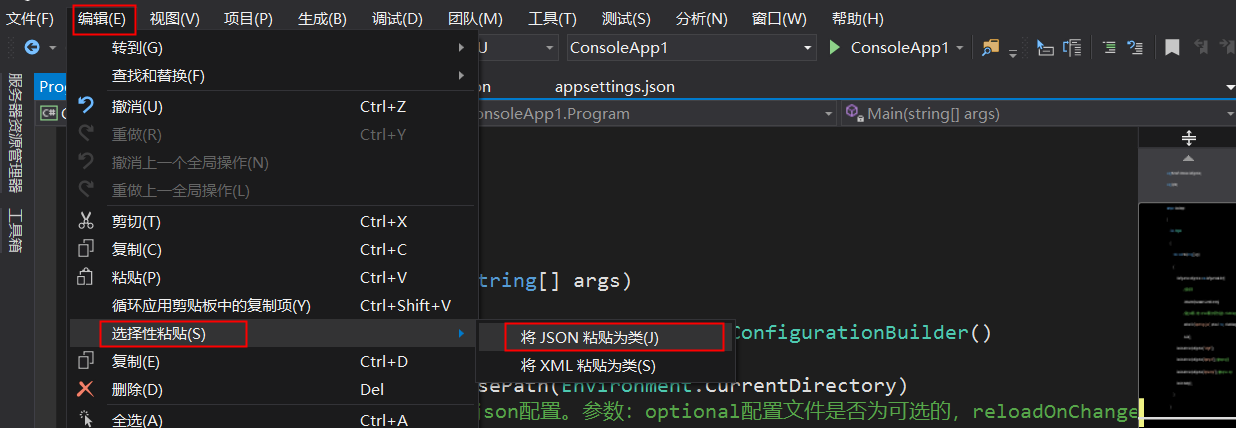
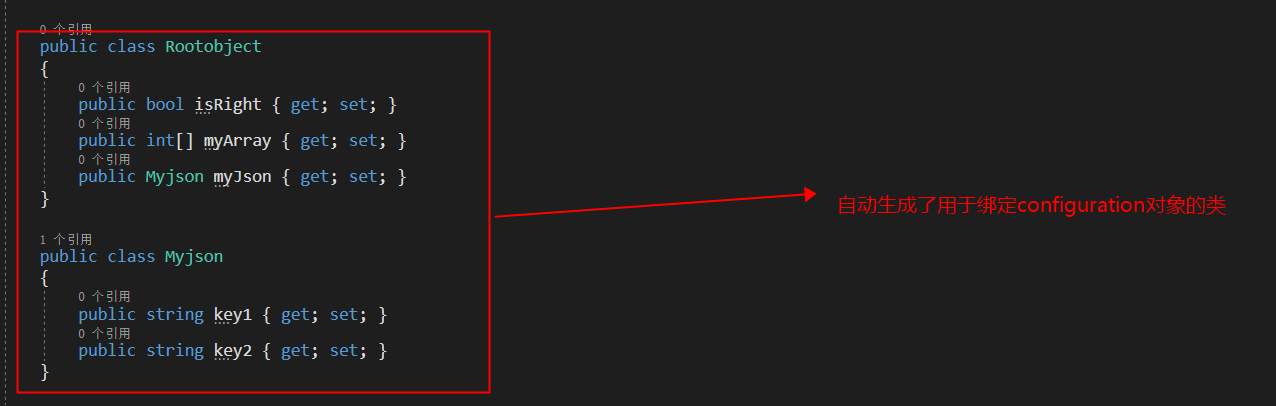
生成configuration绑定的类,可以自己写一个绑定类。(一个小技巧:复制appsettings中的内容,【编辑】-【选择性粘贴】-【将Json粘贴为类】)
效果如下:
具体操作的代码如下
    class Program

    {

        static void Main(string[] args)

        {

            IConfiguration configuration = new ConfigurationBuilder()

                    //设置根目录

                    .SetBasePath(Environment.CurrentDirectory)

                    //添加json配置。参数:optional配置文件是否为可选的,reloadOnChange是否热加载

                    .AddJsonFile("appsettings.json", optional: true, reloadOnChange: true)

                    .Build();

            //普通方式读取

            Console.WriteLine("----------------普通方式读取");

            Console.WriteLine($"{configuration["isRight"]}--{configuration["myArray:"]}--{configuration["myJson:key1"]}");

            //对象方式读取

            Rootobject cfgObj = configuration.Get<Rootobject>();

            //也可以用下边的方式绑定,效果一样:

            //Rootobject cfgObj = new Rootobject();

            //configuration.Bind(cfgObj);

            Console.WriteLine("----------------对象方式读取");

            Console.WriteLine($"{cfgObj.isRight}--{cfgObj.myArray[0]}--{cfgObj.myJson.key1}");

            Console.ReadKey();

        }

    }

    //绑定Configuration对象的类

    public class Rootobject

    {

        public bool isRight { get; set; }

        public int[] myArray { get; set; }

        public Myjson myJson { get; set; }

    }

    public class Myjson

    {

        public string key1 { get; set; }

        public string key2 { get; set; }

    }
通过对象绑定读配置文件有两个优点:①读取配置文件时为强类型读取(如configuration.isRight为bool类型,而不是统一的string类型);②具有代码提示功能
.Net Core配置文件介绍的更多相关文章
- 4 Redis 配置文件介绍
2016-12-22 14:28:39 该系列文章链接NoSQL 数据库简介Redis的安装及及一些杂项基础知识Redis 的常用五大数据类型(key,string,hash,list,set,zse ...
- .NET Core配置文件加载与DI注入配置数据
.NET Core配置文件 在以前.NET中配置文件都是以App.config / Web.config等XML格式的配置文件,而.NET Core中建议使用以JSON为格式的配置文件,因为使用起来更 ...
- Apache源码包安装和子配置文件介绍--update.2014-12-5
安装apache: 官网:http://httpd.apache.org/download.cgi#apache24 1.wget http://mirror.bit.edu.cn/apache//h ...
- Linux core 文件介绍
Linux core 文件介绍 http://www.cnblogs.com/dongzhiquan/archive/2012/01/20/2328355.html 1. core文件的简单介绍在一个 ...
- net core体系-web应用程序-4net core2.0大白话带你入门-6asp.net core配置文件
asp.net core配置文件 读取配置文件 asp.net core使用appsettings.json代替传统.net framework的web.config中的<appSettin ...
- Logstash配置文件介绍
Logstash配置文件介绍 Logstash配置文件有两种,分别是pipeline配置文件和setting配置文件. Pipeline配置文件主要定义logstash使用的插件以及每个插件的设置,定 ...
- [转].NET Core配置文件加载与DI注入配置数据
本文转自:http://www.cnblogs.com/skig/p/6079187.html .NET Core配置文件 在以前.NET中配置文件都是以App.config / Web.config ...
- [01]从零开始学 ASP.NET Core 与 EntityFramework Core 课程介绍
从零开始学 ASP.NET Core 与 EntityFramework Core 课程介绍 本文作者:梁桐铭- 微软最有价值专家(Microsoft MVP) 文章会随着版本进行更新,关注我获取最新 ...
- Nginx服务配置文件介绍
LNMP架构应用实战——Nginx服务配置文件介绍 nginx的配置文件比较简单,但功能相当强大,可以自由灵活的进行相关配置,因此,还是了解下其配置文件的一此信息 1.Nginx服务目录结构介绍 安装 ...
随机推荐
- android开发中调用python代码(带参数)
android开发主要用到的是java代码,但是当开发涉及到一些算法时,往往用python可以提高软件的运行速度,也更加便捷,这里分享自己项目调用python代码的方式,主要有以下几个步骤(个人方法, ...
- 网站注册与登录使用 bcrypt与 passport 双重验证 解释
网站在登录前,需要进行注册收集用户基本信息,bcrypt 提供密码加密验证的方法,但是使用不正确,会给初学者带来各种问题. bcrypt 的安装: npm i bcrypt 经过测试,经常安装不成功, ...
- POJ 3085 - Quick Change
Quick Change Time Limit: 1000MS Memory Limit: 65536K Total Submissions: 6288 Accepted: 4468 Desc ...
- sql声明变量,及if -else语句、while语句的用法
--声明变量,同时为变量赋值 declare @n print @n --单独使用一条语句为变量复制 print @n print @n --通过set赋值与select复制的区别 select @n ...
- 简单的C#实体映射 AutoMapper
AutoMapper是对象到对象的映射工具.在完成映射规则之后,AutoMapper可以将源对象转换为目标对象. 要映射实体 public class SourceModel { public int ...
- linux杀毒软件ClamAV的安装使用
1.安装依赖环境 yum install -y zlib openssl-devel yum groupinstall -y "Development Tools" apt ins ...
- php微信h5支付超简单!!!
本示例应用于tp3.2版本 不懂私聊我QQ:1195989301 请备注来意! 代码链接 请点击下载 密码: ekd4 不喜欢打字望谅解.....
- Jquery消息提示插件toastr使用详解
toastr是一个基于jQuery简单.漂亮的消息提示插件,使用简单.方便,可以根据设置的超时时间自动消失. 1.使用很简单,首选引入toastr的js.css文件 html <script s ...
- 闲谈2-sat问题
问题简介 在计算机科学中,布尔可满足性问题(有时称为命题可满足性问题,缩写为SATISFIABILITY或SAT)是确定是否存在满足给定布尔公式的解释的问题.换句话说,它询问给定布尔公式的变量是否可以 ...
- 08 Django REST Framework 解决前后端分离项目中的跨域问题
01-安装模块 pip install django-cors-headers 02-添加到INSTALL_APPS中 INSTALLED_APPS = ( ... 'corsheaders', .. ...