Angular动画——路由动画及高阶动画函数
一、路由动画
路由动画需要在host元数据中指定触发器。动画注意不要过多,否则适得其反。
内容优先,引导用户去注意到某个内容。动画只是辅助手段。
定义一个进场动画,一个离场动画。
因为进场动画和离场动画用的特别频繁,有一个别名叫:enter和:leave。
import { trigger, state, transition, style, animate} from '@angular/animations';

export const slideToRight = trigger('routeAnim',[

    state('void',style({'position':'fixed','width':'100%','height':'100%'})),

    state('*',style({'position':'fixed','width':'100%','height':'80%'})),

    transition('void => *',[

        style({transform:'translateX(-100%)'}),

        animate('.5s ease-in-out', style({transform:'translateX(0)'}))

    ]),

    transition('* => void',[

        style({transform:'translateX(0)'}),

        animate('.5s ease-in-out', style({transform:'translateX(100%)'}))

    ]),

]);
在project-list中使用路由动画。
import { Component, OnInit , HostBinding } from "@angular/core";
import { MatDialog } from "@angular/material";
import { NewProjectComponent } from "../new-project/new-project.component";
import { InviteComponent } from '../invite/invite.component';
import { ConfirmDialogComponent } from '../../shared/confirm-dialog/confirm-dialog.component';
import {slideToRight} from '../../animate/router.animate'
@Component({
selector: "app-project-list",
templateUrl: "./project-list.component.html",
styleUrls: ["./project-list.component.scss"],
animations:[
slideToRight
]
})
export class ProjectListComponent implements OnInit {
@HostBinding('@routeAnim') state;
projects = [
{
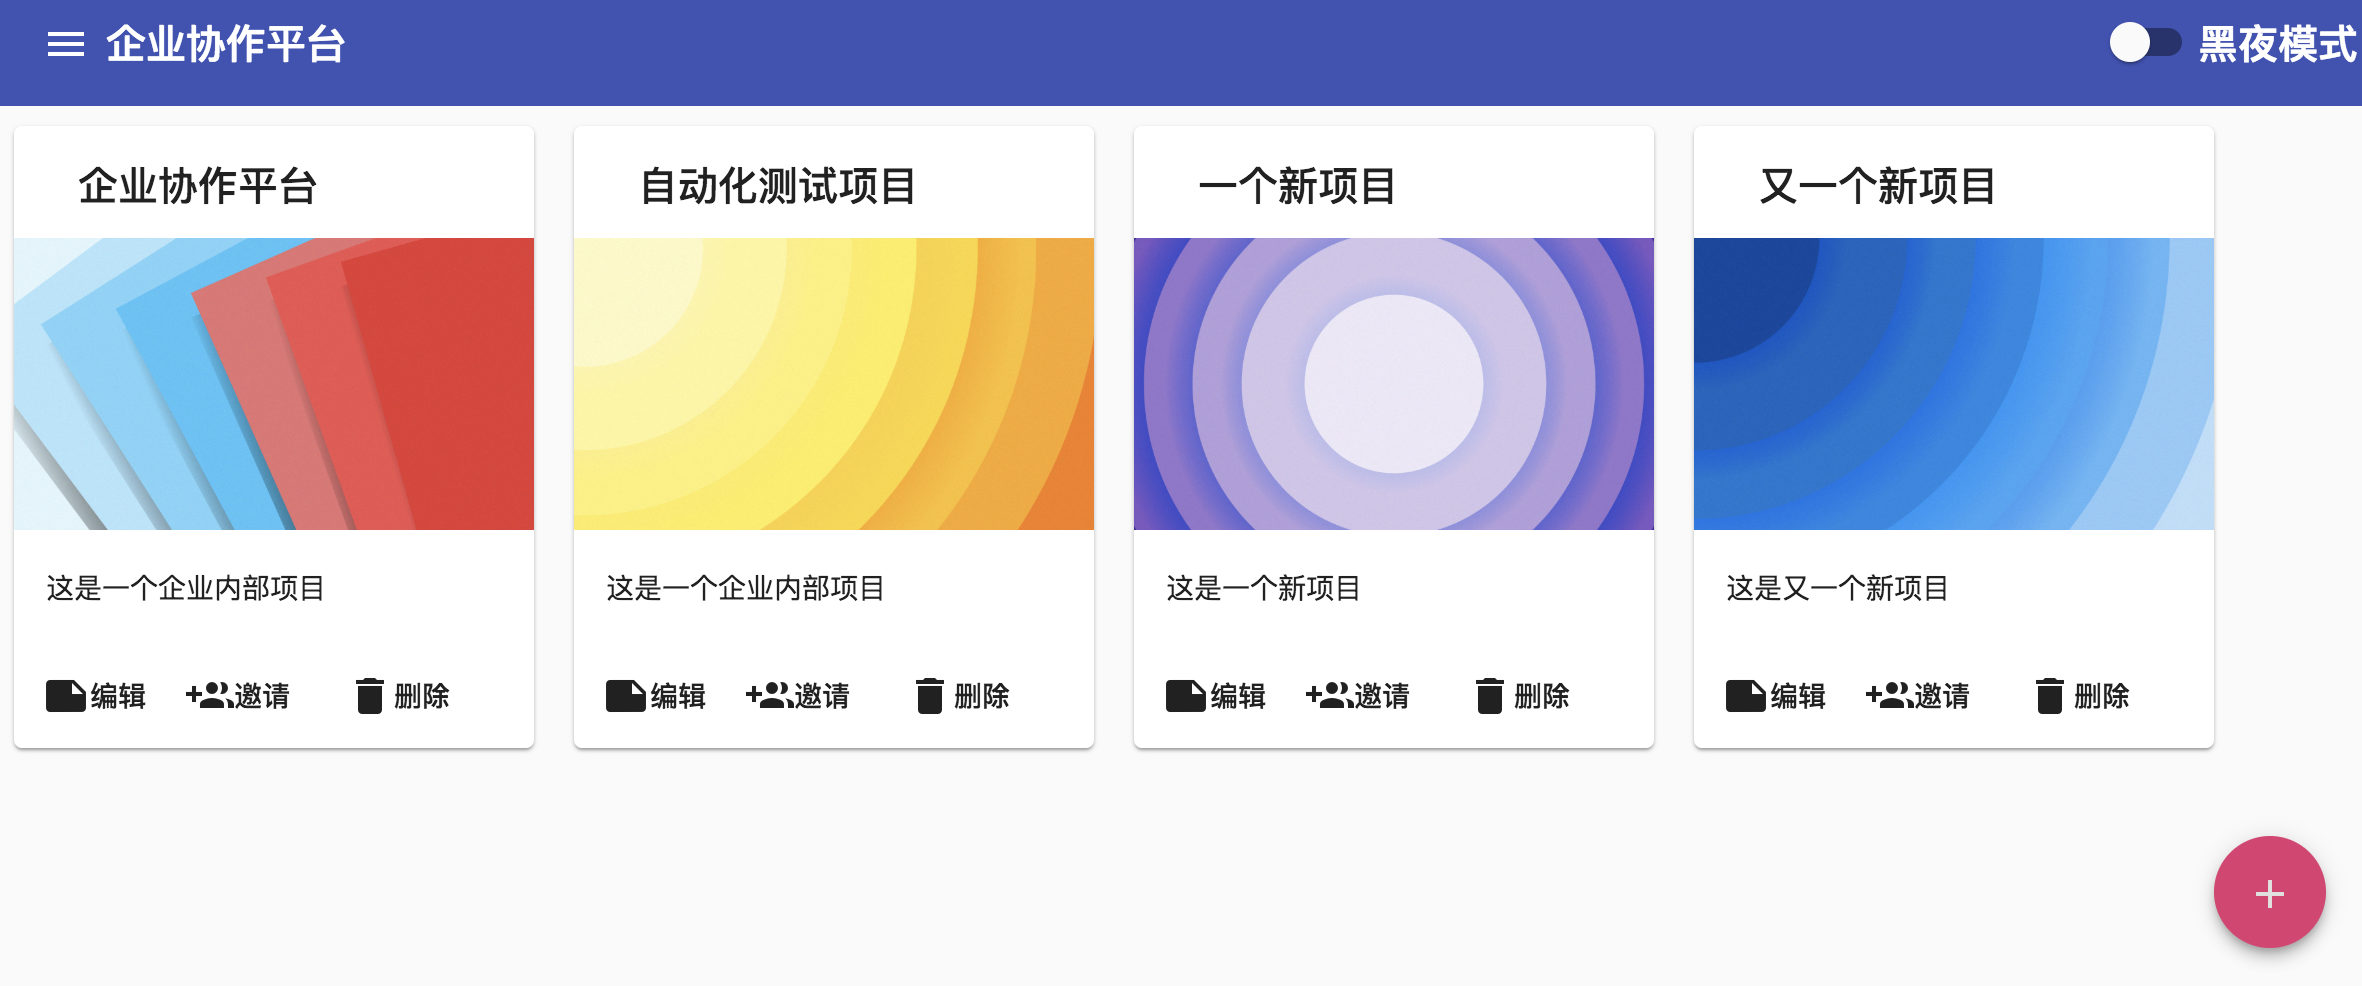
name: "企业协作平台",
desc: "这是一个企业内部项目",
coverImg: "assets/images/covers/0.jpg"
},
{
name: "自动化测试项目",
desc: "这是一个企业内部项目",
coverImg: "assets/images/covers/2.jpg"
}
];
constructor(private dialog: MatDialog) { }
ngOnInit() { }
openNewProjectDialog() {
// this.dialog.open(NewProjectComponent,{data:'this is a dialog'});
const dialogRef = this.dialog.open(NewProjectComponent, {
data: { title: '新建项目' }
});
dialogRef.afterClosed().subscribe((result) => {
console.log(result);
});
}
lauchInviteDialog() {
const dialogRef = this.dialog.open(InviteComponent);
}
lauchUpdateDialog() {
const dialogRef = this.dialog.open(NewProjectComponent, {
data: { title: '编辑项目' }
});
}
lauchConfimDialog() {
const dialogRef = this.dialog.open(ConfirmDialogComponent, {
data: { title: '编辑项目', content: '您确认删除该项目吗?' }
});
}
}
在task-home中使用路由动画。
import { Component, OnInit , HostBinding } from "@angular/core";

import { NewTaskComponent } from "../new-task/new-task.component";

import { MatDialog } from "@angular/material";

import { CopyTaskComponent } from "../copy-task/copy-task.component";

import { ConfirmDialogComponent } from "../../shared/confirm-dialog/confirm-dialog.component";

import { NewTaskListComponent } from "../new-task-list/new-task-list.component";

import {slideToRight} from '../../animate/router.animate';

@Component({

  selector: "app-task-home",

  templateUrl: "./task-home.component.html",

  styleUrls: ["./task-home.component.scss"],

  animations:[

    slideToRight

  ]

})

export class TaskHomeComponent implements OnInit {

  constructor(private dialog: MatDialog) {}

  @HostBinding('@routeAnim') state;

  ngOnInit() {}

  launchNewTaskDialog() {

    // this.dialog.open(NewTaskComponent);

    const dialogRef = this.dialog.open(NewTaskComponent, {

      data: { title: "新建任务" }

    });

  }

  lauchCopyTaskDialog() {

    const dialogRef = this.dialog.open(CopyTaskComponent, {

      data: { lists: this.lists }

    });

  }

  launchUpdateTaskDialog(task) {

    const dialogRef = this.dialog.open(NewTaskComponent, {

      data: { title: "修改任务", task: task }

    });

  }

  launchConfirmDialog() {

    const dialogRef = this.dialog.open(ConfirmDialogComponent, {

      data: { title: "删除任务列表", content: "您确定要删除该任务列表吗?" }

    });

  }

  launchEditListDialog() {

    const dialogRef = this.dialog.open(NewTaskListComponent, {

      data: { title: "更改列表名称" }

    });

    dialogRef.afterClosed().subscribe(result => console.log(result));

  }

  launchNewListDialog() {

    const dialogRef = this.dialog.open(NewTaskListComponent, {

      data: { title: "新建列表名称" }

    });

    dialogRef.afterClosed().subscribe(result => console.log(result));

  }

  lists = [

    {

      id: ,

      name: "待办",

      tasks: [

        {

          id: ,

          desc: "任务一: 去星巴克买咖啡",

          completed: true,

          priority: ,

          owner: {

            id: ,

            name: "张三",

            avatar: "avatars:svg-11"

          },

          dueDate: new Date(),

          reminder: new Date()

        },

        {

          id: ,

          desc: "任务一: 完成老板布置的PPT作业",

          completed: false,

          priority: ,

          owner: {

            id: ,

            name: "李四",

            avatar: "avatars:svg-12"

          },

          dueDate: new Date()

        }

      ]

    },

    {

      id: ,

      name: "进行中",

      tasks: [

        {

          id: ,

          desc: "任务三: 项目代码评审",

          completed: false,

          priority: ,

          owner: {

            id: ,

            name: "王五",

            avatar: "avatars:svg-13"

          },

          dueDate: new Date()

        },

        {

          id: ,

          desc: "任务一: 制定项目计划",

          completed: false,

          priority: ,

          owner: {

            id: ,

            name: "李四",

            avatar: "avatars:svg-12"

          },

          dueDate: new Date()

        }

      ]

    }

  ];

}
定义路由
  <mat-list-item [routerLink]="['/project']">

    <mat-icon mat-list-icon svgIcon="projects"></mat-icon>

    <h4 mat-line>项目首页</h4>

    <p mat-line mat-subheader> 查看您的所有项目</p>

  </mat-list-item>

  <mat-list-item [routerLink]="['/task']">

    <mat-icon mat-list-icon svgIcon="projects"></mat-icon>

    <h4 mat-line>任务首页</h4>

    <p mat-line mat-subheader> 查看您的所有项目</p>

  </mat-list-item>
注意:一定要用HostBinding形式。
二、Group
用于同时进行一组动画变换
group([animate(...),animate(...)...])接收一个数组,数组里写多个动画。
import { trigger, state, transition, style, animate, group} from '@angular/animations';

export const slideToRight = trigger('routeAnim',[

    state('void',style({'position':'fixed','width':'100%','height':'80%'})),

    state('*',style({'position':'fixed','width':'100%','height':'80%'})),

    transition(':enter',[

        style({transform:'translateX(-100%)',opacity:''}),

        group([

            animate('.5s ease-in-out', style({transform:'translateX(0)'})),

            animate('.3s ease-in', style({opacity:}))

        ])

    ]),

    transition(':leave',[

        style({transform:'translateX(0)',opacity:''}),

        group([

            animate('.5s ease-in-out', style({transform:'translateX(100%)'})),

            animate('.3s ease-in', style({opacity:}))

        ])

    ]),

]);
三、Query & Stagger
Query用于父节点寻找子节点,把动画应用到选中元素。非常强大。
Stagger指定有多个满足Query的元素,每个的动画之间有间隔。
做一个示例:新建的时候同时新建2个项目,两个新建出的项目的动画依次产生,第一个完成后才开始第二个。
建立list.animate.ts
进场动画,先隐藏起来,通过stagger间隔1000s做一个1s的动画。
import { trigger, state, transition, style, animate, query, animation,stagger} from '@angular/animations';

export const listAnimation = trigger('listAnim', [

    transition('* => *', [

      query(':enter', style({opacity: }), { optional: true }), //加入optional为true,后面的状态动画都是可选的

      query(':enter', stagger(, [

        animate('1s', style({opacity: }))

      ]), { optional: true }),

      query(':leave', style({opacity: }), { optional: true }),

      query(':leave', stagger(, [

        animate('1s', style({opacity: }))

      ]), { optional: true })

    ])

  ]);
在project_list中使用
应用query动画一般都是跟*ngFor在一起的,需要外面套一层div。
<div class="container" [@listAnim]="projects.length">

  <app-project-item *ngFor="let project of projects" [item]="project"

  class="card"

  (onInvite)="lauchInviteDialog()"

  (onEdit)="lauchUpdateDialog()"

  (onDelete)="lauchConfimDialog(project)">

  </app-project-item>

</div>

<button class="ab-buttonmad-fab fab-button" mat-fab type="button" (click)="openNewProjectDialog()">

  <mat-icon>add</mat-icon>

</button>
修改对应的css
// :host{

//     display: flex;

//     flex-direction: row;

//     flex-wrap: wrap;

// }

//把host改为div

.container{

    display: flex;

    flex-direction: row;

    flex-wrap: wrap;

}
修改一下component
import { Component, OnInit , HostBinding } from "@angular/core";

import { MatDialog } from "@angular/material";

import { NewProjectComponent } from "../new-project/new-project.component";

import { InviteComponent } from '../invite/invite.component';

import { ConfirmDialogComponent } from '../../shared/confirm-dialog/confirm-dialog.component';

import {slideToRight} from '../../animate/router.animate'

import { listAnimation } from '../../animate/list.animate';

import { projection } from '@angular/core/src/render3';

@Component({

  selector: "app-project-list",

  templateUrl: "./project-list.component.html",

  styleUrls: ["./project-list.component.scss"],

  animations:[

    slideToRight,listAnimation  //第一步,导入listAnimation

  ]

})

export class ProjectListComponent implements OnInit {

  @HostBinding('@routeAnim') state;

  //第二步,改造一下数组,加id

  projects = [

    {

      id:,

      name: "企业协作平台",

      desc: "这是一个企业内部项目",

      coverImg: "assets/images/covers/0.jpg"

    },

    {

      id:,

      name: "自动化测试项目",

      desc: "这是一个企业内部项目",

      coverImg: "assets/images/covers/2.jpg"

    }

  ];

  constructor(private dialog: MatDialog) { }

  ngOnInit() { }

  //第三步,新增元素时hard code一下

  openNewProjectDialog() {

    // this.dialog.open(NewProjectComponent,{data:'this is a dialog'});

    const dialogRef = this.dialog.open(NewProjectComponent, {

      data: { title: '新建项目' }

    });

    dialogRef.afterClosed().subscribe((result) => {

      console.log(result);

      this.projects = [...this.projects,

        {id:,name:'一个新项目',desc:'这是一个新项目',coverImg:"assets/images/covers/3.jpg"},

        {id:,name:'又一个新项目',desc:'这是又一个新项目',coverImg:"assets/images/covers/4.jpg"}]

    });

  }

  lauchInviteDialog() {

    const dialogRef = this.dialog.open(InviteComponent);

  }

  lauchUpdateDialog() {

    const dialogRef = this.dialog.open(NewProjectComponent, {

      data: { title: '编辑项目' }

    });

  }

  //第四步,改造一下删除项目

  lauchConfimDialog(project) {

    const dialogRef = this.dialog.open(ConfirmDialogComponent, {

      data: { title: '删除项目', content: '您确认删除该项目吗?' }

    });

    dialogRef.afterClosed().subscribe(result=>{

      console.log(result);

      this.projects=this.projects.filter(p=>p.id!=project.id);

    });

  }

}
Stagger使得在多个元素时候,动画交错开,而不是一起。
Angular动画——路由动画及高阶动画函数的更多相关文章
- 函数高阶(函数,改变函数this指向,高阶函数,闭包,递归)
一.函数的定义方式 1.函数声明方式 function 关键字(命名函数) 2.函数表达式(匿名函数) 3.new Function( ) var fn = new Function(‘参数1 ...
- 从 ES6 高阶箭头函数理解函数柯里化
前言:第一次看到多个连续箭头函数是在一个 react 项目中,然鹅确认了下眼神,并不是对的人,因为看得一脸懵逼.em......于是开始各种搜索,先是知道了多个连续箭头函数就是 es6 的多次柯里化的 ...
- JS高阶---IIFE&&函数前加;
IIFE( 立即调用函数表达式)是一个在定义时就会立即执行的 JavaScript 函数. 全称为Immediately Invoked Function Expression 有时如果不加:会出现一 ...
- JS高阶---回调函数
1.什么函数是回调函数? 此时两者的执行并没有先后顺序 两个都是回调函数 满足三个特点就是回调 .定义了函数 .没有主动调用 .最后执行了 2.常见的回调函数有哪些? .DOM事件回调函数 .定时器回 ...
- Hive高阶聚合函数 GROUPING SETS、Cube、Rollup
-- GROUPING SETS作为GROUP BY的子句,允许开发人员在GROUP BY语句后面指定多个统计选项,可以简单理解为多条group by语句通过union all把查询结果聚合起来结合起 ...
- react_结合 redux - 高阶函数 - 高阶组件 - 前端、后台项目打包运行
Redux 独立的集中式状态管理 js 库 - 参见 My Git 不是 react 库,可以与 angular.vue 配合使用,通常和 react 用 yarn add redux import ...
- react高阶组件的一些运用
今天学习了react高阶组件,刚接触react学习起来还是比较困难,和大家分享一下今天学习的知识吧,另外缺少的地方欢迎补充哈哈 高阶组件(Higher Order Components,简称:HOC) ...
- Scheme 4 Javaer-3.高阶函数
1.3 Formulating Abstractions with Higher-Order Procedures 教材有时候依照学生的基础.从0讲起:有时候给出一个大图,然后具体地逐一介绍. 本文 ...
- 高阶组件(Higher-Order Components)
有时候人们很喜欢造一些名字很吓人的名词,让人一听这个名词就觉得自己不可能学会,从而让人望而却步.但是其实这些名词背后所代表的东西其实很简单. 我不能说高阶组件就是这么一个东西.但是它是一个概念上很简单 ...
随机推荐
- Event filter with query "SELECT * FROM __InstanceModi
Event filter with query "SELECT * FROM __InstanceModi 问题描述: Details -Event filter with quer ...
- 深入剖析Kubernetes学习笔记:容器基础(05-06)
05 :从进程说起 1.容器本身没有价值,有价值的是"容器编排" 2.什么是进程? 一旦"程序"被执行起来,它就从磁盘上的二进制文件,变成 1.计算机内存中的数 ...
- js 时间格式化 兼容safari 苹果手机
export function formatTime (fmt, date) { date = new Date(date + '+08:00') // 兼容safari var o = { 'M+' ...
- linux_systemctl介绍
声明:本文转载自:systemd (中文简体) systemd 是 Linux 下的一款系统和服务管理器,兼容 SysV 和 LSB 的启动脚本.systemd 的特性有:支持并行化任务:同一时候採用 ...
- java连接jdbc
package com.dy.util; import java.sql.Connection; import java.sql.DriverManager; import java.sql.SQLE ...
- java(12)字符串
一.字符串概述 1.1如何使用字符串 1)定义并初始化字符串 2)使用字符串,对字符串进行一些处理 1.2字符串的长度 语法: 字符串1.length(); -->返回字符串1的长度 publ ...
- 移动端1px问题处理方法
在做移动端开发时,设计师提供的视觉稿一般是750px,当你定义 border-width:1px 时,在iphone6手机上却发现:边框变粗了.. 这是因为,1px是相对于750px的(物理像素),而 ...
- luogu P5324 [BJOI2019]删数
传送门 不如先考虑暴力,能删的序列首先有\(1,2,3...n\),还有就是升序排序后从后往前放数,第\(i\)位要么放\(i\),要么放\(i+1\)位置的数,例如\(1,2,4,4,5,6,9,9 ...
- hdu5974 A Simple Math Problem(数学)
题目链接 大意:给你两个数X,YX,YX,Y,让你找两个数a,ba,ba,b,满足a+b=X,lcm(a,b)=Ya+b=X,lcm(a,b)=Ya+b=X,lcm(a,b)=Y. 思路:枚举gcd( ...
- node的应用场景
I/O密集型 I/O密集的优势主要在于Node利用事件循环的处理能力,而不是启动每一个线程为每一个请求服务,资源占用极少. 是否不擅长CPU密集型业务 换一个角度,在CPU密集的应用场景中,Node是 ...