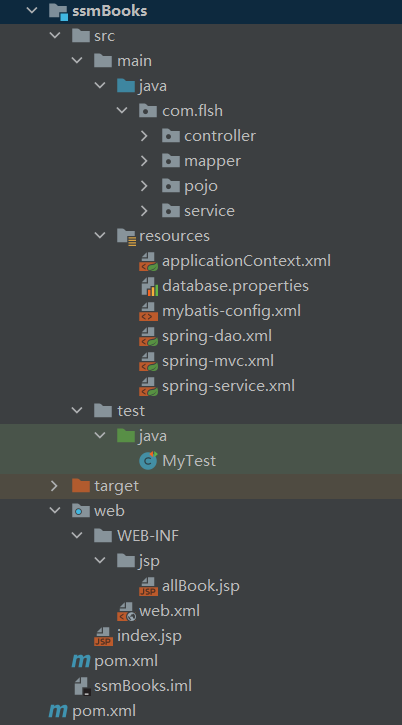
用maven创建ssm框架样版

在pom.xml中添加依赖包
特别要注意导入的"org.springframework"的版本,不兼容会报错
<!--依赖:junit ,数据库驱动,连接池,servlet,jsp,mybatis,mybatis-spring,spring-->

    <dependencies>

        <!--Junit-->

        <dependency>

            <groupId>junit</groupId>

            <artifactId>junit</artifactId>

            <version>4.12</version>

        </dependency>

        <!--数据库驱动-->

        <dependency>

            <groupId>mysql</groupId>

            <artifactId>mysql-connector-java</artifactId>

            <version>8.0.24</version>

        </dependency>

        <!-- 数据库连接池 -->

        <dependency>

            <groupId>com.mchange</groupId>

            <artifactId>c3p0</artifactId>

            <version>0.9.5.5</version>

        </dependency>

        <!--Servlet - JSP -->

        <dependency>

            <groupId>javax.servlet</groupId>

            <artifactId>servlet-api</artifactId>

            <version>2.5</version>

        </dependency>

        <dependency>

            <groupId>javax.servlet.jsp</groupId>

            <artifactId>jsp-api</artifactId>

            <version>2.2</version>

        </dependency>

        <dependency>

            <groupId>javax.servlet</groupId>

            <artifactId>jstl</artifactId>

            <version>1.2</version>

        </dependency>

        <!--Mybatis-->

        <dependency>

            <groupId>org.mybatis</groupId>

            <artifactId>mybatis</artifactId>

            <version>3.5.7</version>

        </dependency>

        <dependency>

            <groupId>org.mybatis</groupId>

            <artifactId>mybatis-spring</artifactId>

            <version>2.0.6</version>

        </dependency>

        <!--Spring-->

<!--        <dependency>-->

<!--            <groupId>org.springframework</groupId>-->

<!--            <artifactId>spring-webmvc</artifactId>-->

<!--            <version>5.3.13</version>-->

<!--        </dependency>-->

        <dependency>

            <groupId>org.springframework</groupId>

            <artifactId>spring-jdbc</artifactId>

            <version>5.3.13</version>

        </dependency>

<!--springMVC-->

        <dependency>

            <groupId>org.springframework</groupId>

            <artifactId>spring-webmvc</artifactId>

            <version>5.1.9.RELEASE</version>

        </dependency>

        <!--lombok-->

        <dependency>

            <groupId>org.projectlombok</groupId>

            <artifactId>lombok</artifactId>

            <version>1.18.22</version>

        </dependency>

        <!--横切-->

        <dependency>

            <groupId>org.aspectj</groupId>

            <artifactId>aspectjweaver</artifactId>

            <version>1.9.9</version>

        </dependency>

    </dependencies>

    <!--静态资源导出问题-->

    <build>

        <resources>

            <resource>

                <directory>src/main/java</directory>

                <includes>

                    <include>**/*.properties</include>

                    <include>**/*.xml</include>

                </includes>

                <filtering>false</filtering>

            </resource>

            <resource>

                <directory>src/main/resources</directory>

                <includes>

                    <include>**/*.properties</include>

                    <include>**/*.xml</include>

                </includes>

                <filtering>false</filtering>

            </resource>

        </resources>

    </build>
创建applicationContext.xml上下文的配置文件(用于连接其他配置的)
<?xml version="1.0" encoding="UTF-8"?>

<beans xmlns="http://www.springframework.org/schema/beans"

       xmlns:xsi="http://www.w3.org/2001/XMLSchema-instance"

       xsi:schemaLocation="http://www.springframework.org/schema/beans

        http://www.springframework.org/schema/beans/spring-beans.xsd">

    <import resource="classpath:spring-dao.xml"/>

    <import resource="classpath:spring-service.xml"/>

    <import resource="classpath:spring-mvc.xml"/>

</beans>
创建database.properties(用于配置连接数据库的信息)
jdbc.driver=com.mysql.cj.jdbc.Driver

jdbc.url=jdbc:mysql://localhost:3306/ssmbuild?\

  useSSL=true&useUnicode=true&characterEncoding=utf8

jdbc.username=root

jdbc.password=a1814995041
创建spring-dao.xml(用于连接数据库连接池与DAO中配置)
<?xml version="1.0" encoding="UTF-8"?>

<beans xmlns="http://www.springframework.org/schema/beans"

       xmlns:xsi="http://www.w3.org/2001/XMLSchema-instance"

       xmlns:context="http://www.springframework.org/schema/context"

       xsi:schemaLocation="http://www.springframework.org/schema/beans

       http://www.springframework.org/schema/beans/spring-beans.xsd

       http://www.springframework.org/schema/context

       https://www.springframework.org/schema/context/spring-context.xsd">

    <!-- 配置整合mybatis -->

    <!-- 1.关联数据库文件 -->

    <context:property-placeholder location="classpath:database.properties"/>

    <!-- 2.数据库连接池 -->

    <!--数据库连接池-->

    <bean id="dataSource" class="com.mchange.v2.c3p0.ComboPooledDataSource">

        <!-- 配置连接池属性 -->

        <property name="driverClass" value="${jdbc.driver}"/>

        <property name="jdbcUrl" value="${jdbc.url}"/>

        <property name="user" value="${jdbc.username}"/>

        <property name="password" value="${jdbc.password}"/>

        <!-- c3p0连接池的私有属性 -->

        <property name="maxPoolSize" value="30"/>

        <property name="minPoolSize" value="10"/>

        <!-- 关闭连接后不自动commit -->

        <property name="autoCommitOnClose" value="false"/>

        <!-- 获取连接超时时间 -->

        <property name="checkoutTimeout" value="10000"/>

        <!-- 当获取连接失败重试次数 -->

        <property name="acquireRetryAttempts" value="2"/>

    </bean>

    <!-- 3.配置SqlSessionFactory对象 -->

    <bean id="sqlSessionFactory" class="org.mybatis.spring.SqlSessionFactoryBean">

        <!-- 注入数据库连接池 -->

        <property name="dataSource" ref="dataSource"/>

        <!-- 配置MyBaties全局配置文件:mybatis-config.xml -->

        <property name="configLocation" value="classpath:mybatis-config.xml"/>

    </bean>

    <!-- 4.配置扫描Dao接口包,动态实现Dao接口注入到spring容器中 -->

    <!--解释 :https://www.cnblogs.com/jpfss/p/7799806.html-->

    <bean class="org.mybatis.spring.mapper.MapperScannerConfigurer">

        <!-- 注入sqlSessionFactory -->

        <property name="sqlSessionFactoryBeanName" value="sqlSessionFactory"/>

        <!-- 给出需要扫描Dao接口包 -->

        <property name="basePackage" value="com.flsh.mapper"/>

    </bean>

</beans>
创建spring-mvc.xml(用于配置controller层的视图的配置)
<?xml version="1.0" encoding="UTF-8"?>

<beans xmlns="http://www.springframework.org/schema/beans"

       xmlns:xsi="http://www.w3.org/2001/XMLSchema-instance"

       xmlns:context="http://www.springframework.org/schema/context"

       xmlns:mvc="http://www.springframework.org/schema/mvc"

       xsi:schemaLocation="http://www.springframework.org/schema/beans

   http://www.springframework.org/schema/beans/spring-beans.xsd

   http://www.springframework.org/schema/context

   http://www.springframework.org/schema/context/spring-context.xsd

   http://www.springframework.org/schema/mvc

   https://www.springframework.org/schema/mvc/spring-mvc.xsd">

<!--    1.注解驱动-->

    <mvc:annotation-driven/>

<!--    2.静态资源过滤-->

    <mvc:default-servlet-handler/>

<!--    3.扫描包:controller-->

    <context:component-scan base-package="com.flsh.controller"/>

<!--    4.视图解析器-->

    <bean class="org.springframework.web.servlet.view.InternalResourceViewResolver">

        <property name="prefix" value="/WEB-INF/jsp"/>

        <property name="suffix" value=".jsp"/>

    </bean>

</beans>
创建spring-service.xml(用于注入属性)
<?xml version="1.0" encoding="UTF-8"?>

<beans xmlns="http://www.springframework.org/schema/beans"

       xmlns:xsi="http://www.w3.org/2001/XMLSchema-instance"

       xmlns:context="http://www.springframework.org/schema/context"

       xsi:schemaLocation="http://www.springframework.org/schema/beans

        http://www.springframework.org/schema/beans/spring-beans.xsd http://www.springframework.org/schema/context https://www.springframework.org/schema/context/spring-context.xsd">

    <context:component-scan base-package="com.flsh.service"/>

    <bean id="BookServiceImpl" class="com.flsh.service.BookServiceImpl">

        <property name="bookMapper" ref="bookMapper"/>

    </bean>

    <!-- 配置事务管理器 -->

    <bean id="transactionManager" class="org.springframework.jdbc.datasource.DataSourceTransactionManager">

        <!-- 注入数据库连接池 -->

        <property name="dataSource" ref="dataSource"/>

    </bean>

</beans>
创建mybatis-config.xml(用于配置mapper的)
<?xml version="1.0" encoding="UTF-8" ?>

<!DOCTYPE configuration

        PUBLIC "-//mybatis.org//DTD Config 3.0//EN"

        "http://mybatis.org/dtd/mybatis-3-config.dtd">

<configuration>

<settings>

    <setting name="logImpl" value="STDOUT_LOGGING"/>

</settings>

<!--配置数据源,这里交给spring去做-->

<!--起别名-->

<typeAliases>

    <package name="com.flsh.pojo"/>

</typeAliases>
<!--每有一个mapper都要配置-->

 <mappers>
  <mapper class="com.flsh.mapper.BookMapper"></mapper>
 </mappers>
</configuration>
web.xml中添加
 <!--乱码过滤-->
    <filter>
        <filter-name>encodingFilter</filter-name>
        <filter-class>
            org.springframework.web.filter.CharacterEncodingFilter
        </filter-class>
        <init-param>
            <param-name>encoding</param-name>
            <param-value>utf-8</param-value>
        </init-param>
    </filter>
    <filter-mapping>
        <filter-name>encodingFilter</filter-name>
        <url-pattern>/*</url-pattern>
    </filter-mapping>

    <servlet>
        <servlet-name>springmvc</servlet-name>
        <servlet-class>org.springframework.web.servlet.DispatcherServlet</servlet-class>
        <init-param>
            <param-name>contextConfigLocation</param-name>
            <param-value>classpath:applicationContext.xml</param-value>
        </init-param>
        <load-on-startup>1</load-on-startup>
    </servlet>
    <servlet-mapping>
        <servlet-name>springmvc</servlet-name>
        <url-pattern>/</url-pattern>
    </servlet-mapping>

    <!--Session过期时间-->
    <session-config>
        <session-timeout>15</session-timeout>
    </session-config>
</web-app>
用maven创建ssm框架样版的更多相关文章
- Maven项目搭建(二):Maven搭建SSM框架
上一章给大家讲解了如何使用Maven搭建web项目. 这次给大家介绍一下怎么使用Maven搭建SSM框架项目. 首先我们来看一下pom.xml的属性介绍: project: pom的xml根元素. p ...
- 【原】无脑操作:eclipse + maven搭建SSM框架
网上看到一些Spring + Spring MVC + MyBatis框架的搭建教程,不是很详细或是时间久远了,自己动手整一个简单无脑的! 0.系统环境 1)Windows 10 企业版 2)JDK ...
- 基于maven的ssm框架整合
基于maven的ssm框架整合 第一步:通过maven建立一个web项目. 第二步:pom文件导入jar包 (1 ...
- Eclipse中使用Maven搭建SSM框架
Eclipse中不使用Maven搭建SSM框架:https://www.cnblogs.com/xuyiqing/p/9569459.html IDEA中使用Maven搭建SSM框架:https:// ...
- eclipse + maven搭建SSM框架
0.系统环境 1)Windows 10 企业版 2)JDK 1.8.0_131 3)Eclipse Java EE IDE for Web Developers Version: Neon.3 Re ...
- 使用maven搭建ssm框架的javaweb项目
目前主流的javaweb项目,常会用到ssm(Spring+Spring MVC+Mybatis)框架来搭建项目的主体框架,本篇介绍搭建SSM框架的maven项目的实施流程.记之共享! 一.SSM框架 ...
- 使用maven搭建SSM框架
使用maven搭建SSM框架,首先得准备好maven环境. 搭建maven环境 第一步:下载maven http://maven.apache.org/download.cgi 下载后解压就可以了. ...
- 使用Maven搭建SSM框架(Eclipse)
今天学习一下使用Maven搭建SSM框架,以前都是用别人配置好的框架写代码,今天试试自己配置一下SSM框架. 这里我的参数是Windows7 64位,tomcat9,eclipse-jee-neon- ...
- 使用maven搭建ssm框架环境
1.前言 因为经常换环境,在搭ssm框架的时候老是出错,所以记录一下最近搭建的环境,以供参考. 本文讲解如何使用maven搭建ssm框架,并能用于简单的登录注册. IDE:IDEA,JDK版本:1.8 ...
随机推荐
- Linux系统sed命令常用参数实战
Linux系统sed命令常用参数实战 常用参数 -n 输出某行的文本内容,通常与p联合使用, -e 命令行模式下进行sed的动作编辑,输出编辑后的内容,源文件不会发生变化 -f 以命令中指定的scri ...
- Redis初启(一)
1.数据库存存储性能优化 在mysql的文章专题中我写过了关于传统关系型数据库的一些优化思路,整体来说,通过优化之后能够提升程序访问数据库的计算性能.但是还是有一些情况,即便是优化之后,使用传统关系型 ...
- 开发工具-PowerShell下载地址
更新日志 2022年6月10日 初始化链接. https://github.com/PowerShell/PowerShell/releases/
- 表达式的动态解析和计算,Flee用起来真香
前言 在很多项目中经常会出现需要动态解析表达式和计算的场景,比如一些自动审核规则,或者是一些变量的值通过维护的公式在运行过程中动态算出:由于场景需求,都需要比较灵活的配置对应的表达式,然后希望在需要的 ...
- 关于webstorm打开HTML文件出现404错误的情况
第一种情况是你的端口号错误.你可以到设置里面找到调试器(第四个可以展开的按钮里面),找到端口号,把端口号改成8080(默认),再勾选旁边的按钮(可以接受外部链接). 你的文件命名方式不对,最好的文件名 ...
- SAP OLE download to excel
REPORT RSDEMO01 NO STANDARD PAGE HEADING. * this report demonstrates how to send some ABAP data to a ...
- WPF开发随笔收录-ScrollViewer滑块太小解决方案
一.前言 在WPF开发过程中,ScrollViewer是一个很常使用到的控件,在自己工作的项目中,收到一个反馈就是当ScrollViewer里面的内容太长时,滚动条的滑块就会变得很小,然后导致点击起来 ...
- 机械硬盘和ssd固态硬盘的原理对比分析
固态硬盘和机械硬盘的区别 机械硬盘 磁头是不是直接和盘片接触的呢 磁盘中有几个盘片 机械硬盘的工作原理 固态硬盘的寻址方式 SMR叠瓦式真的比PMR优秀吗 固态硬盘 主控芯片 闪存颗粒 缓存单元 固态 ...
- python线程池 ThreadPoolExecutor 的用法及实战
写在前面的话 (https://jq.qq.com/?_wv=1027&k=rX9CWKg4) 文章来源于互联网从Python3.2开始,标准库为我们提供了 concurrent.future ...
- 『现学现忘』Git后悔药 — 31、reset版本回退命令总结
目录 1.--soft回退说明 2.--mixed回退说明 3.--hard回退说明 4.总结 在Git中进行版本回退需要使用git reset命令. 以前面文章中的示例为例,当我准备在V4版本,回退 ...
