
图解CompletableFuture源码
前言
关于CompletableFuture源码解析部分,整体上感觉还是写比较难的,不过为了推广到团队还是要好好搞一下的,我还是希望大家看到这边文章能学到点什么,废话不多说开始吧。
属性部分
首先看属性部分,我觉得可以从全貌了解他的整体的数据结构,后续我们看到一些操作的时候,也不会产生疑问,算是一种先整体后部分的思想。
打开CompletableFuture源码以后我们首先看到是下面两个核心的关键属性result和stack,关于这两个属性也有核心的注释,result可能是返回的结果集,也可能是包装的AltResult,stack这个数据暴露出了CompletableFuture的整体的结构是一个栈。
    volatile Object result;       // Either the result or boxed AltResult
    volatile Completion stack;    // Top of Treiber stack of dependent actions
接下来我们看下Completion的情况,Completion是一个抽象类,分别实现了Runnable、AsynchronousCompletionTask接口,继承了ForkJoinPoolTask类,而ForJoinPoolTask抽象类又实现了Future接口,因此Completion实际上就是一个Future。
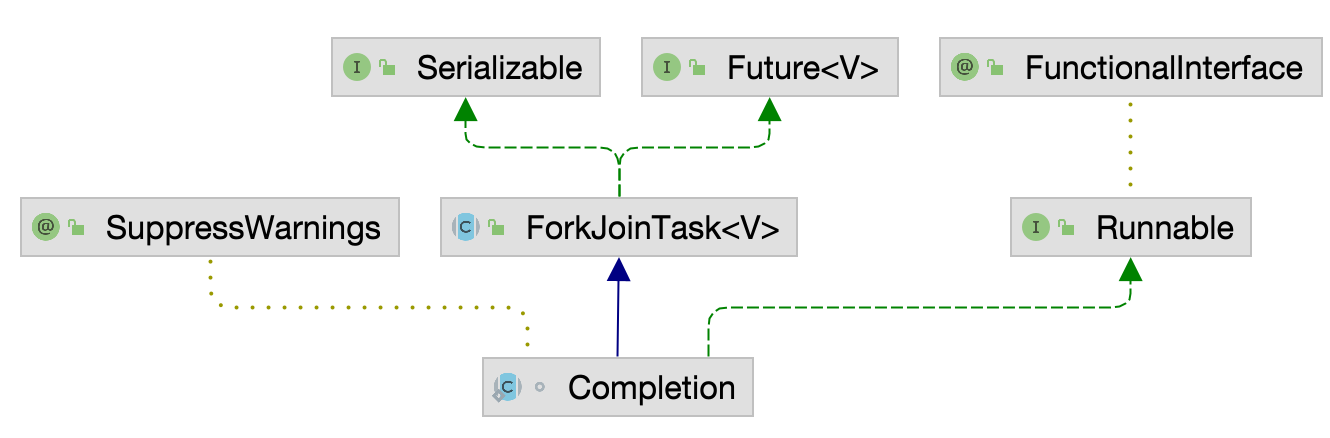
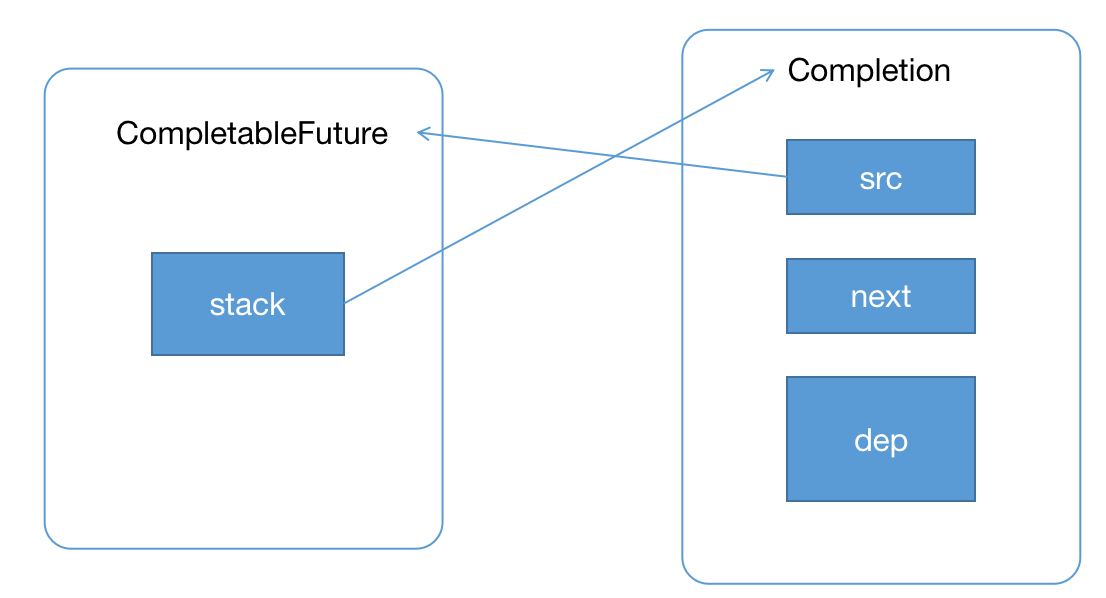
在Completion类中还有一个非常重要的成员属性,结合我们上面看到的CompletableFuture的stack属性,整好能验证CompletableFuture是一个链表的一个数据结构,Completion中的next保存了栈中下一个元素的引用,而CompletableFuture中的stack永远指向栈顶,至于是不是栈我们可以看下后续方法是如何操作的。
volatile Completion next;
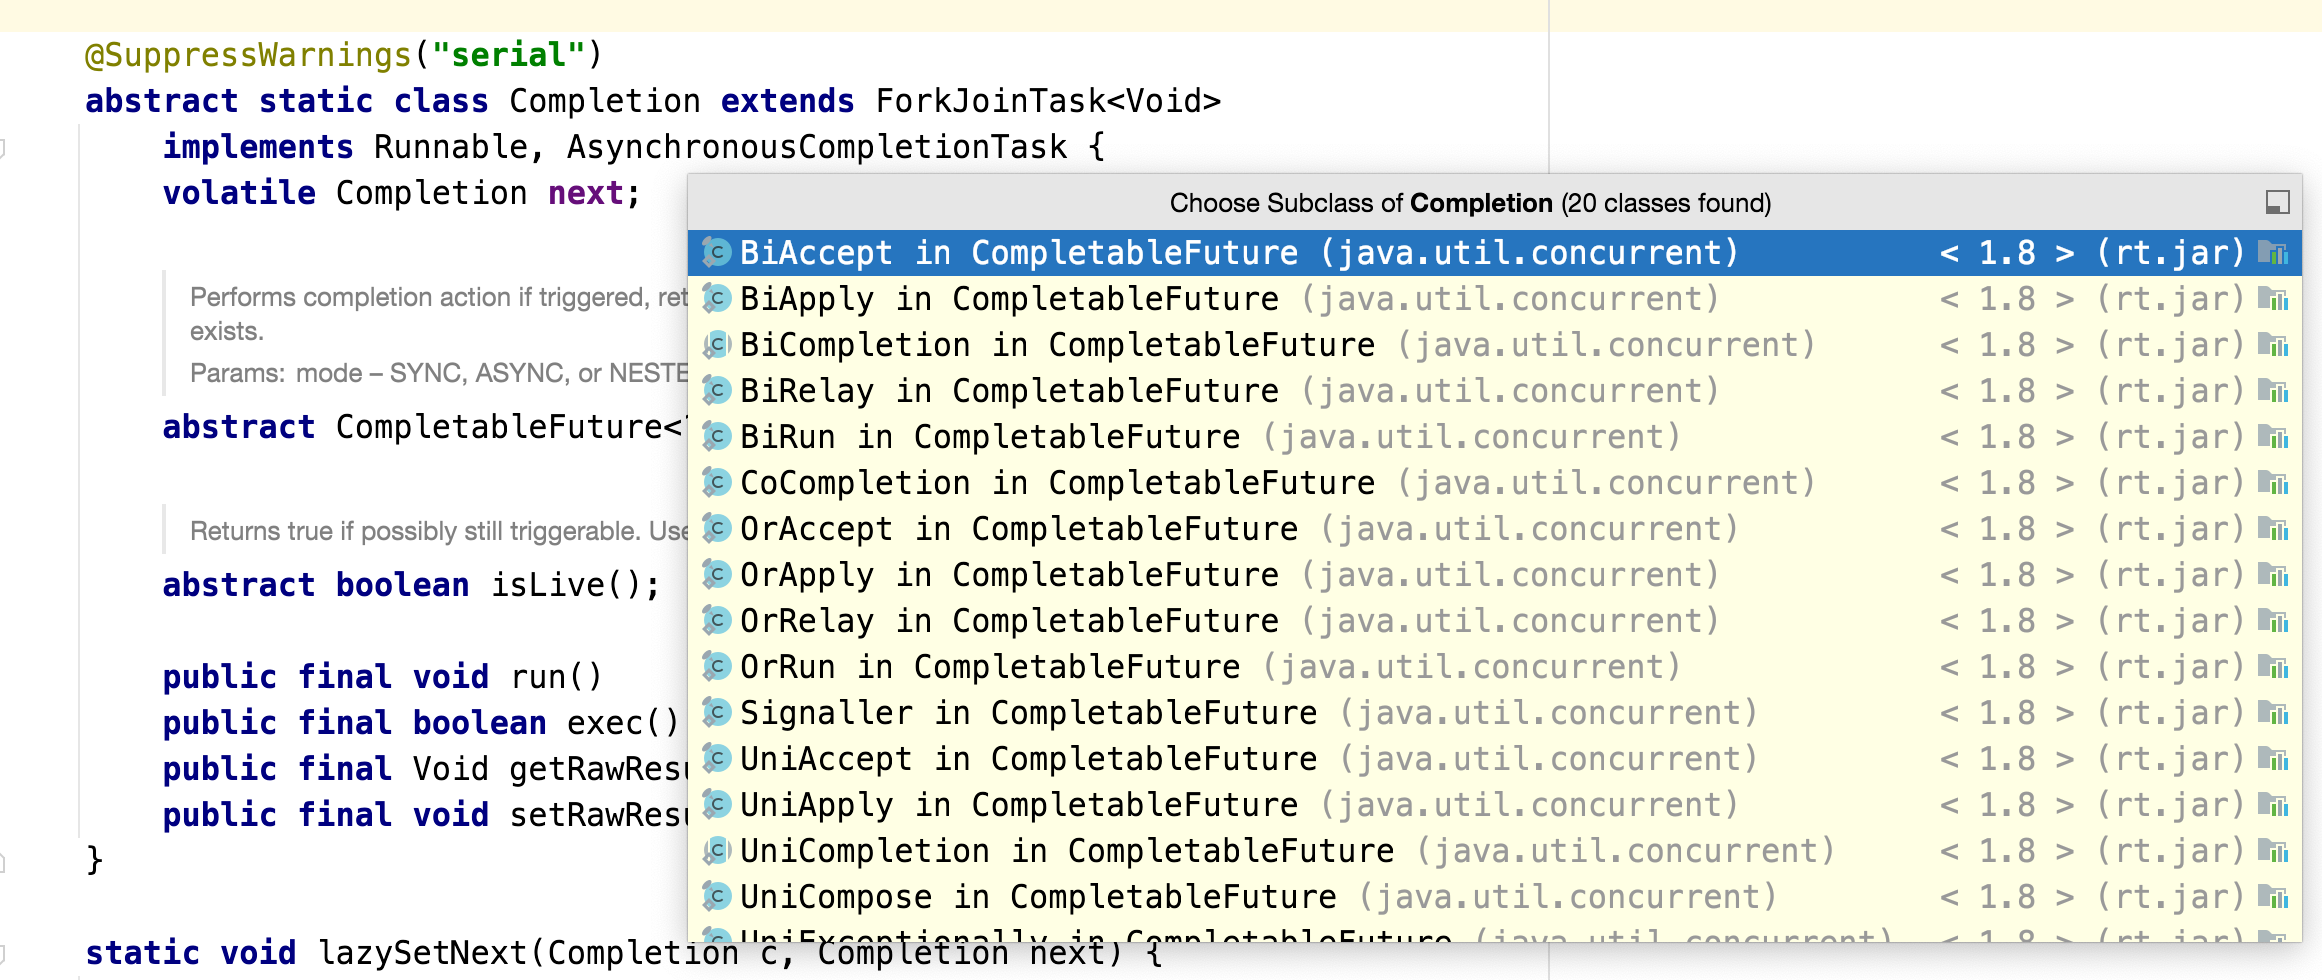
关于Completion类其实是一个抽象类,还有很多的实现,如下图,后续我们看到具体的实现的时候再来细化实现类。
核心方法源码解析
首先我们来看两个测试用例,
    @Test
    public void test1() throws ExecutionException, InterruptedException {
        CompletableFuture<String> base = new CompletableFuture<>();
        CompletableFuture<String> future = base.thenApply(s -> s + " 2").thenApply(s -> s + " 3");
        base.complete("1");
        System.out.println(future.get());
    }

    @Test
    public void test2() throws ExecutionException, InterruptedException {
        CompletableFuture<String> base = new CompletableFuture<>();
        CompletableFuture<String> future = base.thenApply(s -> s + " 2").thenApply(s -> s + " 3");
        future.complete("1");
        System.out.println(future.get());
    }
执行这两个测试用例以后,我们会发现最终的结果的是不一致的,这里base和future对象,分别调用complete()和get()方法的排列组合,最终导致结果就发生了变化,是不是很神奇,接下来我们就来看看thenApply相关源码部分。
thenApply
关于thenApply的使用,CompletableFuture提供了类似的三个方法,以Async结尾的表示异步执行,如果传入Executor则以指定线程池执行,否则默认使用的线程池是ForkJoinPool。
public <U> CompletableFuture<U> thenApply(
    Function<? super T,? extends U> fn) {
    return uniApplyStage(null, fn);
}

public <U> CompletableFuture<U> thenApplyAsync(
    Function<? super T,? extends U> fn) {
    return uniApplyStage(asyncPool, fn);
}

public <U> CompletableFuture<U> thenApplyAsync(
    Function<? super T,? extends U> fn, Executor executor) {
    return uniApplyStage(screenExecutor(executor), fn);
    }
我们重点关注的thenApply的方法,整体的源码如下:
    public <U> CompletableFuture<U> thenApply(
        Function<? super T,? extends U> fn) {
        return uniApplyStage(null, fn);
    }

    private <V> CompletableFuture<V> uniApplyStage(
        Executor e, Function<? super T,? extends V> f) {
        if (f == null) throw new NullPointerException();
        1.创建一个新的CompletableFuture对象
        CompletableFuture<V> d =  new CompletableFuture<V>();
        if (e != null || !d.uniApply(this, f, null)) {
            2. 构建UniApply e代表线程池 d 代表新的CompletableFuture this 代表当前
                f 代表方法 这个时候 UniApply 内部的所有的引用都处于为null的状态
            UniApply<T,V> c = new UniApply<T,V>(e, d, this, f);
            3. c其实就是Completion对象,被push到栈中
            push(c);
            4. 尝试执行c
            c.tryFire(SYNC);
        }
        5. 这个d会一直返回到调用thenApply的地方,后续的链式调用会作用在这个d上面
        return d;
    }

    @SuppressWarnings("serial")
    static final class UniApply<T,V> extends UniCompletion<T,V> {
        Function<? super T,? extends V> fn;
        UniApply(Executor executor, CompletableFuture<V> dep,
                 CompletableFuture<T> src,
                 Function<? super T,? extends V> fn) {
            2.1 向上执行
            super(executor, dep, src); this.fn = fn;
        }
    }

    abstract static class UniCompletion<T,V> extends Completion {
        Executor executor;                 // executor to use (null if none)
        CompletableFuture<V> dep;          // the dependent to complete
        CompletableFuture<T> src;          // source for action

        UniCompletion(Executor executor, CompletableFuture<V> dep,
                      CompletableFuture<T> src) {
            2.2 dep就是新创建的d  src就是当前的this
            this.executor = executor; this.dep = dep; this.src = src;
        }
    }
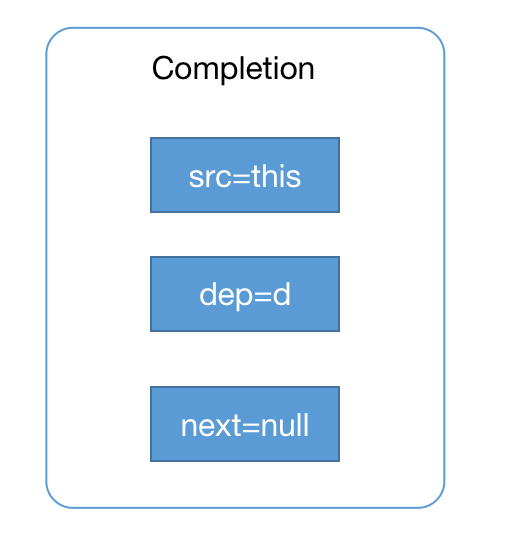
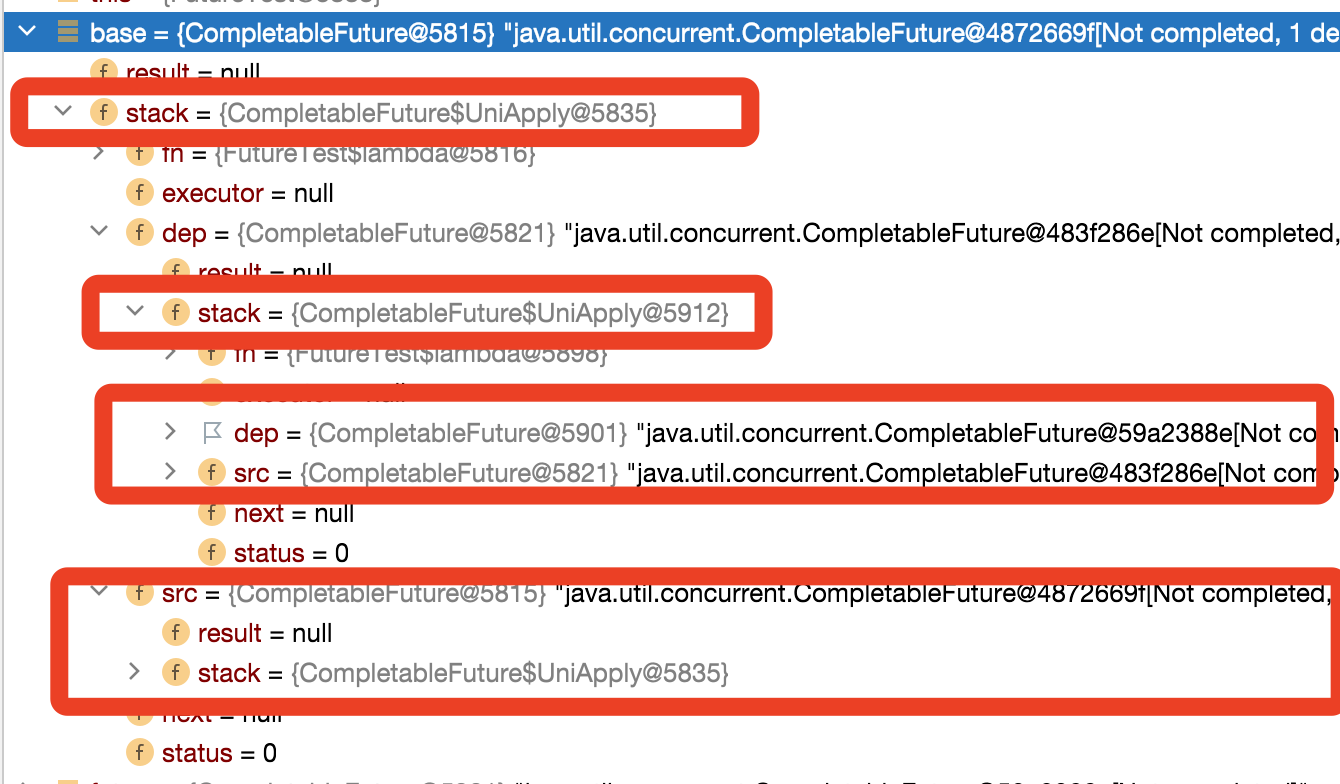
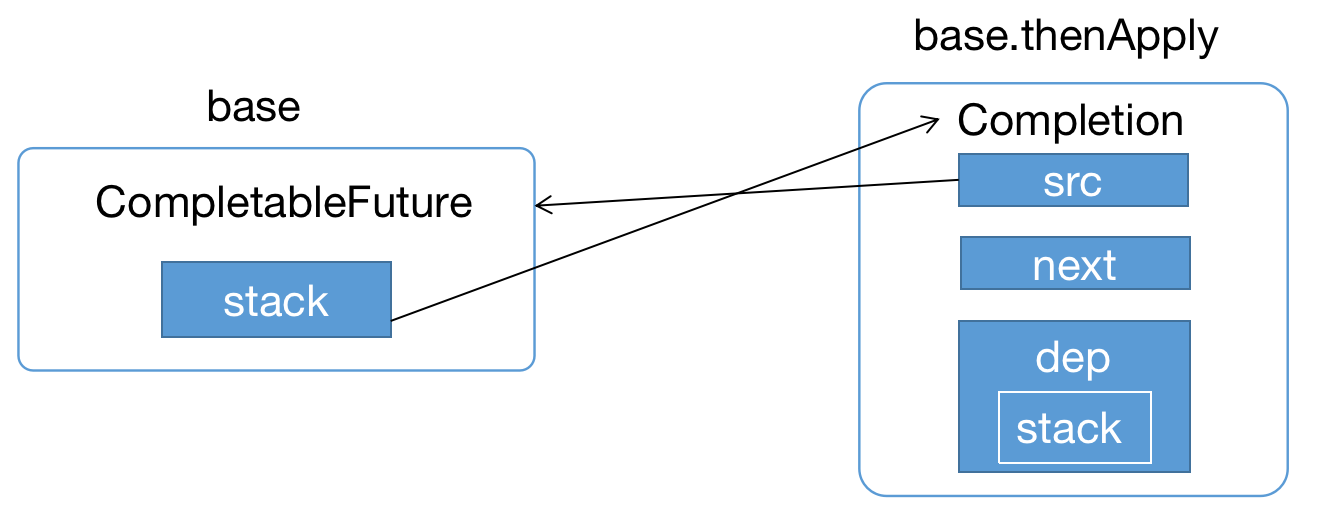
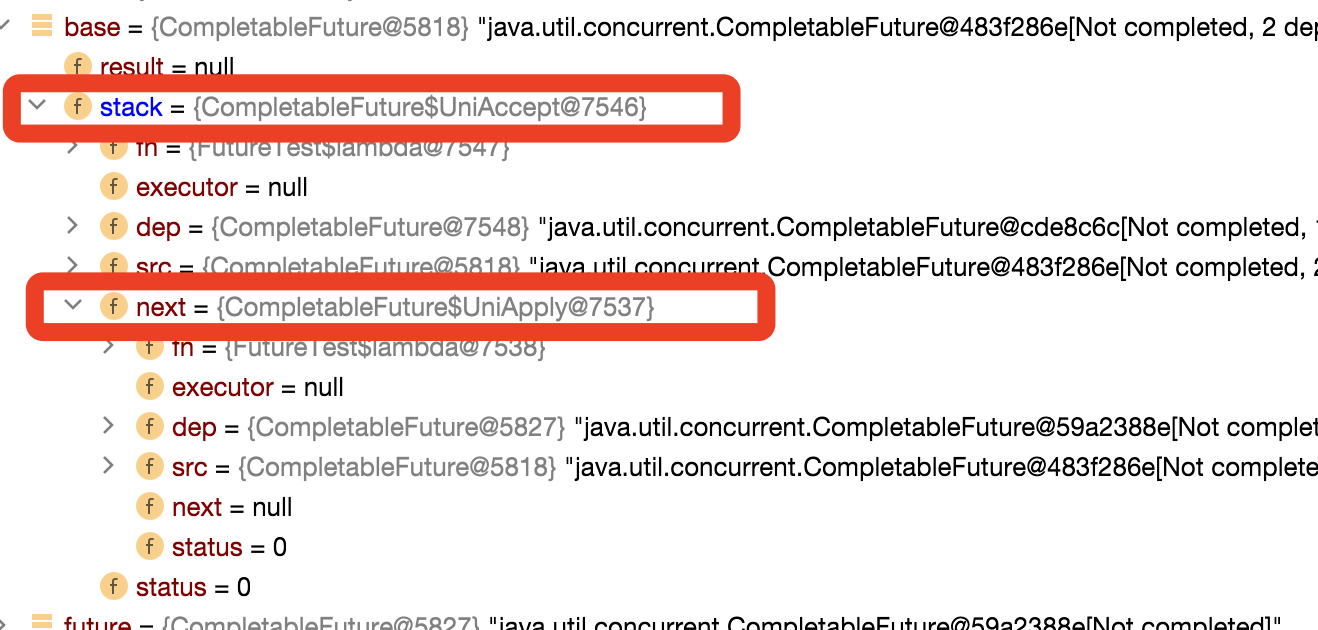
关于执行第2步的时候,构建的对象如下图, src和dep都是空的CompletableFuture,next为Null,这里我们会发现所有的都是继承Completion对象,最终所有都是构建都可以理解为Completion对象;
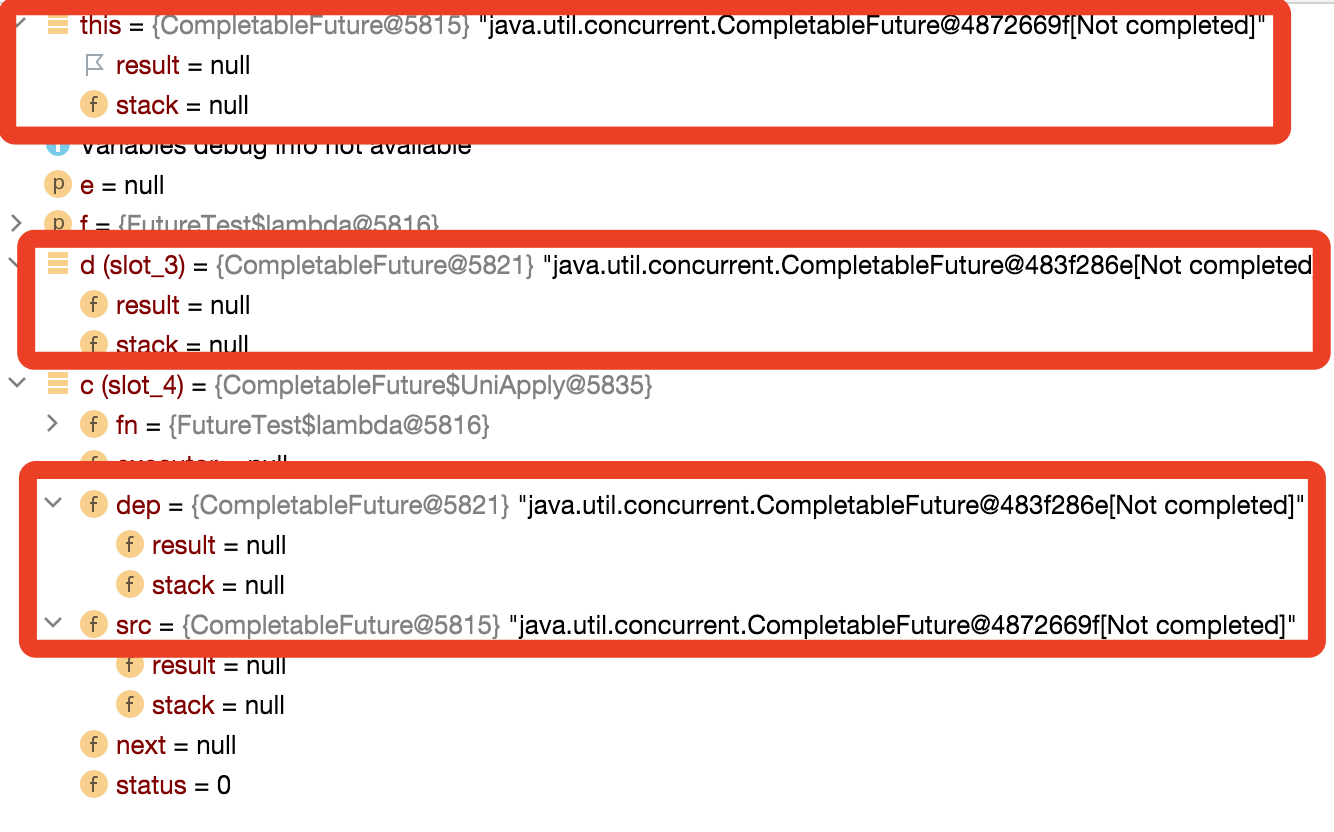
关于执行第3步的时候,构建的UniApply对象的内容完成压栈的操作,将CompletableFuture的stack属性指向Completion对象;
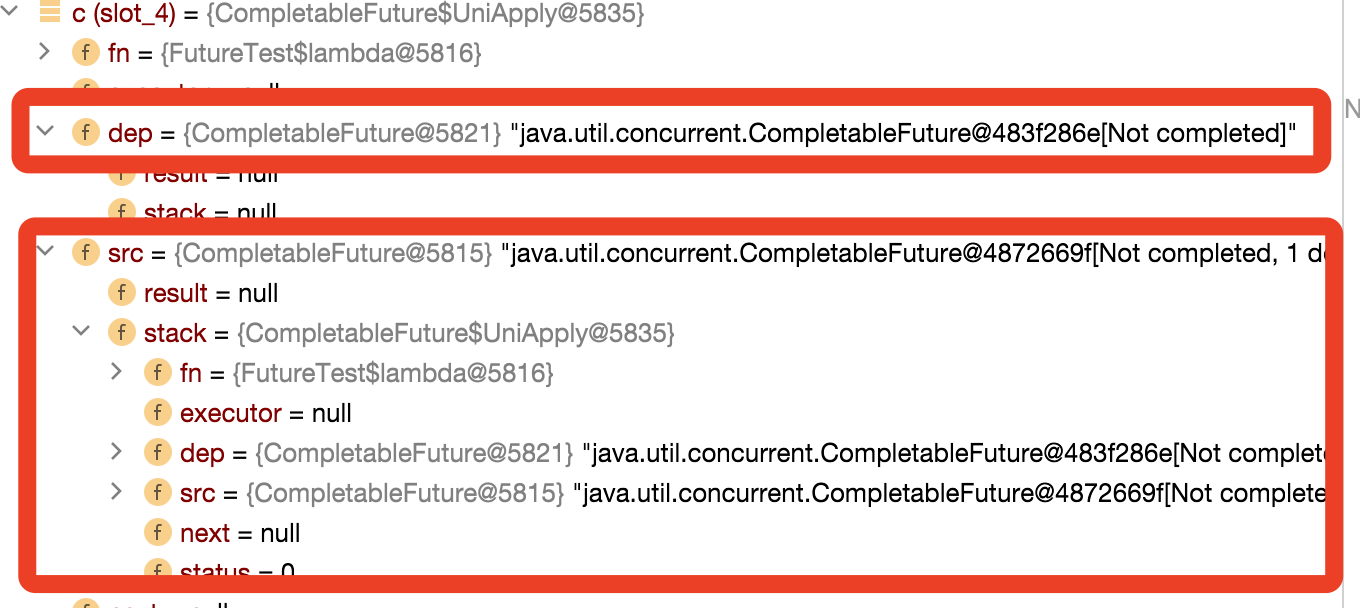
接下来看第4步操作,尝试执行Completion;
    @SuppressWarnings("serial")
    static final class UniApply<T,V> extends UniCompletion<T,V> {
        Function<? super T,? extends V> fn;
        UniApply(Executor executor, CompletableFuture<V> dep,
                 CompletableFuture<T> src,
                 Function<? super T,? extends V> fn) {
            super(executor, dep, src); this.fn = fn;
        }
        final CompletableFuture<V> tryFire(int mode) {
            4.1 d新创建的 a(也是c中的src) 就是原来的
            CompletableFuture<V> d; CompletableFuture<T> a;
            4.2 如果uniApply执行成功,则会进到下面的postFire调用
                否则返回null 如果返回null,就要等待以后的主动complete来再次触发
            if ((d = dep) == null ||
                !d.uniApply(a = src, fn, mode > 0 ? null : this))
                return null;
            4.5 tryFire成功后,会把以下几个属性设为null,表面此Completion已经完成任务,
                变成dead状态
            dep = null; src = null; fn = null;
            4.6 出栈
            return d.postFire(a, mode);
        }
    }
    final <S> boolean uniApply(CompletableFuture<S> a,
                               Function<? super S,? extends T> f,
                               UniApply<S,T> c) {
        Object r; Throwable x;
        4.3 如果a(也是c中的src)没有准备完成,那result是空,这里就会直接返回false
        if (a == null || (r = a.result) == null || f == null)
            return false;
        tryComplete: if (result == null) {
            if (r instanceof AltResult) {
                if ((x = ((AltResult)r).ex) != null) {
                    completeThrowable(x, r);
                    break tryComplete;
                }
                r = null;
            }
            try {
                if (c != null && !c.claim())
                    return false;
                @SuppressWarnings("unchecked") S s = (S) r;
                4.4 如果r不为空,则会作为f的输入参数,f的输出则成为当前CompletableFuture的完成值
                completeValue(f.apply(s));
            } catch (Throwable ex) {
                completeThrowable(ex);
            }
        }
        return true;
    }
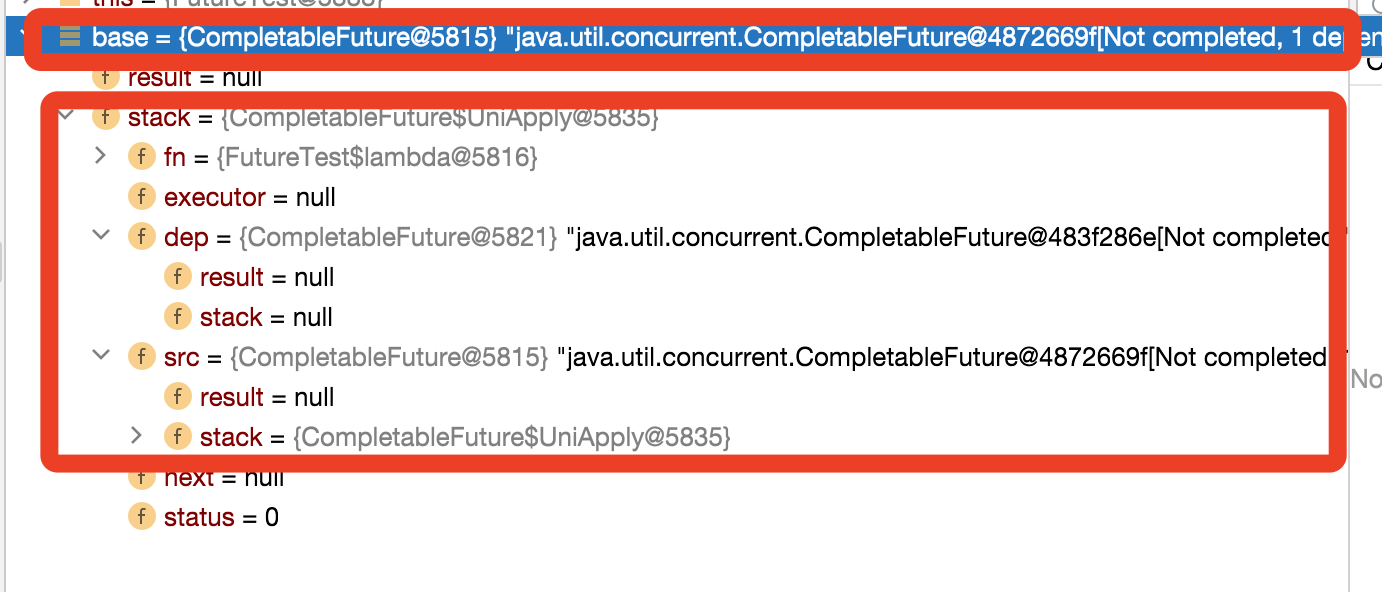
第5步返回d, 这个d会返回到调用thenApply的地方,后续的链式调用会作用在这个d上面,接下来我们可以看到base对象就是我们构建好的第一个链;
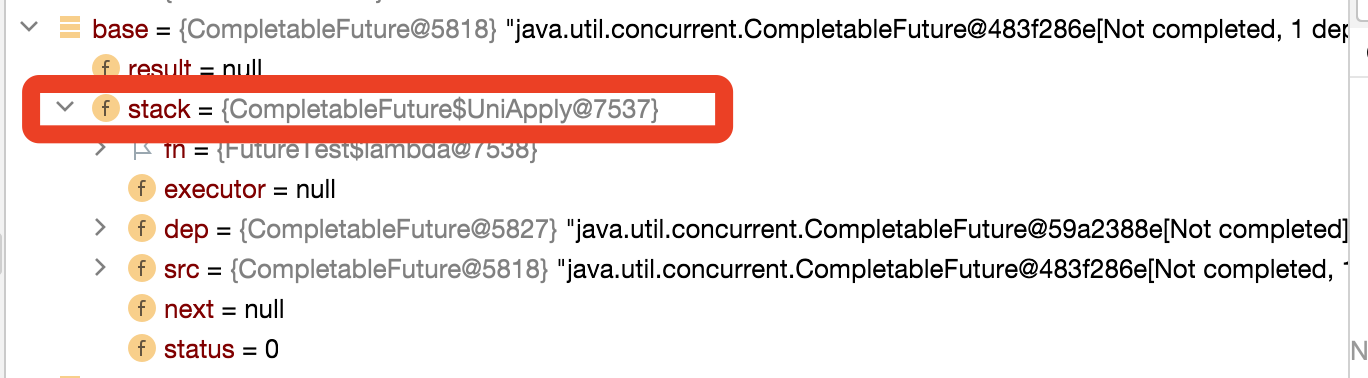
这里我们可以猜测后续的执行thenApply的方法,也就是执行完成test1的第二行代码,生成的结构如下图:
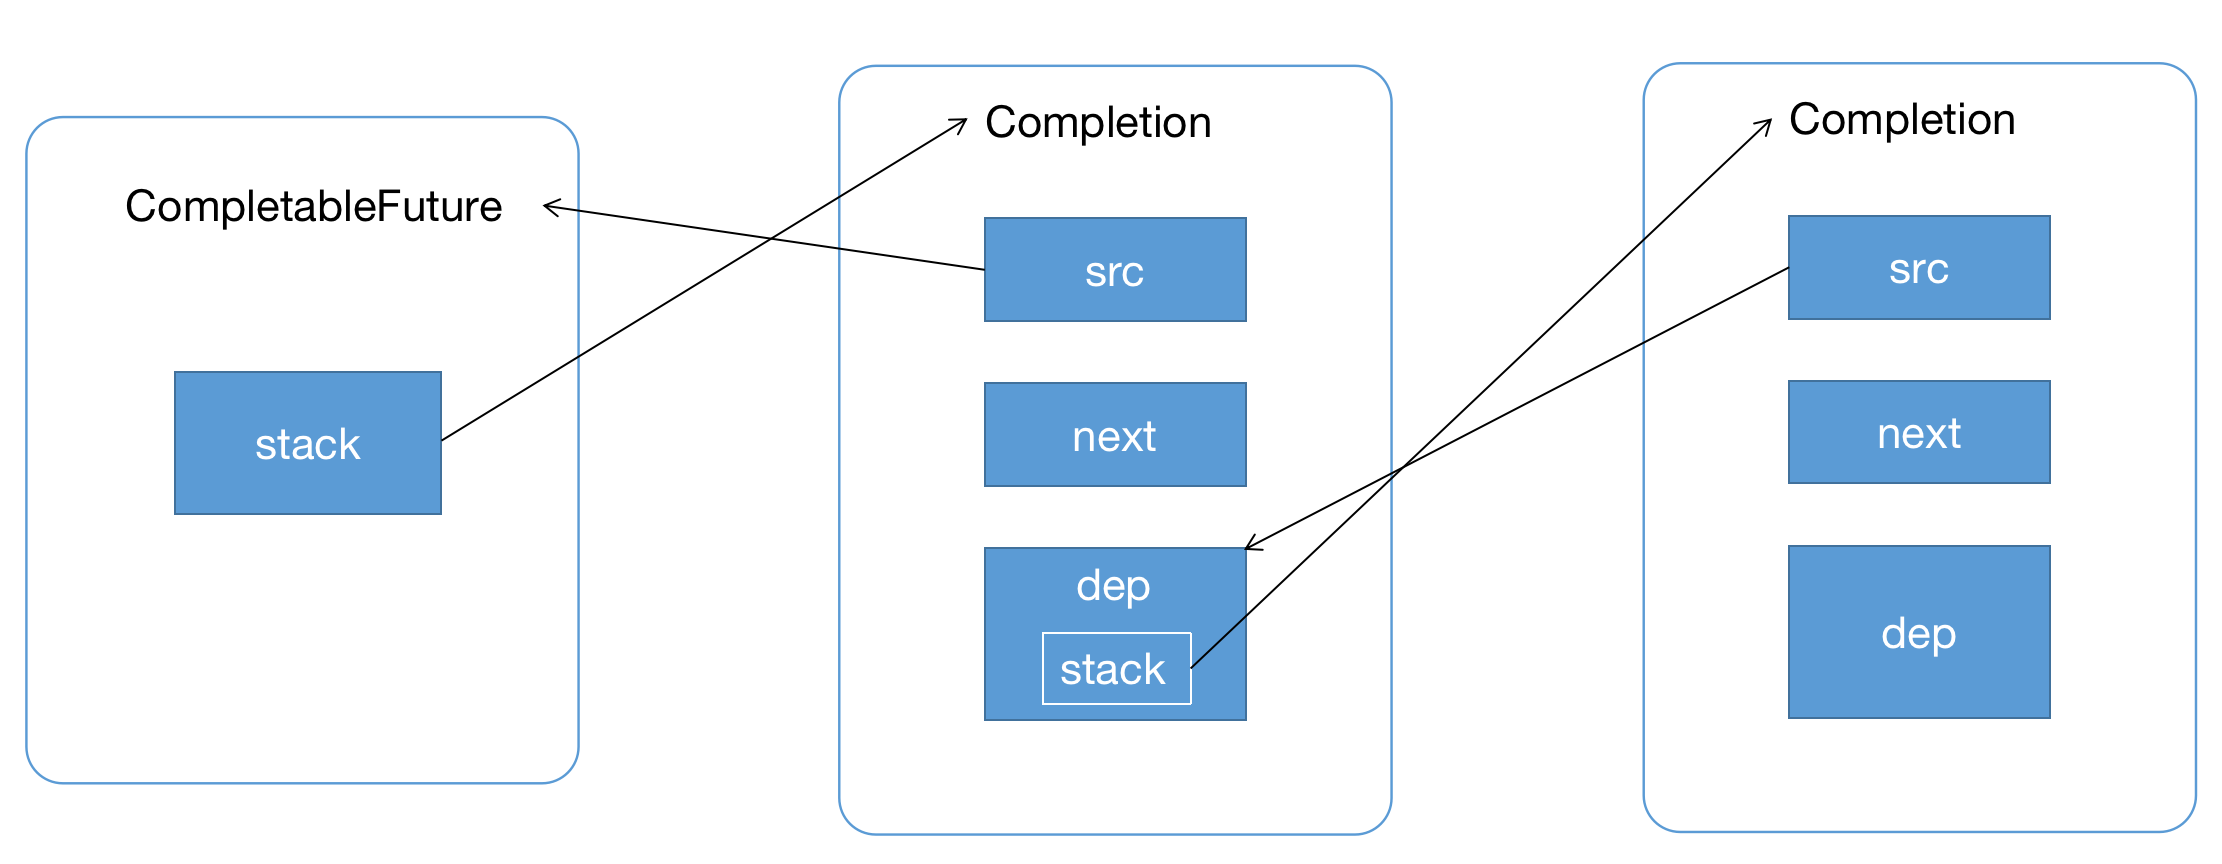
接下来我们验证一下,我们可以发现和我们猜想一致;
当我们的代码执行到test1的第3行的时候,也就是complete方法,该方法也就是为了解决我们执行tryFire执行失败后动作,源码如下:
    public boolean complete(T value) {
        boolean triggered = completeValue(value);
        postComplete();
        return triggered;
    }

    final void postComplete() {
        1. this表示当前的CompletableFuture, 也就是我们base
        CompletableFuture<?> f = this; Completion h;
        2. 判断stack是否为空  或者如果f的栈为空且不是this则重置
        while ((h = f.stack) != null ||
               (f != this && (h = (f = this).stack) != null)) {
            CompletableFuture<?> d; Completion t;
            3. CAS出栈
            if (f.casStack(h, t = h.next)) {
                if (t != null) { 4.出栈的h不是最后一个元素,最后一个元素直接执行7即可
                    if (f != this) {
                        5. 如果f不是this,将刚出栈的h, 入this的栈顶
                            我猜测这个地方大家会有迷惑
                        pushStack(h);
                        continue;
                    }
                    h.next = null;    6. detach
                }
                f = (d = h.tryFire(NESTED)) == null ? this : d;  7.调用tryFire
            }
        }
    }
对于postComplete()方法可以理解为当任务完成之后,调用的一个后完成方法,主要用于触发其他依赖任务,也就是完成出栈的操作,关于第4、5步和的疑惑,这里我先说一下,这里的原因是每次调用产生的Completion并不在同一个stack中,接下来我们来看一个复杂的案例,可能大家就比较明白了;
复杂案例
    @Test
    public void test3() throws ExecutionException, InterruptedException {
        CompletableFuture<String> base = new CompletableFuture<>();
        CompletableFuture<String> future = base.thenApply(s -> {
            log.info("2");
            return s + " 2";
        });
        base.thenAccept(s -> log.info(s + "3-1")).thenAccept(aVoid -> log.info("3-2"));
        base.thenAccept(s -> log.info(s + "4-1")).thenAccept(aVoid -> log.info("4-2"));
        base.complete("1");
        log.info("base result: {}", base.get());
        log.info("future result: {}", future.get());
    }
首先看下输出,我们可以看到基本上是按照4-3-2-1的顺序输出的,证明CompletableFuture整体上是一个栈的结构,接下来我们就图解下这一过程;

当代码执行完第7行的时候我们得到的是这样的结构:
代码执行完第8行的时候,结构是这样的:
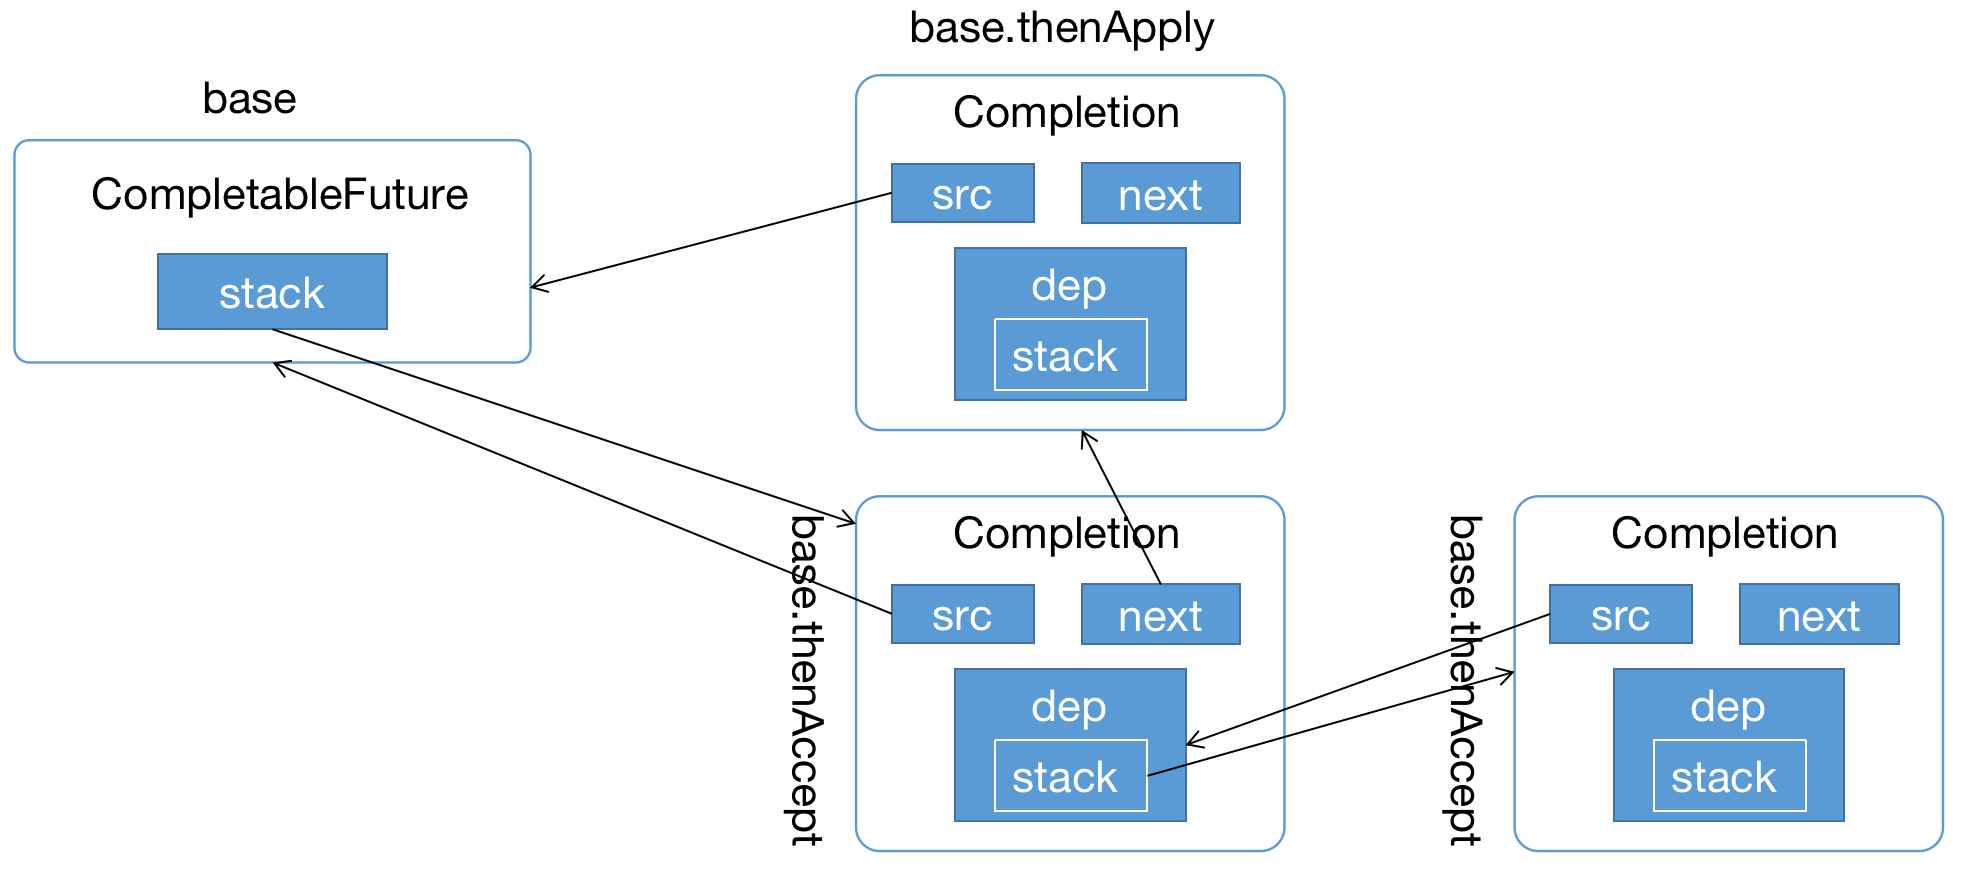
执行完第9行的时候,结构是这样的:
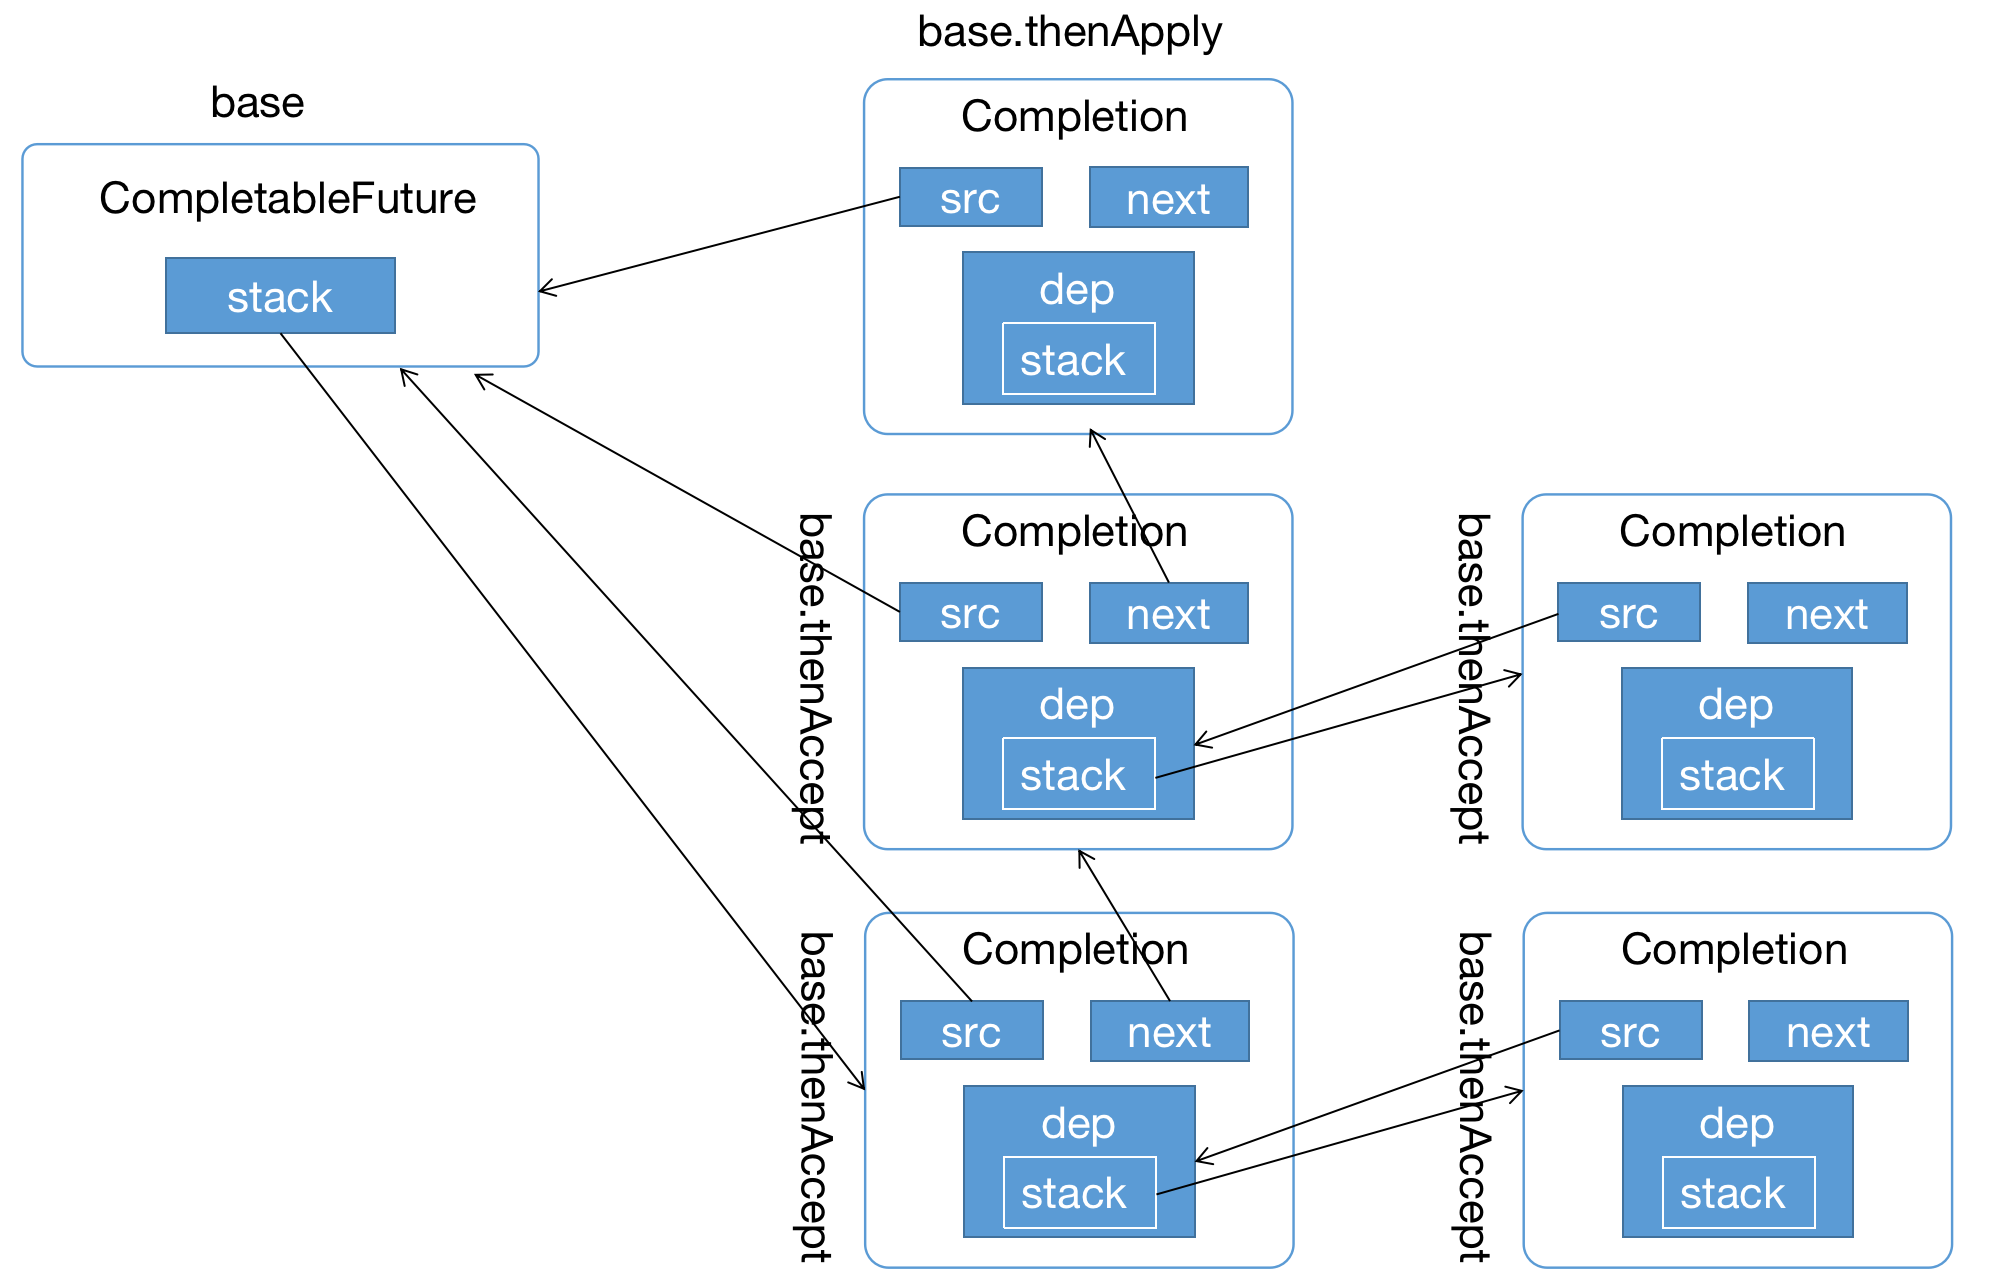
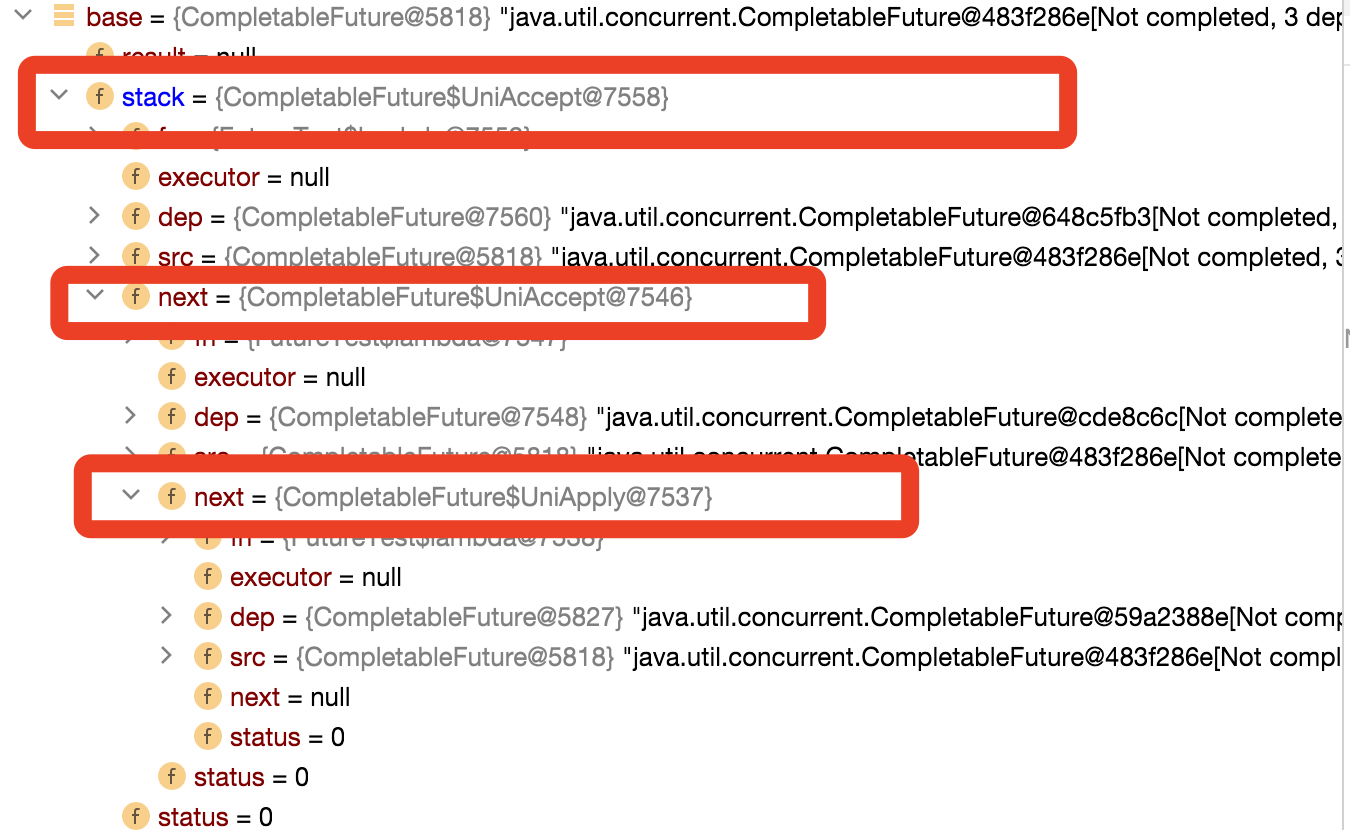
到这里就构成我们整个的调用链路,这个时候我们可以想明白为什么出栈的时候要判断下f != this了吧,因为内部又嵌套层栈的结构,构成了一个图状;
当代码执行到第10行的时候,就开始出栈,按照4-3-2-1的顺序输出,到这里这部分内容就讲解完成了。
参考以下内容:
结束
欢迎大家点点关注,点点赞!

图解CompletableFuture源码的更多相关文章
- [图解tensorflow源码] 入门准备工作附常用的矩阵计算工具[转]
[图解tensorflow源码] 入门准备工作 附常用的矩阵计算工具[转] Link: https://www.cnblogs.com/yao62995/p/5773142.html tensorf ...
- [图解tensorflow源码] [原创] Tensorflow 图解分析 (Session, Graph, Kernels, Devices)
TF Prepare [图解tensorflow源码] 入门准备工作 [图解tensorflow源码] TF系统概述篇 Session篇 [图解tensorflow源码] Session::Run() ...
- [图解tensorflow源码] 入门准备工作
tensorflow使用了自动化构建工具bazel.脚本语言调用c或cpp的包裹工具swig.使用EIGEN作为矩阵处理工具.Nvidia-cuBLAS GPU加速计算库.结构化数据存储格式prot ...
- 图解tensorflow 源码分析
http://www.cnblogs.com/yao62995/p/5773578.html https://github.com/yao62995/tensorflow
- [图解tensorflow源码] TF系统概述篇
Rendezvous 1. 定义在core/framework/rendezvous.h 2. A Rendezvous is an abstraction for passing a Tensor ...
- [图解tensorflow源码] [转载] tensorflow设备内存分配算法解析 (BFC算法)
转载自 http://weibo.com/p/1001603980563068394770 @ICT_吴林阳 tensorflow设备内存管理模块实现了一个best-fit with coales ...
- [图解tensorflow源码] Graph 图优化 (graph optimizer)
- [图解tensorflow源码] Graph 图构建 (Graph Constructor)
- [图解tensorflow源码] Graph 图模块 —— Graph Loading
随机推荐
- Spring 配置概述
理解了IoC的概念,那Spring框架是如何具体操作的呢?Spring IoC容器(ApplicaitonContext)负责创建Bean,并通过容器将功能类Bean注入到其他需要的Bean中.Spr ...
- 使用java程序完成大量文件目录拷贝工作
java程序完成目录拷贝工作 背景描述:我目录有140多个,每个目录里面都有一个src目录.我现在想要所有的src目录移动到同一个目录中. package com.util.cp; import ja ...
- python3发邮件脚本
官方文档中建议保存token,且token是每2小时更新一次. 所以token先保存在本地token.txt文件夹中,设定计划任务每1小时删除一下token.txt.虽然造成了浪费,对于发消息不多的人 ...
- nginx 80端口强制转443
server { listen 80; server_name test.com; rewrite ^(.*)$ https://${server_name}$1 permanent; } serve ...
- PentestBox在win10里打不开工具 显示无系统命令的解决方法
PentestBox详细安装过程:http://www.cnblogs.com/ESHLkangi/p/8336398.html 在使用PentestBox的时候出现了打不开工具的问题,最后看到一个大 ...
- Shell、命令行界面、控制台什么区别
Shell 是什么?Shell 是一个命令解释器,它为用户提供了一个向 操作系统内核发送请求以便运行程序界面系统级程序,它的作用就是遵循一定的语法将输入的命令加以解释并传给系统,他大意是指对系统的操控 ...
- WPF中TreeView控件数据绑定和后台动态添加数据(二)
写在前面:在(一)中,介绍了TreeView控件MVVM模式下数据绑定的方法.在这篇文章中,将总结给节点添加事件的方法,这样说有些不对,总之实现的效果就是点击某个节点,将出现对应于该节点的页面或者数据 ...
- MySQL Community Server安装
MySQL Community Server安装 下载地址:https://dev.mysql.com/downloads/mysql/,zip安装,解压缩之后其实就可以用了,但是要进行配置. 1,解 ...
- PCL库在Linux环境下的编译安装
PCL库在Linux环境下的编译安装 PCL库的源码库:https://github.com/PointCloudLibrary/pcl 下载完了之后解压下来 编译库的几个步骤 mkdir build ...
- C#更新packages
有时重新clone代码到本地时,会出现references中引用的包报错,这时可以重新更新下载这些包: 在VS工具栏中,Tools→NuGet Package Manager→Package Mana ...