Spring源码之循环依赖
https://www.cnblogs.com/longy2012/articles/12834762.html
https://www.bilibili.com/video/BV1iD4y1o7pM?p=7
https://www.jianshu.com/p/8bb67ca11831
https://cloud.tencent.com/developer/article/1497692
https://blog.nowcoder.net/n/2bb528b258b44c7eab1703a52170ef09
总结
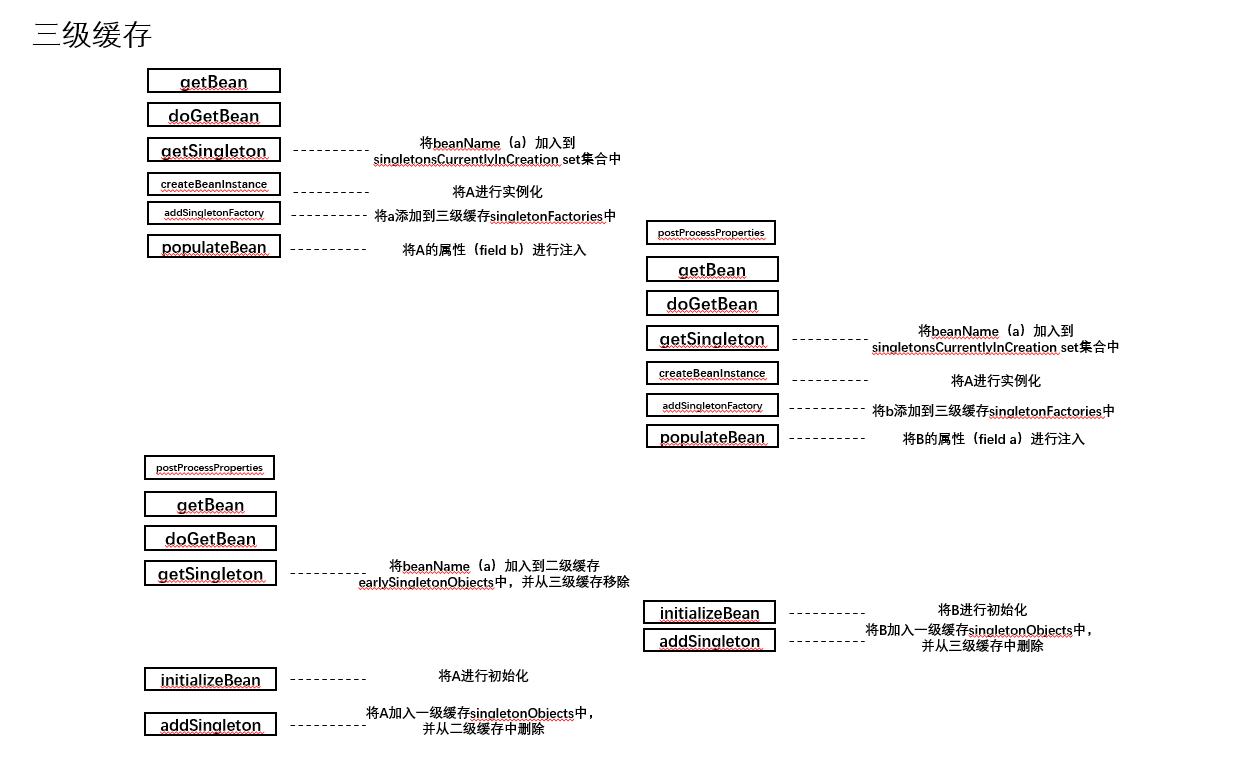
- 在DefaultSingletonBeanRegistry类getSingleton方法中将beanName(a)加入到singletonsCurrentlyInCreation set集合中
- A进行实例化(未初始化)
- A加入三级缓存singletonFactories中
- 在AbstractAutowireCapableBeanFactory中populateBean方法中开始属性填充(field B)(调用AutowiredAnnotationBeanPostProcessor类中postProcessProperties方法)
- 在DefaultSingletonBeanRegistry类getSingleton方法中将beanName(b)加入到singletonsCurrentlyInCreation set集合中
- 将B加入singletonsCurrentlyInCreation,标志为正在创建中
- B进行实例化(未初始化)
- B加入三级缓存singletonFactories中
- 开始对B类进行属性填充(A field)
- 重新走到AbstractBeanFactory中doGetBean方法,调用DefaultSingletonBeanRegistry类getSingleton方法,将A put到二级缓存earlySingletonObjects中,并在三级缓存singletonFactories中移除
- B进行初始化
- getSingleton方法中调用DefaultSingletonBeanRegistry类afterSingletonCreation方法,将beanName(b)从singletonsCurrentlyInCreation移除
- 走到DefaultSingletonBeanRegistry中getSingleton方法finally中,将B加入一级缓存,并从三级缓存中移除
- 将B返回,A进行初始化
- getSingleton方法中调用DefaultSingletonBeanRegistry类afterSingletonCreation方法,将beanName(a)从singletonsCurrentlyInCreation移除
- 最后走到DefaultSingletonBeanRegistry中getSingleton方法finally中,将A加入一级缓存,并从二级缓存中移除
示例
- @DependsOn
@DependsOn("b")

@Component

public class A {

}

@DependsOn("a")

@Component

public class B {

}
报错:
org.springframework.beans.factory.BeanCreationException: Error creating bean with name 'b' defined
- field属性注入循环依赖(不报错)
@Component

public class A {

    @Autowired

    private B b;

}

@Component

public class B {

    @Autowired

    private A a;

}
源码解析
三级缓存
DefaultSingletonBeanRegistry类中:
	/** Cache of singleton objects: bean name to bean instance. */

	//一级缓存

	private final Map<String, Object> singletonObjects = new ConcurrentHashMap<>(256);

	/** Cache of singleton factories: bean name to ObjectFactory. */

	//三级缓存

	private final Map<String, ObjectFactory<?>> singletonFactories = new HashMap<>(16);

	/** Cache of early singleton objects: bean name to bean instance. */

	//二级缓存

	private final Map<String, Object> earlySingletonObjects = new ConcurrentHashMap<>(16);
springboot中入口
调用链:
SpringApplication#run() --> SpringApplication#refreshContext() --> SpringApplication#refresh() --> ServletWebServerApplicationContext#refresh() --> AbstractApplicationContext#refresh() --> AbstractApplicationContext#finishBeanFactoryInitialization() --> DefaultListableBeanFactory#preInstantiateSingletons() --> AbstractBeanFactory#getBean() --> AbstractBeanFactory#doGetBean()
将beanName(a)加入到singletonsCurrentlyInCreation
AbstractBeanFactory#doGetBean()方法中:
if (!typeCheckOnly) {

	markBeanAsCreated(beanName);

}
markBeanAsCreated方法中:
this.alreadyCreated.add(beanName);
在getSingleton方法中,执行
beforeSingletonCreation(beanName);
this.singletonsCurrentlyInCreation.add(beanName)
其中singletonsCurrentlyInCreation为
/** Names of beans that are currently in creation. */

private final Set<String> singletonsCurrentlyInCreation =

		Collections.newSetFromMap(new ConcurrentHashMap<>(16));
A进行实例化(未初始化)
在在getSingleton方法执行到
singletonObject = singletonFactory.getObject();
调用匿名方法
() -> {

    	try {

    		return createBean(beanName, mbd, args);

    	}

    	catch (BeansException ex) {

    		// Explicitly remove instance from singleton cache: It might have been put there

    		// eagerly by the creation process, to allow for circular reference resolution.

    		// Also remove any beans that received a temporary reference to the bean.

    		destroySingleton(beanName);

    		throw ex;

    	}

    }
调用AbstractAutowireCapableBeanFactory#createBean() --> AbstractAutowireCapableBeanFactory#doCreateBean(),执行如下代码进行实例化:
if (instanceWrapper == null) {

	instanceWrapper = createBeanInstance(beanName, mbd, args);

}

Object bean = instanceWrapper.getWrappedInstance();
bean(A)具备地址
A加入三级缓存singletonFactories中
// Eagerly cache singletons to be able to resolve circular references

// even when triggered by lifecycle interfaces like BeanFactoryAware.

boolean earlySingletonExposure = (mbd.isSingleton() && this.allowCircularReferences &&

		isSingletonCurrentlyInCreation(beanName));

if (earlySingletonExposure) {

	if (logger.isTraceEnabled()) {

		logger.trace("Eagerly caching bean '" + beanName +

				"' to allow for resolving potential circular references");

	}

	addSingletonFactory(beanName, () -> getEarlyBeanReference(beanName, mbd, bean));

}
protected void addSingletonFactory(String beanName, ObjectFactory<?> singletonFactory) {

	Assert.notNull(singletonFactory, "Singleton factory must not be null");

	synchronized (this.singletonObjects) {

		if (!this.singletonObjects.containsKey(beanName)) {

			this.singletonFactories.put(beanName, singletonFactory);

			this.earlySingletonObjects.remove(beanName);

			this.registeredSingletons.add(beanName);

		}

	}

}
在populateBean方法中开始对A属性填充
populateBean(beanName, mbd, instanceWrapper);
对B重复上面步骤
调用链
AbstractApplicationContext#refresh() --> AbstractApplicationContext#finishBeanFactoryInitialization() --> DefaultListableBeanFactory#preInstantiateSingletons() --> AbstractBeanFactory#getBean() --> AbstractBeanFactory#doGetBean() --> AbstractAutowireCapableBeanFactory#createBean()
--> AbstractAutowireCapableBeanFactory#doCreateBean()
(上面为A,下面开始A属性B注入)
--> AbstractAutowireCapableBeanFactory#populateBean() --> AutowiredAnnotationBeanPostProcessor#postProcessProperties() --> InjectionMetadata#inject() --> AutowiredAnnotationBeanPostProcessor#inject() --> DefaultListableBeanFactory#resolveDependency() --> DefaultListableBeanFactory#doResolveDependency() --> DependencyDescriptor#resolveCandidate() --> AbstractBeanFactory#getBean() --> AbstractBeanFactory#doGetBean()
会和上面A同样做下面这些操作:
- 在DefaultSingletonBeanRegistry类getSingleton方法中将beanName(b)加入到singletonsCurrentlyInCreation set集合中
- 将B加入singletonsCurrentlyInCreation,标志为正在创建中
- B进行实例化(未初始化,具有B地址)
- B加入三级缓存singletonFactories中
- 开始对B类进行属性填充(A field)
将A put到二级缓存earlySingletonObjects中
重新对A执行doGetBean方法,执行getSingleton时,singletonFactory != null,故A放到二级缓存中,并从三级缓存中移除
Object sharedInstance = getSingleton(beanName);
protected Object getSingleton(String beanName, boolean allowEarlyReference) {

	// Quick check for existing instance without full singleton lock

	Object singletonObject = this.singletonObjects.get(beanName);

	if (singletonObject == null && isSingletonCurrentlyInCreation(beanName)) {

		singletonObject = this.earlySingletonObjects.get(beanName);

		if (singletonObject == null && allowEarlyReference) {

			synchronized (this.singletonObjects) {

				// Consistent creation of early reference within full singleton lock

				singletonObject = this.singletonObjects.get(beanName);

				if (singletonObject == null) {

					singletonObject = this.earlySingletonObjects.get(beanName);

					if (singletonObject == null) {

						ObjectFactory<?> singletonFactory = this.singletonFactories.get(beanName);

						if (singletonFactory != null) {

							singletonObject = singletonFactory.getObject();

							this.earlySingletonObjects.put(beanName, singletonObject);

							this.singletonFactories.remove(beanName);

						}

					}

				}

			}

		}

	}

	return singletonObject;

}
B进行初始化
此时B完成属性注入,A具有地址,开始初始化:
// Initialize the bean instance.

Object exposedObject = bean;

try {

	populateBean(beanName, mbd, instanceWrapper);

	exposedObject = initializeBean(beanName, exposedObject, mbd);

}
将beanName(b)从singletonsCurrentlyInCreation移除
B执行完AbstractBeanFactory类匿名方法中createBean(beanName, mbd, args),接着getSingleton往下执行,在finally中:
finally {

	if (recordSuppressedExceptions) {

		this.suppressedExceptions = null;

	}

	afterSingletonCreation(beanName);

}
protected void afterSingletonCreation(String beanName) {

	if (!this.inCreationCheckExclusions.contains(beanName) && !this.singletonsCurrentlyInCreation.remove(beanName)) {

		throw new IllegalStateException("Singleton '" + beanName + "' isn't currently in creation");

	}

}
将B加入一级缓存,并从三级缓存中移除
在getSingleton方法执行addSingleton(beanName, singletonObject);从而将B从三级缓存中移除,并添加到一级缓存中
protected void addSingleton(String beanName, Object singletonObject) {

	synchronized (this.singletonObjects) {

		this.singletonObjects.put(beanName, singletonObject);

		this.singletonFactories.remove(beanName);

		this.earlySingletonObjects.remove(beanName);

		this.registeredSingletons.add(beanName);

	}

}
完成A中B属性注入,对A进行初始化
A开始执行下面代码:
exposedObject = initializeBean(beanName, exposedObject, mbd);
开始将beanName(a)从singletonsCurrentlyInCreation移除;并从二级缓存中移除,添加到一级缓存
A接着getSingleton往下执行,在finally中执行afterSingletonCreation将beanName(a)从singletonsCurrentlyInCreation移除;
最后在addSingleton(beanName, singletonObject)将A从二级缓存中移除,添加到一级缓存
面试问题
- 一级缓存是否够用?
不能。多线程情况下,会获取到实例化但没有初始化的对象,属性都为null
- 二级缓存是否够用?
如果创建是普通类,二级缓存满足
- 为什么需要三级缓存?(代理)
在动态代理中,返回是代理类。如果没有三级缓存,最开始放置是实例化好对象,然后缓存有了,后面进行代理处理,那原来的对象是否覆盖??
	/**

	 * Obtain a reference for early access to the specified bean,

	 * typically for the purpose of resolving a circular reference.

	 * @param beanName the name of the bean (for error handling purposes)

	 * @param mbd the merged bean definition for the bean

	 * @param bean the raw bean instance

	 * @return the object to expose as bean reference

	 */

	protected Object getEarlyBeanReference(String beanName, RootBeanDefinition mbd, Object bean) {

		Object exposedObject = bean;

		if (!mbd.isSynthetic() && hasInstantiationAwareBeanPostProcessors()) {

			for (BeanPostProcessor bp : getBeanPostProcessors()) {

				if (bp instanceof SmartInstantiationAwareBeanPostProcessor) {

					SmartInstantiationAwareBeanPostProcessor ibp = (SmartInstantiationAwareBeanPostProcessor) bp;

					exposedObject = ibp.getEarlyBeanReference(exposedObject, beanName);

				}

			}

		}

		return exposedObject;

	}
Spring源码之循环依赖的更多相关文章
- Spring源码解析——循环依赖的解决方案
一.前言 承接<Spring源码解析--创建bean>.<Spring源码解析--创建bean的实例>,我们今天接着聊聊,循环依赖的解决方案,即创建bean的ObjectFac ...
- Spring IOC 容器源码分析 - 循环依赖的解决办法
1. 简介 本文,我们来看一下 Spring 是如何解决循环依赖问题的.在本篇文章中,我会首先向大家介绍一下什么是循环依赖.然后,进入源码分析阶段.为了更好的说明 Spring 解决循环依赖的办法,我 ...
- 3.2spring源码系列----循环依赖源码分析
首先,我们在3.1 spring5源码系列--循环依赖 之 手写代码模拟spring循环依赖 中手写了循环依赖的实现. 这个实现就是模拟的spring的循环依赖. 目的是为了更容易理解spring源码 ...
- 3.4 spring5源码系列--循环依赖的设计思想
前面已经写了关于三篇循环依赖的文章, 这是一个总结篇 第一篇: 3.1 spring5源码系列--循环依赖 之 手写代码模拟spring循环依赖 第二篇: 3.2spring源码系列----循环依赖源 ...
- 3.1 spring5源码系列--循环依赖 之 手写代码模拟spring循环依赖
本次博客的目标 1. 手写spring循环依赖的整个过程 2. spring怎么解决循环依赖 3. 为什么要二级缓存和三级缓存 4. spring有没有解决构造函数的循环依赖 5. spring有没有 ...
- 小白都能看懂的 Spring 源码揭秘之依赖注入(DI)源码分析
目录 前言 依赖注入的入口方法 依赖注入流程分析 AbstractBeanFactory#getBean AbstractBeanFactory#doGetBean AbstractAutowireC ...
- 【Spring源码解析】—— 依赖注入结合SpringMVC Demo-xml配置理解
在IOC容器初始化的梳理之后,对依赖注入做一个总结,就是bean实例化的过程,bean的定义有两种方式,一种是xml文件配置,一种是注解,这里是对xml配置文件的依赖注入的介绍,后续对bean与该部分 ...
- Spring源码-循环依赖源码解读
Spring源码-循环依赖源码解读 笔者最近无论是看书还是从网上找资料,都没发现对Spring源码是怎么解决循环依赖这一问题的详解,大家都是解释了Spring解决循环依赖的想法(有的解释也不准确,在& ...
- Spring源码分析(十七)循环依赖
本文结合<Spring源码深度解析>来分析Spring 5.0.6版本的源代码.若有描述错误之处,欢迎指正. 实例化bean是一个非常复杂的过程,而其中比较难以理解的就是对循环依赖的解决, ...
随机推荐
- 2020年在项目中使用MVVM正确姿势,你用对了吗?
最近看到了几篇与 Jetpack MVVM 有关到文章,使我不禁也想淌一下这场混水.我是在 2017 年下半年接触的 Jetpack 的那套开发工具,并且后来一直将其作为开发的主要框架.在这段时间的使 ...
- windbg加载符号表
0x00 前言 在使用windbg调试windows中的程序时会经常碰到一些系统的dll里面的一些函数调用,有些函数是没有具体函数名的,这对于调试非常不利,基于此,微软针对windows也发布了很多系 ...
- centos8安装fastdfs6.06集群方式一之:软件下载与安装
一,查看本地centos的版本 [root@localhost lib]# cat /etc/redhat-release CentOS Linux release 8.1.1911 (Core) 说 ...
- __getattr__和__setattr__
getattr 拦截运算(obj.xx),对没有定义的属性名和实例,会用属性名作为字符串调用这个方法 class F(object): def __init__(self): self.name = ...
- Kubernetes K8S之存储Volume详解
K8S之存储Volume概述与说明,并详解常用Volume示例 主机配置规划 服务器名称(hostname) 系统版本 配置 内网IP 外网IP(模拟) k8s-master CentOS7.7 2C ...
- Helium文档4-WebUI自动化-write写入
前言 write方法是模拟在输入框中写入数据 write入参说明 def write(text, into=None): """ :param text: The ...
- 《Kafka笔记》4、Kafka架构,与其他组件集成
目录 1 kafka架构进阶 1.1 Kafka底层数据的同步机制(面试常问) 1.1.1 高水位截断的同步方式可能带来数据丢失(Kafka 0.11版本前的问题) 1.1.2 解决高水位截断数据丢失 ...
- sql优化整理(二)
对于连接查询,EXPLAIN的extra字段出现using join buffer,表示使用了连接缓存,保证JOIN语句中被驱动表上JOIN条件字段已经添加索引: LEFT JOIN 条件用于确定如何 ...
- IDEA安装IDEA阿里Java规范插件
插件安装方式有两种: 1.通过在线方式安装,搜索后找到,点击Install安装即可: 2.去官网plugins下载对应插件离线包,地址:https://plugins.jetbrains.com/pl ...
- 集合与map