【Demo 1】基于object_detection API的行人检测 3:模型训练并在OpenCV调用模型
训练准备
模型选择
选择ssd_mobilenet_v2_coco模型,下载地址(https://github.com/tensorflow/models/blob/master/research/object_detection/g3doc/detection_model_zoo.md),解压到./Pedestrian_Detection/ssd_mobilenet_v2_coco_2018_03_29.
修改object_detection配置文件
进入目录./Pedestrian_Detection/models/research/object_detection/samples/configs 找到对应的模型配置文件ssd_mobilenet_v2_coco.config修改配置文件。
根据提示信息:
1、第9行,检测类别把90改为1,因为我们只检测行人,只有一个类别。
2、修改除提示外所有的
2.1、第一个(156行)是我们所需模型的路径,即上一步下载好的:./Pedestrian_Detection/ssd_mobilenet_v2_coco_2018_03_29/model.ckpt
2.2、第二个(175行)是train.record文件的路径,上一篇中我们准备好的record文件:./Pedestrian_Detection/project/pedestrian_train/data/pascal_train.record
2.3、第三个(177行)是上一篇准备好的label_map.pbtxt的路径:./Pedestrian_Detection/project/pedestrian_train/data/label_map.pbtxt
2.4、第四个(189行)是eval.record文件的路径,上一篇中我们准备好的record文件:./Pedestrian_Detection/project/pedestrian_train/data/pascal_eval.record
2.5、第五个(191行)同2.3
这样config文件就修改完成了。然后把它放到:./Pedestrian_Detection/project/pedestrian_train/models目录下。最后在该目录下创建两个文件夹:train 和 eval,用于储存训练和验证的记录。
开始训练
打开命令行窗口
在research目录下输入:
(dl) D:\Study\dl\Pedestrian_Detection\models\research>python object_detection/legacy/train.py --train_dir=D:\Study\dl\Pedestrian_Detection\project\pedestrian_train\models\train --pipeline_config_path=D:\Study\dl\Pedestrian_Detection\project\pedestrian_train\models\ssd_mobilenet_v2_coco.config --logtostderr
即可开始训练。
这里我们选择2000次之后,按ctrl+c结束训练。训练的详细信息可通过tensorboard来进行查看(这里不再赘述)。
查看我们的训练记录:
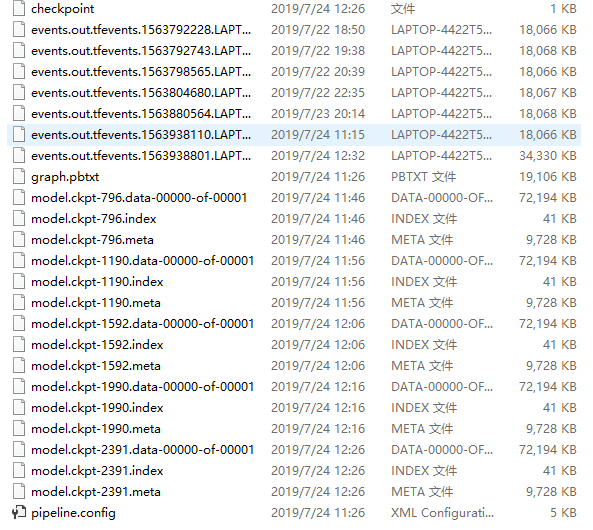
导出模型
这里我们选择第2391次的训练数据来生成模型。
把下图4个文件放到:./Pedestrian_Detection/pedestrian_data/model 目录下

在命令行窗口下输入命令:
(dl) D:\Study\dl\Pedestrian_Detection\models\research>python object_detection/export_inference_graph.py --input_type=image_tensor --pipeline_config_path=D:\Study\dl\Pedestrian_Detection\project\pedestrian_train\models\ssd_mobilenet_v2_coco.config --trained_checkpoint_prefix=D:\Study\dl\Pedestrian_Detection\pedestrian_data\model\model.ckpt-2391 --output_directory=D:\Study\dl\Pedestrian_Detection\pedestrian_data\test
查看发现对应的目录下已经生成了一系列的模型文件:

测试模型
测试代码:
 import os

 import sys

 import cv2

 import numpy as np

 import tensorflow as tf

 sys.path.append("..")

 from object_detection.utils import label_map_util

 from object_detection.utils import visualization_utils as vis_util

 ##################################################

 ##################################################

 # Path to frozen detection graph

 PATH_TO_CKPT = 'D:/Study/dl/Pedestrian_Detection/pedestrian_data/test/frozen_inference_graph.pb'

 # List of the strings that is used to add correct label for each box.

 PATH_TO_LABELS = os.path.join('D:/Study/dl/Pedestrian_Detection/project/pedestrian_train/data', 'label_map.pbtxt')

 NUM_CLASSES = 1

 detection_graph = tf.Graph()

 with detection_graph.as_default():

     od_graph_def = tf.GraphDef()

     with tf.gfile.GFile(PATH_TO_CKPT, 'rb') as fid:

         serialized_graph = fid.read()

         od_graph_def.ParseFromString(serialized_graph)

         tf.import_graph_def(od_graph_def, name='')

 label_map = label_map_util.load_labelmap(PATH_TO_LABELS)

 categories = label_map_util.convert_label_map_to_categories(label_map, max_num_classes=NUM_CLASSES, use_display_name=True)

 category_index = label_map_util.create_category_index(categories)

 def load_image_into_numpy_array(image):

     (im_width, im_height) = image.size

     return np.array(image.getdata()).reshape(

       (im_height, im_width, 3)).astype(np.uint8)

 with detection_graph.as_default():

     with tf.Session(graph=detection_graph) as sess:

         image_np = cv2.imread("D:/Study/dl/Pedestrian_Detection/project/test_images/3600.jpg")

         # image_np = cv2.imread("D:/images/pedestrain.png")

         cv2.imshow("input", image_np)

         print(image_np.shape)

         # image_np == [1, None, None, 3]

         image_np_expanded = np.expand_dims(image_np, axis=0)

         image_tensor = detection_graph.get_tensor_by_name('image_tensor:0')

         boxes = detection_graph.get_tensor_by_name('detection_boxes:0')

         scores = detection_graph.get_tensor_by_name('detection_scores:0')

         classes = detection_graph.get_tensor_by_name('detection_classes:0')

         num_detections = detection_graph.get_tensor_by_name('num_detections:0')

         # Actual detection.

         (boxes, scores, classes, num_detections) = sess.run(

             [boxes, scores, classes, num_detections],

             feed_dict={image_tensor: image_np_expanded})

         # Visualization of the results of a detection.

         vis_util.visualize_boxes_and_labels_on_image_array(

               image_np,

               np.squeeze(boxes),

               np.squeeze(classes).astype(np.int32),

               np.squeeze(scores),

               category_index,

               use_normalized_coordinates=True,

               min_score_thresh=0.5,

               line_thickness=1)

         cv2.imshow('object detection', image_np)

         cv2.imwrite("D:/run_result.png", image_np)

         cv2.waitKey(0)

         cv2.destroyAllWindows()
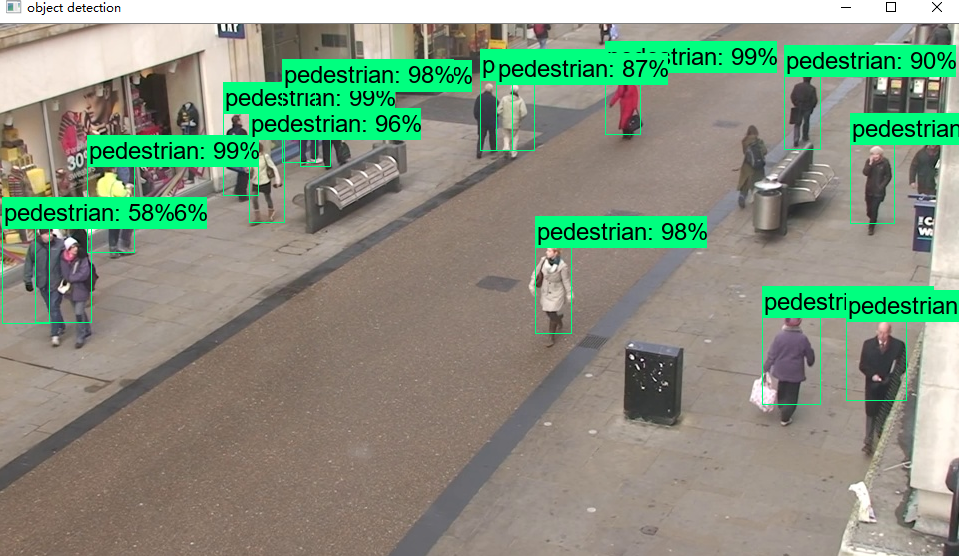
测试效果:
【Demo 1】基于object_detection API的行人检测 3:模型训练并在OpenCV调用模型的更多相关文章
- 【Demo 1】基于object_detection API的行人检测 2:数据制作
项目文件结构 因为目录太多又太杂,而且数据格式对路径有要求,先把文件目录放出来.(博主目录结构并不规范) 1.根目录下的models为克隆下来的项目.2.pedestrian_data目录下的路径以及 ...
- 【Demo 1】基于object_detection API的行人检测 1:环境与依赖
环境 系统环境: win10.python3.6.tensorflow1.14.0.OpenCV3.8 IDE: Pycharm 2019.1.3.JupyterNotebook 依赖 安装objec ...
- OpenCV中基于HOG特征的行人检测
目前基于机器学习方法的行人检测的主流特征描述子之一是HOG(Histogram of Oriented Gradient, 方向梯度直方图).HOG特征是用于目标检测的特征描述子,它通过计算和统计图像 ...
- 基于YOLO-V2的行人检测(自训练)附pytorch安装方法
声明:本文是别人发表在github上的项目,并非个人原创,因为那个项目直接下载后出现了一些版本不兼容的问题,故写此文帮助解决.(本人争取在今年有空的时间,自己实现基于YOLO-V4的行人检测) 项目链 ...
- opencv+树莓PI的基于HOG特征的行人检测
树莓PI远程控制摄像头请参考前文:http://www.cnblogs.com/yuliyang/p/3561209.html 参考:http://answers.opencv.org/questio ...
- 基于虚拟数据的行人检测研究(Expecting the Unexpected: Training Detectors for Unusual Pedestrians with Adversarial Imposters)
Paper Link : https://arxiv.org/pdf/1703.06283 Github: https://github.com/huangshiyu13/RPNplus 摘要: 这篇 ...
- paper 87:行人检测资源(下)代码数据【转载,以后使用】
这是行人检测相关资源的第二部分:源码和数据集.考虑到实际应用的实时性要求,源码主要是C/C++的.源码和数据集的网址,经过测试都可访问,并注明了这些网址最后更新的日期,供学习和研究进行参考.(欢迎补充 ...
- 行人检测(Pedestrian Detection)资源
一.论文 综述类的文章 [1]P.Dollar, C. Wojek,B. Schiele, et al. Pedestrian detection: an evaluation of the stat ...
- 目标检测之行人检测(Pedestrian Detection)---行人检测之简介0
一.论文 综述类的文章 [1]P.Dollar, C. Wojek,B. Schiele, et al. Pedestrian detection: an evaluation of the stat ...
随机推荐
- IO多路复用与异步非阻塞
1.基于socket,发送http请求 import socket import requests # 方式一 list=['li','gh ','nn'] for i in list: ret=re ...
- Dynamics 365中的事件框架与事件执行管道(Event execution pipeline)
本文介绍了Microsoft Dynamics 365(以下简称D365)中的两个概念,事件框架(Event Framework)与事件执行管道(Event execution pipeline). ...
- nvm淘宝源升级安装最新稳定版nodejs
为了在服务器上面升级nodejs,用nvm下载实在太慢了,推荐淘宝源安装命令,非常快能安装好: 第一步: NVM_NODEJS_ORG_MIRROR=https://npm.taobao.org/mi ...
- 『 效率工具 』Spring Boot版的轻量级代码生成器,减少70%以上的开发任务
一. 前言 之前很着迷于代码自动生成,减少写重复代码的工作量.网络上也搜索了很久,有基于插件的,有GUI的.但其配置和学习成本都比较高,都不是很如我意. 本想自己用SpringBoot写一个,在收集相 ...
- Android自动化测试探索(三)Android SDK tools安装、aapt配置以及使用aapt获取apk包名
Android SDK tools安装 下载连接: https://www.androiddevtools.cn 找到对应mac的版本下载安装即可 AAPT配置 #1. 进入根目录 cd ~ #2. ...
- Git--将已有的项目添加到github
(2). 初始化本地仓库,并提交内容到本地 需要先打开 命令行终端,然后通过 cd 命令切换到需要添加到github 的项目的目录下,然后依次执行如下命令, 具体命令及其含义如下: 1). touch ...
- 【转载】JDK自带的log工具
版权声明:本文为Jaiky_杰哥原创,转载请注明出处.This blog is written by Jaiky, reproduced please indicate. https://blog.c ...
- swoole异步任务数据报表生成
<?php include 'vendor/autoload.php'; class server { private $serv; private $db; /** * [__construc ...
- 《深入浅出RxJS》读书笔记
rxjs的引入 // 如果以这种方式导入rxjs,那么整个库都会导入,我们一般不可能在项目中运用到rxjs的所有功能 const Rx = require('rxjs'); 解决这个问题,可以使用深链 ...
- scikit-learn算法选择路径图
 原文链接:https://blog.csdn.net/guang_mang/article/details/73658496