二、Spring Cloud之注册中心 Eureka
前言
算是正式开始学习 spring cloud 的项目知识了,大概的知道Springcloud 是由众多的微服务组成的,所以我们现在一个一个的来学习吧。
注册中心,在微服务中算是核心了。所有的服务都会注册到注册中心,请求服务的时候,并不会直接去请求服务地址,而是先通过注册中心再转到目的地址。虽然Eureka 已经停止维护了,但是我们暂时使用起来还是没有问题的。
Eureka 主要有服务注册中心、服务提供者和服务消费。很多时候服务消费者也是服务提供者。所以就 Eureka 而言,分为 Eureka 服务端和Eureka 客户端,服务端就是注册中心,客户端就是服务提供者和消费者。
单机模式
好了,我们动手搭建一个Eureka 的服务端吧先,服务端有单机模式和集群模式,我们先来单机模式。
更具上篇文章讲的,我们使用maven 模块化开发,我们创建一个父级maven项目,pom.xml 文件内容如下:
<?xml version="1.0" encoding="UTF-8"?>

<project xmlns="http://maven.apache.org/POM/4.0.0"

         xmlns:xsi="http://www.w3.org/2001/XMLSchema-instance"

         xsi:schemaLocation="http://maven.apache.org/POM/4.0.0 http://maven.apache.org/xsd/maven-4.0.0.xsd">

    <modelVersion>4.0.0</modelVersion>

    <parent>

        <groupId>org.springframework.boot</groupId>

        <artifactId>spring-boot-starter-parent</artifactId>

        <version>2.2.2.RELEASE</version>

        <relativePath/> <!-- lookup parent from repository -->

    </parent>

    <groupId>cn.quellanan</groupId>

    <artifactId>SpringCloud</artifactId>

    <version>1.0.0</version>

    <packaging>pom</packaging>

    <properties>

        <java.version>1.8</java.version>

        <spring-cloud.version>Hoxton.SR1</spring-cloud.version>

    </properties>

    <dependencies>

        <dependency>

            <groupId>org.springframework.boot</groupId>

            <artifactId>spring-boot-starter</artifactId>

        </dependency>

        <dependency>

            <groupId>org.springframework.boot</groupId>

            <artifactId>spring-boot-starter-test</artifactId>

            <scope>test</scope>

            <exclusions>

                <exclusion>

                    <groupId>org.junit.vintage</groupId>

                    <artifactId>junit-vintage-engine</artifactId>

                </exclusion>

            </exclusions>

        </dependency>

    </dependencies>

    <dependencyManagement>

        <dependencies>

            <dependency>

                <groupId>org.springframework.cloud</groupId>

                <artifactId>spring-cloud-dependencies</artifactId>

                <version>${spring-cloud.version}</version>

                <type>pom</type>

                <scope>import</scope>

            </dependency>

        </dependencies>

    </dependencyManagement>

    <build>

        <plugins>

            <plugin>

                <groupId>org.springframework.boot</groupId>

                <artifactId>spring-boot-maven-plugin</artifactId>

            </plugin>

        </plugins>

    </build>

    <modules>

        <module>eureka-server-8000</module>

        <module>eureka-server-8001</module>

        <module>eureka-server-8002</module>

        <module>zlflovemm</module>

    </modules>

</project>
可以看到文件中指定了spring boot 和Spring cloud 等基础依赖的版本,这样保证各个模块版本的一致性。
子模块
接下来我们创建一个eureka-server-8000 的子模块。
pom.xml
pom.xml的内容如下:
<?xml version="1.0" encoding="UTF-8"?>

<project xmlns="http://maven.apache.org/POM/4.0.0" xmlns:xsi="http://www.w3.org/2001/XMLSchema-instance"

         xsi:schemaLocation="http://maven.apache.org/POM/4.0.0 https://maven.apache.org/xsd/maven-4.0.0.xsd">

    <modelVersion>4.0.0</modelVersion>

    <parent>

        <groupId>cn.quellanan</groupId>

        <artifactId>SpringCloud</artifactId>

        <version>1.0.0</version>

    </parent>

    <groupId>com.quellanan.springcloud</groupId>

    <artifactId>eureka-server-8000</artifactId>

    <version>1.0.0</version>

    <name>eureka-server-8000</name>

    <description>eureka project for Spring Boot</description>

    <dependencies>

        <dependency>

            <groupId>org.springframework.cloud</groupId>

            <artifactId>spring-cloud-starter-netflix-eureka-server</artifactId>

        </dependency>

    </dependencies>

</project>
可以看到继承了父级pom,额外的增加了 spring-cloud-starter-netflix-eureka-server 的依赖。
@EnableEurekaServer
在启动类中增加@EnableEurekaServer 注解,表示启用Eureka 服务端。
@SpringBootApplication

@EnableEurekaServer

public class EurekaServer8000Application {

    public static void main(String[] args) {

        SpringApplication.run(EurekaServer8000Application.class, args);

    }

}
application.properties
配置文件中增加如下配置
spring.application.name=spring-cloud-eureka-server-8000

server.port=8000

#表示是否将自己注册到Eureka Server,默认为true。

eureka.client.register-with-eureka=true

# 表示是否从Eureka Server获取注册信息,默认为true。

eureka.client.fetch-registry=true

#设置与Eureka Server交互的地址,查询服务和注册服务都需要依赖这个地址。多个地址可使用 , 分隔。

eureka.client.serviceUrl.defaultZone=http://localhost:${server.port}/eureka/
现在我们就可以启动项目看看

可以看到我们将自身注册到了服务中。
Eureka 客户端
前面说了,服务提供者和服务消费者都是客户端,其实就是我们具体的某一业务的项目。所以我们再创建一个子模块。我这里分开吧,我们分别创建服务提供者和服务消费者。
服务提供者
我们创建一个eureka-client-provider的子模块,pom 文件中引入spring-cloud-starter-netflix-eureka-client。
	<parent>

        <groupId>cn.quellanan</groupId>

        <artifactId>SpringCloud</artifactId>

        <version>1.0.0</version>

    </parent>

    groupId>com.quellanan.springcloud</groupId>

    <artifactId>eureka-client-provider</artifactId>

    <version>1.0.0</version>

    <name>eureka-client-provider</name>

    <description>eureka-client-provider 服务提供者</description>

    <dependencies>

        <dependency>

            <groupId>org.springframework.boot</groupId>

            <artifactId>spring-boot-starter-web</artifactId>

        </dependency>

        <dependency>

            <groupId>org.springframework.cloud</groupId>

            <artifactId>spring-cloud-starter-netflix-eureka-client</artifactId>

        </dependency>

    </dependencies>
启动类中加入@EnableEurekaClient注解或者@EnableDiscoveryClient注解都可以。
@SpringBootApplication

@EnableDiscoveryClient

public class EurekaClientProviderApplication {

    public static void main(String[] args) {

        SpringApplication.run(EurekaClientProviderApplication.class, args);

    }

}
application.properties 中增加如下配置
server.port=9000

#服务名,在注册时所用

spring.application.name=eureka-client-provider

eureka.client.serviceUrl.defaultZone=http://localhost:8000/eureka/
这里指定的eureka的服务中心的地址为8000。如上配置就可以将服务注册到注册中心啦。
我们在写一个测试接口。
创建一个IndexController 类,内容如下:
@RestController

public class HelloController {

    @RequestMapping("/hello")

    public String hello(){

        return "hello world ";

    }

}
服务消费者
我们一样的创建一个 eureka-client-consumer的模块。pom文件如下:
<parent>

        <groupId>cn.quellanan</groupId>

        <artifactId>SpringCloud</artifactId>

        <version>1.0.0</version>

    </parent>

    <groupId>com.quellanan.springcloud</groupId>

    <artifactId>eureka-client-consumer</artifactId>

    <version>1.0.0</version>

    <name>eureka-client-consumer</name>

    <description>eureka-client-consumer 服务消费者</description>

    <dependencies>

        <dependency>

            <groupId>org.springframework.boot</groupId>

            <artifactId>spring-boot-starter-web</artifactId>

        </dependency>

        <dependency>

            <groupId>org.springframework.cloud</groupId>

            <artifactId>spring-cloud-starter-netflix-eureka-client</artifactId>

        </dependency>

        <dependency>

            <groupId>org.springframework.cloud</groupId>

            <artifactId>spring-cloud-starter-openfeign</artifactId>

        </dependency>

    </dependencies>
相对于服务提供者,我们增加了Feign 依赖,主要用来发现服务和实现客户端负载均衡,我们这里用来发现服务就可以了。
在启动类中@EnableDiscoveryClient 用来发现服务,并注入RestTemplate 的实例bean 用来对服务提供的接口进行调用。@LoadBalanced 是开启客户端负载均衡的,最开始我没有加这个注解,但是发现不加的话,服务消费者就不能通过服务名来获取可用的服务提供者的实例。所以这里大家可以试验一下。
@EnableDiscoveryClient

@SpringBootApplication

public class EurekaClientConsumerApplication {

    @Bean

    @LoadBalanced

    public RestTemplate restTemplate(){

        return new RestTemplate();

    }

    public static void main(String[] args) {

        SpringApplication.run(EurekaClientConsumerApplication.class, args);

    }

}
我们接下写一个接口,调用服务消费者,我们创建一个IndexController,内容如下:
@RestController

public class IndexController {

    private static final String applicationName = "eureka-client-provider";

    @Autowired

    private RestTemplate restTemplate;

    @RequestMapping("/index")

    public String getHello(){

        String url = "http://"+ applicationName +"/hello";

        return  restTemplate.getForObject(url,String.class);

    }

}
这里我们可以看到applicationName 就是服务提供者的服务名。实际中,一种类型的服务可能有好几台服务器,可能物理地址和ip不一样,但是保证他们的服务名一样就可以了,这样服务消费者就可以通过服务名获取可用的列表,再通过复杂均衡策略选择其中一个实例访问。
最后我们在application中加上如下配置:
server.port=9001

#服务名,在注册时所用

spring.application.name=eureka-client-consumer

eureka.client.serviceUrl.defaultZone=http://localhost:8000/eureka/
测试
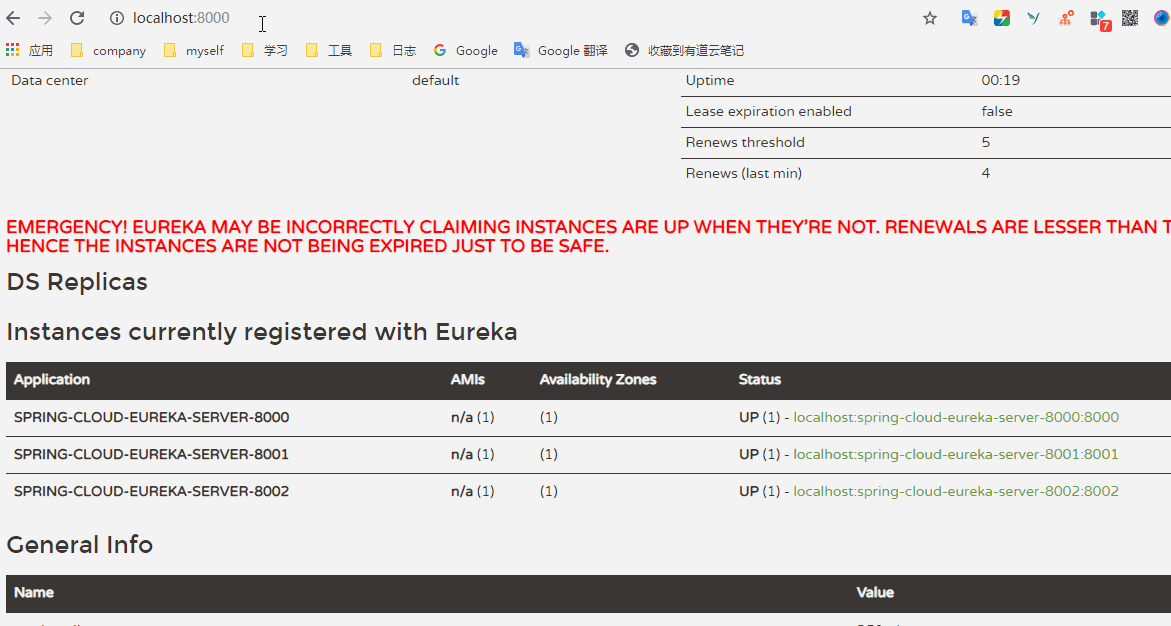
现在我们启动注册中心和客户端这两个项目来看下。启动后,我们输入
http://localhost:8000

可以发现我们的客户端已经注册到注册中心啦。服务提供者和服务消费者都已经注册到了注册中心啦。我们再来调接口试试。我们输入如下:
http://localhost:9001/index

可以看到其实获取了9000服务提供者的接口。这样就实现了服务的注册和发现啦,并实现远程调用。
集群模式(高可用)
上面我们我们搭建的注册中心只是单机模式,只有一个Eureka 服务端,单实际应用中注册中心其实是尤为重要的,所以就需要搭建集群环境,其实Eureka 对集群模式是天然的支持的,我们搭建也非常简单。
为什么这么说呢,我们前面可以看到只要配置了eureka.client.serviceUrl.defaultZone 就就会被对应的注册中线检测到,所以我们代码完全一样,只需要将eureka.client.serviceUrl.defaultZone相互指引就可以了,就就可以简单的搭建一个高可用的环境。
下面我们来搭建一个,因为我们就一台服务器,所以就用不同的端口,其实代码完全一样的,只是配置文件中配置不一样,我们分别把三个分配置文件贴出来。
8000端口的
spring.application.name=spring-cloud-eureka-server-8000

server.port=8000

#表示是否将自己注册到Eureka Server,默认为true。

eureka.client.register-with-eureka=true

# 表示是否从Eureka Server获取注册信息,默认为true。

eureka.client.fetch-registry=true

#设置与Eureka Server交互的地址,查询服务和注册服务都需要依赖这个地址。多个地址可使用 , 分隔。

eureka.client.serviceUrl.defaultZone=http://localhost:8001/eureka/,http://localhost:8002/eureka/
8001端口:
spring.application.name=spring-cloud-eureka-server-8001

server.port=8001

#表示是否将自己注册到Eureka Server,默认为true。

eureka.client.register-with-eureka=true

# 表示是否从Eureka Server获取注册信息,默认为true。

eureka.client.fetch-registry=true

#设置与Eureka Server交互的地址,查询服务和注册服务都需要依赖这个地址。多个地址可使用 , 分隔。

eureka.client.serviceUrl.defaultZone=http://localhost:8000/eureka/,http://localhost:8002/eureka/
8002 端口
spring.application.name=spring-cloud-eureka-server-8002

server.port=8002

#表示是否将自己注册到Eureka Server,默认为true。

eureka.client.register-with-eureka=true

# 表示是否从Eureka Server获取注册信息,默认为true。

eureka.client.fetch-registry=true

#设置与Eureka Server交互的地址,查询服务和注册服务都需要依赖这个地址。多个地址可使用 , 分隔。

eureka.client.serviceUrl.defaultZone=http://localhost:8000/eureka/,http://localhost:8001/eureka/
我们现在分别启动这个这三个配置文件,你们可以用profile 来指向,我这为了分明,直接创建了三个模块。启动后,我们分别访问
http://localhost:8000/

http://localhost:8001/

http://localhost:8002/
这里可以看到其实已经相互监控了。我们了解一下这两个配置参数。
#定义服务续约任务的调用时间间隔,默认30s

eureka.instance.lease-renewal-interval-in-seconds=30

#定义服务失效的时间默认90s

eureka.instance.lease-expiration-duration-in-seconds=90
我们现在再将我们的服务提供者和服务消费者注册进来,但是这里,需要修改的地方也是eureka.client.serviceUrl.defaultZone。将服务注册到集群中。
eureka.client.serviceUrl.defaultZone=http://localhost:8000/eureka/,http://localhost:8001/eureka/,http://localhost:8002/eureka/
然后启动项目可,可以看到注册到了注册中心,并且可以调用服务提供者提供的接口。

总结
最后画了一张图来说明整个注册中心的架构图。
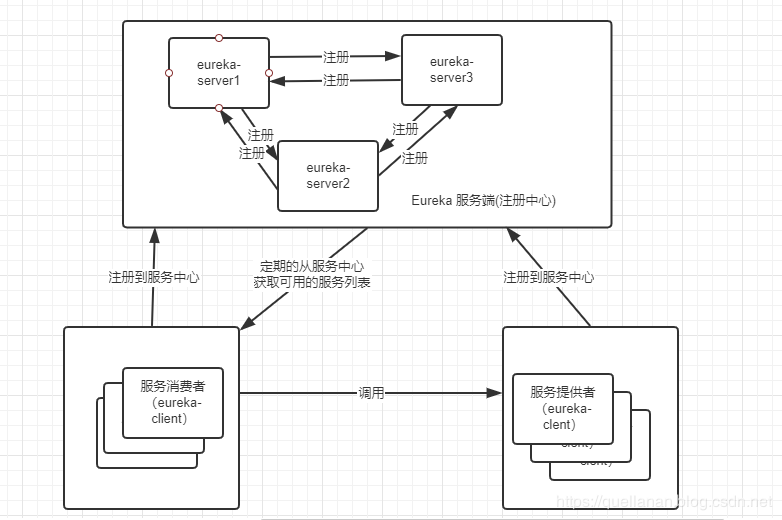
可以看到注册服务端可以是一个集群。相互注册监控。服务消费者和服务提供者都是服务客户端,都会将服务注册到服务中心,同时这些服务也都可以使是集群或者分布式的。服务提供者会从服务端获取服务提供者可用的服务实例列表,通过负载均衡策略选择其中某一实例进行调用。这个算是Eureka 的总结吧哈哈
番外
好啦,总是是写完了,这篇文章真是是卡了我好几天,有的地方写的不是很好,欢迎大家指点。
代码上传到github:
https://github.com/QuellanAn/SpringCloud
后续加油♡
欢迎大家关注个人公众号 "程序员爱酸奶"
分享各种学习资料,包含java,linux,大数据等。资料包含视频文档以及源码,同时分享本人及投递的优质技术博文。
如果大家喜欢记得关注和分享哟❤

二、Spring Cloud之注册中心 Eureka的更多相关文章
- spring cloud 服务注册中心eureka高可用集群搭建
spring cloud 服务注册中心eureka高可用集群搭建 一,准备工作 eureka可以类比zookeeper,本文用三台机器搭建集群,也就是说要启动三个eureka注册中心 1 本文三台eu ...
- spring Cloud服务注册中心Eureka集群
spring Cloud服务注册中心Eureka集群配置: 在application.yml文件加以下配置: server: port: 8761 tomcat: uri-encoding: UTF- ...
- 孰能巧用 Spring Cloud 服务注册中心Eureka
Eureka介绍 在Spring Cloud Netflix 整合技术栈中,Eureka既可以作为服务注册中心也可以用于服务发现对整个微服务架构起着最核心的整合作用. Eureka是基于REST(Re ...
- Spring Cloud 中注册中心Eureka客户端配置
注册中心配置客户端(注册一个虚拟的商品服务) 一.新建项目: 1.创建一个SpirngBoot应用,增加服务注册和发现依赖 2.模拟商品信息,存储在内存中 3.开发商品列表接口 ...
- spring Cloud服务注册中心eureka
Eureka是什么? 1.Eureka是SpringCloud Netflix的核心子模块. 2.Eureka包含Eureka Server和Eureka Client. 3.Server提供注册服务 ...
- Spring Cloud服务注册中心交付至kubernetes
前言 服务发现原则: 各个微服务在启动时,会将自己的网络地址等信息注册到服务发现组件中,服务发现组件会存储这些信息 服务消费者可以从服务发现组件中查询到服务提供者的网络地址,并使用该地址来远程调用服务 ...
- Spring Cloud的注册中心和服务者,消费者的构建
Spring Cloud的注册中心和服务者,消费者的构建 注册中心Eureka: 新建项目stu-eureka: StuEurekaApplication: package com.demo.stue ...
- Spring Cloud之注册中心搭建
一.注册中心服务端搭建 1)引入相关Maven坐标 <dependency> <groupId>org.springframework.cloud</groupId> ...
- Spring Cloud - Nacos注册中心入门单机模式及集群模式
近几年微服务很火,Spring Cloud提供了为服务领域的一整套解决方案.其中Spring Cloud Alibaba是我们SpringCloud的一个子项目,是提供微服务开发的一站式解决方案. 包 ...
随机推荐
- Android中使用lambda表达式
lambda 语法简介 视频为本篇播客知识点讲解,建议采用超清模式观看, 欢迎点击订阅我的优酷 如果刚学Android,不知道怎么写点击事件可以跳转,传送门 要想在Android中使用lambda语法 ...
- www的iptables实例
#!/bin/bash export PATH=/sbin:/usr/sbin:/bin:/usr/bin #加载相关模块 modprobe iptable_nat modprobe ip_nat_f ...
- Python--day22--面向对象的交互
Python里面自带的类和对象: 类名的作用: 类里面的与属性相关的对象self的运用: 实例化:就是创建一个对象 调用方法,类名.方法名(对象名) 执行步骤: 简写:alex.walk()等价于Pe ...
- spring security自定义指南
序 本文主要研究一下几种自定义spring security的方式 主要方式 自定义UserDetailsService 自定义passwordEncoder 自定义filter 自定义Authent ...
- 【u233】单词化简
Time Limit: 1 second Memory Limit: 64 MB [问题描述] 最近情报人员得到了一些经过加密的文章,每个单词都很长.破译人员想到先把单词化简一下,方法是把每个单词尽量 ...
- linux平台依赖性
每个电脑平台有其自己的特点, 内核设计者可以自由使用所有的特性来获得更好的性能. in the target object file ??? 不象应用程序开发者, 他们必须和预编译的库一起连接他们的代 ...
- The bind() Method
The bind() method was added in ESMAScript 5, but it is easy to simulate in ESMAScrpt 3. As its name ...
- 2019-4-10-win10-uwp-自定义标记扩展
title author date CreateTime categories win10 uwp 自定义标记扩展 lindexi 2019-04-10 09:46:13 +0800 2019-04- ...
- ipv6现状,加英文的中括号访问, ipv6测试http://test-ipv6.com
加英文的中括号就可以,如[2001:4998:c:e33::1004],我发现这是yahoo首页.但并不是所有IPv6网站都可以通过IPv6地址访问,跟IPv4一样,网站服务器端可以只绑定域名,不接受 ...
- vue在html中写动态背景图片
<div class="img" :style="`background: url(`+item.img+'?any_string_is_ok'+`)center ...