[2017-7-25]Android Learning Day3
最近真的有点迷茫,感觉没有一个完整的教学体系很难进行下去,有的都是自己瞎捉摸,就跟以前ACM的时候一样,动不动就“这就是一道,水题暴力就行了”、“我们枚举一下所有的状态,找一下规律就行了”,mmp哟。
不过!!!!!!!!!!!!!!!!!!!!!!B站简直就是万能的有没有!!!!!!!!!!!!!!!!!!!!!
前段时间在极客学院上看到了不错的Android教学,我看了看感觉教的有点乱,但是感觉很全。But!!!!!!!!!!!!!!!!!!!!!!!!!!!!!!!!
果然这些网站就是为了收钱哦,不过也可以理解啦。但是还是 买不起,结果嘿嘿嘿~~~~~~~~~~~~~~~~~~~~
废话不多说,快记录一下今天的自学!
1.Fragment
step1:写好两个Fragment布局文件,这个和活动的布局文件好像是一样的呢
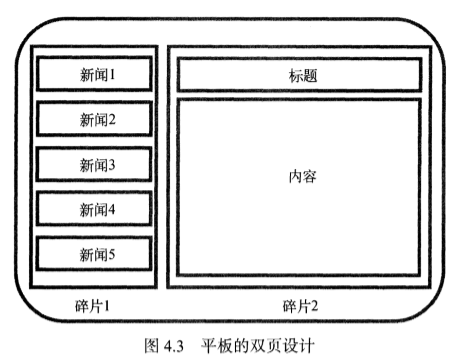
大概就是这个样子咯
左边一个右边一个,所以要写两个布局文件。
<!-- left_fragment.xml 左边的布局文件 -->

<?xml version="1.0" encoding="utf-8"?>

<LinearLayout xmlns:android="http://schemas.android.com/apk/res/android"

    android:orientation="vertical"

    android:layout_width="match_parent"

    android:layout_height="match_parent">

    <Button

        android:id="@+id/button"

        android:layout_width="wrap_content"

        android:layout_height="wrap_content"

        android:layout_gravity="center_horizontal"

        android:text="Button" />

</LinearLayout>

<!-- right_fragment.xml 右边的布局文件 -->

<?xml version="1.0" encoding="utf-8"?>

<LinearLayout xmlns:android="http://schemas.android.com/apk/res/android"

    android:orientation="vertical"

    android:background="#0fa4e9"

    android:layout_width="match_parent"

    android:layout_height="match_parent">

    <TextView

        android:id="@+id/textView"

        android:layout_width="wrap_content"

        android:layout_height="wrap_content"

        android:layout_gravity="center_horizontal"

        android:textSize="20sp"

        android:text="This is right fragment!" />

</LinearLayout>
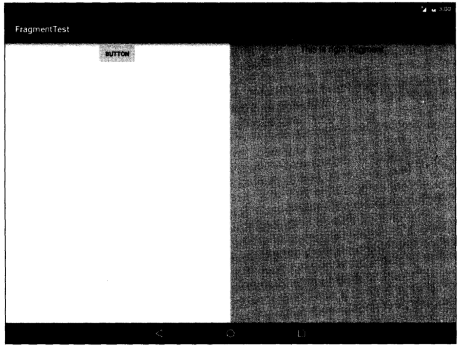
step2:将布局文件添加到主视图里哦
 <!-- activity_main.xml -->

 <?xml version="1.0" encoding="utf-8"?>

 <LinearLayout xmlns:android="http://schemas.android.com/apk/res/android"

     android:orientation="horizontal"

     android:layout_width="match_parent"

     android:layout_height="match_parent">

     <fragment

         android:id="@+id/left_fragment"

         <!-- 这里要注意完整的包名来引入布局文件 -->

         android:name="com.liwenchi.learnfragment.LeftFragment"

         android:layout_width="0dp"

         android:layout_height="match_parent"

         android:layout_weight="1" />

     <fragment

         android:id="@+id/right_fragment"

         android:name="com.liwenchi.learnfragment.RightFragment"

         android:layout_width="0dp"

         android:layout_height="match_parent"

         android:layout_weight="1" />

 </LinearLayout>
step3:新建RightFragment类和LeftFragment类并继承自Fragment
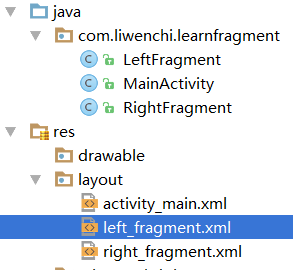
public class LeftFragment extends android.support.v4.app.Fragment{ //选择v4下的Fragment

    @Override

    public View onCreateView(LayoutInflater inflater, ViewGroup container, Bundle savedInstanceState) {

        View view = inflater.inflate(R.layout.left_fragment, container, false);

        return view;

    }

}
这样就OK啦。。。。。。。。。。。。
但其实我还是不知道这两个类在什么时候被调用的。。。。。。。。。我面向对象真的好菜啊!!!!!!!!!!!!!
2.动态创建Fragment
刚才那种方法只能先写好,就不能改了,这样不好。
先写一个another_right_fragment.xml,我们想实现,点击button,让右边的碎片更新。
<?xml version="1.0" encoding="utf-8"?>

<LinearLayout xmlns:android="http://schemas.android.com/apk/res/android"

    android:orientation="vertical"

    android:background="#9b9b9b"

    android:layout_width="match_parent"

    android:layout_height="match_parent">

    <TextView

        android:layout_width="wrap_content"

        android:layout_height="wrap_content"

        android:layout_gravity="center_horizontal"

        android:textSize="20sp"

        android:text="This is another right ftagment!"/>

</LinearLayout>
然后更新right_fragment.xml文件
<?xml version="1.0" encoding="utf-8"?>

<LinearLayout xmlns:android="http://schemas.android.com/apk/res/android"

    android:orientation="horizontal"

    android:layout_width="match_parent"

    android:layout_height="match_parent">

    <fragment

        android:id="@+id/left_fragment"

        android:name="com.liwenchi.learnfragment.LeftFragment"

        android:layout_width="0dp"

        android:layout_height="match_parent"

        android:layout_weight="1" />


    !注意这里的改动将一个静态绑定的Fragment换成了一个布局,以后将在这个布局内动态的创建或移除Fragment

    <FrameLayout

        android:id="@+id/right_layout"

        android:layout_width="0dp"

        android:layout_height="match_parent"

        android:layout_weight="1" >

    </FrameLayout>

</LinearLayout>
改写MainActivity.java
public class MainActivity extends AppCompatActivity implements View.OnClickListener {

    @Override

    protected void onCreate(Bundle savedInstanceState) {

        super.onCreate(savedInstanceState);

        setContentView(R.layout.activity_main);

        Button button = (Button) findViewById(R.id.button);

        button.setOnClickListener(this);

        replaceFragment(new RightFragment());

    }

    @Override

    public void onClick(View v) {

        switch (v.getId()) {

            case R.id.button:

                replaceFragment(new AnotherRightFragment()); 如果点击了button,那么执行replaceFragment方法

                break;

            default:

                break;

        }

    }


    这里创建了一个方法用来置换当前的Fragment

    private void replaceFragment(Fragment fragment) {

        FragmentManager fragmentManager = getSupportFragmentManager();先获取Fragmentmanager

        FragmentTransaction transaction = fragmentManager.beginTransaction();开启一个事务

        transaction.replace(R.id.right_layout, fragment);替换碎片

        transaction.addToBackStack(null);事务添加到返回栈,这样当你点击back按钮时,会返回上一个碎片

        transaction.commit();提交事务

    }

}
另外还有一个方法可以返回上一个碎片
fragmentManager.popBackStack();
这样就大功告成啦!
但是!!!!!!!!!!!!!!!!!!!!!!!!!!!!!!!!
还有个问题,就是这个返回栈有点小漏洞比如栈内一开始是空的
{null}oncreate会添加一个碎片1
{1}我点击button再添加一个碎片2
{1,2}这时候我又点击了button,又replace了一个碎片2
{1,2,2}但是很明显,我这个栈想要维护一个不重复的序列,而且不大看的懂英文文档。。。。。。现在不知道怎么解决了。。。。。。
===============================================
Tips:在活动里获取FragmentManager是
getSupportFragmentManager();
在碎片类里获取FragmentManager是
getFragmentManager();
动态加载布局的技巧
反正好像就是你创建一个layout-large文件夹,重写一个活动的xml文件,然后 系统就能很智能的判断他是大屏幕还是小屏幕。
3.碎片之间的通信
fragmentManager.findFragmentById(R.id.right_layout);  通过id调用碎片

MainActivity thisActivity = (MainActivity) getActivity();  在碎片类中调用与之关联的活动
4.碎片的生命周期
看视频学习......
[2017-7-25]Android Learning Day3的更多相关文章
- 【LOJ6067】【2017 山东一轮集训 Day3】第三题 FFT
[LOJ6067][2017 山东一轮集训 Day3]第三题 FFT 题目大意 给你 \(n,b,c,d,e,a_0,a_1,\ldots,a_{n-1}\),定义 \[ \begin{align} ...
- 【LOJ#6066】「2017 山东一轮集训 Day3」第二题(哈希,二分)
[LOJ#6066]「2017 山东一轮集训 Day3」第二题(哈希,二分) 题面 LOJ 题解 要哈希是很显然的,那么就考虑哈希什么... 要找一个东西可以表示一棵树,所以我们找到了括号序列. 那么 ...
- Becoming inspired (2) - ASC 2017 March 25
Becoming inspired - part 2 @ Advanced Studio Classroom Vol: 2017 MARCH 25 7.Who was I like as a chil ...
- iOS 动态库、静态库 . framework 总结(2017.1.25 修改)
修改于2017.1.25 使用Xcode Version 8.2.1 1.怎么创建.framework? 打开Xcode, 选择File ----> New ---> Project 选择 ...
- [2017-8-02]Android Learning Day8
自定义动画效果 新建一个customAnim类 package com.liwenchi.myapplication; import android.view.animation.Animation; ...
- [2017-7-26]Android Learning Day4
RecycleView 恩,学习Fragment的过程中的一个小实践居然用到了RecycleView!坑了我好久有木有!!好气哦,从昨晚到现在.(现在也还是一头雾水,不过照搬也会用了) 这是第一版的代 ...
- Android 笔记 day3
短信发送器 电脑弱爆了,开第二个emulater要10min!!! 顺便学会查看API文档 package com.example.a11; import java.util.*; import an ...
- Android Learning:微信第三方登录
这两天,解决了微信第三方授权登录的问题,作为一个新手,想想也是一把辛酸泪.我想着,就把我的遇到的坑给大家分享一下,避免新手遇到我这样的问题能够顺利避开. 步骤一 微信开发者平台 我开始的解决思路是,去 ...
- Android Learning:多线程与异步消息处理机制
在最近学习Android项目源码的过程中,遇到了很多多线程以及异步消息处理的机制.由于之前对这块的知识只是浅尝辄止,并没有系统的理解.但是工程中反复出现让我意识到这个知识的重要性.所以我整理出这篇博客 ...
随机推荐
- 测试python最大递归层次
转自:https://www.cnblogs.com/xiongdashuai/p/6243372.html python默认的最大递归层数: 运行环境:Windows 7,x64python环境:p ...
- spring aop学习记录
许多AOP框架,比较常用的是Spring AOP 与AspectJ.这里主要学习的Spring AOP. 关于AOP 日志.事务.安全验证这些通用的.散步在系统各处的需要在实现业务逻辑时关注的事情称为 ...
- Spring Boot(1)——开发你的第一款Spring Boot应用(Edition1)
Spring Boot(1)——开发你的第一款Spring Boot应用(Edition1) 准备工作: java:java 8 或者 java 9: Spring框架:5.0.8.RELEASE或以 ...
- CentOS7下Nginx搭建反向代理,并使用redis保存session
1.启动两个tomcat,端口分别为8080,8081 2.配置nginx,vim /usr/local/nginx/conf/nginx.conf 添加如下配置: 3.启动nginx或热加载 启动: ...
- 当使用cokie进行数据交互时候,cookie只需存储该对象的id即可不需要存放其他数据;只需在写个接口根据cookie里面的对象id来创建对象
当使用cokie进行数据交互时候,cookie只需存储该对象的id即可不需要存放其他数据:只需在写个接口根据cookie里面的对象id来创建对象
- 思路:controller层:后台如何取值 前端如何给name赋值 例如是id赋值还是自己随意定义
思路:controller层:后台如何取值 前端如何给name赋值 例如是id赋值还是自己随意定义
- Nginx CGI反向代理对照
陶辉104 CGI是什么? CGI全称是“通用网关接口”(Common Gateway Interface),HTTP服务器与你的或其它机器上的程序进行“交谈”的一种工具
- .net core 2.0 数据访问-迁移
将用于进行迁移的 Entity Framework Core NuGet包 添加到`.csproj`文件 <ItemGroup> <DotNetCliToolReference In ...
- linux系统命令大全
文件管理 cat chattr chgrp chmod chown cksum cmp cp cut diff diffstat file find git gitview in indent les ...
- BZOJ5418[Noi2018]屠龙勇士——exgcd+扩展CRT+set
题目链接: [Noi2018]屠龙勇士 题目大意:有$n$条龙和初始$m$个武器,每个武器有一个攻击力$t_{i}$,每条龙有一个初始血量$a_{i}$和一个回复值$p_{i}$(即只要血量为负数就一 ...