Tkinter控件Canvas
网上关于tkinter的canvas组件系统的中文教程很少,英文教程未知。要么是专业的参考文档,没有丰富的实例,要么在不同的论坛,博客平台零零散散存在一些canvas的例子,这给学习canvas带来了不便。也许应该从各种canvas的实例着手,结合参考文档,边学习边总结。除此之外从哪里开始也是一个问题,目前对我来说,需求是通过canvas实现自绘按钮,那么就这样开始吧。
1.canvas绘制基本图形的方法
1.1画线(Line)
方法:
create_line(x0,y0,x1,y1,……,xn,yn,*options)
参数x0到yn指定显示中一系列的两点或多点坐标,来描述一条线或一系列线。在数的后面可以是任何数量的选项-值对。每对用户来配置选项。这些相同的选项-值对可以用在itemconfigure调用中修改项的配置。
例子:
from tkinter import *

root=Tk()

cv=Canvas(root,background="white")

cv.pack()

line_point=[(10,10),(12,11),(15,18),

            (20,22),(24,23),(30,39),

            (40,45),(50,60),(60,10),

            (100,101),(110,110),(112,114),

            (116,115),(120,118),(170,200)]

line1=cv.create_line(line_point,fill="orange",dash=(10,6,3),arrow=LAST,smooth=TRUE,width=5)

line2=cv.create_line(line_point,fill="blue",dash=(10,6,3),arrow=LAST,smooth=TRUE,width=5)

line3=cv.create_line(line_point,fill="red",dash=(10,6,3),arrow=LAST,smooth=TRUE,width=5)

cv.coords(line1,20,20,30,10,170,200)

cv.delete(line3)

root.mainloop()

用到的属性
·fill,设置线的填充颜色
·dash,设置为虚线
·arrow,设置线的箭头,默认为None,表示无箭头,还可以设置为FIRST,LAST,BOTH
·smooth,值为布尔值,指出线是否是曲的
·width,设置线宽
其他方法
·coords(item,x0,y0,x1,y1,……,xn,yn
查询或修改一个项的坐标
·delete(item)
删除一项
1.2画矩形(Rectangle)
方法:
create_rectangle(x0,y0,x1,y1,*options)
参数x0,y0,x1,y1指定显示中长方形对坐标(左上角和右下角),在数的后面可以是任何数量的选项-值对。每对用户来配置选项。这些相同的选项-值对可以用在itemconfigure调用中修改项的配置。
例子:
from tkinter import *

root=Tk()

cv=Canvas(root,background="white")

cv.pack()

rt1=cv.create_rectangle(100,50,300,200,outline="green",fill="red",stipple="gray25")

rt2=cv.create_rectangle(100,50,300,200,outline="green",fill="green",stipple="gray25")

cv.coords(rt2,60,70,260,220)

root.mainloop()
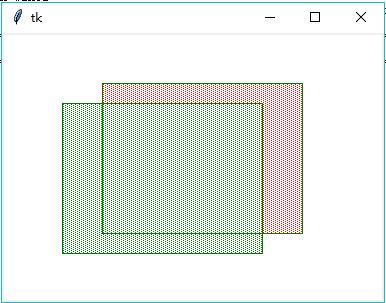
用到的属性
·outline,边界颜色,如果为空则不画边界
·stipple,指出长方形填充点的样式,单位为bitmap
其他方法
coords,delete
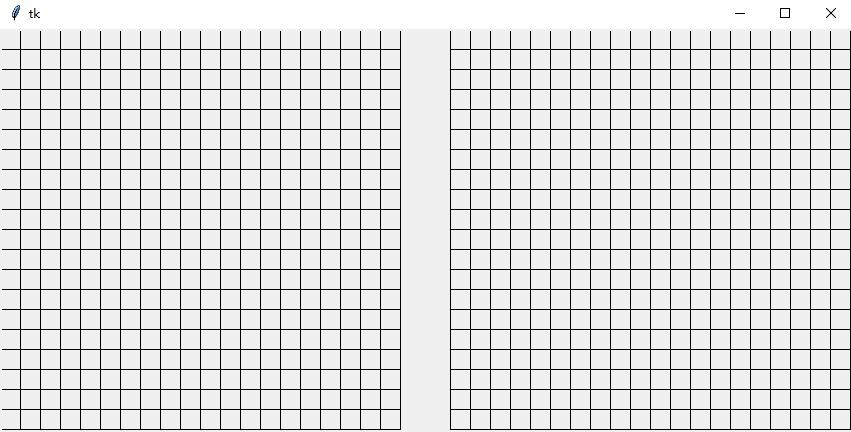
例2:
from tkinter import *

root=Tk()

cv=Canvas(root,width=850,height=400)

cv.pack()

pw=20

for k in range(2):

    for i in range(20):

        for j in range(20):

            cv.create_rectangle(

            k*450+j*pw, i*pw, k*450+(j+1)*pw, (i+1)*pw)

root.mainloop()
1.3画多边形(Polygon)
方法:
create_polygon(x0,y0,x1,y1,*options)
参数x0到yn指定显示中一系列的三点或多点坐标,来描述一个封闭多边形。起点和终点可以相同也可以不同;不管相同与否,Tkinter都画出封闭的多边形。在数的后面可以是任何数量的选项-值对。每对用户来配置选项。这些相同的选项-值对可以用在itemconfigure调用中修改项的配置。
例1:
from tkinter import *

root=Tk()

cv=Canvas(root)

cv.pack()

poly_points=[(0,80),(140,0),(140,40),(270,40),

             (270,120),(140,120),(140,160)]

cv.create_polygon(poly_points,fill="pink")

root.mainloop()
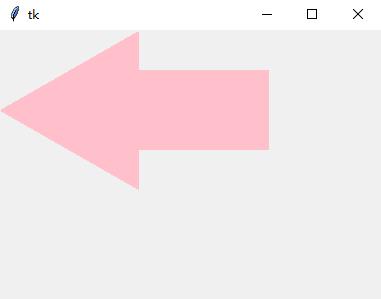
属性有outline,smooth,stipple,tags
其他方法:delete,coords.itemconfigure
扩展阅读Canvas Widgets
以下为节选:
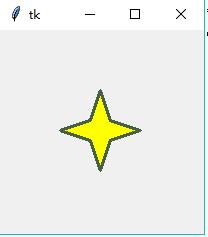
当你看到这里的时候,可能马上就到圣诞节了,也可能没有,我们通过Tkinter创建一些星星来提高下一个圣诞节的氛围。第一颗星星是直接创建的,几乎不使用任何编程的技巧。
from tkinter import *

canvas_width = 200

canvas_height =200

python_green = "#476042"

master = Tk()

w = Canvas(master,

           width=canvas_width,

           height=canvas_height)

w.pack()

points = [100, 140, 110, 110, 140, 100, 110, 90, 100, 60, 90, 90, 60, 100, 90, 110]

w.create_polygon(points, outline=python_green,

            fill='yellow', width=3)

mainloop()
正如我们提及的,这是一种很笨拙的方法。设想如果我们需要改变星星的尺寸或者厚度,我们就必须手动地改变所有的点坐标,这很容易出错而且显得很繁琐。所以我们提供前一个脚本的新版本,将包含更多的编程技能。我们使用函数来生成星星,使用一个起始点和两个表示长度的p和t参数创建星星:
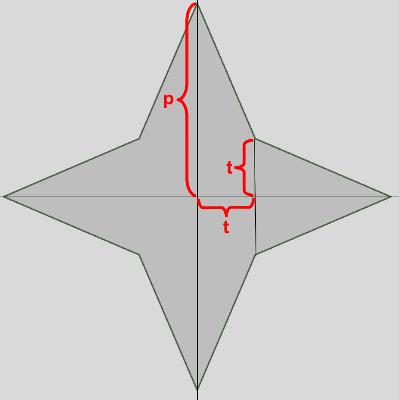
我们改进的程序如下:
from tkinter import *

canvas_width = 400

canvas_height =400

python_green = "#476042"

def polygon_star(canvas, x,y,p,t, outline=python_green, fill='yellow', width = 1):

   points = []

   for i in (1,-1):

      points.extend((x,          y + i*p))

      points.extend((x + i*t, y + i*t))

      points.extend((x + i*p, y))

      points.extend((x + i*t, y - i * t))

   print(points)

   canvas.create_polygon(points, outline=outline,

                         fill=fill, width=width)

master = Tk()

w = Canvas(master,

           width=canvas_width,

           height=canvas_height)

w.pack()

p = 50

t = 15

nsteps = 10

step_x = int(canvas_width / nsteps)

step_y = int(canvas_height / nsteps)

for i in range(1, nsteps):

   polygon_star(w,i*step_x,i*step_y,p,t,outline='red',fill='gold', width=3)

   polygon_star(w,i*step_x,canvas_height - i*step_y,p,t,outline='red',fill='gold', width=3)

mainloop()

1.4画椭圆
方法:
create_oval(x0,y0,x1,y1,*options)
x0,y0,x1,x2给出椭圆的矩形的对角坐标。在坐标之后可以是任何数量的选项-值对。每对用户来配置选项。这些相同的选项-值对可以用在itemconfigure调用中修改项的配置。
例子:
from tkinter import *

root=Tk()

cv=Canvas(root)

cv.create_oval(50,30,300,200,fill="lightblue",outline="",width=3)

cv.pack()

mainloop()

属性有:outline,stipple(貌似无效),tags
其他方法:delete,coords.itemconfigure
1.5画弧形(Arc)
方法:create_arc(x0,y0,x1,y1,*options)
x0,y0,x1,y1给出包含定义弧的椭圆的矩形对角坐标。在坐标之后可以是任何数量的选项-值对。每对用户来配置选项。这些相同的选项-值对可以用在itemconfigure调用中修改项的配置。
例子:
from tkinter import *

root=Tk()

cv=Canvas(root)

cv.create_arc(50,30,300,200,fill="lightblue",outline="lightblue",style="arc")

cv.create_arc(50,30,300,200,fill="orange",outline="",start=90,extent=70)

cv.create_arc(50,30,300,200,fill="yellow",outline="",start=160,extent=60)

cv.create_arc(50,30,300,200,fill="blue",outline="",start=220,extent=90,style=CHORD)

cv.pack()

mainloop()
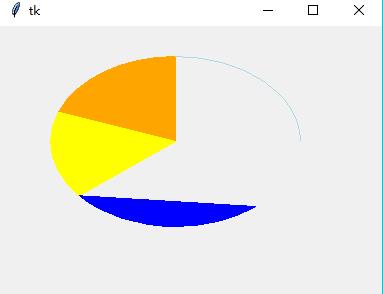
用到的属性:
·start,指定弧所占角度起始点,角度是按照顺时针方向测量的,角度大小可以是正,也可以是负
·extent,指出所包含角度的大小,角度从起始点按逆时针方向开始
·style,指定如何画弧,默认是PIESLICE,还可以设置为ARC,CHORD
其他属性:
stipple(未知),outlinestipple(未知),tags等
其他方法:delete,coords
1.6画位图(Bitmap)
方法:create_bitmap(x,y,*options)
参数x,y指定显示中用来定位位图的点的坐标(使用anchor选项)。在坐标后面可以是任何数量的选项-值对。每对用户来配置选项。这些相同的选项-值对可以用在itemconfigure调用中修改项的配置。
例子:
from tkinter import *

root=Tk()

cv=Canvas(root)

bitmaps = ["error", "gray75", "gray50", "gray25", "gray12",

"hourglass", "info", "questhead", "question", "warning"]

for i in range(len(bitmaps)):

    cv.create_bitmap((i+1)*30,30,bitmap=bitmaps[i])

cv.pack()

mainloop()

属性:tags,bitmap
其他方法:delete,coords
1.7画图像(Image)
create_image(x,y,*options)
参数x,y指定显示中用来定位图像的点的坐标(使用anchor选项)。在坐标后面可以是任何数量的选项-值对。每对用户来配置选项。这些相同的选项-值对可以用在itemconfigure调用中修改项的配置。
属性:tags,image
其他方法:delete,coords
1.8文本(Text)
方法:create_text(x,y,*options)
参数x,y指定显示文本的点的坐标,在数的后面可以是任何数量的选项-值对。每对用户来配置选项。这些相同的选项-值对可以用在itemconfigure调用中修改项的配置。
例子:
from tkinter import *

root=Tk()

cv=Canvas(root)

cv.create_text(100,50,text="这是第一行文字",font="黑体,16",fill="Blue",)

cv.pack()

mainloop()
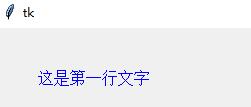
属性:font,justify,tags,text
其他属性:stipple(未知)
其他方法:delete,coords
1.9画窗口
方法:create_window(x,y,*options
参数x,y指定显示窗口的点的坐标,在数的后面可以是任何数量的选项-值对。每对用户来配置选项。这些相同的选项-值对可以用在itemconfigure调用中修改项的配置。
例子:
from tkinter import *

root=Tk()

cv=Canvas(root)

frm=Frame(cv,relief=GROOVE,borderwidth=2)

Label(frm,text="Embedded Frame/Label").pack()

cv.create_window(100,50,window=frm,anchor=CENTER)

cv.pack()

mainloop()
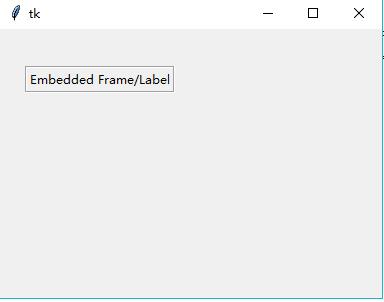
属性:tags,window
其他方法:delete,coords
1.10Canvas函数一些属性,方法
1.10.1属性
·highlightthickness,缺省值为2,文本框高两边宽度
·stipple,用画刷填充,单位是bitmap,可以直接使用系统bitmap索引,["error", "gray75", "gray50", "gray25", "gray12","hourglass", "info", "questhead", "question", "warning
·tags,为项目添加标签,tags可以用来索引item,如item=cv.create_rectangle(tags="t1"),delete("t1")和delete(item)等效;可以使用gettags(item)获得项目的tags,与此相反,使用find_widthtag("t1")获得对应item。其他关于tags的操作函数还有addtag_above,addtag_below,find_above,find_below等
1.10.2方法
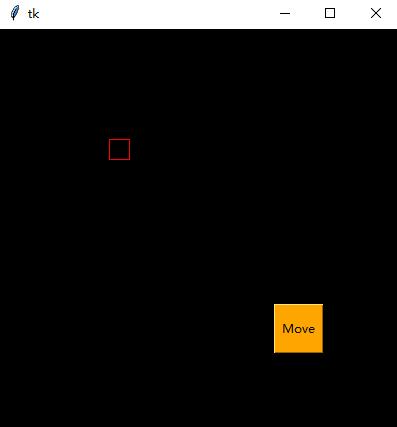
·move(item,x,y),将项目的横纵坐标移动x,y个单位
示例:
from tkinter import *

def move_rect():

    cv.move(rect,10,10)

root=Tk()

cv=Canvas(root,width=400,height=400,highlightthickness=0,bd=0)

cv.configure(bg="black")

rect=cv.create_rectangle(0,0,20,20,outline="red")

btn=Button(cv,text="Move",background="orange",activebackground="green",command=move_rect)

cv.create_window(300,300,height=50,width=50,window=btn)

cv.pack()

root.mainloop()
·delete(item1,item2,item3,item4)删除项目,传入ALL删除所有项目
·scale(item, xscale, yscale, xoffset, yoffset)
按比例调整item的大小(缩放),项目的坐标按照(coord-offset)*scale+offset被重新计算。换言之,每个项目先移动 -offset,然后乘以比例因子,最后再移回来。值得注意的是,这种方法修改了项目的坐标,如果在一个项目中多次使用该方法,可能会降低精度。
·tag_bind(item, event=None, callback, add=None)
为所有匹配项目添加事件绑定
Tkinter控件Canvas的更多相关文章
- Tkinter 控件详细介绍
Tkinter 控件详细介绍 1.Button 按钮.类似标签,但提供额外的功能,例如鼠标掠过.按下.释放以及键盘操作/事件 2.Canvas 画布.提供绘图功能(直线.椭圆.多边形.矩形) ;可以包 ...
- 重新想象 Windows 8 Store Apps (7) - 控件之布局控件: Canvas, Grid, StackPanel, VirtualizingStackPanel, WrapGrid, VariableSizedWrapGrid
原文:重新想象 Windows 8 Store Apps (7) - 控件之布局控件: Canvas, Grid, StackPanel, VirtualizingStackPanel, WrapGr ...
- python之Tkinter控件学习
转载自 http://www.cnblogs.com/kaituorensheng/p/3287652.html#_label0 阅读目录 1. 产品介绍 2. 设计规划 3. 相关知识 4. 源码 ...
- Tkinter控件
1.顶层(Toplevel) Toplevel为其他控件提供单独的容器.共有四种类型(1)主顶层,作为根被应用,应该就是root(2)子顶层,依赖于根,根破坏,子顶层也被破坏(3)临时顶层,画在父顶层 ...
- Silverlight 2学习笔记二:三个基本布局控件(Canvas、StackPanel、Grid )
这篇文章主要是翻译了ScottGu博客的文章:Silverlight Tutorial Part 2: Using Layout Management.虽然是翻译,但通过笔记记录,我发现对这三个布局控 ...
- Python tkinter 控件更新信息
下面几个例子关于tkinter界面更新的,简单易懂,分享一下. 例子_1: 代码_1: from tkinter import Tk, Checkbutton, Label from tkinter ...
- Tkinter 控件
文章更新于:2020-02-19 待翻译跟进 In this part of the Tkinter tutorial, we will cover some basic Tkinter widget ...
- Tkinter控件(python GUI)
- tkinter的控件
包含如下控件: Button 按钮控件 Canvas 画布控件,显示图形元素如线程或文本 Checkbutton 多选框控件,用于在程序中提供多项选择框 Entry 单行输入控件,用于显示简单的文本 ...
随机推荐
- 面试题(10)之 leetcode-26
题目描述 解法一 对数组去重求数组长度,没有必要 /** * @param {number[]} nums * @return {number} */ var removeDuplicates = f ...
- java菜鸡循环练习
While 循环练习 输入3次密码,则打印密码锁定 package com.lv.test; import java.util.Scanner; public class DemoPass { pu ...
- kali下DNS劫持(9.28 第十四天)
DNS劫持 环境: windows2008R2 被攻击者 kali 攻击者 1.在攻击者电脑中搭建web服务 2.在/var/www/html 写入html文件 index.htm ...
- UVA - 12107 Digit Puzzle(数字谜)(IDA*)
题意:给出一个数字谜,要求修改尽量少的数,使修改后的数字谜只有唯一解.空格和数字可以随意替换,但不能增删,数字谜中所有涉及的数必须是没有前导零的正数.输入数字谜一定形如a*b=c,其中a.b.c分别最 ...
- MVC MVP MVVM 简述
MVC 通过代理或者通知传递数据. MVP 通过P绑定model和view解耦. MVVM 通过V绑定VM(监听VM属性的变化.方法传递(改变自身被监听属性)) VM绑定model设置自身属性.
- (1) JVM内存管理:内存模型
引子 一段简单的代码结果引发疑问,==到底比较的是什么?equals呢? public static void main(String args[]){ String s1="abc&quo ...
- ajax 跨域webapi 最简单的demo(只介绍Get)
这几天遇到一个nodejs的项目,使用VSCode开发,需要连接数据库的,但是用nodejs连接数据库比较繁琐,需要安装很多东西,本人也懒得去研究了.后来想到建一个WebAPI然后用ajax来调用,避 ...
- 2020PHP面试-Redis篇
一.Redis 数据类型 1. string 字符型. 2.hash hash 结构化的对象. key不可重复 3.list 队列 lpush rpop lpop rpush 4. set 集 ...
- Condition接口及其主要实现类ConditionObject源码浅析
1.引子 任意一个Java对象,都拥有一组监视器方法(定义在java.lang.Object上),主要包括wait().wait(long timeout).notify()以及notifyAll() ...
- CodeForces - 131C The World is a Theatre(组合数)
题意:已知有n个男生,m个女生.现在要选t个人,要求有至少4个男生,至少1个女生,求有多少种选法. 分析: 1.展开,将分子中的m!与分母中n!相约,即可推出函数C. #pragma comment( ...