
Spring Boot学习笔记(二二) - 与Mybatis集成
Spring Boot中的JPA部分默认是使用的hibernate,而如果想使用Mybatis的话就需要自己做一些配置。使用方式有两种,第一种是Mybatis官方提供的 mybatis-spring-boot-starter ,第二种是类似 mybatis-spring的方式,需要自己写一些代码。但是可以更方便地控制Mybatis的各项配置。
mybatis-spring-boot-starter
这种方式只需要在application.properties中配置相关的Mybatis属性就可以了。数据源使用的是Spring Boot默认的数据源
mybatis.mapperLocations: mapper配置文件的路径,支持通配符方式

mybatis.typeAliasesPackage: 用来扫描Entity的包

mybatis.config:mybatis-config.xml配置文件的路径

mybatis.typeHandlersPackage:扫描typeHandlers的包

mybatis.checkConfigLocation:检查配置文件是否存在

mybatis.executorType:设置执行模式(SIMPLE, REUSE, BATCH),默认为SIMPLE
mybatis-spring方式
这种方式和平常的用法比较接近。需要添加mybatis依赖和mybatis-spring依赖。然后创建一个MyBatisConfig配置类:
package com.freud.test.springboot;

import javax.sql.DataSource;

import org.apache.ibatis.session.SqlSessionFactory;

import org.mybatis.spring.SqlSessionFactoryBean;

import org.mybatis.spring.SqlSessionTemplate;

import org.springframework.beans.factory.annotation.Autowired;

import org.springframework.context.annotation.Bean;

import org.springframework.context.annotation.Configuration;

import org.springframework.core.io.support.PathMatchingResourcePatternResolver;

import org.springframework.core.io.support.ResourcePatternResolver;

import org.springframework.jdbc.datasource.DataSourceTransactionManager;

import org.springframework.transaction.PlatformTransactionManager;

import org.springframework.transaction.annotation.EnableTransactionManagement;

import org.springframework.transaction.annotation.TransactionManagementConfigurer;

/**

 * MyBatis基础配置

 *

 * @author Freud

 */

@Configuration

@EnableTransactionManagement

public class MybatisConfig implements TransactionManagementConfigurer {

    @Autowired

    private DataSource dataSource;

    @Bean(name = "sqlSessionFactory")

    public SqlSessionFactory sqlSessionFactoryBean() {

        SqlSessionFactoryBean bean = new SqlSessionFactoryBean();

        bean.setDataSource(dataSource);

        bean.setTypeAliasesPackage("com.freud.test.springboot");

        // 添加XML目录

        ResourcePatternResolver resolver = new PathMatchingResourcePatternResolver();

        try {

            bean.setMapperLocations(resolver.getResources("classpath:mapper/*.xml"));

            return bean.getObject();

        } catch (Exception e) {

            e.printStackTrace();

            throw new RuntimeException(e);

        }

    }

    @Bean

    public SqlSessionTemplate sqlSessionTemplate(SqlSessionFactory sqlSessionFactory) {

        return new SqlSessionTemplate(sqlSessionFactory);

    }

//
* 因为添加了spring-boot-starter-
* jdbc依赖,会触发DataSourceTransactionManagerAutoConfiguration这个自动化配置类
* ,自动构造事务管理器,所以若只有一个数据源可以不必进行下面的配置@Bean public PlatformTransactionManager annotationDrivenTransactionManager() { return new DataSourceTransactionManager(dataSource); } }上面代码创建了一个SqlSessionFactory和一个SqlSessionTemplate,为了支持注解事务,增加了@EnableTransactionManagement注解,并且反回了一个PlatformTransactionManagerBean。
添加一个MyBatisMapperScannerConfig.java类,把mapper扫描单独放在这里配置(或者在Application 添加@MapperScan注解)
如果想要扫描MyBatis的Mapper接口, 就需要配置MapperScannerConfigurer。
package com.freud.test.springboot;

import org.mybatis.spring.mapper.MapperScannerConfigurer;

import org.springframework.boot.autoconfigure.AutoConfigureAfter;

import org.springframework.context.annotation.Bean;

import org.springframework.context.annotation.Configuration;

/**

 * MyBatis扫描接口

 *

 * @author Freud

 */

@Configuration

// 注意,由于MapperScannerConfigurer执行的比较早,所以必须有下面的注解

@AutoConfigureAfter(MybatisConfig.class)

public class MyBatisMapperScannerConfig {

    @Bean

    public MapperScannerConfigurer mapperScannerConfigurer() {

        MapperScannerConfigurer mapperScannerConfigurer = new MapperScannerConfigurer();

        mapperScannerConfigurer.setSqlSessionFactoryBeanName("sqlSessionFactory");

        mapperScannerConfigurer.setBasePackage("com.freud.test.springboot.mapper");

        return mapperScannerConfigurer;

    }

}
实验
本实验使用mybatis-spring-boot-starter方式。
创建一个Maven项目

pom.xml
<project xmlns="http://maven.apache.org/POM/4.0.0" xmlns:xsi="http://www.w3.org/2001/XMLSchema-instance"

    xsi:schemaLocation="http://maven.apache.org/POM/4.0.0 http://maven.apache.org/xsd/maven-4.0.0.xsd">

    <modelVersion>4.0.0</modelVersion>

    <groupId>com.freud.test</groupId>

    <artifactId>spring-boot-22</artifactId>

    <version>0.0.1-SNAPSHOT</version>

    <packaging>jar</packaging>

    <name>spring-boot-22</name>

    <url>http://maven.apache.org</url>

    <properties>

        <project.build.sourceEncoding>UTF-8</project.build.sourceEncoding>

    </properties>

    <dependencies>

        <dependency>

            <groupId>org.springframework.boot</groupId>

            <artifactId>spring-boot-starter-web</artifactId>

        </dependency>

        <dependency>

            <groupId>org.mybatis.spring.boot</groupId>

            <artifactId>mybatis-spring-boot-starter</artifactId>

            <version>1.0.0</version>

        </dependency>

        <dependency>

            <groupId>org.springframework.boot</groupId>

            <artifactId>spring-boot-starter-jdbc</artifactId>

        </dependency>

        <dependency>

            <groupId>mysql</groupId>

            <artifactId>mysql-connector-java</artifactId>

        </dependency>

    </dependencies>

    <build>

        <plugins>

            <plugin>

                <groupId>org.springframework.boot</groupId>

                <artifactId>spring-boot-maven-plugin</artifactId>

            </plugin>

        </plugins>

    </build>

    <dependencyManagement>

        <dependencies>

            <dependency>

                <groupId>org.springframework.boot</groupId>

                <artifactId>spring-boot-dependencies</artifactId>

                <version>1.5.4.RELEASE</version>

                <type>pom</type>

                <scope>import</scope>

            </dependency>

        </dependencies>

    </dependencyManagement>

</project>
application.yml
spring:

  application:

    name: test-22

  jpa:

    generate-ddl: false

    show-sql: true

    hibernate:

      ddl-auto: none

  datasource:

    platform: MYSQL

    continue-on-error: false

    driver-class-name: com.mysql.jdbc.Driver

    url: jdbc:mysql://localhost:3306/test?useSSL=false

    username: root

    password: root

    schema: classpath:schema.sql

    data: classpath:data.sql

server:

  port: 9090

mybatis:

  mapper-locations: classpath:mapper/*.xml

  type-aliases-package: com.freud.test.springboot
schema.sql
DROP TABLE IF EXISTS `user`;

CREATE TABLE `user` (

  `id` int(20) NOT NULL AUTO_INCREMENT,

  `name` varchar(50) NOT NULL,

  `age` int(10) NOT NULL,

  PRIMARY KEY (`id`)

) ENGINE=InnoDB DEFAULT CHARSET=utf8;

DELETE FROM `user`;
data.sql
insert into user(id, name, age) values(1,'Freud1',29);

insert into user(id, name, age) values(2,'Freud2',29);

insert into user(id, name, age) values(3,'Freud3',29);

insert into user(id, name, age) values(4,'Freud4',29);

insert into user(id, name, age) values(5,'Freud5',29);
UserMapper.xml
<?xml version="1.0" encoding="UTF-8" ?>

<!DOCTYPE mapper

PUBLIC "-//ibatis.apache.org//DTD Mapper 3.0//EN"

"http://ibatis.apache.org/dtd/ibatis-3-mapper.dtd">

<mapper namespace="com.freud.test.springboot.mapper.UserMapper">

    <resultMap id="user" type="com.freud.test.springboot.bean.User">

        <id property="id" jdbcType="INTEGER" column="ID"/>

        <result property="name" jdbcType="VARCHAR" column="NAME"/>

        <result property="age" jdbcType="INTEGER" column="AGE"/>

    </resultMap>

    <select id="getById" resultMap="user">

        SELECT

            ID,

            NAME,

            AGE

        FROM USER

        WHERE ID = #{id}

    </select>

    <insert id="insert">

        INSERT INTO USER

        (

            NAME,

            AGE

        )

        VALUES

        (

            #{name},

            #{age}

        )

    </insert>

    <delete id="delete">

        DELETE FROM USER

        WHERE ID = #{id}

    </delete>

</mapper>
User.java
package com.freud.test.springboot.bean;

/**

 * @author Freud

 */

public class User {

    private long id;

    private String name;

    private int age;

    public long getId() {

        return id;

    }

    public void setId(long id) {

        this.id = id;

    }

    public String getName() {

        return name;

    }

    public void setName(String name) {

        this.name = name;

    }

    public int getAge() {

        return age;

    }

    public void setAge(int age) {

        this.age = age;

    }

}
UserController.java
package com.freud.test.springboot.controller;

import java.util.List;

import org.springframework.beans.factory.annotation.Autowired;

import org.springframework.web.bind.annotation.GetMapping;

import org.springframework.web.bind.annotation.RequestMapping;

import org.springframework.web.bind.annotation.RequestParam;

import org.springframework.web.bind.annotation.RestController;

import com.freud.test.springboot.bean.User;

import com.freud.test.springboot.mapper.UserMapper;

/**

 * @author Freud

 */

@RestController

@RequestMapping("/user")

public class UserController {

    public static final String RESULT_SUCCESS = "success";

    public static final String RESULT_FAILED = "failed";

    @Autowired

    private UserMapper userMapper;

    @GetMapping("/all")

    public List<User> all() {

        return userMapper.getAll();

    }

    @GetMapping("/find")

    public User find(@RequestParam("id") long id) {

        return userMapper.getById(id);

    }

    @GetMapping("/save")

    public String save(User user) {

        try {

            userMapper.insert(user);

            return RESULT_SUCCESS;

        } catch (Exception e) {

            return RESULT_FAILED;

        }

    }

    @GetMapping("/delete")

    public String delete(@RequestParam("id") long id) {

        try {

            userMapper.delete(id);

            return RESULT_SUCCESS;

        } catch (Exception e) {

            return RESULT_FAILED;

        }

    }

}
UserMapper.java
package com.freud.test.springboot.mapper;

import java.util.List;

import org.apache.ibatis.annotations.Param;

import org.apache.ibatis.annotations.Select;

import com.freud.test.springboot.bean.User;

/**

 * @author Freud

 */

public interface UserMapper {

    @Select("SELECT * FROM USER")

    public List<User> getAll();

    public User getById(@Param("id") long id);

    public void insert(User user);

    public void delete(@Param("id") long id);

}
App.java
package com.freud.test.springboot;

import org.springframework.boot.SpringApplication;

import org.springframework.boot.autoconfigure.SpringBootApplication;

/**

 * @author Freud

 */

@SpringBootApplication

public class App {

    public static void main(String[] args) {

        SpringApplication.run(App.class, args);

    }

}
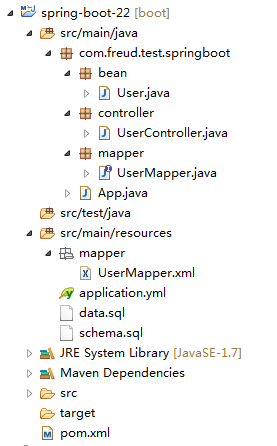
项目结构
运行及结果
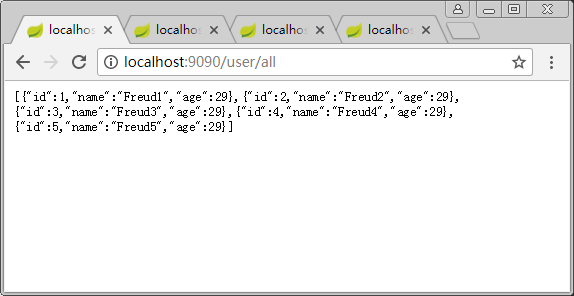
访问http://localhost:9090/user/all,查看所有的用户列表:
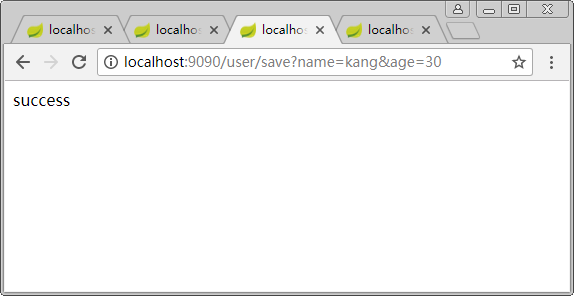
通过浏览器的Get请求创建一个新的用户http://localhost:9090/user/save?name=kang&age=30
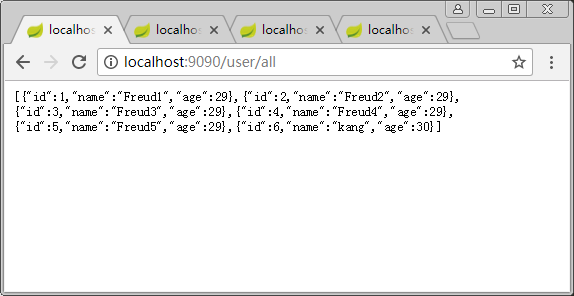
重新访问http://localhost:9090/user/all,查看所有的用户列表:
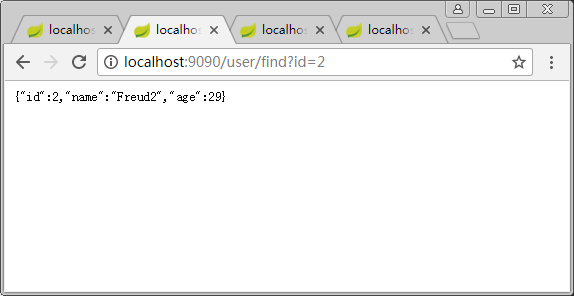
通过ID查询某个用户信息http://localhost:9090/user/find?id=2:
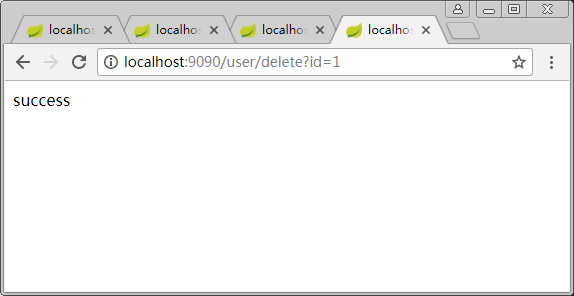
通过ID删除某个用户信息http://localhost:9090/user/delete?id=1
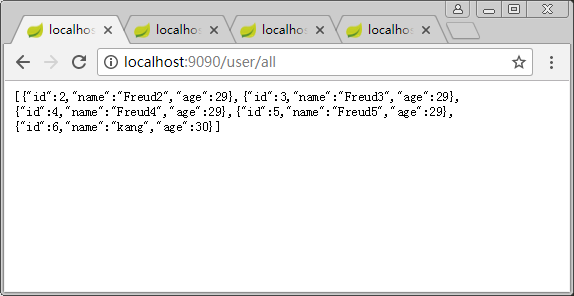
重新访问http://localhost:9090/user/all,查看所有的用户列表:
参考资料
Spring Boot学习笔记(二二) - 与Mybatis集成的更多相关文章
- spring boot 学习笔记(二)之打包
一.叙述 spring boot 在 pom 中可以配置成 packaging 为 jar ,这样打包出来的就是一个 jar 包,可以通过 Java 命令直接运行, Java 命令为: java - ...
- spring boot学习笔记(二)创建spring boot项目
用eclipse(需要用高版本,要不然弄不出来):new →Spring Sarter Project 用IDEA:一般默认 一般默认 入门级的先 剩下的一般默认... 一.项目至少有下面的东西,里面 ...
- 我的第一个spring boot程序(spring boot 学习笔记之二)
第一个spring boot程序 写在前面:鉴于spring注解以及springMVC的配置有大量细节和知识点,在学习理解之后,我们将直接进入spring boot的学习,在后续学习中用到注解及其他相 ...
- Java框架spring Boot学习笔记(二):Hello Spring Boot、以及项目属性配置
新建一个新建一个SpringBootTest工程 新建一个HelloController.java文件 package com.example.demo; import org.springframe ...
- Spring Boot学习笔记(二)——HelloWorld实现
提示:要在Eclipse里使用Spring Boot,首先要安装STS插件,前面我们已经安装了STS插件了,可以创建Spring Boot项目了. 1.创建项目: 新建项目,选择Spring Boot ...
- Spring Boot 学习笔记(六) 整合 RESTful 参数传递
Spring Boot 学习笔记 源码地址 Spring Boot 学习笔记(一) hello world Spring Boot 学习笔记(二) 整合 log4j2 Spring Boot 学习笔记 ...
- Spring Boot学习笔记2——基本使用之最佳实践[z]
前言 在上一篇文章Spring Boot 学习笔记1——初体验之3分钟启动你的Web应用已经对Spring Boot的基本体系与基本使用进行了学习,本文主要目的是更加进一步的来说明对于Spring B ...
- 我的Spring Boot学习记录(二):Tomcat Server以及Spring MVC的上下文问题
Spring Boot版本: 2.0.0.RELEASE 这里需要引入依赖 spring-boot-starter-web 这里有可能有个人的误解,请抱着怀疑态度看. 建议: 感觉自己也会被绕晕,所以 ...
- 【Spring Boot学习之十二】mybatis3 分页打印sql日志
环境 eclipse 4.7 jdk 1.8 Spring Boot 1.5.2 参考: mybatis手册 Mybatis的插件 PageHelper 分页查询使用方法MyBatis中Like语句使 ...
随机推荐
- C# 实现OrderBy按多个字段排序
//倒序 list.OrderByDescending(i => i.a).ThenByDescending(i => i.b); //顺序 list.OrderBy(i => i. ...
- IntelliJ IDEA 2017.2 下载和破解方法
一.IntelliJ IDEA 2017 下载地址 http://www.jetbrains.com/idea/#chooseYourEdition 要下载付费版的,免费版的很多功能不能用 二.破解 ...
- JSON初试
本次在课堂上老师教我使用JSON. 本次的教学网站是:https://developer.mozilla.org/en-US/docs/Learn/JavaScript/Objects/JSON?td ...
- vue的一些特殊特性
一.使用$ref特性获取DOM元素 代码示例如下所示: <!DOCTYPE html> <html lang="en"> <head> < ...
- CentOS 7 学习笔记
Centos7 命令行 快捷键: 上方向键, 查看上一条命令 Ctrl+C 强制终止程序运行 新版 nmtui 配置网络 旧版 setup(已经没了) 网络接口 ip a = ip a ...
- pId的数据结构转children 数据结构(JS);
在工作中经常遇到需要把带有pId的的list数据转换为children格式的树形结构,一直都没有找到太好的工具函数.偶然间看到了这个函数,研究了下,感觉这个函数很强大,所以记录下来,作为备用,同时也贴 ...
- Latest SoC
From: http://laoyaoba.com/ss6/html/68/n-505768.html 2014年国产ARM SoC芯片巡礼(上) 关注“集微网”,微信点播新闻.随要随有 来源: &l ...
- wxpython Menus and toolbars
Menus and toolbars A common part in a GUI application is a menubar. A menubar consists of objects ca ...
- wxpyhon 对话框
Python内置了好多定义好了的对话框供我们使用,这里先介绍三个最常用的: 1 Message dialog 2 Text entry 3 Choosing from a list 当然python还 ...
- Appium 如何模拟返回按键
from appium.webdriver import Remote driver.keyevent(4) python中点击返回键是这样写的 附录 keycode 电话键 KEYCODE_CALL ...