Graylog2日志服务安装配置
软件版本:
- mongodb-org-3.2.10
- jdk-1.8.0 (推荐rpm包,不然要修改Graylog启动脚本定义的JAVA命令路径)
- elasticsearch-2.4.1 (Graylog 2.x does not work with Elasticsearch 5.x)
- graylog-server-2.1.1 (1.3版本之后已经集成graylog-web)
1.MongoDB
编辑/etc/yum.repos.d/mongodb-org-3.2.repo文件
[mongodb-org-3.2]

name=MongoDB Repository

baseurl=https://repo.mongodb.org/yum/redhat/$releasever/mongodb-org/3.2/x86_64/

gpgcheck=1

enabled=1

gpgkey=https://www.mongodb.org/static/pgp/server-3.2.asc
安装mongodb
yum install mongodb-org
启动mongodb
/etc/init.d/mongod start
2.Elasticsearch
编辑/etc/yum.repos.d/elasticsearch.repo文件
[elasticsearch-2.x]

name=Elasticsearch repository for 2.x packages

baseurl=https://packages.elastic.co/elasticsearch/2.x/centos

gpgcheck=1

gpgkey=https://packages.elastic.co/GPG-KEY-elasticsearch

enabled=1
安装elasticsearch
yum install elasticsearch
修改/etc/elasticsearch/elasticsearch.yml文件
cluster.name: graylog
启动elasticsearch
/etc/init.d/elasticsearch start
3.Graylog
安装graylog仓库
rpm -Uvh https://packages.graylog2.org/repo/packages/graylog-2.1-repository_latest.rpm

yum install graylog-server
安装epel仓库和pwgen软件
rpm -ivh https://dl.fedoraproject.org/pub/epel/epel-release-latest-6.noarch.rpm

yum install -y pwgen (后面生成密码使用)
生成password_secret密码
pwgen -N -s
生成root_password_sha2密码
echo -n | sha256sum
修改/etc/graylog/server/server.conf配置文件,将上面生成的密码写入到对应的变量
password_secret =

root_password_sha2 =

root_timezone = Asia/Shanghai

rest_listen_uri =  http://0.0.0.0:9000/api/

web_listen_uri = http://0.0.0.0:9000/

allow_highlighting = true (运行查询结果高亮)

elasticsearch_shards =  (当前只安装了一个elasticsearch)

elasticsearch_index_prefix = graylog
启动graylog
/etc/init.d/graylog-server start
登录graylog
http://IP(graylog-server):9000 进入graylog登录页

管理员帐号/密码: admin/(前面生成的密码)
4.日志采集
4.1测试日志获取
- 添加tcp协议
进入 System > Inputs > Inputs in Cluster > Raw/Plaintext TCP | Launch new input
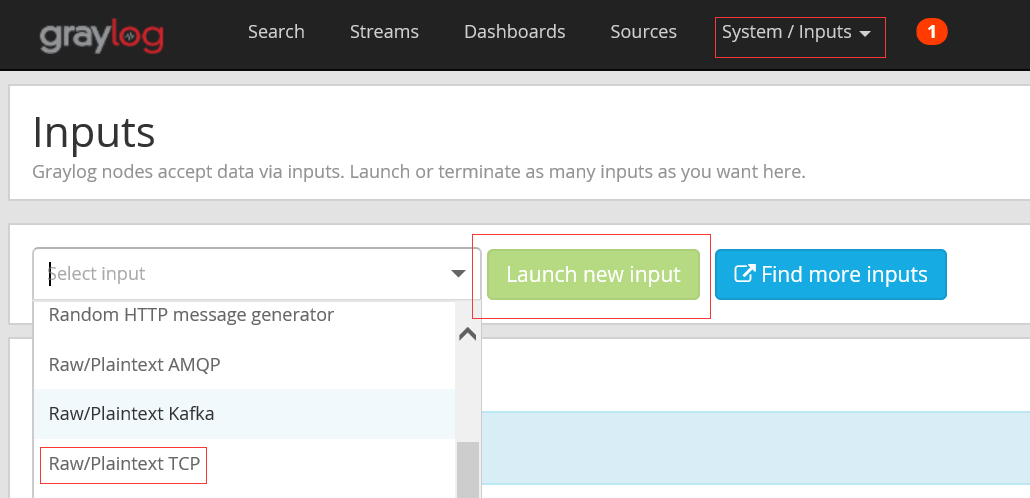
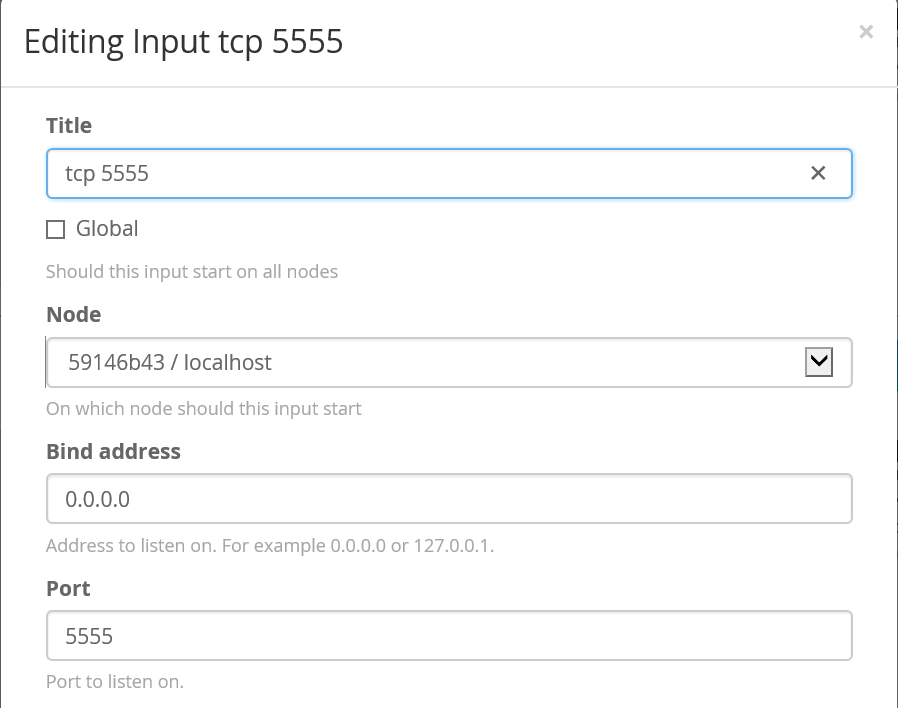
取名"tcp 5555" 完成创建:
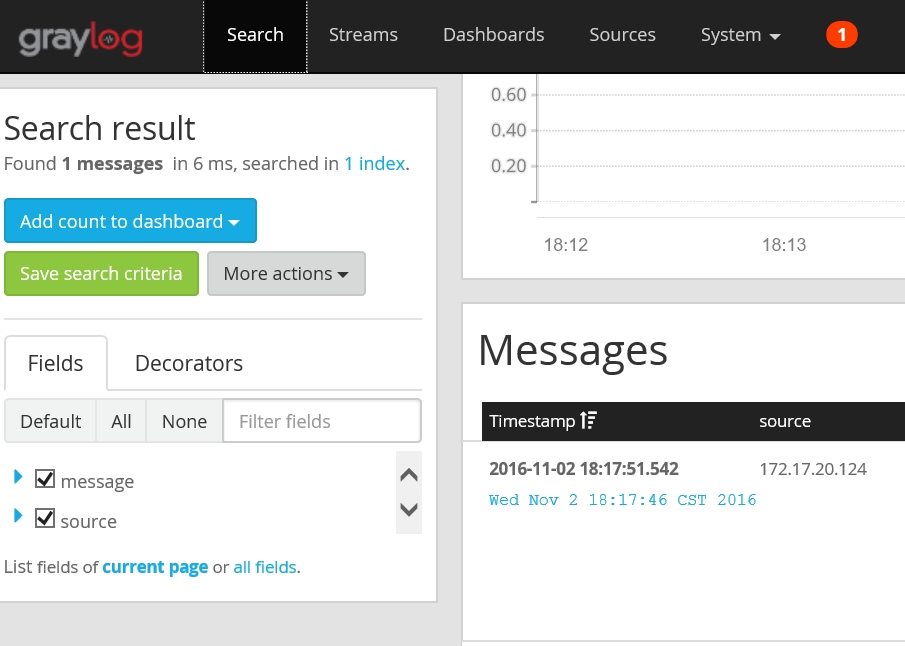
在安装有nc命令的Linux机器上执行:
echo `date` | nc graylog-server 5555
登录web页面查看获取的信息:
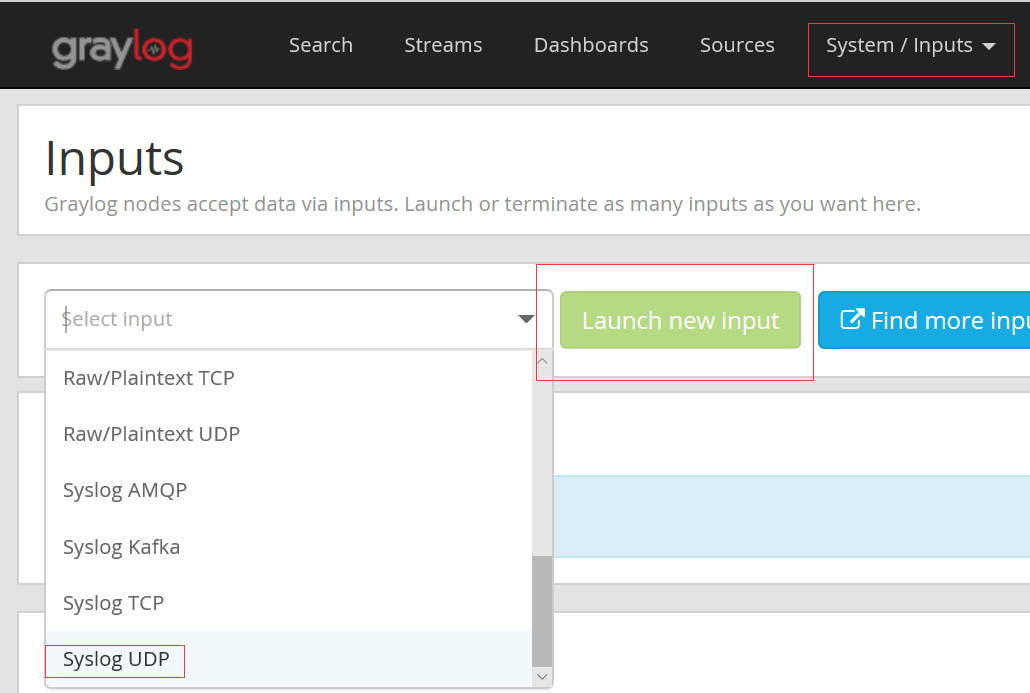
4.2 系统日志采集,使用rsyslog服务推送
添加Inputs端口,例如1514
修改采集端的rsyslog配置文件/etc/rsyslog.conf,开启UDP端口。重启rsyslog服务
$ModLoad imudp
$UDPServerRun 514
修改被采集端的rsyslog配置文件/etc/rsyslog.conf。重启rsyslog服务
$template GRAYLOGRFC5424,"<%pri%>%protocol-version% %timestamp:::date-rfc3339% %HOSTNAME% %app-name% %procid% %msg%\n"*.* @172.17.20.123:1514(Inputs定义的端口);GRAYLOGRFC5424
搜集到的系统日志信息:

4.3 nginx日志采集,使用rsyslog服务推送
在nginx服务器上,修改rsyslog配置文件/etc/rsyslog.conf,修改如下配置
$ModLoad imfile
添加配置文件/etc/rsyslog.d/nginx.conf(名称自定义)
$InputFileName /var/log/nginx/error.log
$InputFileTag graylog-nginx-errorlog:
$InputFileStateFile state-graylog-nginx-errorlog
$InputRunFileMonitor
$InputFileName /var/log/nginx/access.log
$InputFileTag graylog-nginx-accesslog:
$InputFileStateFile state-graylog-nginx-accesslog
$InputRunFileMonitor
$InputFilePollInterval 10 #等待10秒钟发送一次
if $programname == 'graylog-nginx-errorlog' then @172.17.20.123:514
if $programname == 'graylog-nginx-errorlog' then ~
if $programname == 'graylog-nginx-accesslog' then @172.17.20.123:514
if $programname == 'graylog-nginx-accesslog' then ~
*.* @172.17.20.123:514
重启rsyslog服务
/etc/init.d/rsyslog restart
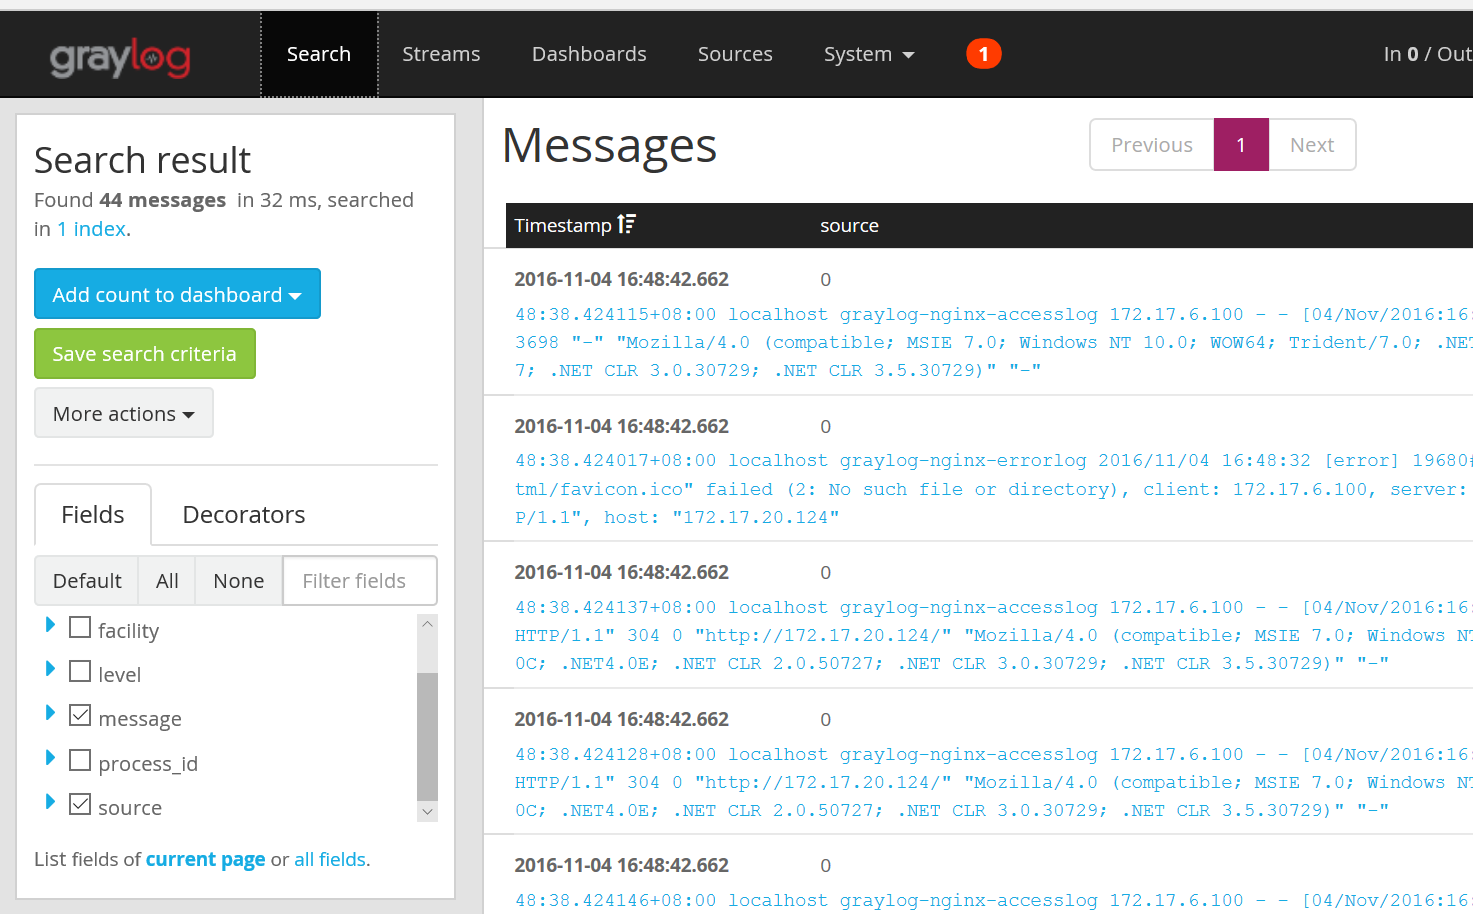
搜集到的nginx日志信息:
5.和kibana集成
- 安装kibana
rpm -ivh https://download.elastic.co/kibana/kibana/kibana-4.6.2-x86_64.rpm
- 启动kibana
/etc/init.d/kibana start
- 创建graylog index mapping 文件,graylog-custom-mapping.json
{
"template": "graylog_*",
"mappings" : {
"message" : {
"properties" : {
"http_method" : {
"type" : "string",
"index" : "not_analyzed"
},
"http_response_code" : {
"type" : "long"
},
"ingest_time" : {
"type" : "date",
"format": "strict_date_time"
},
"took_ms" : {
"type" : "long"
}
}
}
}
}
- 加载index mapping到Elasticsearch
$ curl -X PUT -d @'graylog-custom-mapping.json' 'http://localhost:9200/_template/graylog-custom-mapping?pretty'
{
"acknowledged" : true
}
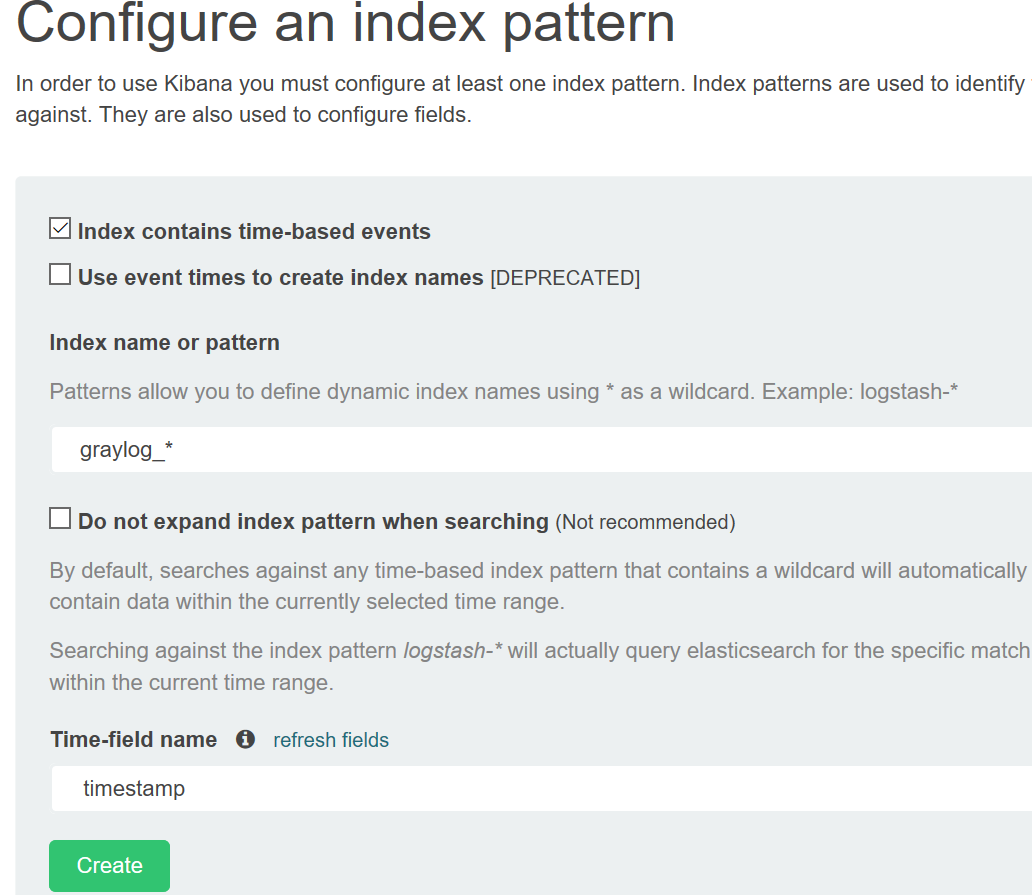
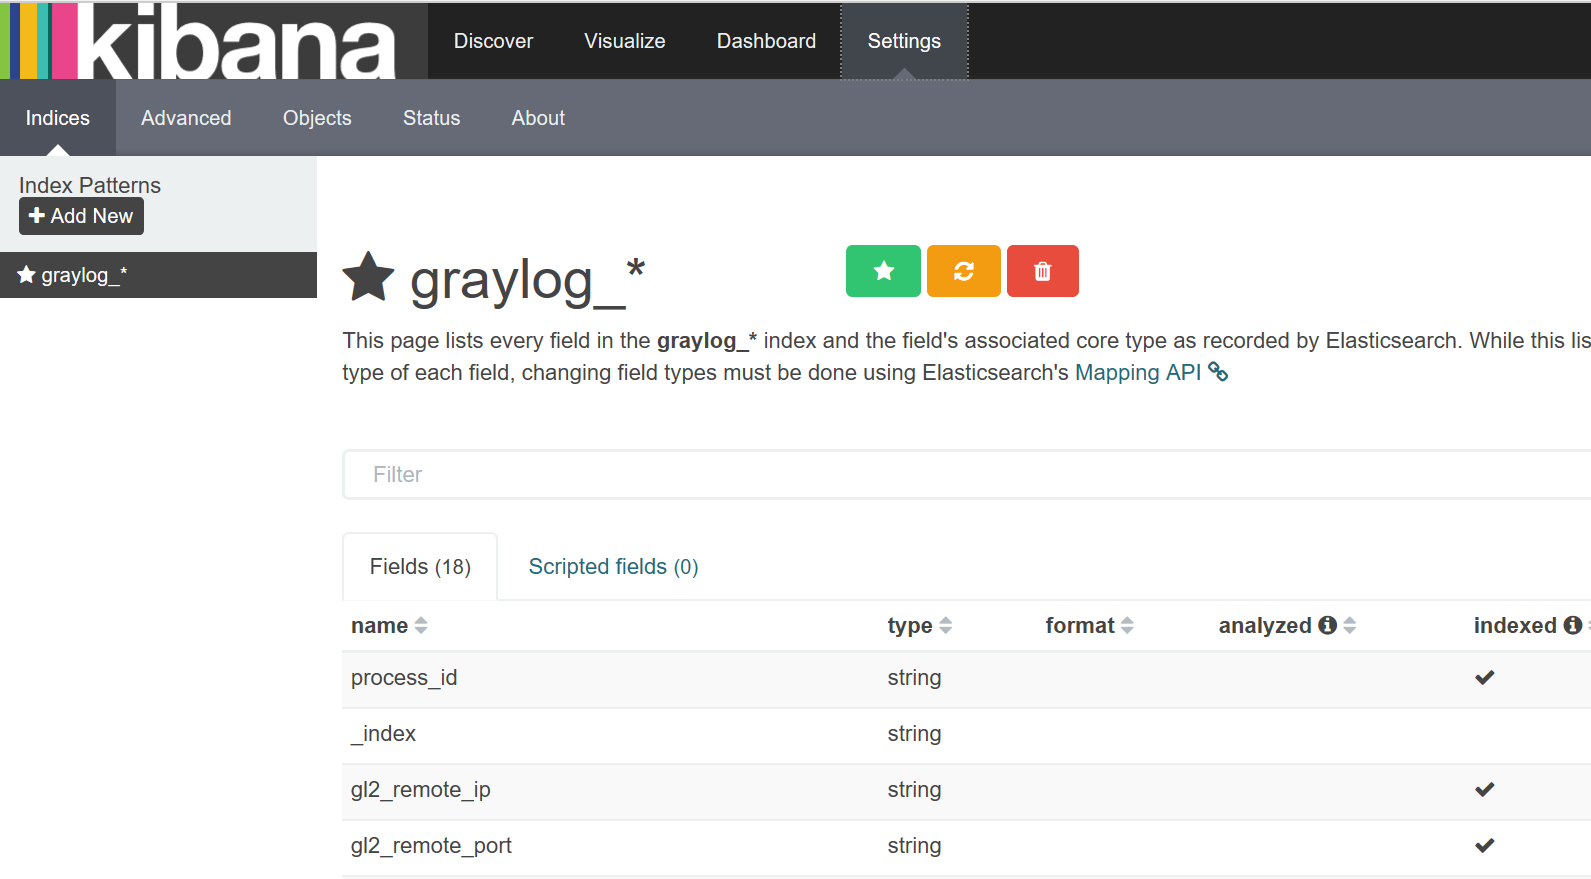
- 打开kibana页面,创建graylog_*索引
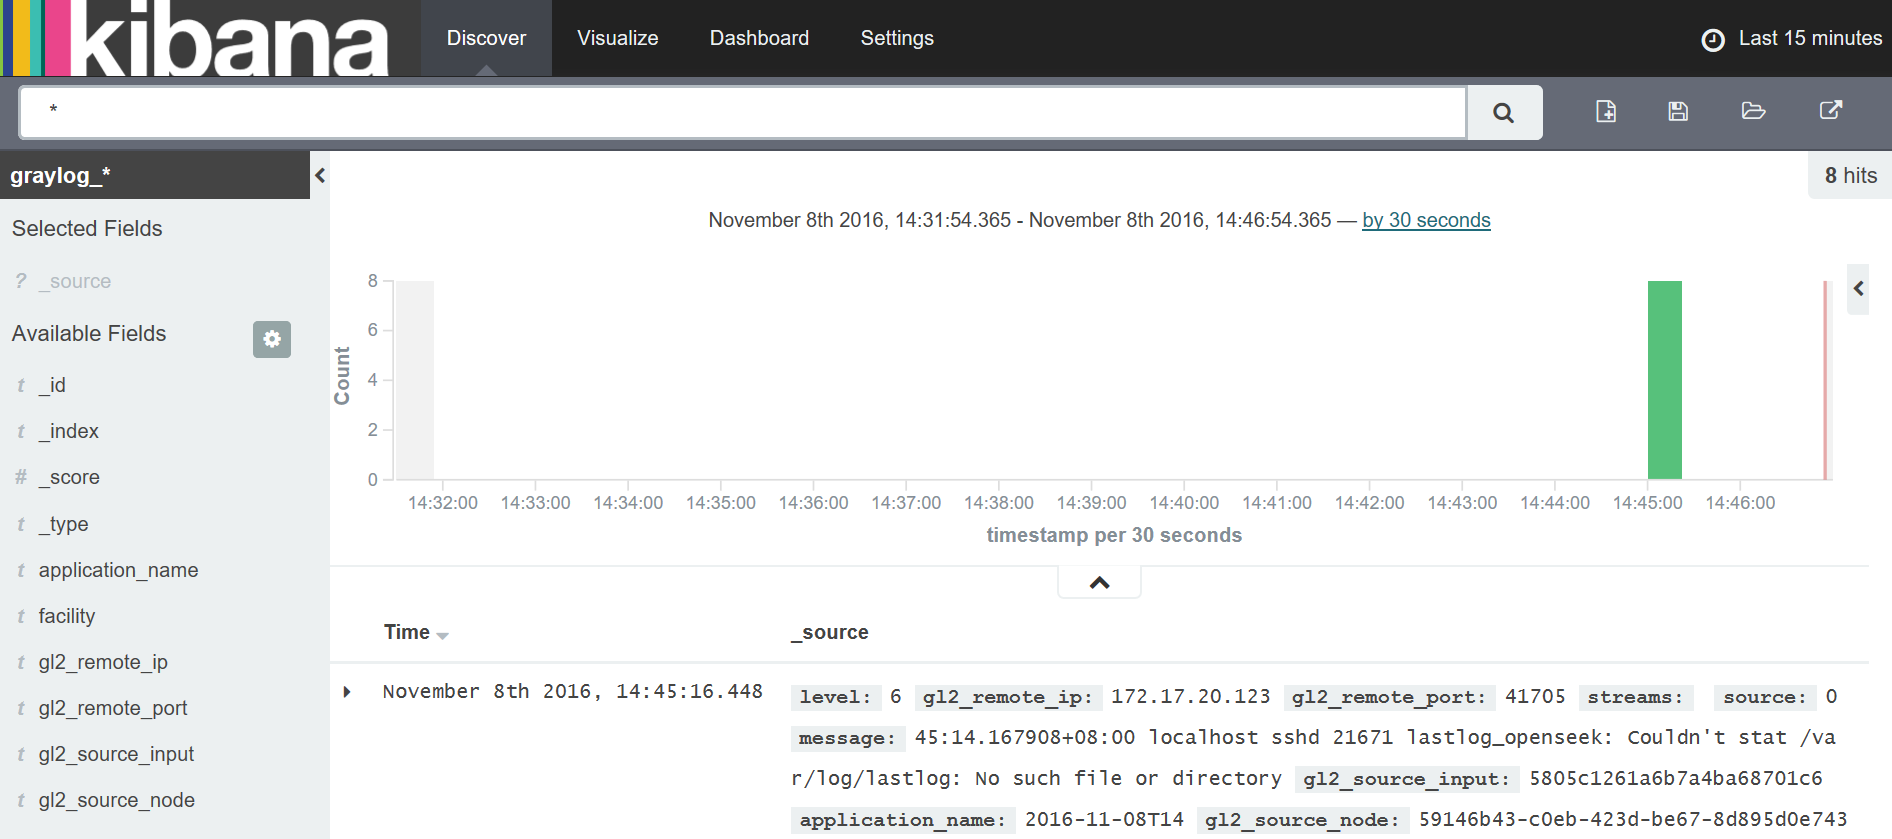
- 点击“ Discover ”,查看数据
6.使用Nxlog+Graylog Collector Sidecar搜集日志
6.1安装Nxlog
wget  https://nxlog.co/system/files/products/files/348/nxlog-ce-2.9.1716-1_rhel6.x86_64.rpm

yum install -y nxlog-ce-2.9.-1_rhel6.x86_64.rpm
可参考:http://blog.csdn.net/iwannarun/article/details/52604646
修改 /etc/nxlog.conf配置文件
Group nxlog

LogFile /var/log/nxlog/nxlog.log

LogLevel INFO

########################################

# Modules                              #

########################################

<Extension gelf>

    Module      xm_gelf

</Extension>

<Input in1>

    Module      im_file

    File        "/var/log/messages"

</Input>

<Input in2>

    Module      im_file

    File        "/var/log/cron"

</Input>

<Output out1>

    Module      om_udp

    Host        10.101.21.229

    Port

    OutputType  GELF

</Output>

########################################

# Routes                               #

########################################

<Route >

    Path        in1 => out1

</Route>

<Route >

    Path        in2 => out1
启动nxlog服务
/etc/init.d/nxlog start

查看日志排错

/var/log/nxlog/nxlog.log
6.2安装Graylog Collector Sidecar
官方文档:http://docs.graylog.org/en/latest/pages/collector_sidecar.html#id3
service nxlog stop

chkconfig --del nxlog

gpasswd -a nxlog root

chown -R nxlog.nxlog /var/spool/collector-sidecar/nxlog

https://github.com/Graylog2/collector-sidecar/releases 下载地址

rpm -ivh collector-sidecar-0.1.-.x86_64.rpm

graylog-collector-sidecar -service install
修改/etc/graylog/collector-sidecar/collector_sidecar.yml 配置文件
server_url: http://127.0.0.1:9000/api/  #改为graylog server机器的IP

update_interval:

tls_skip_verify: false

send_status: true

list_log_files:

node_id: graylog-collector-sidecar

collector_id: file:/etc/graylog/collector-sidecar/collector-id

cache_path: /var/cache/graylog/collector-sidecar

log_path: /var/log/graylog/collector-sidecar

log_rotation_time:

log_max_age:

tags:

    - messages

backends:

    - name: nxlog

      enabled: true

      binary_path: /usr/bin/nxlog

      configuration_path: /etc/graylog/collector-sidecar/generated/nxlog.conf
6.3在web页面配置
可参考:http://blog.csdn.net/iwannarun/article/details/52802680
7.使用filebeat+Graylog Collector Sidecar搜集日志
7.1安装Graylog Collector Sidecar
https://github.com/Graylog2/collector-sidecar/releases 下载地址

rpm -ivh collector-sidecar-0.1.-.x86_64.rpm

graylog-collector-sidecar -service install
7.2修改/etc/graylog/collector-sidecar/collector_sidecar.yml 配置文件
server_url: http://IP:9000/api/ #改为graylog server机器的IP

update_interval:

tls_skip_verify: false

send_status: true

list_log_files:

node_id: graylog-collector-sidecar

collector_id: file:/etc/graylog/collector-sidecar/collector-id

cache_path: /var/cache/graylog/collector-sidecar

log_path: /var/log/graylog/collector-sidecar

log_rotation_time:

log_max_age:

tags:

    - nginx log  #按需修改

backends:

    - name: nxlog

      enabled: false  #不开启ngxlog

      binary_path: /usr/bin/nxlog

      configuration_path: /etc/graylog/collector-sidecar/generated/nxlog.conf

    - name: filebeat

      enabled: true #开启filebeat

      binary_path: /usr/bin/filebeat

      configuration_path: /etc/graylog/collector-sidecar/generated/filebeat.yml
7.3在web页面上配置
可参考:https://www.linuxea.com/1599.html
a)配置收集器
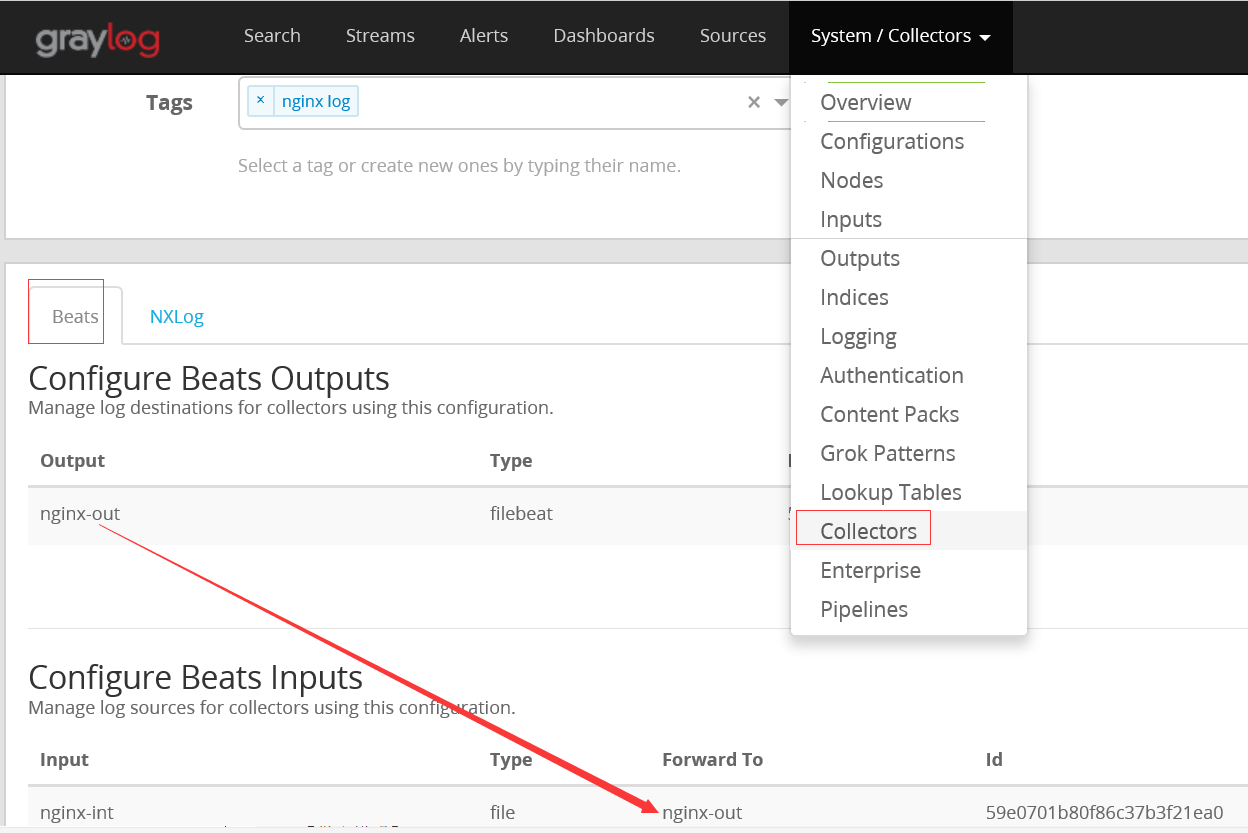
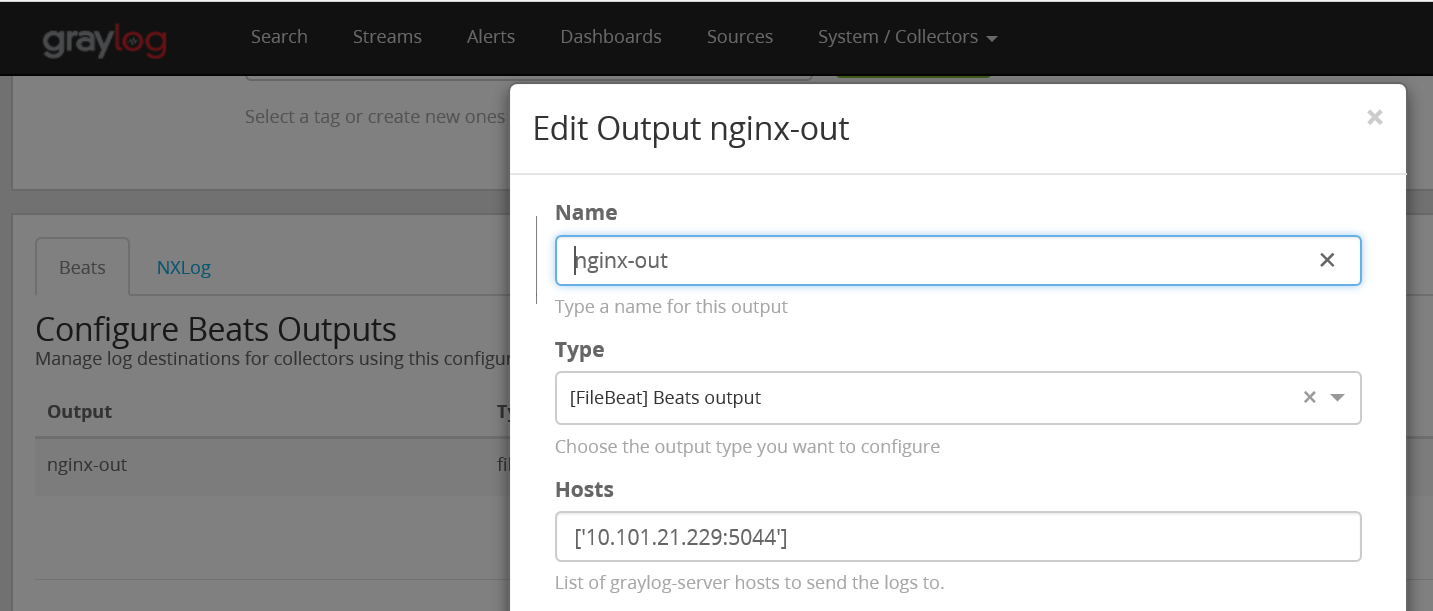
b)配置收集器中的OUTPUT
c)配置收集器中的INPUT
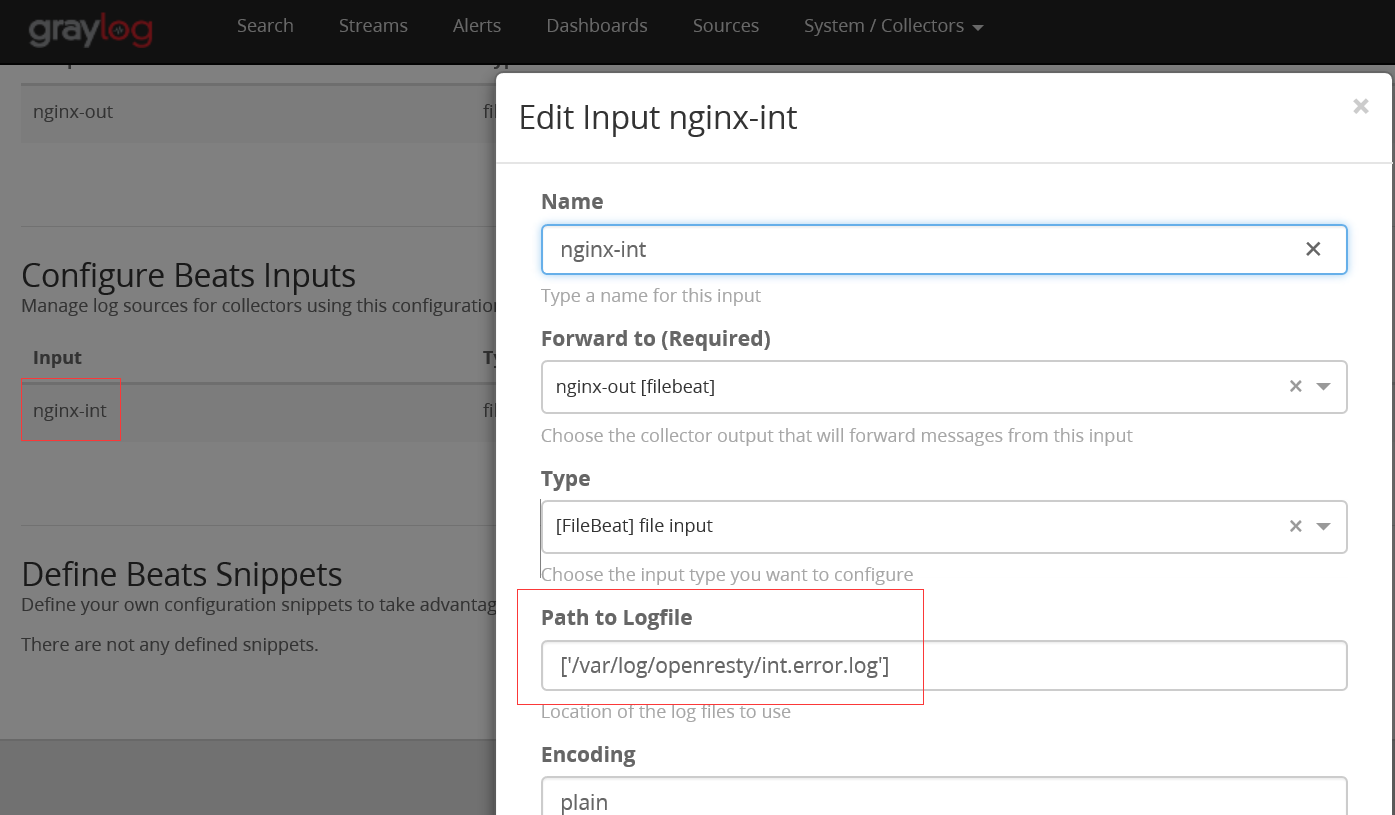
如果有多个日志文件可以使用*号等正则匹配,或者['/var/log/openresty/int.error.log', '/var/log/openresty/ext.error.log']定义多个。
d)在收集日志的客户端启动 collector-sidecar
/etc/init.d/collector-sidecar start

/var/log/collector-sidecar.err 可查看日志排错
启动成功后会把刚在页面上的配置自动生成filebeat配置文件
启动后生成的配置文件

/etc/graylog/collector-sidecar/generated/filebeat.yml
e)配置Graylog Server的INPUT接口
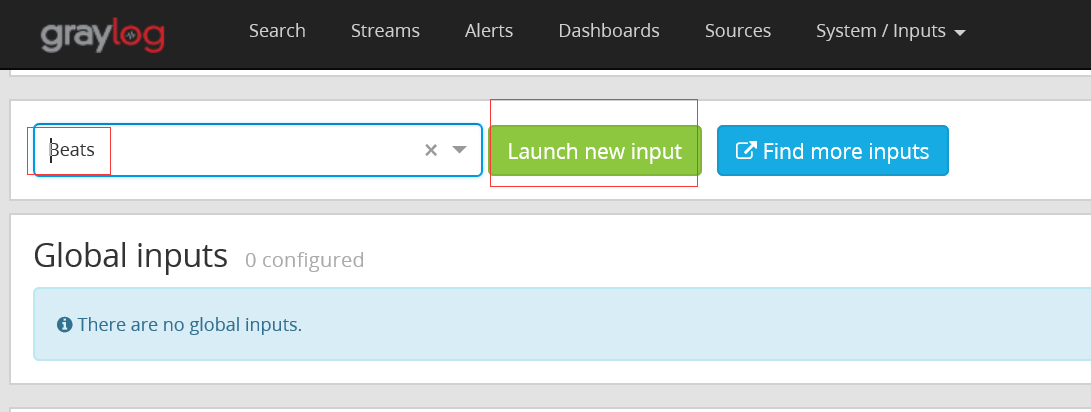
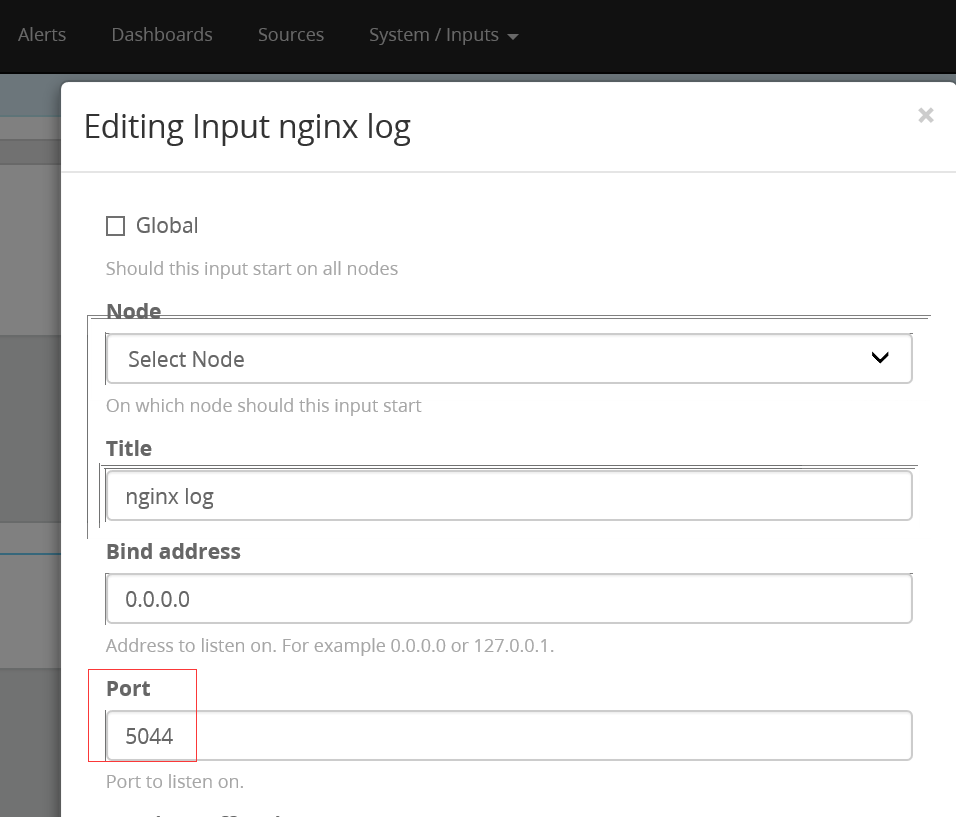
配置完保存后,garylog会在服务端启动定义的tcp端口5044
在web页面验证是否收到日志
graylog有告警功能,可以匹配到需要触发的条件进行日志告警。
Graylog2日志服务安装配置的更多相关文章
- ubuntu14.04 server ftp 服务安装配置详解
ubuntu14.04 server ftp 服务安装配置详解 cheungmine 2016-01-27 http://wiki.ubuntu.com.cn/Vsftpd 0 安装好vsftpd服务 ...
- CentOS 6.8 ftp服务安装配置 基于本地用户和虚拟用户
CentOS 6.8 ftp服务安装配置 基于本地用户和虚拟用户 一.安装ftp服务 1.检查是否已经安装 # rpm -qa | grep ftp ftp-0.17-54.el6.x86_64 vs ...
- CentOS 7 Xinetd服务安装配置
CentOS 7 Xinetd服务安装配置 目录 CentOS 7 Xinetd服务安装配置 一.Linux守护进程与初始化进程 1. 什么是守护进程 2. 什么是初始化 二.Linux独立启动进程和 ...
- Asterisk服务安装配置和启动
Asterisk服务安装配置和启动 2014年11月4日 11:36 注意: 更新源的重要性 源的地址: http://fffo.blog.163.com/blog/static/2119130682 ...
- CentOS7下RabbitMQ服务安装配置
参考文档: CentOS7下RabbitMQ服务安装配置 http://www.linuxidc.com/Linux/2016-03/129557.htm 在linux下安装配置rabbitMQ详细教 ...
- Linux下的python3,virtualenv,Mysql、nginx、redis等常用服务安装配置
Linux下的python3,virtualenv,Mysql.nginx.redis等常用服务安装配置 学了前面的Linux基础,想必童鞋们是不是更感兴趣了?接下来就学习常用服务部署吧! 安装环 ...
- RabbitMQ服务安装配置
RabbitMQ是流行的开源消息队列系统,是AMQP(Advanced Message Queuing Protocol高级消息队列协议)的标准实现,用erlang语言开发.RabbitMQ据说具有良 ...
- Nginx服务安装配置
1.Nginx介绍 Nginx是一个高性能的HTTP和反向代理服务器,由俄罗斯人开发的,第一个版本发布于2004年10月4日.Nginx由于出色的性能,在世界范围内受到了越来越多人的关注,其特点是占有 ...
- Erlang&RabbitMQ服务安装配置
RabbitMQ是流行的开源消息队列系统,是AMQP(Advanced Message Queuing Protocol高级消息队列协议)的标准实现,用erlang语言开发.RabbitMQ据说具有良 ...
随机推荐
- 针对 IE的 的优化
针对 IE 的优化 有些时候,你需要对 IE 浏览器的 bug 定义一些特别的规则,这里有太多的 CSS 技巧(hacks),我只使用其中的两种方法,不 管微软在即将发布的 IE7 beta 版里是否 ...
- 自封装ajax
项目中有时候用不到jq,需要了解xmlhttp原理,自己写一套函数请求和发送数据! /* 封装ajax函数 * @param {string}opt.type http连接的方式,包括POST和GET ...
- toMapFromStage layerDefinitions ClassBreakRenderer
class Map 方法 toMapFromStage 用于把屏幕坐标转换为地理坐标 public function toMapFromStage(stageX:Number, stageY:Numb ...
- java中加密的方式概述
加密是用一种特殊的算法改变原有的数据,使未经授权的用户即使获得了已经加密的信息,但不知其解密的方法,仍然无法了解信息的内容. 大体上分为单向加密和双向加密,双向加密又可分为对称加密和非对称加密 ...
- 通过 Powershell 来替换 ARM 模式下虚拟机的网络接口
需求描述 客户在部署完 ARM 模式的虚拟机以后,由于误操作在虚拟机内部禁用了网卡导致远程访问虚拟机受到限制,以下是通过 Powershell 命令来替换原有虚拟网络接口实现虚拟网卡重置功能. Not ...
- SQL 根据身份证号码获取年龄的函数
在数据库的运用过程中,我们时常会碰到根据身份证号码来获取当前的年龄,今天我在这里写了一个函数,就是关于获取年龄的 create or replace function FUNC_COMPARE_SFZ ...
- CentOS 7 使用 yum 安装 jdk 1.8
安装之前先检查一下系统有没有自带open-jdk 命令: rpm -qa |grep java rpm -qa |grep jdk rpm -qa |grep gcj 如果没有输入信息表示没有安装. ...
- Spring Boot学习路线
Spring Boot 学习路线,本文计划根据作者近几年的工作.学习经验,来分析和制定一个学习使用 Spring Boot技术的步骤路线图. SpringBoot是伴随着Spring4.0诞生的: S ...
- VSCode-python 进阶配置
VSCode-python 进阶配置 中文乱码 中文乱码,网上一堆解决方法,但是根本没有有效起作用的. 在python脚本的前面添加: # -*- coding:utf-8 -*- 并不能在控制台输出 ...
- 微信小程序国际化
微信小程序国际化 现状 小程序国际化官方没有支持,也没有现成的插件. 网上有人做了国际化的尝试.但是只能替换静态文本,就是简单的键值匹配. vue-i18n 由于是基于html 和 vue, 不同于w ...