swagger搭建(基于springBoot)详解
前后端分离后,api接口文档的维护就成了一个让人头疼的问题,api接口更新慢,或因开发工作量大,没时间整理文档,导致前后端分离后前端同学和后端同 学都纠结于文档的问题。而swagger的出现,不亚于一道曙光,功能强大,ui简洁美观,提供在线测试,不能说完美,但基本上解决了文档的问题
本此搭建是基于springBoot项目,希望对大家有帮助
官方网站为:http://swagger.io/
步骤1.maven
在maven的pom文件中引入相关的依赖
    <dependency>

        <groupId>io.springfox</groupId>

        <artifactId>springfox-swagger2</artifactId>

        <version>2.2.2</version>

    </dependency>

    <dependency>

        <groupId>io.springfox</groupId>

        <artifactId>springfox-swagger-ui</artifactId>

        <version>2.2.2</version>

    </dependency>
步骤2.配置Swagger的配置文件
    import java.util.ArrayList;

    import java.util.List;

    import org.springframework.context.annotation.Bean;

    import org.springframework.context.annotation.Configuration;

    import springfox.documentation.builders.ParameterBuilder;

    import springfox.documentation.builders.ApiInfoBuilder;

    import springfox.documentation.builders.PathSelectors;

    import springfox.documentation.builders.RequestHandlerSelectors;

    import springfox.documentation.schema.ModelRef;

    import springfox.documentation.service.ApiInfo;

    import springfox.documentation.spi.DocumentationType;

    import springfox.documentation.spring.web.plugins.Docket;

    import springfox.documentation.swagger2.annotations.EnableSwagger2;

    import springfox.documentation.service.Parameter;

    @Configuration

    @EnableSwagger2

    public class Swagger2 {

        @Bean

        public Docket createRestApi() {

            ParameterBuilder tokenPar = new ParameterBuilder();

            List<Parameter> pars = new ArrayList<Parameter>();

            tokenPar.name("token").description("令牌")

            .modelRef(new ModelRef("string")).parameterType("query").required(false).build();

            pars.add(tokenPar.build());

            return new Docket(DocumentationType.SWAGGER_2)

                    .apiInfo(apiInfo())

                    .select()

                    .apis(RequestHandlerSelectors.basePackage("com.sst"))

                    .paths(PathSelectors.any())

                    .build().globalOperationParameters(pars)  ;

        }

        @SuppressWarnings("deprecation")

        private ApiInfo apiInfo() {

            return new ApiInfoBuilder()

                    .title("个人测试")

                    .description("个人测试用api")

                    .termsOfServiceUrl("http://blog.csdn.net/penyoudi1")

                    .contact("测试")

                    .version("1.0")

                    .build();

        }

    }
步骤3.在Controller中引入注解
    import org.springframework.web.bind.annotation.RequestMapping;

    import org.springframework.web.bind.annotation.RestController;

    import io.swagger.annotations.Api;

    import io.swagger.annotations.ApiImplicitParam;

    import io.swagger.annotations.ApiImplicitParams;

    import io.swagger.annotations.ApiOperation;

    @RestController

    @RequestMapping("test")

    @Api(value="测试接口Controller")

    public class TestController {

        @ApiOperation(value="测试用接口", notes="测试用接口" ,httpMethod="POST")

        @ApiImplicitParams({

            @ApiImplicitParam(name="name", value="用户姓名", dataType = "String", required=true, paramType="form"),

            @ApiImplicitParam(name="id", value="id", dataType = "int", required=false, paramType="form")

        })

        @RequestMapping("word")

        public String HelloWord(String name,Integer id) {

            return "Hello Word";

        }

    }
然后输入地址 http://127.0.0.1:8080/SpringSwaggerTest/swagger-ui.html
可以查看到
可以查看到
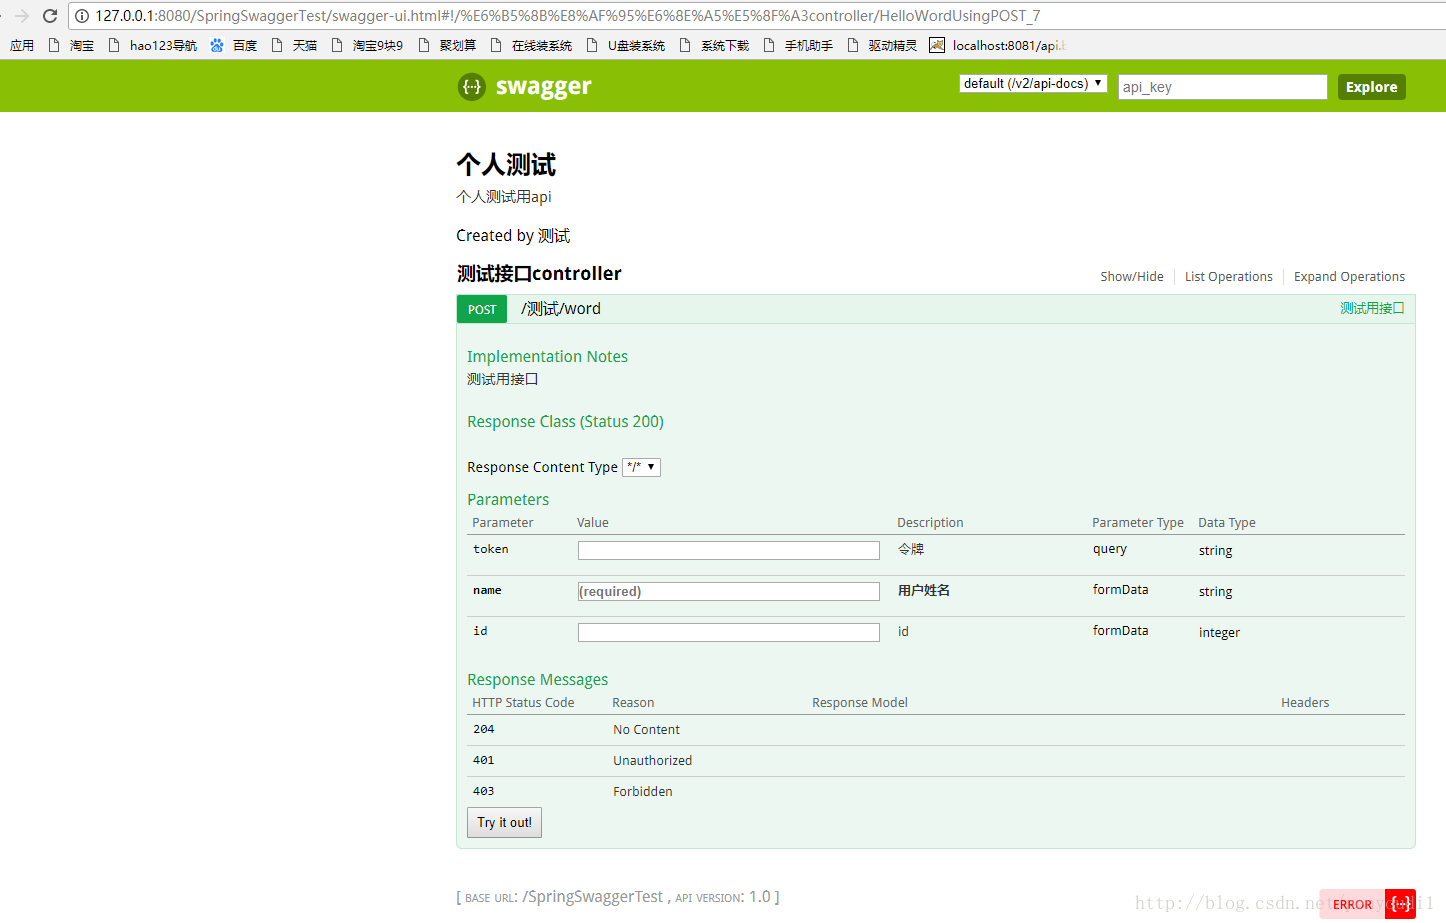
看到这个页面,说明配置成功!!
以上就是swagger基于springBoot的配置方法,下面详细说一下具体的参数
swagger配置文件说明
    ParameterBuilder tokenPar = new ParameterBuilder();

            List<Parameter> pars = new ArrayList<Parameter>();

            tokenPar.name("token").description("令牌")

            .modelRef(new ModelRef("string")).parameterType("query").required(false).build();

            pars.add(tokenPar.build());
这段代码是默认参数,添加上后,所有的接口都会有一个公共参数,不需要在每个接口单独配置 [java]
.apis(RequestHandlerSelectors.basePackage("com.sst"))
- .apis(RequestHandlerSelectors.basePackage("com.sst"))
    return new ApiInfoBuilder()

            .title("个人测试")

            .description("个人测试用api")

            .termsOfServiceUrl("http://blog.csdn.net/penyoudi1")

            .contact("测试")

            .version("1.0")

            .build();
这个是一些页面展示数据的配置,用于标题,分组说明等
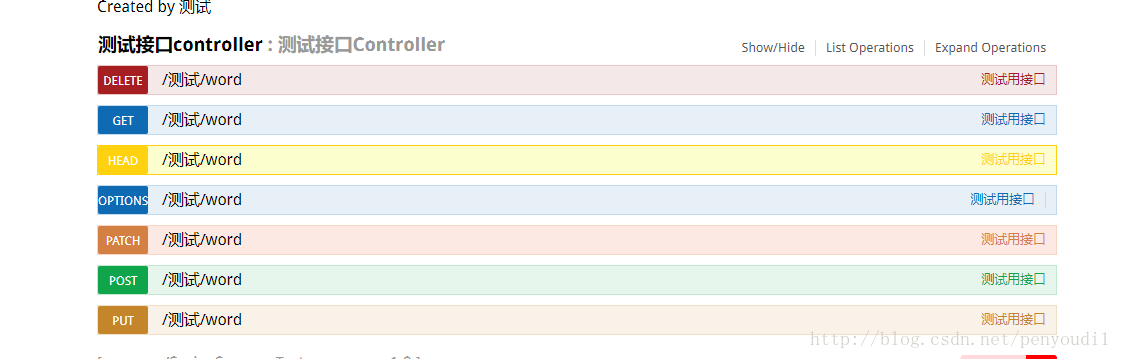
controller注解说明
@Api(value="测试接口Controller")
这个注解用于整个类上,对整个类中的接口列表进行简单说明
@ApiOperation(value="测试用接口", notes="测试用接口" ,httpMethod="POST")
@ApiOperation(value="测试用接口", notes="测试用接口" ,httpMethod="POST")
    @ApiImplicitParams({

            @ApiImplicitParam(name="name", value="用户姓名", dataType = "String", required=true, paramType="form"),

            @ApiImplicitParam(name="id", value="id", dataType = "int", required=false, paramType="form")

        })
@ApiImplicitParams是传入参数的集合,里面可以包含多个参数
@ApiImplicitParam(name="name", value="用户姓名", dataType = "String", required=true, paramType="form"),
name是参数的名称,value是参数的说明,dataType是参数的类型,前端不是限制,仅做说明使用,required true时是必传参数,false是选填参数。paramType是提交方式=-= 好像都是写的from
以上就是基本的使用的参数说明
问题
1.在开发中遇到过,使用swagger做excel导出中文乱码的问题,尚未解决,如果你也遇到了,可以单独访问下接口,尝试下是否是swagger本身的问题
swagger搭建(基于springBoot)详解的更多相关文章
- 基于CentOS6.5下snort+barnyard2+base的入侵检测系统的搭建(图文详解)(博主推荐)
为什么,要写这篇论文? 是因为,目前科研的我,正值研三,致力于网络安全.大数据.机器学习研究领域! 论文方向的需要,同时不局限于真实物理环境机器实验室的攻防环境.也不局限于真实物理机器环境实验室的大数 ...
- 基于Windows7下snort+apache+php 7 + acid(或者base) + adodb + jpgraph的入侵检测系统的搭建(图文详解)(博主推荐)
为什么,要写这篇论文? 是因为,目前科研的我,正值研三,致力于网络安全.大数据.机器学习.人工智能.区域链研究领域! 论文方向的需要,同时不局限于真实物理环境机器实验室的攻防环境.也不局限于真实物理机 ...
- 【转】jumpserver 堡垒机环境搭建(图文详解)
jumpserver 堡垒机环境搭建(图文详解) 摘要: Jumpserver 是一款由python编写开源的跳板机(堡垒机)系统,实现了跳板机应有的功能.基于ssh协议来管理,客户端无需安装ag ...
- Ubuntu下Git从搭建到使用详解
Ubuntu下Git从搭建到使用详解 一.git的搭建 (1).sudo apt-get update (2).sudo apt-get -y install git 符:安装最新版本方法: add- ...
- springboot 详解RestControllerAdvice(ControllerAdvice)(转)
springboot 详解RestControllerAdvice(ControllerAdvice)拦截异常并统一处理简介 @Target({ElementType.TYPE}) @Retentio ...
- 基于CentOS6.5下Suricata(一款高性能的网络IDS、IPS和网络安全监控引擎)的搭建(图文详解)(博主推荐)
不多说,直接上干货! 为什么,要写这篇论文? 是因为,目前科研的我,正值研三,致力于网络安全.大数据.机器学习研究领域! 论文方向的需要,同时不局限于真实物理环境机器实验室的攻防环境.也不局限于真实物 ...
- [spark]-Spark2.x集群搭建与参数详解
在前面的Spark发展历程和基本概念中介绍了Spark的一些基本概念,熟悉了这些基本概念对于集群的搭建是很有必要的.我们可以了解到每个参数配置的作用是什么.这里将详细介绍Spark集群搭建以及xml参 ...
- 【JAVAEE学习笔记】hibernate01:简介、搭建、配置文件详解、API详解和CRM练习:保存客户
今日学习:hibernate是什么 一.hibernate是什么 框架是什么: 1.框架是用来提高开发效率的 2.封装了好了一些功能.我们需要使用这些功能时,调用即可.不需要再手动实现. 3.所以框架 ...
- 实时监控、直播流、流媒体、视频网站开发方案流媒体服务器搭建及配置详解:使用nginx搭建rtmp直播、rtmp点播、,hls直播服务配置详解
注意:这里不会讲到nginx流媒体模块如何安装的问题,只研究rtmp,hls直播和录制相关的nginx服务器配置文件的详细用法和说明.可以对照这些命令详解配置nginx -rtmp服务 一.nginx ...
- 简单搭建SpringMVC框架详解
在公司待了两年,用的一直是Spring+SpringMVC+Hibernate框架,都是公司自己搭建好的,自己从来没有主动搭建过,闲来无聊,自己搭建试试.一下即我搭建的过程以及搭建所遇到的问题,有部分 ...
随机推荐
- python 全栈开发,Day12(函数的有用信息,带参数的装饰器,多个装饰器装饰一个函数)
函数的执行时,*打散.函数的定义时,*聚合. from functools import wraps def wrapper(f): # f = func1 @wraps(f) def inner(* ...
- Python 2维数组90度旋转
一.二维列表 a = [[col for col in range(4)] for row in range(4)] [[0, 1, 2, 3], [0, 1, 2, 3], [0, 1, 2, 3] ...
- 各种浏览器下的页面元素xpath获取方法
参考链接: http://blog.sina.com.cn/s/blog_654c6ec70100v1i2.html
- POJ 1375 Intervals 光源投影【平面几何】
<题目链接> <转载于> 题目大意: 给一个光源点s,给一些圆,源点和s相切会形成阴影,求每一段阴影在横轴上的区间. 解题分析: 这道其实不需要点与圆切线的板子来求解,完全可以 ...
- python爬虫之下载文件的方式总结以及程序实例
python爬虫之下载文件的方式以及下载实例 目录 第一种方法:urlretrieve方法下载 第二种方法:request download 第三种方法:视频文件.大型文件下载 实战演示 第一种方法: ...
- JS-最全的创建对象的方式
JS最全创建对象方式汇总 1.最简单的方式--创建一个Object实例 var person = new Object(); //创建实例 person.name = "BlueBeginn ...
- CF1039C.Network Safety
目录 题目链接 题解 代码 题目链接 CF1039C.Network Safety 题解 对于一对相邻点,^异或后相同的值唯一a_i ^ t= b_i,a_i ^ b_i = t 对于不在t集合的直接 ...
- Codeforces.741D.Arpa’s letter-marked tree and Mehrdad’s Dokhtar-kosh paths(dsu on tree 思路)
题目链接 \(Description\) 给定一棵树,每条边上有一个字符(a~v).对每个节点,求它的子树中一条最长的路径,满足 路径上所有边上的字符可以重新排列成一个回文串.输出其最长长度. \(n ...
- BZOJ.3928.[CERC2014]Outer space invaders(区间DP)
BZOJ3928 双倍经验BZOJ4048 Codeforces GYM100543 L \(Description\) \(Solution\) 考虑出现时间在\([l,r]\)内的敌人,设最远的敌 ...
- 洛谷.1110.[ZJOI2007]报表统计(Multiset Heap)
题目链接 主要思路 /* 对于询问1,用堆代替multiset/Splay 对于询问2,multiset 1.注意哨兵元素 2.注意multiset中删除时是删除某元素的一个位置,而不是这个元素!这个 ...