Java可视化AWT
AWT
总体上Swing组件替代了绝大部分AWT组件,对AWT图形用户界面编程有极好的补充和加强。
package ch11;

import java.awt.*;

/**

 * Created by Jiqing on 2016/12/1.

 */

public class FrameTest {

    public static void main(String[] args) {

        Frame f = new Frame("测试窗口");

        // 设置窗口的大小、位置

        f.setBounds(30,30,250,200);

        // 将窗口显示出来

        f.setVisible(true);

    }

}
AWT容器
图形界面编程,类似于小朋友玩的拼图游戏,容器类似于拼图的母板,普通组件类似于拼图图块。
package ch11;

import java.awt.*;

/**

 * Created by Jiqing on 2016/12/1.

 */

public class PanelTest {

    public static void main(String[] args) {

        Frame f = new Frame("测试页面");

        Panel p = new Panel();

        p.add(new TextField(20));

        p.add(new Button("Click Me"));

        f.add(p);

        f.setBounds(30,30,250,120);

        f.setVisible(true);

    }

}
FlowLayout布局管理器
- 组件像水流一样向某方向流动,遇到障碍就折回,重头开始排列。
package ch11;

import java.awt.*;

/**

 * Created by Jiqing on 2016/12/1.

 */

public class FlowLayoutTest {

    public static void main(String[] args) {

        Frame f = new Frame("测试窗口");

        // 设置Frame使用FlowLayout布局管理器

        f.setLayout(new FlowLayout(FlowLayout.LEFT,20,5));

        // 向窗口添加10个按钮

        for (int i = 0;i<10;i++) {

            f.add(new Button("Button"+i));

        }

        // 设置窗口为最佳大小

        f.pack();

        f.setVisible(true);

    }

}
BorderLayout布局管理器
- BorderLayout将容器分为EAST、SOUTH、WEST、NORTH、CENTER五个区域。普通组件可以放在这五个区域中的任意一个。
- 默认添加到中间区域。
package ch11;

import java.awt.*;

import static java.awt.BorderLayout.*;

/**

 * Created by Jiqing on 2016/12/1.

 */

public class BorderLayoutTest {

    public static void main(String[] args) {

        Frame f = new Frame("测试窗口");

        // 设置Frame容器使用BorderLayout布局管理器

        f.setLayout(new BorderLayout(50,50));

        f.add(new Button("S"),SOUTH);

        f.add(new Button("N"),NORTH);

        // 默认添加到中间区域

        f.add(new Button("M"));

        f.add(new Button("E"),EAST);

        f.add(new Button("W"),WEST);

        f.pack();

        f.setVisible(true);

    }

}
GirdLayout布局管理器
GirdLayout布局管理器将容器分割成纵横分割的网格,每个网格所占据的领域大小相同。
package ch11;

import java.awt.*;

import static java.awt.BorderLayout.*; // 默认布局

/**

 * Created by Jiqing on 2016/12/1.

 */

public class GridLayoutTest {

    public static void main(String[] args) {

        Frame f = new Frame("计算器");

        Panel p1 = new Panel();

        p1.add(new TextField(30));

        f.add(p1,NORTH); // import static java.awt.BorderLayout.*;

        Panel p2 = new Panel();

        p2.setLayout(new GridLayout(3,5,4,4));

        String[] name = {"0","1","2","3","4","5","6","7","8","9","+","-","*","/","."};

        for (int i = 0;i<name.length;i++) {

            p2.add(new Button(name[i]));

        }

        f.add(p2);

        f.pack();

        f.setVisible(true);

    }

}
GridBagLayout
与GridLayout不同,它可以跨越一个或多个网络,并可以设置网络的大小互不相同。
增加布局的灵活性
使用步骤
- 创建GridBagLayout布局管理器
- 创建GridBagConstraints对象
- 建立关联
- 添加组件
package ch11;

import java.awt.*;

/**

 * Created by Jiqing on 2016/12/2.

 */

public class GridBagTest {

    private Frame f = new Frame("测试窗口");

    private GridBagLayout gb = new GridBagLayout();

    private GridBagConstraints gbc = new GridBagConstraints();

    private Button[] bs = new Button[10];

    public void init() {

        f.setLayout(gb);

        for (int i = 0;i<bs.length;i++) {

            bs[i] = new Button("Button"+i);

        }

        // 所有组件都可以横向、纵向扩大

        gbc.fill = GridBagConstraints.BOTH;

        gbc.weightx = 1;

        addButton(bs[0]);

        addButton(bs[1]);

        addButton(bs[2]);

        gbc.gridwidth = GridBagConstraints.REMAINDER;

        addButton(bs[3]);

        gbc.weightx = 0;

        addButton(bs[4]);

        gbc.gridwidth = 2;

        addButton(bs[5]);

        gbc.gridwidth = 1;

        gbc.gridheight = 2;

        gbc.gridwidth = GridBagConstraints.REMAINDER;

        addButton(bs[6]);

        gbc.gridwidth = 1;

        gbc.gridheight =2;

        gbc.weighty = 1;

        addButton(bs[7]);

        gbc.weighty = 0;

        gbc.gridwidth = GridBagConstraints.REMAINDER;

        gbc.gridheight = 1;

        addButton(bs[8]);

        addButton(bs[9]);

        f.pack();

        f.setVisible(true);

    }

    public static void main(String[] args) {

        new GridBagTest().init();

    }

    private void addButton(Button button) {

        gb.setConstraints(button,gbc);

        f.add(button);

    }

}
BoxLayout
- BoxLayout 可以在垂直和水平两个方向摆放控件
package ch11;

import javax.swing.*;

import java.awt.*;

/**

 * Created by Jiqing on 2016/12/2.

 */

public class BoxLayoutTest {

    private Frame f = new Frame("测试");

    public void init() {

        f.setLayout(new BoxLayout(f,BoxLayout.Y_AXIS));

        // 下面按钮将垂直排列

        f.add(new Button("First Button"));

        f.add(new Button("Second Button"));

        f.pack();

        f.setVisible(true);

    }

    public static void main(String[] args) {

        new BoxLayoutTest().init();

    }

}
package ch11;

import javax.swing.*;

import java.awt.*;

/**

 * Created by Jiqing on 2016/12/2.

 */

public class BoxTest {

    private Frame f = new Frame("测试");

    // 定义水平组件Box对象

    private Box horizontal = Box.createHorizontalBox();

    // 定义垂直组件Box对象

    private Box verical = Box.createVerticalBox();

    public void init() {

        horizontal.add(new Button("H btn1"));

        horizontal.add(new Button("H btn2"));

        verical.add(new Button("V btn1"));

        verical.add(new Button("V btn2"));

        f.add(horizontal,BorderLayout.NORTH);

        f.add(verical);

        f.pack();

        f.setVisible(true);

    }

    public static void main(String[] args) {

        new BoxTest().init();

    }

}
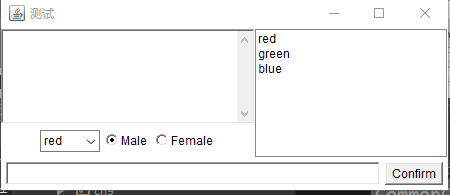
常用的
package ch11;

import javax.swing.*;

import java.awt.*;

/**

 * Created by Jiqing on 2016/12/2.

 */

public class CommonComponent {

    Frame f = new Frame("测试");

    Button ok = new Button("Confirm");

    CheckboxGroup cbg = new CheckboxGroup();

    Checkbox male = new Checkbox("Male",cbg,true);

    Checkbox female = new Checkbox("Female",cbg,false);

    Choice colorChooser = new Choice();

    List colorList = new List(6,true);

    TextArea ta = new TextArea(5,20);

    TextField name = new TextField(50);

    public void init() {

        colorChooser.add("red");

        colorChooser.add("green");

        colorChooser.add("blue");

        colorList.add("red");

        colorList.add("green");

        colorList.add("blue");

        Panel bottom = new Panel();

        bottom.add(name);

        bottom.add(ok);

        f.add(bottom,BorderLayout.SOUTH);

        Panel checkPanel = new Panel();

        checkPanel.add(colorChooser);

        checkPanel.add(male);

        checkPanel.add(female);

        Box topLeft = Box.createVerticalBox();

        topLeft.add(ta);

        topLeft.add(checkPanel);

        Box top = Box.createHorizontalBox();

        top.add(topLeft);

        top.add(colorList);

        f.add(top);

        f.pack();

        f.setVisible(true);

    }

    public static void main(String[] args) {

        new CommonComponent().init();

    }

}
Dialog对话框
- 对话框
package ch11;

import java.awt.*;

/**

 * Created by Jiqing on 2016/12/2.

 */

public class DialogTest {

    Frame f = new Frame("测试");

    Dialog d1 = new Dialog(f,"Modal Dialog",true);

    Dialog d2 = new Dialog(f,"Not Modal Dialog",false);

    Button b1 = new Button("Open MD");

    Button b2 = new Button("Open NMD");

    public void init() {

        d1.setBounds(20,30,300,400);

        d2.setBounds(20,30,300,400);

        b1.addActionListener(e->d1.setVisible(true));

        b2.addActionListener(e->d2.setVisible(true));

        f.add(b1);

        f.add(b2,BorderLayout.SOUTH);

        f.pack();

        f.setVisible(true);

    }

    public static void main(String[] args) {

        new DialogTest().init();

    }

}
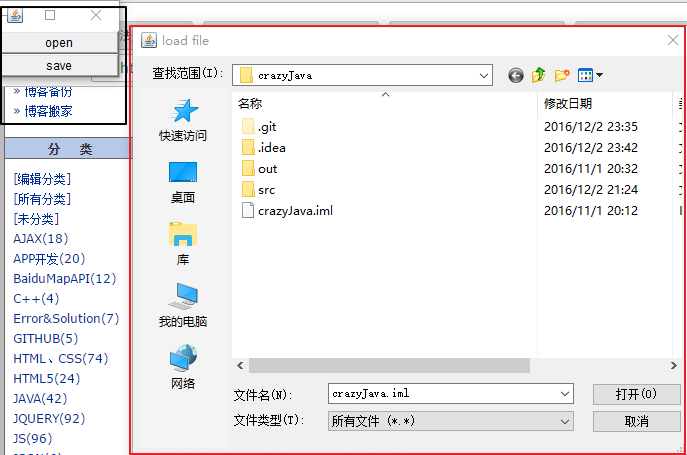
package ch11;

import java.awt.*;

/**

 * Created by Jiqing on 2016/12/2.

 */

public class FileDialogTest {

    Frame f = new Frame("测试");

    FileDialog d1 = new FileDialog(f,"load file",FileDialog.LOAD);

    FileDialog d2 = new FileDialog(f,"save file",FileDialog.SAVE);

    Button b1 = new Button("open");

    Button b2 = new Button("save");

    public void init() {

        b1.addActionListener(e->{

            d1.setVisible(true);

            System.out.println(d1.getDirectory()+d1.getFile());

        });

        b2.addActionListener(e->{

            d2.setVisible(true);

            System.out.println(d2.getDirectory()+d2.getFile());

        });

        f.add(b1);

        f.add(b2,BorderLayout.SOUTH);

        f.pack();

        f.setVisible(true);

    }

    public static void main(String[] args) {

        new FileDialogTest().init();

    }

}
Java可视化AWT的更多相关文章
- JAVA 可视化分析工具 第12节
JAVA 可视化分析工具 第12节 经过前几章对堆内存以及垃圾收集机制的学习,相信小伙伴们已经建立了一套比较完整的理论体系!那么这章我们就根据已有的理论知识,通过可视化工具来实践一番. 我们今天要讲 ...
- JAVA中AWT编程
JAVA使用AWT和Swing 类完成图形用户界面编程,AWT全称是抽象窗口工具集(Abstract Window Toolkit),它是最早的sun提供的GUI库(Graphics User Int ...
- Java中AWT、Swing与SWT三大GUI技术的原理与效率差异
Java中AWT.Swing与SWT三大GUI技术的原理与效率差异 转 https://blog.csdn.net/weixin_37703598/article/details/81843810 ...
- JAVA学习AWT绘图
package com.graphics; import java.awt.Graphics; import javax.swing.JFrame; import javax.swing.JPanel ...
- Java可视化编程---SendMail工具的开发
介绍: SendMail是一款简便的163邮箱发件工具 利用了163的SMTP接口来发送邮件 版本号:SendMail v1.0 在编写发送邮件工具之前,还需要安装 JavaMail API 和Jav ...
- JAVA可视化闹钟源码
概述 一些同学的Java课设有这样一个问题,比较感兴趣就做了一下 功能介绍: 1.可增加闹钟 2.可删除闹钟 3.时间到了响铃 4.关闭闹钟不会丢失闹钟(因为闹钟存储在txt文件中,不会因程序关闭就终 ...
- Java可视化计算器
利用java中的AWT和SWING包来做可视化界面. 首先来简单了解一下这两个包: AWT和Swing都是Java中用来做可视化界面的.AWT(Abstract Window Toolkit):抽象窗 ...
- [java] 可视化日历的实现(基于Calendar类 )
写在前面 博文安排顺序如下 1.写在前面 2.源码 3.思路 4.相关知识 该小程序是对Date类及其相关类的复习 要求如下图:实现可视化日历 实现思路 1.先从键盘输入指定格式的字符串(str)2. ...
- Java基础---AWT
流式布局FlowLayout package net.zyz; import java.awt.Button; import java.awt.FlowLayout; import java.awt. ...
随机推荐
- Maven invalid task...
执行maven构建项目报错: Invalid task '‐DgroupId=*': you must specify a valid lifecycle phase, or a goal in th ...
- oracle查看表占磁盘大小
select segment_name, bytes/1024/1024 from user_segments S where S.segment_type = 'TABLE' AND S.segme ...
- ds.Merge 与 ds.Tables[0].Merge 的用法
DataSet ds = new DataSet(); SqlConnection conn = new SqlConnection(ConnectionStr); SqlCom ...
- Poj(2253),Dijkstra松弛条件的变形
题目链接:http://poj.org/problem?id=2253 题意: 给出两只青蛙的坐标A.B,和其他的n-2个坐标,任一两个坐标点间都是双向连通的.显然从A到B存在至少一条的通路,每一条通 ...
- Combox控件初始化项的技巧
有时候combox下拉项就是几条固定的,不需要做数据绑定,但是如果直接采用字符串集合编辑器的时候,SelectedValue貌似会不起作用. 于是简单的封装一下 /// <summary> ...
- canvas动画基础
setInterval( function(){ render( context ); update(); } , ); window.requestAnimFrame = (function() { ...
- 邮箱性质--全选单选的操作和传值 用属性的name传值
封装类 using System; using System.Collections.Generic; using System.Web; /// <summary> /// Ha 的摘要 ...
- PKCS10生成证书csr
public static String genCSR(String subject, String alg,String provider) throws InvalidKeyException, ...
- wireshark抓包直观图解 TCP三次握手/四次挥手详解
转http://www.seanyxie.com/category/linux/ 作者:seanyxie | 一. TCP/IP协议族 TCP/IP是一个协议族,通常分不同层次进行开发,每个层次负 ...
- 关于htons和htonl
htons的功能:将一个无符号短整型数值转换为网络字节序,即大端模式(big-endian) 参数u_short hostshort: 16位无符号整数 返回值:TCP / IP网络字节顺序. hto ...