
java:Maven(Maven_ssm)
1.maven_ssm:
DOS命令向maven仓库导入jar包:
mvn install:install-file -Dfile=F:\jars\json-lib-2.4-jdk15.jar -DgroupId=net.sf.json-lib -DartifactId=json-lib -Dversion=2.4 -Dpackaging=jar -DgeneratePom=true -DcreateChecksum=true
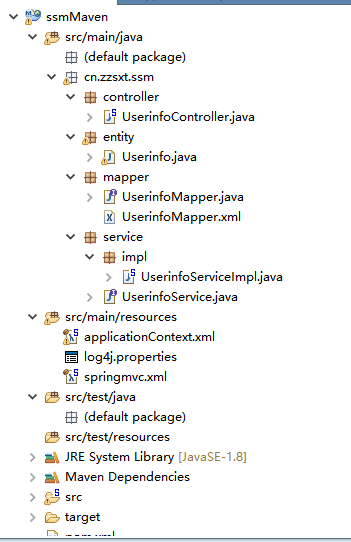
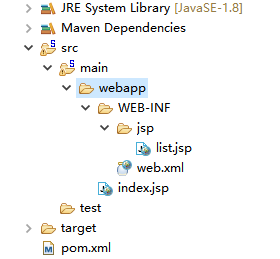
pom.xml:
<project xmlns="http://maven.apache.org/POM/4.0.0" xmlns:xsi="http://www.w3.org/2001/XMLSchema-instance" xsi:schemaLocation="http://maven.apache.org/POM/4.0.0 http://maven.apache.org/xsd/maven-4.0.0.xsd">

  <modelVersion>4.0.0</modelVersion>

  <groupId>cn.zzsxt</groupId>

  <artifactId>ssmMaven</artifactId>

  <version>0.0.1-SNAPSHOT</version>

  <packaging>war</packaging>


  <build>

    <plugins>

    <!-- compiler插件 -->

      <plugin>

        <artifactId>maven-compiler-plugin</artifactId>

        <configuration>

          <source>1.8</source>

          <target>1.8</target>

        </configuration>

      </plugin>

    <!-- tomcat7的插件 -->

      <plugin>

             <groupId>org.apache.tomcat.maven</groupId>

            <artifactId>tomcat7-maven-plugin</artifactId>

            <configuration>

                <port>8080</port>

                <path>/ssmMaven</path>

            </configuration>

        </plugin>

    </plugins>

  </build>

  <dependencies>

      <!-- spring -->

    <dependency>

        <groupId>org.springframework</groupId>

        <artifactId>spring-context</artifactId>

        <version>4.3.9.RELEASE</version>

    </dependency>

    <dependency>

        <groupId>org.springframework</groupId>

        <artifactId>spring-webmvc</artifactId>

        <version>4.3.9.RELEASE</version>

    </dependency>

    <dependency>

        <groupId>org.springframework</groupId>

        <artifactId>spring-tx</artifactId>

        <version>4.3.9.RELEASE</version>

    </dependency>

    <dependency>

        <groupId>org.springframework</groupId>

        <artifactId>spring-jdbc</artifactId>

        <version>4.3.9.RELEASE</version>

    </dependency>

    <dependency>

        <groupId>org.aspectj</groupId>

        <artifactId>aspectjweaver</artifactId>

        <version>1.8.10</version>

    </dependency>

    <dependency>

        <groupId>org.aspectj</groupId>

        <artifactId>aspectjrt</artifactId>

        <version>1.8.10</version>

    </dependency>

      <!-- mybatis -->

    <dependency>

        <groupId>org.mybatis</groupId>

        <artifactId>mybatis</artifactId>

        <version>3.4.1</version>

    </dependency>

      <!-- mybatis-spring -->

      <dependency>

        <groupId>org.mybatis</groupId>

        <artifactId>mybatis-spring</artifactId>

        <version>1.3.0</version>

    </dependency>

    <!-- log4j -->

    <dependency>

        <groupId>org.apache.logging.log4j</groupId>

        <artifactId>log4j-core</artifactId>

        <version>2.8.2</version>

    </dependency>

      <!-- mysql -->

      <dependency>

        <groupId>mysql</groupId>

        <artifactId>mysql-connector-java</artifactId>

        <version>5.1.38</version>

    </dependency>

    <!-- c3p0 -->

    <dependency>

        <groupId>c3p0</groupId>

        <artifactId>c3p0</artifactId>

        <version>0.9.1.2</version>

    </dependency>

      <!-- servlet api -->

    <dependency>

        <groupId>javax.servlet</groupId>

        <artifactId>javax.servlet-api</artifactId>

        <version>3.1.0</version>

        <scope>provided</scope>

    </dependency>

    <!-- jsp  -->

    <dependency>

        <groupId>javax.servlet.jsp</groupId>

        <artifactId>jsp-api</artifactId>

        <version>2.1</version>

        <scope>provided</scope>

    </dependency>

    <!-- jstl -->

    <dependency>

        <groupId>javax.servlet</groupId>

        <artifactId>jstl</artifactId>

        <version>1.2</version>

    </dependency>

  </dependencies>

</project>
applicationContext.xml:
<?xml version="1.0" encoding="UTF-8"?>

<beans xmlns="http://www.springframework.org/schema/beans"

    xmlns:xsi="http://www.w3.org/2001/XMLSchema-instance"

    xmlns:aop="http://www.springframework.org/schema/aop"

    xmlns:tx="http://www.springframework.org/schema/tx"

    xmlns:context="http://www.springframework.org/schema/context"

    xsi:schemaLocation="http://www.springframework.org/schema/beans

        http://www.springframework.org/schema/beans/spring-beans-4.3.xsd

        http://www.springframework.org/schema/aop

        http://www.springframework.org/schema/aop/spring-aop.xsd

        http://www.springframework.org/schema/tx

        http://www.springframework.org/schema/tx/spring-tx.xsd

       http://www.springframework.org/schema/context

       http://www.springframework.org/schema/context/spring-context.xsd">

    <!--1 扫描注解包 -->

    <context:component-scan base-package="cn.zzsxt.ssm"></context:component-scan>

    <!-- 2.配置数据源DataSource -->

    <bean id="dataSource" class="com.mchange.v2.c3p0.ComboPooledDataSource">

        <property name="driverClass" value="com.mysql.jdbc.Driver"></property>

        <property name="jdbcUrl" value="jdbc:mysql://localhost:3306/test"></property>

        <property name="user" value="root"></property>

        <property name="password" value="root"></property>

    </bean>

    <!-- 3.配置sqlSessionFactory,并注入数据源 -->

    <bean id="sqlSessionFactory" class="org.mybatis.spring.SqlSessionFactoryBean">

        <property name="dataSource" ref="dataSource"></property>

          <!-- 加载cn/zzsxt/ssm/mapper/所有以 Mapper.xml结尾的映射文件 -->

         <property name="mapperLocations" value="classpath:cn/zzsxt/ssm/mapper/*Mapper.xml"></property>

    </bean>

    <!-- 4.配置MapperScannerConfigurer,用于扫描指定包下的Mapper接口,生成代理对象的id为Mapper接口名第一个字母小写 -->

    <bean class="org.mybatis.spring.mapper.MapperScannerConfigurer">

        <property name="basePackage" value="cn.zzsxt.ssm.mapper"></property>

        <property name="sqlSessionFactory" ref="sqlSessionFactory"></property>

    </bean>

    <!-- 配置声明式事务 -->

    <!-- 配置事务管理器,并注入数据源 -->

    <bean id="transactionManager" class="org.springframework.jdbc.datasource.DataSourceTransactionManager">

        <property name="dataSource" ref="dataSource"></property>

    </bean>

    <tx:advice id="txAdvice" transaction-manager="transactionManager">

        <tx:attributes>

            <tx:method name="add*" propagation="REQUIRED"/>

            <tx:method name="update*" propagation="REQUIRED"/>

            <tx:method name="delete*" propagation="REQUIRED"/>

            <tx:method name="*" propagation="SUPPORTS"/>

        </tx:attributes>

    </tx:advice>

    <aop:config>

        <aop:pointcut expression="execution(* cn.zzsxt.ssm.service.*.*(..))" id="serviceMethods"/>

        <aop:advisor advice-ref="txAdvice" pointcut-ref="serviceMethods"/>

    </aop:config>

</beans>
log4j.properties:
log4j.rootLogger=DEBUG, Console

log4j.appender.Console=org.apache.log4j.ConsoleAppender

log4j.appender.Console.layout=org.apache.log4j.PatternLayout

log4j.appender.Console.layout.ConversionPattern=%-5p - %m%n

log4j.logger.org.mybatis.spring=ERROR

log4j.logger.org.apache.ibatis.logging.LogFactory=ERROR

log4j.logger.com.alibaba.druid.pool.DruidDataSource=ERROR
springmvc.xml:
<?xml version="1.0" encoding="UTF-8"?>

<beans xmlns="http://www.springframework.org/schema/beans"

       xmlns:xsi="http://www.w3.org/2001/XMLSchema-instance"

       xmlns:context="http://www.springframework.org/schema/context"

       xmlns:mvc="http://www.springframework.org/schema/mvc"

       xsi:schemaLocation="http://www.springframework.org/schema/beans

      http://www.springframework.org/schema/beans/spring-beans-4.3.xsd

      http://www.springframework.org/schema/mvc

      http://www.springframework.org/schema/mvc/spring-mvc.xsd

      http://www.springframework.org/schema/context

      http://www.springframework.org/schema/context/spring-context.xsd">

     <!-- 注解扫描!!!-->

      <context:component-scan base-package="cn.zzsxt.ssm"></context:component-scan>

    <bean class="org.springframework.web.servlet.view.InternalResourceViewResolver">

        <property name="viewClass" value="org.springframework.web.servlet.view.JstlView"></property>

        <property name="prefix" value="/WEB-INF/jsp/"></property>

        <property name="suffix" value=".jsp"></property>

    </bean>

    <mvc:annotation-driven></mvc:annotation-driven>

    <mvc:default-servlet-handler/>

</beans>
java:Maven(Maven_ssm)的更多相关文章
- [3] 注解(Annotation)-- 深入理解Java:注解(Annotation)--注解处理器
转载 http://www.cnblogs.com/peida/archive/2013/04/26/3038503.html 深入理解Java:注解(Annotation)--注解处理器 如果没有用 ...
- [1] 注解(Annotation)-- 深入理解Java:注解(Annotation)基本概念
转载 http://www.cnblogs.com/peida/archive/2013/04/23/3036035.html 深入理解Java:注解(Annotation)基本概念 什么是注解(An ...
- [2]注解(Annotation)-- 深入理解Java:注解(Annotation)自定义注解入门
转载 http://www.cnblogs.com/peida/archive/2013/04/24/3036689.html 深入理解Java:注解(Annotation)自定义注解入门 要深入学习 ...
- 深入理解Java:注解(Annotation)自己定义注解入门
深入理解Java:注解(Annotation)自己定义注解入门 要深入学习注解.我们就必须能定义自己的注解,并使用注解,在定义自己的注解之前.我们就必须要了解Java为我们提供的元注解和相关定义注解的 ...
- java:maven(maven-ssm(聚合,分包开发))
1.maven-ssm: maven-ssm_diy: pom.xml: <?xml version="1.0" encoding="UTF-8"?> ...
- Java:注解(元数据)
初识Java注解 所谓的元数据是指用来描述数据的数据,可能刚听到元数据的时候你会有点陌生,其实任何一个使用过struts或者hibernate的开发人员都在不知不觉中使用元数据,更通俗一点来说元数据是 ...
- 深入理解Java:注解(Annotation)自定义注解入门
转载:http://www.cnblogs.com/peida/archive/2013/04/24/3036689.html 元注解: 元注解的作用就是负责注解其他注解.Java5.0定义了4个标准 ...
- 深入理解Java:注解(Annotation)基本概念
转自:http://www.cnblogs.com/peida/archive/2013/04/23/3036035.html 竹子-博客(.NET/Java/Linux/架构/管理/敏捷) 什么是注 ...
- 【转】深入理解Java:注解(Annotation)自定义注解入门
http://www.cnblogs.com/peida/archive/2013/04/24/3036689.html 元注解: 元注解的作用就是负责注解其他注解.Java5.0定义了4个标准的me ...
随机推荐
- 【hdu 6089】Rikka with Terrorist
题意 有一个 \(n\times m\) 的二维网格,其中有 \(k\) 个禁止点. 有 \(q\) 组询问,每组询问为给一个点,求有多少个矩形以这个点为一角且不包含禁止点. \(n,m,k,q\le ...
- Codeforces Manthan, Codefest 18 (rated, Div. 1 + Div. 2) E.Trips
比赛的时候想到怎么做了 没调出来(感觉自己是个睿智) 给你N个点M条边,这M条边是一条一条加进去的 要求你求出加入每一条边时图中极大'K度'子图的大小 极大'K度'子图的意思是 要求出一个有尽量多的点 ...
- springboot 开启缓存
Caching Data with Spring This guide walks you through the process of enabling caching on a Spring ma ...
- JS实现表单全选以及取消全选实例
实现效果: 全选按钮:点击全选按钮所有的小按钮都会被选中:点掉全选按钮,所有按钮取消选中: 小按钮:只有全部被选中,全选按钮才会被选中 思路分析: 1.全选和取消全选做法:让下面所有复选框的 chec ...
- Spring Boot教程(三十)使用Spring-data-jpa(1)
在实际开发过程中,对数据库的操作无非就“增删改查”.就最为普遍的单表操作而言,除了表和字段不同外,语句都是类似的,开发人员需要写大量类似而枯燥的语句来完成业务逻辑. 为了解决这些大量枯燥的数据操作语句 ...
- 揭秘Android Studio项目目录结构
I don't know if this is because of the Gradle Build System (I'd wager it is), but I'll tell you what ...
- LeetCode 43. 字符串相乘(Multiply Strings) 大数乘法
题目描述 给定两个以字符串形式表示的非负整数 num1 和 num2,返回 num1 和 num2 的乘积,它们的乘积也表示为字符串形式. 示例 1: 输入: num1 = "2" ...
- 在electron中使用sqlite:sql.js简介
在electron中使用sqlite:sql.js简介 在开发electron应用的时候如果想要使用sqlite3,步骤上除了npm安装以外还要rebuild,比较麻烦.如果你想找一个开箱即用的sql ...
- b站编程课程资源汇总
b站编程课程资源汇总 一.总结 一句话总结: b站的编程资源很多,而且很良心 二.编程课程资源汇总 b站看到的,分享给大家 https://www.bilibili.com/video/av50680 ...
- git设置mergetool可视化工具
可以设置BeyondCompare,DiffMerge等作为git的比较和合并的可视化工具,方便操作. 设置如下: 先下载并安装BeyondCompare,DiffMerge等. 设置git配置, ...