
Flutter样式和布局控件简析(二)
开始
继续接着分析Flutter相关的样式和布局控件,但是这次内容难度感觉比较高,怕有分析不到位的地方,所以这次仅仅当做一个参考,大家最好可以自己阅读一下代码,应该会有更深的体会。
Sliver布局
Flutter存在着两大布局体系(就目前分析),一个是Box布局,还有另外一个就是Sliver布局;但是Sliver布局明显比Box会更加复杂,这真是一个坎,那么为啥说Sliver更加复杂尼,请看一下对比:
首先是Box布局,主要看输入的BoxConstraints(约束)和输出Size(尺寸)
class BoxConstraints extends Constraints {

    const BoxConstraints({

        this.minWidth: 0.0,

        this.maxWidth: double.infinity,

        this.minHeight: 0.0,

        this.maxHeight: double.infinity

      });

  }
class Size extends OffsetBase {
const Size(double width, double height) : super(width, height);
}而Sliver布局,SliverConstraints(约束)和输出SliverGeometry
class SliverConstraints extends Constraints {

const SliverConstraints({

    @required this.axisDirection,

    @required this.growthDirection,

    @required this.userScrollDirection,

    @required this.scrollOffset,

    @required this.overlap,

    @required this.remainingPaintExtent,

    @required this.crossAxisExtent,

    @required this.crossAxisDirection,

    @required this.viewportMainAxisExtent,

  })

}
class SliverGeometry extends Diagnosticable {
const SliverGeometry({
this.scrollExtent: 0.0,
this.paintExtent: 0.0,
this.paintOrigin: 0.0,
double layoutExtent,
this.maxPaintExtent: 0.0,
this.maxScrollObstructionExtent: 0.0,
double hitTestExtent,
bool visible,
this.hasVisualOverflow: false,
this.scrollOffsetCorrection,
})
}两者一对比,Box布局明显参数更少,也更直观:maxWidth,width,minWidth这些一看就明白其起到的作用;但是Sliver布局无论输入输出都是一大堆参数,这些参数究竟起到什么作用,为什么需要这些参数,不看代码真的很难明白。
Viewport组件
其实介绍Sliver布局,必须得先介绍Viewport组件,因为Sliver相关组件需要在Viewport组件下使用,而Viewport组件的主要作用就是提供滚动机制,可以根据传入的offset参数来显示特定的内容;在Flutter中并不像web只需在每个元素样式上加上overflow: auto,元素内容就可以自动滚动,这是因为Flutter主要一个思想就是万物皆组件,无论样式还是布局或者功能都是以组件形式出现。
class Viewport extends MultiChildRenderObjectWidget {

    Viewport({

        Key key,

        this.axisDirection: AxisDirection.down, //主轴方向,默认往下

        this.crossAxisDirection, //纵轴方向

        this.anchor: 0.0, //决定scrollOffset = 0分割线在viewport的位置(0 <= anchor <= 1.0)

        @required this.offset, //viewport偏移位置

        this.center, //标记哪个作为center组件

        List<Widget> slivers: const <Widget>[], //sliver组件双向列表

      })

  }
虽然简单描述了各个参数的作用,但是还是不够直观。。。还是画图吧:
首先上图整个可以看到Center参数的作用可以标出整个列表应该以哪个组件为基线来布局,Center组件始终在scrollOffset = 0.0的初始线上开始布局,而anchor参数则可以控制scrollOffset = 0.0这个初始线在Viewport上的位置,这里设置的是0.3,所以初始线的位置是距离顶端506 * .3 = 151.8这个位置上放置的。
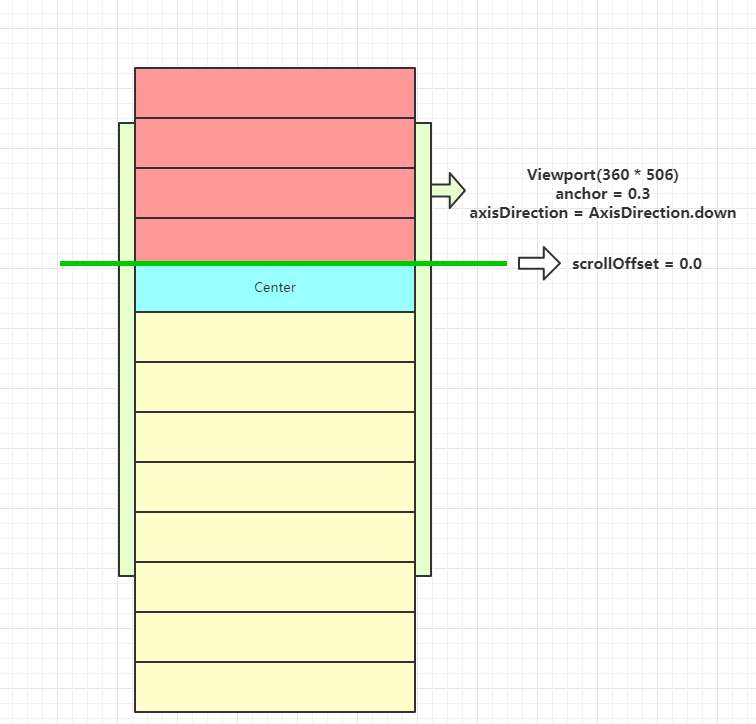
虽然这样好像把参数的作用都搞清楚了,但是仍然没有知道为什么需要这些参数,继续深入RenderViewport,了解一下布局的核心。
直接跳到performLayout方法:
void performLayout() {

    ...

     final double centerOffsetAdjustment = center.centerOffsetAdjustment;

    double correction;

    int count = 0;

    do {

      assert(offset.pixels != null);

      correction = _attemptLayout(mainAxisExtent, crossAxisExtent, offset.pixels + centerOffsetAdjustment);

      if (correction != 0.0) {

        offset.correctBy(correction);

      } else {

        if (offset.applyContentDimensions(

              math.min(0.0, _minScrollExtent + mainAxisExtent * anchor),

              math.max(0.0, _maxScrollExtent - mainAxisExtent * (1.0 - anchor)),

           ))

          break;

      }

      count += 1;

    } while (count < _kMaxLayoutCycles);
这里可以注意到performLayout里面存在一个循环,只要哪个元素布局的过程中需要调整滚动的偏移量,就会更新滚动偏移量之后再重新布局,但是重新布局的次数不能超过_kMaxLayoutCycles也就是10次,这里也是明显从性能考虑;
另外Center组件还有一个centerOffsetAdjustment属性,例如centerOffsetAdjustment为50.0的时候,Center组件就会再原来基础上往上50.0,但是这里的处理可以看到只是等同于改变了滚动偏移量,增加50.0的偏移位置,所做到的效果。
然后直接把Viewport的宽高和调整后的滚动偏移量传入_attemptLayout方法:
double _attemptLayout(double mainAxisExtent, double crossAxisExtent, double correctedOffset) {

    _minScrollExtent = 0.0;

    _maxScrollExtent = 0.0;

    _hasVisualOverflow = false;

    final double centerOffset = mainAxisExtent * anchor - correctedOffset;

    final double clampedForwardCenter = math.max(0.0, math.min(mainAxisExtent, centerOffset));

    final double clampedReverseCenter = math.max(0.0, math.min(mainAxisExtent, mainAxisExtent - centerOffset));

    final RenderSliver leadingNegativeChild = childBefore(center);

    if (leadingNegativeChild != null) {

      // negative scroll offsets

      final double result = layoutChildSequence(

        leadingNegativeChild,

        math.max(mainAxisExtent, centerOffset) - mainAxisExtent,

        0.0,

        clampedReverseCenter,

        clampedForwardCenter,

        mainAxisExtent,

        crossAxisExtent,

        GrowthDirection.reverse,

        childBefore,

      );

      if (result != 0.0)

        return -result;

    }

    // positive scroll offsets

    return layoutChildSequence(

      center,

      math.max(0.0, -centerOffset),

      leadingNegativeChild == null ? math.min(0.0, -centerOffset) : 0.0,

      clampedForwardCenter,

      clampedReverseCenter,

      mainAxisExtent,

      crossAxisExtent,

      GrowthDirection.forward,

      childAfter,

    );

  }
这里先提前说一下两个关键属性layoutOffset和remainingPaintExtent:
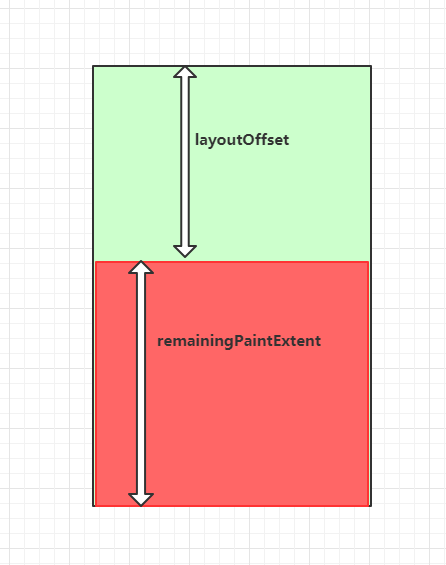
layoutOffset表示组件在Viewport中偏移多少距离才开始布局,而remainingPaintExtent表示在Viewport中剩余绘制区域大小,一旦remainingPaintExtent为0的时候,控件是不需要绘制的,因为就算绘制了用户也看不到。
而这几行代码:
final double centerOffset = mainAxisExtent * anchor - correctedOffset;

final double clampedForwardCenter = math.max(0.0, math.min(mainAxisExtent, centerOffset));

final double clampedReverseCenter = math.max(0.0, math.min(mainAxisExtent, mainAxisExtent - centerOffset));
就是计算这两个关键属性过程,可以假设centerOffset为0.0的时候,clampedForwardCenter就等于0.0,clampedReverseCenter 等于 mainAxisExtent;所以也就等于layoutOffset等于0.0,remainingPaintExtent等于mainAxisExtent。
接着分析,当Center组件前面还有组件的时候,就会进入刚才代码的处理流程:
if (leadingNegativeChild != null) {

      // negative scroll offsets

  final double result = layoutChildSequence(

    leadingNegativeChild,

    math.max(mainAxisExtent, centerOffset) - mainAxisExtent,

    0.0,

    clampedReverseCenter,

    clampedForwardCenter,

    mainAxisExtent,

    crossAxisExtent,

    GrowthDirection.reverse,

    childBefore,

  );

  if (result != 0.0)

    return -result;

}
Center前面的组件会一个接一个布局,但是对于Center前面的组件,刚才描述layoutOffset和remainingPaintExtent的图得要倒着来看,也就是说会变成这样:
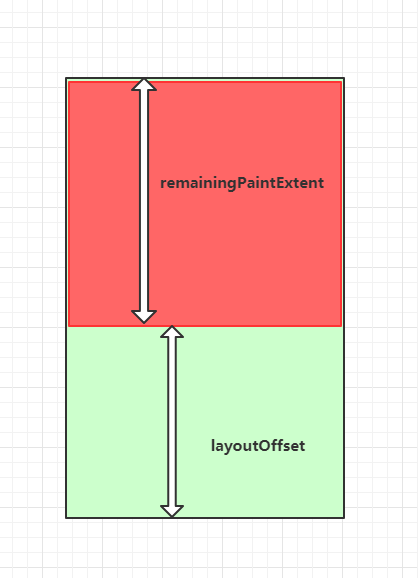
所以Center组件其实就是一个分割线把内容分成上下两部分,一部分顺着Viewport主轴方向,另外一部分是反主轴的方向发展的,再看看layoutChildSequence方法:
 double layoutChildSequence(

    RenderSliver child,

    double scrollOffset,

    double overlap,

    double layoutOffset,

    double remainingPaintExtent,

    double mainAxisExtent,

    double crossAxisExtent,

    GrowthDirection growthDirection,

    RenderSliver advance(RenderSliver child),

  ) {

    assert(scrollOffset.isFinite);

    assert(scrollOffset >= 0.0);

    final double initialLayoutOffset = layoutOffset;

    final ScrollDirection adjustedUserScrollDirection =

        applyGrowthDirectionToScrollDirection(offset.userScrollDirection, growthDirection);

    assert(adjustedUserScrollDirection != null);

    double maxPaintOffset = layoutOffset + overlap;

    while (child != null) {

      assert(scrollOffset >= 0.0);

      child.layout(new SliverConstraints(

        axisDirection: axisDirection,

        growthDirection: growthDirection,

        userScrollDirection: adjustedUserScrollDirection,

        scrollOffset: scrollOffset,

        overlap: maxPaintOffset - layoutOffset,

        remainingPaintExtent: math.max(0.0, remainingPaintExtent - layoutOffset + initialLayoutOffset),

        crossAxisExtent: crossAxisExtent,

        crossAxisDirection: crossAxisDirection,

        viewportMainAxisExtent: mainAxisExtent,

      ), parentUsesSize: true);

      final SliverGeometry childLayoutGeometry = child.geometry;

      assert(childLayoutGeometry.debugAssertIsValid());

      // If there is a correction to apply, we'll have to start over.

      if (childLayoutGeometry.scrollOffsetCorrection != null)

        return childLayoutGeometry.scrollOffsetCorrection;

      // We use the child's paint origin in our coordinate system as the

      // layoutOffset we store in the child's parent data.

      final double effectiveLayoutOffset = layoutOffset + childLayoutGeometry.paintOrigin;

      updateChildLayoutOffset(child, effectiveLayoutOffset, growthDirection);

      maxPaintOffset = math.max(effectiveLayoutOffset + childLayoutGeometry.paintExtent, maxPaintOffset);

      scrollOffset -= childLayoutGeometry.scrollExtent;

      layoutOffset += childLayoutGeometry.layoutExtent;

      if (scrollOffset <= 0.0)

        scrollOffset = 0.0;

      updateOutOfBandData(growthDirection, childLayoutGeometry);

      // move on to the next child

      child = advance(child);

    }

    // we made it without a correction, whee!

    return 0.0;

  }
这个方法比较长,而且没法精简了。
scrollOffset属性表示超出Viewport边界的距离,这里可以看到传进来的scrollOffset是必须大于等于0,也就是说scrollOffset其实等同于web的scrollTop属性了,但是如果scrollOffset大于0的时候,layoutOffset必然是等于0,remainingPaintExtent必然等于mainAxisExtent,只要联想一下刚才的图的就可以推出他们的关系了。
关于SliverConstraints.overlap属性,指前一个Sliver组件的layoutExtent(布局区域)和paintExtent(绘制区域)重叠了。
这里红色部分比绿色部分多出地方及时overlap的大小
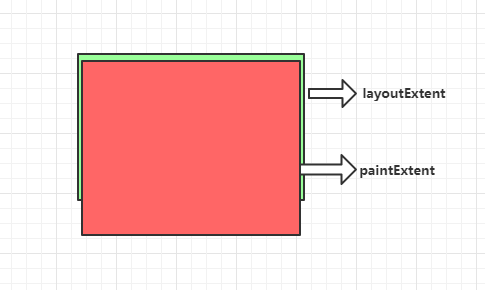
但是也受SliverGeometry.paintOrigin影响,所以必须计算在内:
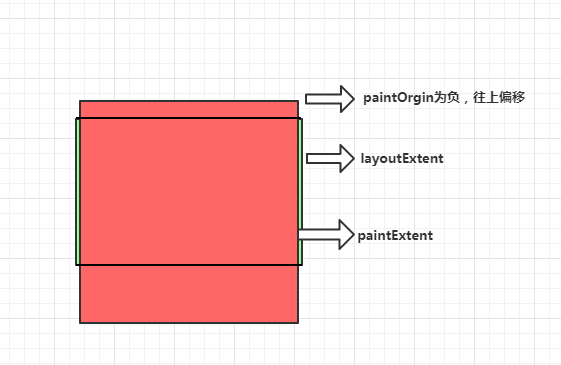
所以这里计算是这样:首先layoutOffset + paintOrigin + paintExtent = maxPaintOffset;再layoutOffset += layoutExtent;最后maxPintOffset - layoutOffset = 下个sliver的overlap。
  final double effectiveLayoutOffset = layoutOffset + childLayoutGeometry.paintOrigin;

  maxPaintOffset = math.max(effectiveLayoutOffset + childLayoutGeometry.paintExtent, maxPaintOffset);

  scrollOffset -= childLayoutGeometry.scrollExtent;

  layoutOffset += childLayoutGeometry.layoutExtent;
而layoutOffset不停增加,最终导致remainingPaintExtent变成0.0,也就是告诉Sliver无需绘制了,而remainingPaintExtent为0.0的Sliver,最终计算的SliverGeometry的paintExtent和layoutExtent一般都是0.0,唯有scrollExtent不能为0.0,因为这个值需要加起来,决定下次是否能够继续滚动。
还有SliverGeometry.scrollOffsetCorrection属性的作用,这个值只要返回不是0.0,就会触发Viewport根据这个值修正偏移量后重新布局(这里存在的一个用途可能是滑动翻页的时候每次都能定位每一页的开始)
结束?
当然没有,下次接着写,Sliver布局还有挺多可以挖掘的地方,今天先到这里。
Flutter样式和布局控件简析(二)的更多相关文章
- RecycleView + CardView 控件简析
今天使用了V7包加入的RecycleView 和 CardView,写篇简析. 先上效果图: 原理图: 这是RecycleView的工作原理: 1.LayoutManager用来处理RecycleVi ...
- Android RecycleView + CardView 控件简析
今天使用了V7包加入的RecycleView 和 CardView,写篇简析. 先上效果图: 原理图: 这是RecycleView的工作原理: 1.LayoutManager用来处理RecycleVi ...
- Flutter 布局控件完结篇
本文对Flutter的29种布局控件进行了总结分类,讲解一些布局上的优化策略,以及面对具体的布局时,如何去选择控件. 1. 系列文章 Flutter 布局详解 Flutter 布局(一)- Conta ...
- WPF自定义控件与样式(9)-树控件TreeView与菜单Menu-ContextMenu
一.前言 申明:WPF自定义控件与样式是一个系列文章,前后是有些关联的,但大多是按照由简到繁的顺序逐步发布的等,若有不明白的地方可以参考本系列前面的文章,文末附有部分文章链接. 本文主要内容: 菜单M ...
- WPF自定义控件与样式(10)-进度控件ProcessBar自定义样
一.前言 申明:WPF自定义控件与样式是一个系列文章,前后是有些关联的,但大多是按照由简到繁的顺序逐步发布的等,若有不明白的地方可以参考本系列前面的文章,文末附有部分文章链接. 本文主要内容: Pro ...
- 开源布局控件 WeifenLuo.WinFormsUI.Docking.dll使用
WeifenLuo.WinFormsUI.Docking是一个很强大的界面布局控件,可以保存自定义的布局为XML文件,可以加载XML配置文件.! 先看一下效果 使用说明: 1.新建一个WinForm程 ...
- 【转】WPF自定义控件与样式(9)-树控件TreeView与菜单Menu-ContextMenu
一.前言 申明:WPF自定义控件与样式是一个系列文章,前后是有些关联的,但大多是按照由简到繁的顺序逐步发布的等. 本文主要内容: 菜单Menu的自定义样式: 右键菜单ContextMenu的自定义样式 ...
- WinForm界面布局控件WeifenLuo.WinFormsUI.Docking"的使用 (一)
WinForm界面布局控件WeifenLuo.WinFormsUI.Docking"的使用 (一) 编写人:CC阿爸 2015-1-28 在伍华聪的博客中,看到布局控件"Weife ...
- PyQt(Python+Qt)学习随笔:布局控件layoutSpacing属性
在Qt Designer中布局控件有4个,分别是Vertical Layout(垂直布局).Horizontal Layout(水平布局).Grid Layout(网格布局).Form Layout( ...
随机推荐
- Dos.ORM(原Hxj.Data)- 目录、介绍
引言: Dos.ORM(原Hxj.Data)于2009年发布.2015年正式开源,该组件已在数百个成熟项目中应用,是目前国内用户量最大.最活跃.最完善的国产ORM.初期开发过程中参考了NBear与My ...
- Vagrant 手册之 Vagrantfile - SSH 设置 config.ssh
原文地址 配置的命名空间:config.ssh config.ssh 中的设置与配置 Vagrant 如何通过 SSH 访问您的计算机相关. 大多数 Vagrant 设置一样,一般使用默认设置即可,但 ...
- Vagrant 手册之网络 - 私有网络 private network
原文地址 Vagrantfile 配置文件中私有网络的标识符:private_network,例如: config.vm.network "private_network", ty ...
- upc组队赛17 Greatest Common Divisor【gcd+最小质因数】
Greatest Common Divisor 题目链接 题目描述 There is an array of length n, containing only positive numbers. N ...
- oracle三大范式
范式: 设计数据库定义的一个规则, 三大范式, 灵活运用, 人的思想是活的 一范式 1, 不存在冗余数据 同一个表中的记录不能有重复----所以主键(必须有) 2, 每个字段必须是不可再分的信息(列不 ...
- System的两常用个静态方法
package cn.learn; /* System类在java.lang.System,和操作系统有关 1.currentTimeMillis直接调用,是一个返回为long型的静态方法 常用来计算 ...
- 移动app云测试平台
一:移动App云测试平台 1.云测试平台背景 随着智能手机的普及率和渗透率越来越高,App开发软件也越来越多.但是因为安卓和IOS的碎片化,尤其是安卓,因为完全开源的原因,导致设备繁多,品牌众多,版本 ...
- JVM(4)之 使用MAT排查堆溢出
开发十年,就只剩下这套架构体系了! >>> 接下来讲解如何设置以及当发生堆溢出的时候怎么排查问题.先看一小段代码: 代码中使用了一个无限循环来为list添加对象,如果采用 ...
- BUUCTF--刮开有奖
文件链接:https://buuoj.cn/files/abe6e2152471e1e1cbd9e5c0cae95d29/8f80610b-8701-4c7f-ad60-63861a558a5b.ex ...
- pycharm修改字体大小和主题
一,修改文字大小: 二,修改主题:你可能对编辑器的外观仍不满意,例如你希望将文档字符串改变为另外一种颜色,下面介绍具体更改方法: