
Spring MVC 文件上传简单示例(form、ajax方式 )
1、Form Upload
SpringMVC 中,文件的上传是通过 MultipartResolver 实现的,所以要实现上传,只要注册相应的 MultipartResolver 即可。
MultipartResolver 的实现类有两个:
CommonsMultipartResolver(需要 Apache 的 commons-fileupload 支持,它能在比较旧的 servlet 版本中使用,兼容性好)StandardServletMultipartResolver(不需要第三方 jar 包支持,它使用 servlet 内置的上传功能,但是只能在 Servlet 3 以上的版本使用
以 StandardServletMultipartResolver 为例,使用步骤如下。
首先,在 web.xml 中为 DispatcherServlet 配置 Multipart:
<servlet>

  <servlet-name>mvc</servlet-name>

  <servlet-class>org.springframework.web.servlet.DispatcherServlet</servlet-class>

    <multipart-config>

      <max-file-size>5242880</max-file-size>        <!-- 上传文件的大小限制,比如下面表示 5 M -->

      <max-request-size>10485760</max-request-size> <!-- 一次表单提交中文件的大小限制,必须下面代表 10 M -->

      <file-size-threshold>0</file-size-threshold>  <!-- 多大的文件会被自动保存到硬盘上。0 代表所有 -->

    </multipart-config>

</servlet>
其次,在spring中注册MultipartResolver:
<bean id="multipartResolver" class="org.springframework.web.multipart.support.StandardServletMultipartResolver"></bean>
然后就可以使用了。
前端代码:
<%@ page contentType="text/html;charset=UTF-8" language="java" %>

<html>

<head>

    <title>文件上传</title>

</head>

<body>

<form action="/upload" method="post" enctype="multipart/form-data">

    <input type="file" name="filename">

    <input type="submit" value="提交">

</form>

</body>

</html>
后端代码:
package com.oukele.web;

import org.springframework.stereotype.Controller;

import org.springframework.web.bind.annotation.PostMapping;

import org.springframework.web.bind.annotation.RequestMapping;

import org.springframework.web.bind.annotation.RequestMethod;

import org.springframework.web.bind.annotation.RequestPart;

import org.springframework.web.multipart.MultipartFile;

import javax.servlet.http.HttpServletRequest;

import java.io.File;

import java.io.IOException;

import java.text.SimpleDateFormat;

import java.util.Date;

import java.util.regex.Pattern;

@Controller

@RequestMapping(path = "/upload")

public class FileUploadController {

    @RequestMapping(path = "",method = RequestMethod.GET)

    public String getPage(){

        return "fileupload";

    }

    @PostMapping

    public String fileUpload(@RequestPart("filename")MultipartFile multipartFile, HttpServletRequest request) {

        if( !multipartFile.isEmpty() ){

            //验证文件是否为图片格式 && 文件大小不能超过 5M  1KB = 1024B

            if( multipartFile.getContentType().contains("image/") && multipartFile.getSize() < 1024 * 1024 * 1024 * 5 ){

                //图片的存储文件夹

                String save = request.getServletContext().getRealPath("/images");

                File file = new File(save);

                if( !file.exists() ){

                    file.mkdirs();

                }

                //文件名

                String fileName =multipartFile.getOriginalFilename().substring(0,multipartFile.getOriginalFilename().indexOf("."));

               //上传文件的后缀

                String zhui = multipartFile.getOriginalFilename().substring(multipartFile.getOriginalFilename().indexOf("."),multipartFile.getOriginalFilename().length());

                SimpleDateFormat simpleDateFormat = new SimpleDateFormat("yyyy-MM-dd");

                //生成新的文件名

                String fileNewName ="upload_"+fileName+"_"+simpleDateFormat.format(new Date())+zhui;

                try {

                    //将此图片存储到images文件夹中

                    multipartFile.transferTo(new File(save+"\\"+fileNewName));

                } catch (IOException e) {

                    e.printStackTrace();

                }

            }else{

                return "";

            }

        }

        return "redirect:/upload";

    }

}
运行:

结果:
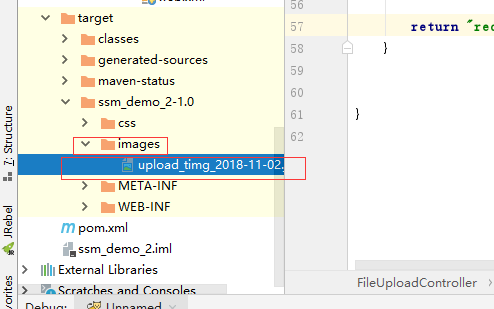
以ajax的方式,进行文件上传
前端代码:
 <form action="#"  method="post" enctype="multipart/form-data">

      宠物图片: <input type="file" name="filename" id="update_pet_img" style="width: 70px">

 </form>
<img style="margin-top: 50px" class="update_img" src="" width="100px" height="100px" alt="未上传图片">
js脚本
<script src="${pageContext.request.contextPath}/js/jquery-1.12.3.js"></script>

<script>

 //修改区域-->,点击选择文件的时候实现自动上传图片。

    $("#update_pet_img").change(function () {

        var form = $(this).closest("form");

        update_file_img(form);

    });

    //图片上传

    function update_file_img(file) {

        var formData = new FormData($(file)[0]);

        //ajax请求

        $.ajax({

            type: "post",

            url: "/imgUpload",

            data: formData,

            contentType: false,//告诉客户端不要设置Content-Type 请求头部

            processData: false,//告诉客户端不处理过程数据

            success: function (data) {//完成后的事件

                $(".update_img").attr("src", data.img_src);//data.img_src得到图片的地址

            },

            error: function (error) {//出现错误时的事件

                alert("出错啦。");

            }

        });

    }

</script>
后端代码:(这里只是简单示例,练习可以适当减少)
package com.oukele.web;

import org.springframework.stereotype.Controller;

import org.springframework.ui.Model;

import org.springframework.web.bind.annotation.*;

import org.springframework.web.multipart.MultipartFile;

import javax.servlet.http.HttpServletRequest;

import javax.servlet.http.HttpServletResponse;

import javax.servlet.http.HttpSession;

import java.io.File;

import java.text.SimpleDateFormat;

import java.util.Date;

@Controller

@RequestMapping(path = "/imgUpload")

public class FileUpload {

    /*

     * 宠物图片上传

     * */

    @PostMapping(produces = "application/json;charset=utf-8")

    @ResponseBody

    public String imgUpload(@RequestPart("filename") MultipartFile multipartFile, HttpServletRequest request, HttpServletResponse response){

        if (multipartFile.isEmpty()) {

            return "{\"error\":\"文件为空,错误格式\"}";

        }

        if (!multipartFile.getContentType().contains("image/")) {

            return "{\"error\":\"只允许上传图片的文件\"}";

        }

        if (multipartFile.getSize() > 1024 * 1024 * 1024 * 5) {

            return "{\"error\":\"图片大小不能超过5M\"}";

        }

        //图片的存储文件夹

        String save = request.getServletContext().getRealPath("/images");

        File file = new File(save);

        if (!file.exists()) {

            file.mkdirs();

        }

        String file1 = createFile(save, multipartFile);

        return file1;

    }

    //创建文件夹,格式为以日期文件名 比如 2018112 , 和 新的文件名,格式为 upload_文件名_日期.后缀名

    public String createFile(String path, MultipartFile multipartFile) {

        boolean flag = false;

        String imgpath ="";

        //创建文件夹

        SimpleDateFormat simpleDateFormat = new SimpleDateFormat("yyyyMMdd");

        String dataFile = "/" + simpleDateFormat.format(new Date());

        path += dataFile;

        File file = new File(path);

        if (!file.exists()) {

            file.mkdirs();

        }

        //文件名

        String fileName = multipartFile.getOriginalFilename().substring(0, multipartFile.getOriginalFilename().indexOf("."));

        //上传文件的后缀

        String zhui = multipartFile.getOriginalFilename().substring(multipartFile.getOriginalFilename().indexOf("."), multipartFile.getOriginalFilename().length());

        //生成新的文件名

        String fileNewName = "upload_" + fileName + "_" + simpleDateFormat.format(new Date()) + zhui;

        try {

            //将此图片存储到对应的文件夹中

            multipartFile.transferTo(new File(path + "/" + fileNewName));

             imgpath ="/images"+dataFile+"/"+ fileNewName;

            flag = true;

        } catch (Exception e) {

            flag = false;

            e.printStackTrace();

        }

        if( flag ){

            return "{\"img_src\":\""+imgpath+"\"}";

        }

        return "{\"error\":\"出现异常\"}";

    }

}
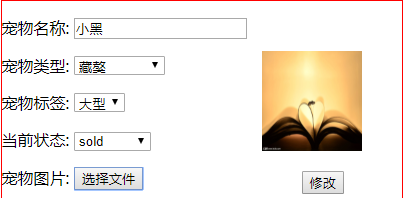
演示: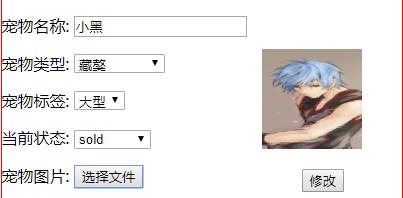
Spring MVC 文件上传简单示例(form、ajax方式 )的更多相关文章
- 【Java Web开发学习】Spring MVC文件上传
[Java Web开发学习]Spring MVC文件上传 转载:https://www.cnblogs.com/yangchongxing/p/9290489.html 文件上传有两种实现方式,都比较 ...
- Spring MVC 笔记 —— Spring MVC 文件上传
文件上传 配置MultipartResolver <bean id="multipartResolver" class="org.springframework.w ...
- Spring MVC文件上传教程 commons-io/commons-uploadfile
Spring MVC文件上传教程 commons-io/commons-uploadfile 用到的依赖jar包: commons-fileupload 1.3.1 commons-io 2.4 基于 ...
- Spring mvc文件上传实现
Spring mvc文件上传实现 jsp页面客户端表单编写 三个要素: 1.表单项type="file" 2.表单的提交方式:post 3.表单的enctype属性是多部分表单形式 ...
- Spring mvc 文件上传到文件夹(转载+心得)
spring mvc(注解)上传文件的简单例子,这有几个需要注意的地方1.form的enctype=”multipart/form-data” 这个是上传文件必须的2.applicationConte ...
- spring mvc 文件上传 ajax 异步上传
异常代码: 1.the request doesn't contain a multipart/form-data or multipart/mixed stream, content type he ...
- Strut2 和Spring MVC 文件上传对比
在Java领域中,有两个常用的文件上传项目:一个是Apache组织Jakarta的Common-FileUpload组件 (http://commons.apache.org/proper/commo ...
- 【Spring】Spring MVC文件上传--整合bootstrap-fileinput和jQuery-File-Upload
前言 这里分享两个使用Spring MVC进行文件上传的简单示例, 分别整合bootstrap-fileinput 和 Jquery File Upload , 代码十分简单, 都是入门的示例,因此这 ...
- Spring MVC文件上传处理
以下示例显示如何在使用Spring Web MVC框架的表单中上传文件和处理.首先使用Eclipse IDE来创建一个WEB工程,实现一个上传文件并保存的功能.并按照以下步骤使用Spring Web ...
随机推荐
- SQL常见面试题(借书卡表_图书表_借书记录表)
问题描述: 本题用到下面三个关系表: CARD 借书卡: CNO 卡号,NAME 姓名,CLASS 班级 BOOKS 图书: BNO 书号,BNAME 书名,AU ...
- 5分钟了解图数据库Neo4j的使用
1.图数据库安装与配置 1.1安装与配置 配置path = %NEO4J_HOME%\bin 启动命令:neo4j console web访问:http://localhost:7474 1. ...
- mac sudo异常
dsenableroot -d -u <your_admin_username> -p <your_password>
- [爬虫] selenium介绍
认识selenium 在爬取百度文库的过程中,我们需要使用到一个工具selenium(浏览器自动测试框架),selenium是一个用于web应用程序测试的工具,它可以测试直接运行在浏览器中,就像我们平 ...
- idea自动化部署插件 Alibaba Cloud Toolkit 使用记录
官方安装文档和使用说明 https://help.aliyun.com/product/29966.html?spm=a2c4g.11186623.6.540.6efa6029JhlPfx 是什么? ...
- PTA(Advanced Level)1031.Hello World for U
Given any string of N (≥5) characters, you are asked to form the characters into the shape of U. For ...
- 在Ubuntu上安装Hive
1.下载hive2.3.5 解压缩并改名为hive目录,放到/usr/local下(注意权限) sudo mv apache-hive-2.3.5-bin /usr/local/hive 2.修改目录 ...
- 2019中山纪念中学夏令营-Day19 数论初步【GCD(最大公约数),素数相关】
关于GCD的一些定理或运用的学习: 1. 2.二进制算法求GCD 思想:使得最后的GCD没有2(提前把2提出来) 代码实现: #include <cstdio> #define int l ...
- Docker 添加容器SSH服务
很多时候我们需要登陆到容器内部操作,此时我们就需要开启容器的SSH支持了,下面的小例子将具体介绍三种分配IP地址的方法,分别是pipworl分配,commit分配,Docker分配等. 基于commi ...
- Collection接口的子接口——Queue接口
https://docs.oracle.com/javase/8/docs/api/java/util/Queue.html public interface Queue<E> exten ...