Spring 使用介绍(十一)—— Spring事件
一、简介
spring事件是观察者设计模式的实现,主要有三个元素:
- 事件 spring事件由ApplicationEvent定义
- 监听者 由ApplicationListener定义
- 发布者 由ApplicationEventPublisher定义,而ApplicationContext继承自ApplicationEventPublisher
简单示例:
自定义事件
public class TestEvent extends ApplicationEvent {

    private String message;

    public TestEvent(Object source) {

        this(source, "default message");

    }

    public TestEvent(Object source, String msg) {

        super(source);

        this.message = msg;

    }

    public String getMessage() {

        return message;

    }

}
监听者
@Component

public class TestListener implements ApplicationListener<ApplicationEvent>  {

    @Override

    public void onApplicationEvent(ApplicationEvent event) {

        if (event instanceof TestEvent) {

        System.out.println(((TestEvent)event).getMessage());

        }

    }

}
XML配置
<context:component-scan base-package="cn.matt.event"/>
测试
public class EventTest {

    @Test

    public void testCustomEvent() {

        ApplicationContext context = new ClassPathXmlApplicationContext("classpath:spring-context.xml");

        context.publishEvent(new TestEvent("", "hello matt"));

    }

}
补充:
定义监听者时,可通过泛型指定监听事件类型,因此,上例监听者可定义如下:
@Component

public class TestListener implements ApplicationListener<TestEvent> {

    @Override

    public void onApplicationEvent(TestEvent event) {

        System.out.println(((TestEvent) event).getMessage());

    }

}
二、spring容器事件
spring为容器启动各阶段定义了相关事件,实现如图:
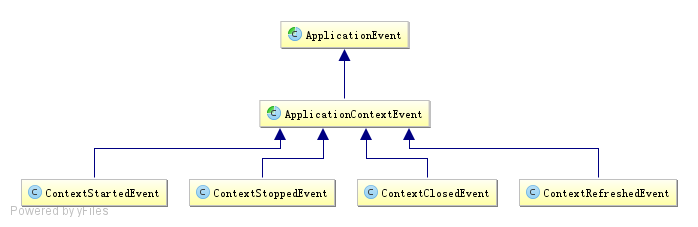
事件说明:
- ContextStartedEvent:ApplicationContext启动后触发的事件(调用start方法)
- ContextStoppedEvent:ApplicationContext停止后触发的事件(调用stop方法)
- ContextClosedEvent:ApplicationContext关闭后触发的事件
- ContextRefreshedEvent:ApplicationContext初始化或刷新完成后触发的事件(容器初始化(如bean的实例化、依赖注入)完成后调用)
使用示例
@Component

public class ApplicationStartUpListener implements ApplicationListener<ContextRefreshedEvent> {

    @Override

    public void onApplicationEvent(ContextRefreshedEvent event) {

        System.out.println("spring context inited");

    }

}
三、事件的执行机制
spring事件的执行机制默认使用单线程同步执行,异步执行可使用@Async注解实现,示例如下(新用户注册):
定义事件
public class RegisterEvent extends ApplicationEvent {

    public RegisterEvent(User user) {

        super(user);

    }

}
定义监听者
// 发生邮件
@Component

public class EmailRegisterListener implements ApplicationListener<RegisterEvent> {

    @Async

    public void onApplicationEvent(final RegisterEvent event) {

        System.out.println(Thread.currentThread().getId() + " **** 注册成功,发送确认邮件给:" + ((User)event.getSource()).getUsername());

    }

}
// 赠送积分

@Component

public class PointRegisterListener implements ApplicationListener<RegisterEvent> {

    @Async

    public void onApplicationEvent(final RegisterEvent event) {

        System.out.println(Thread.currentThread().getId() + " **** 注册成功,赠送积分给:" + ((User)event.getSource()).getUsername());

    }

}
// 赠送大礼包

@Component

public class PresentRegisterListener implements ApplicationListener<RegisterEvent> {

    @Async

    public void onApplicationEvent(final RegisterEvent event) {

        System.out.println(Thread.currentThread().getId() + " **** 注册成功,赠送大礼包给:" + ((User)event.getSource()).getUsername());

    }

}
用户类与业务类
public class User implements Serializable {

    private String username;

    private String password;

    public User(String username, String password) {

        this.username = username;

        this.password = password;

    }

    public String getUsername() {

        return username;

    }

}
@Service

public class RegisterService {

    @Autowired

    private ApplicationContext applicationContext;

    public void register(String username, String password) {

        System.out.println(username + "注册成功!");

        publishRegisterEvent(new User(username, password));

    }

    private void publishRegisterEvent(User user) {

        applicationContext.publishEvent(new RegisterEvent(user));

    }

}
配置
<context:component-scan base-package="com.sishuok"/>

<!-- 任务调度器 -->

<task:scheduler id="scheduler" pool-size="10"/>

<!-- 任务执行器 -->

<task:executor id="executor" pool-size="10"/>

<!--开启注解调度支持 @Async @Scheduled-->

<task:annotation-driven executor="executor" scheduler="scheduler" proxy-target-class="true"/>
测试
@RunWith(SpringJUnit4ClassRunner.class)

@ContextConfiguration(locations={"classpath:spring-config-register.xml"})

public class RegisterServiceIT {

    @Autowired

    private RegisterService registerService;

    @Test

    public void testRegister() {

         registerService.register("long", "123");

    }

}

// 输出:

// long注册成功!

// 15 **** 注册成功,发送确认邮件给:long

// 17 **** 注册成功,赠送积分给:long

// 18 **** 注册成功,赠送大礼包给:long
参考:
Spring进阶之路(2)-ApplicationContext容器以及事件机制
Spring 使用介绍(十一)—— Spring事件的更多相关文章
- [转帖]微服务框架Spring Cloud介绍 Part1: 使用事件和消息队列实现分布式事务
微服务框架Spring Cloud介绍 Part1: 使用事件和消息队列实现分布式事务 http://skaka.me/blog/2016/04/21/springcloud1/ APR 21ST, ...
- 黑马_13 Spring Boot:01.spring boot 介绍&&02.spring boot 入门
13 Spring Boot: 01.spring boot 介绍&&02.spring boot 入门 04.spring boot 配置文件 SpringBoot基础 1.1 原有 ...
- 微服务框架Spring Cloud介绍 Part1: 使用事件和消息队列实现分布式事务
http://skaka.me/blog/2016/04/21/springcloud1/ 不同于单一架构应用(Monolith), 分布式环境下, 进行事务操作将变得困难, 因为分布式环境通常会有多 ...
- 黑马_13 Spring Boot:05.spring boot 整合其他技术
13 Spring Boot: 01.spring boot 介绍&&02.spring boot 入门 04.spring boot 配置文件 05.spring boot 整合其他 ...
- 黑马_13 Spring Boot:04.spring boot 配置文件
13 Spring Boot: 01.spring boot 介绍&&02.spring boot 入门 04.spring boot 配置文件 05.spring boot 整合其他 ...
- [翻译]Spring框架参考文档(V4.3.3)-第二章Spring框架介绍 2.1 2.2 翻译--2.3待继续
英文链接:http://docs.spring.io/spring-framework/docs/current/spring-framework-reference/html/overview.ht ...
- 一、Spring Cloud介绍
springcloud 介绍 研究了一段时间spring boot了准备向spirng cloud进发,公司架构和项目也全面拥抱了Spring Cloud.在使用了一段时间后发现Spring Clou ...
- Spring入门介绍
概述 下载地址:https://repo.spring.io/release/org/springframework/spring/ spring是开源的轻量级框架 spring核心的主要两部分 AO ...
- Spring Cloud第十一篇 | 分布式配置中心高可用
本文是Spring Cloud专栏的第十一篇文章,了解前十篇文章内容有助于更好的理解本文: Spring Cloud第一篇 | Spring Cloud前言及其常用组件介绍概览 Spring Cl ...
随机推荐
- java eclipse jdk 关系
java 经常用到多个jdk版本 1.7 1.8.... 兼容时几个位置 处理 eclipse.ini (A处) #-vm#C:\Program Files\Java\jdk1.7.0_79\bi ...
- 百度智能手环方案开源(含源码,原理图,APP,通信协议等)
分享一个百度智能手环开源项目的设计方案资料. 项目简介 百度云智能手环的开源方案是基于Apache2.0开源协议,开源内容包括硬件设计文档,原理图.ROM.通讯协议在内的全套方案,同时开放APP和云服 ...
- c++_work
while((ch=getopt(argc, argv, "X:Y:C:")) != EOF) { switch((char)ch) { case 'X': strcpy(strS ...
- CSS 定位 (Positioning) 实例
CSS 定位和浮动CSS 为定位和浮动提供了一些属性,利用这些属性,可以建立列式布局,将布局的一部分与另一部分重叠,还可以完成多年来通常需要使用多个表格才能完成的任务. 定位的基本思想很简单,它允许你 ...
- MemSQL与MySQL不兼容问题总结
1.数据行Update更新数据行时,如果数据行没有变化,MySQL返回受影响的数据行数为1,但MemSQL返回的数据行数为0. 2.MemSQL不支持唯一约束 3.MemSQL不支持外键约束
- Python—sys模块介绍
sys.argv 命令行参数List,第一个元素是程序本身路径 sys.exit(n) 退出程序,正常退出时exit(0) sys.version 获取Python解释程序的版本信息 sys.maxi ...
- pycharm异常问题之Unable to save settings: Failed to save settings. Please restart PyCharm
pycharm异常之Unable to save settings: Failed to save settings. Please restart PyCharm 今天一不小心将电脑关了,但是关机之 ...
- Python_内置函数之map()
map 会根据提供的函数对指定序列做映射. 代码如下: def square(x): return x ** 2 ret = map(square, [1, 2, 3, 4, 5]) # 计算列表各元 ...
- 【学习总结】Git学习-参考廖雪峰老师教程二-安装Git
学习总结之Git学习-总 目录: 一.Git简介 二.安装Git 三.创建版本库 四.时光机穿梭 五.远程仓库 六.分支管理 七.标签管理 八.使用GitHub 九.使用码云 十.自定义Git 期末总 ...
- 【问题解决方案】之 jmeter启动报错:Not able to find Java executable or version. Please check your Java installation
故事发生在云计算实验课上-- ** 故事发生在云计算实验课上-- Step 1 在Xshell中登录自己的cloud虚拟机后,<sudo su ->切换到root用户 Step 2 < ...