
小白初入Python人工智能
想要了解人工智能首先要知道“百度大脑”(https://ai.baidu.com/?track=cp:aipinzhuan|pf:pc|pp:AIpingtai|pu:title|ci:|kw:10005792),“百度大脑”是国内做人工智能比较前端的了,有很多功能都是开源的,我们这些小白可以直接拿来用。这篇主要说一下我自己学到的东西和后面做的一个小程序。
要点:
1、需要在CMD中导入两个python第三方包【pip install pillow】、【pip install baidu-aip】
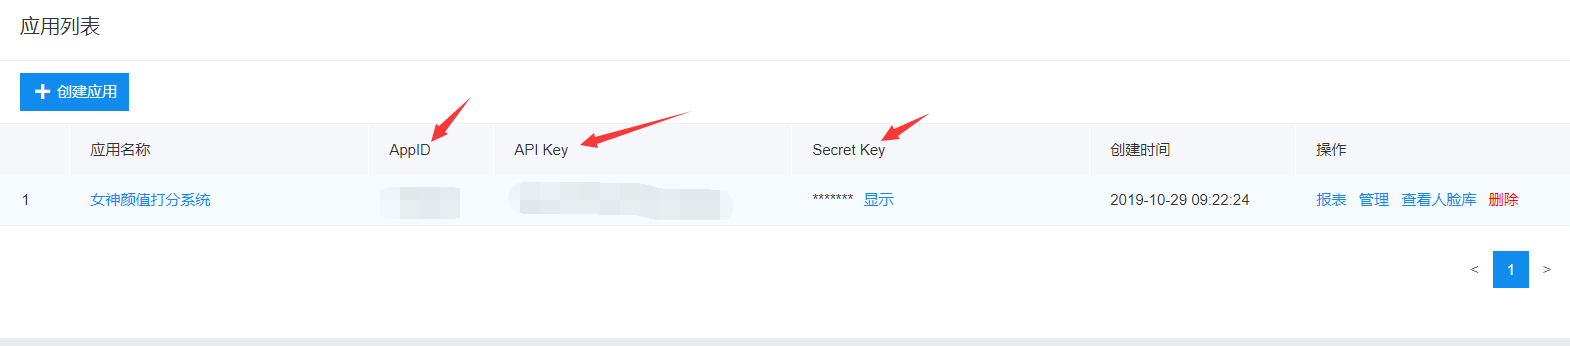
2、需要自己注册一个百度账号API登录到百度大脑来获取下面小程序用的【AppID】、【API Key】、【Secret Key】
3、百度搜索“百度大脑”进入首页→开放功能→(需要使用的模块,这里要用的是人脸识别)人脸识别→立即使用→创建应用(输入一些东西) 就创建完成了,上面会有要点2里所需要获取的三样东西
4、返回到人脸识别首页,进入技术文档界面点击人脸识别模块点击SDK文档点击REST API SDK下面会有python SDK点击进去,这个上面都有用法就不多说了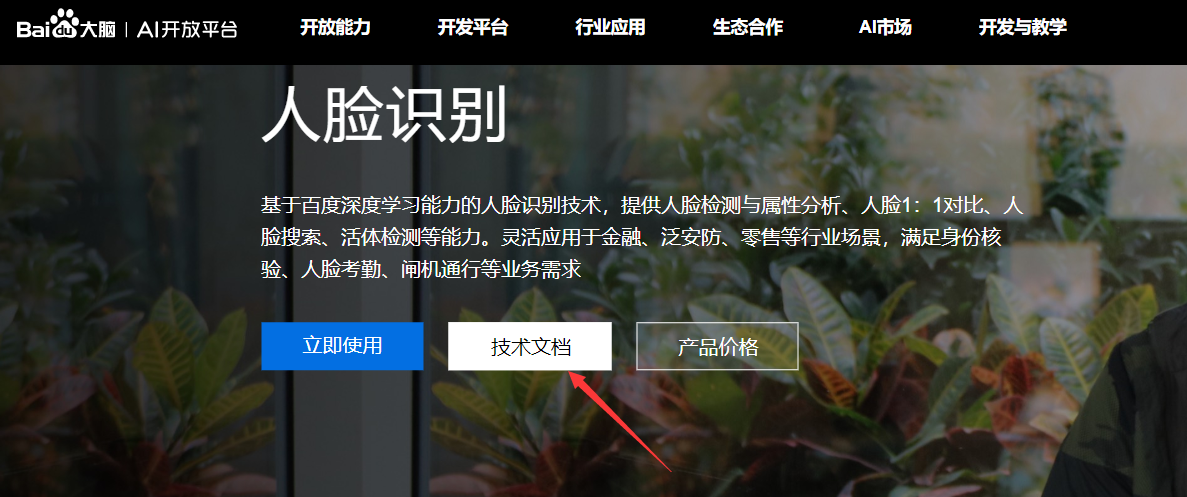
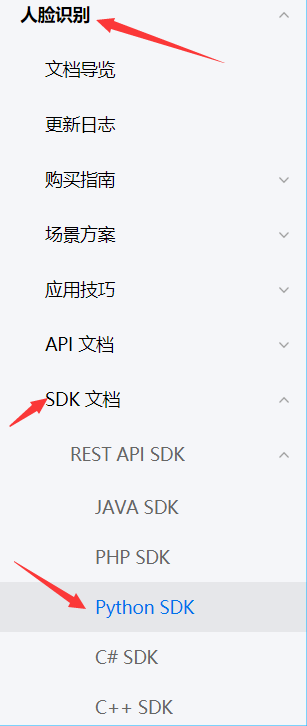
5、把上面的代码复制到pycharm新建的项目中代码如下:
#小小小小小小小小小白出品

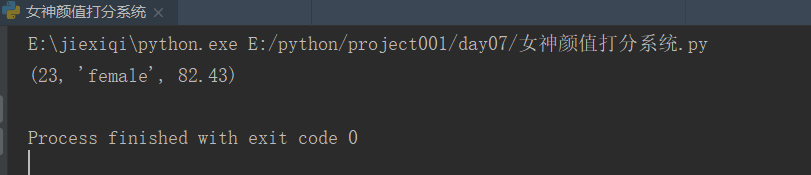
#这个代码只显示了年龄、性别和颜值分数

from aip import AipFace

import base64

""" 你的 APPID AK SK """

APP_ID = '你的APP_ID'

API_KEY = '你的API_KEY'

SECRET_KEY = '你的SECRET_KEY'

client = AipFace(APP_ID, API_KEY, SECRET_KEY)

image = 'dili.jpg'

def set_image(file):

    with open(file, 'rb')as f:

        res = base64.b64encode(f.read())

    return res.decode('utf-8')

imageType = "BASE64"#需要将图片转换成BASE64类型

# image = set_image('你需要用的图片')

""" 调用人脸检测 """

options = {'face_field': 'age,gender,beauty'}

""" 带参数调用人脸检测 """

def face_score(image):

    results = client.detect(set_image(image), imageType, options)

    age = results['result']['face_list'][0]['age']

    gender = results['result']['face_list'][0]['gender']['type']

    beauty = results['result']['face_list'][0]['beauty']

    return age,gender,beauty

# print(results)

print(face_score(image))
6、再创建一个py文件,里面放的是小程序的代码,代码如下:
 """

 pip install pillow

 pip install baidu-aip

 pip install tkinter

 """

 import PIL

 import time

 import base64

 import tkinter as tk

 from PIL import Image

 from PIL import ImageTk

 from aip import AipFace

 from tkinter.filedialog import askopenfilename

 # 配置百度aip参数

 APP_ID = '你的APP_ID'

 API_KEY = '你的API_KEY'

 SECRET_KEY = '你的SECRET_KEY'

 a_face = AipFace(APP_ID, API_KEY, SECRET_KEY)

 image_type = 'BASE64'

 options = {'face_field': 'age,gender,beauty'}

 def get_file_content(file_path):

     """获取文件内容"""

     with open(file_path, 'rb') as fr:

         content = base64.b64encode(fr.read())

         return content.decode('utf8')

 def face_score(file_path):

     """脸部识别分数"""

     result = a_face.detect(get_file_content(file_path), image_type, options)

     print(result)

     age = result['result']['face_list'][0]['age']

     beauty = result['result']['face_list'][0]['beauty']

     gender = result['result']['face_list'][0]['gender']['type']

     return age, beauty, gender

 class ScoreSystem():

     """打分系统类"""

     root = tk.Tk()

     # 修改程序框的大小

     root.geometry('800x500')

     # 添加程序框标题

     root.title('女神颜值打分系统')

     # 修改背景色

     canvas = tk.Canvas(root,

                        width=800,  # 指定Canvas组件的宽度

                        height=500,  # 指定Canvas组件的高度

                        bg='#E6E6FA')  # 指定Canvas组件的背景色

     canvas.pack()

     def start_interface(self):

         """主运行函数"""

         self.title()

         self.time_component()

         # 打开本地文件

         tk.Button(self.root, text='打开文件', command=self.show_original_pic).place(x=50, y=150)

         # 进行颜值评分

         tk.Button(self.root, text='运行程序', command=self.open_files2).place(x=50, y=230)

         # 显示帮助文档

         tk.Button(self.root, text='帮助文档', command=self.show_help).place(x=50, y=310)

         # 退出系统

         tk.Button(self.root, text='退出软件', command=self.quit).place(x=50, y=390)

         # 显示图框标题

         tk.Label(self.root, text='原图', font=10).place(x=380, y=120)

         # 修改图片大小

         self.label_img_original = tk.Label(self.root)

         # 设置显示图框背景

         self.cv_orinial = tk.Canvas(self.root, bg='white', width=270, height=270)

         # 设置显示图框边框

         self.cv_orinial.create_rectangle(8, 8, 260, 260, width=1, outline='red')

         # 设置位置

         self.cv_orinial.place(x=265, y=150)

         # 显示图片位置

         self.label_img_original.place(x=265, y=150)

         # 设置评分标签

         tk.Label(self.root, text='性别', font=10).place(x=680, y=150)

         self.text1 = tk.Text(self.root, width=10, height=2)

         tk.Label(self.root, text='年龄', font=10).place(x=680, y=250)

         self.text2 = tk.Text(self.root, width=10, height=2)

         tk.Label(self.root, text='评分', font=10).place(x=680, y=350)

         self.text3 = tk.Text(self.root, width=10, height=2)

         # 填装文字

         self.text1.place(x=680, y=175)

         self.text2.place(x=680, y=285)

         self.text3.place(x=680, y=385)

         # 开启循环

         self.root.mainloop()

     def show_original_pic(self):

         """放入文件"""

         self.path_ = askopenfilename(title='选择文件')

         # 处理文件

         img = Image.open(fr'{self.path_}')

         img = img.resize((270, 270), PIL.Image.ANTIALIAS)  # 调整图片大小至270*270

         # 生成tkinter图片对象

         img_png_original = ImageTk.PhotoImage(img)

         # 设置图片对象

         self.label_img_original.config(image=img_png_original)

         self.label_img_original.image = img_png_original

         self.cv_orinial.create_image(5, 5, anchor='nw', image=img_png_original)

     def open_files2(self):

         # 获取百度API接口获得的年龄、分数、性别

         age, score, gender = face_score(self.path_)

         # 清楚text文本框内容并进行插入

         self.text1.delete(1.0, tk.END)

         self.text1.tag_config('red', foreground='RED')

         self.text1.insert(tk.END, gender, 'red')

         self.text2.delete(1.0, tk.END)

         self.text2.tag_config('red', foreground='RED')

         self.text2.insert(tk.END, age, 'red')

         self.text3.delete(1.0, tk.END)

         self.text3.tag_config('red', foreground='RED')

         self.text3.insert(tk.END, score, 'red')

     def show_help(self):

         """显示帮助"""

         pass

     def quit(self):

         """退出"""

         self.root.quit()

     def get_time(self, lb):

         """获取时间"""

         time_str = time.strftime("%Y-%m-%d %H:%M:%S")  # 获取当前的时间并转化为字符串

         lb.configure(text=time_str)  # 重新设置标签文本

         self.root.after(1000, self.get_time, lb)  # 每隔1s调用函数 get_time自身获取时间

     def time_component(self):

         """时间组件"""

         lb = tk.Label(self.root, text='', fg='blue', font=("黑体", 15))

         lb.place(relx=0.75, rely=0.90)

         self.get_time(lb)

     def title(self):

         """标题设计"""

         lb = tk.Label(self.root, text='女神颜值打分系统',

                       bg='#6495ED',

                       fg='lightpink', font=('华文新魏', 32),

                       width=20,

                       height=2,

                       # relief=tk.SUNKEN

                       )

         lb.place(x=200, y=10)

 score_system = ScoreSystem()

 score_system.start_interface()
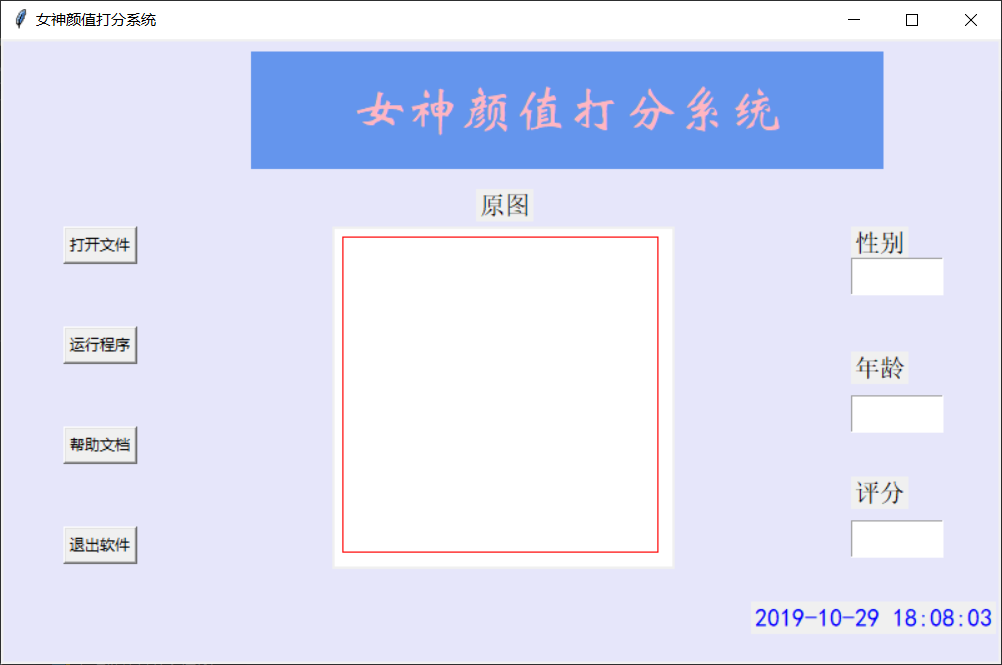
7、运行结果如下图
这就是本篇我所说的内容,如果对你有帮助,点点支持,谢谢。
小白初入Python人工智能的更多相关文章
- 初入python
初入python 一定要学好python 求1-100的和: i=1 s=0 while i<101: s=s+i i=i+1 print(s)
- 初入python 用户输入,if,(while 循环)
python 基础 编译型: 一次性将所有程序编译成二进制文件. 缺点:开发效率低,不能跨平台 优点:运行速度快. :c ,c++语言 等等.... 解释行:当程序执行时,一行一行的解释. 优点:开发 ...
- python之初入Python
python优缺点: Python的优点很多,简单的可以总结为以下几点. 简单和明确,做一件事只有一种方法. 学习曲线低,跟其他很多语言相比,Python更容易上手. 开放源代码,拥有强大的社区和生态 ...
- 初入python,与同学者的第一次见面(小激动)
自2017来,接触python其实已经算是蛮久了,最苦的时光还是刚开始的时候,真的,我感觉编程就是一种感觉,有的时候就像找对象一样,感觉对了,怎么学都是带劲哈哈哈.在这个周围都在学习PHP的环境下,我 ...
- 初入Python继承
1.什么是继承? 新类不用从头编写 新类从现有的类继承,就自动拥有了现有类的所有功能 新类只需要编写现有类缺少的新功能 2.继承的好处 复用已有代码 自动拥有了现有类的所有功能 只需要编写缺少的新功能 ...
- 【翻译】用AIML实现的Python人工智能聊天机器人
前言 用python的AIML包很容易就能写一个人工智能聊天机器人. AIML是Artificial Intelligence Markup Language的简写, 但它只是一个简单的XML. 下面 ...
- 初入前端框架bootstrap--Web前端
Bootstraps是一种简洁.直观.强悍的前端开发框架,它让web开发更迅速.简单.对于初入Bootstrap的小白,高效进入主题很重要,能为我们节省很多时间,下面我将对使用Bootstrap开发前 ...
- 初入pygame——贪吃蛇
一.问题利用pygame进行游戏的编写,做一些简单的游戏比如贪吃蛇,连连看等,后期做完会把代码托管. 二.解决 1.环境配置 python提供一个pygame的库来进行游戏的编写.首先是安装pygam ...
- 初入TensorFlow————配置TensorFlow
能看到这说明你对python已经有一定的了解了,因此很多基础直接跳过. 一.TensorFlow环境配置: TensorFlow的环境配置在网上很多的教程都是用anaconda的方式,但是很容易出现冲 ...
随机推荐
- Android Studio [WebView]
WebViewActivity.java package com.xdw.a122; import android.graphics.Bitmap; import android.support.v7 ...
- 23种设计模式之责任链模式(Chain of Responsibility Pattern)
责任链模式(Chain of Responsibility Pattern)为请求创建了一个接收者对象的链.这种模式给予请求的类型,对请求的发送者和接收者进行解耦.这种类型的设计模式属于行为型模式. ...
- 微项目:一步一步带你使用SpringBoot入门(二)
今天我们来使用JPA做分页项目并且做讲解 如果是新来的朋友请回上一篇 上一篇:微项目(一) maven整合 在pom文件的dependencies依赖中导入以下依赖 <dependency> ...
- Build step 'Invoke top-level Maven targets' marked build as failure Finished解决
最近用法 jenkins部署maven项目时候,突然出现Build step 'Invoke top-level Maven targets' marked build as failure Fini ...
- Nginx 配置项优化详解
(1)nginx运行工作进程个数,一般设置cpu的核心或者核心数x2 如果不了解cpu的核数,可以top命令之后按1看出来,也可以查看/proc/cpuinfo文件 grep ^processor / ...
- 基于SpringBoot+WebSocket搭建一个简单的多人聊天系统
前言 今天闲来无事,就来了解一下WebSocket协议.来简单了解一下吧. WebSocket是什么 首先了解一下WebSocket是什么?WebSocket是一种在单个TCP连接上进行全双工 ...
- MySQL-时区导致的时间前后端不一致
背景 今天早上刚上班,就被同事提示,程序的日期处理有问题.数据库里日期为:2019-05-21 11:00:00 而前端显示的日期为:2019-05-21 16:00:00 分析 那肯定是和时区相关了 ...
- 【Java】 读取Txt文件 处理数据
@RequestMapping("/importTxt") public String readTxtPoints(@RequestParam("file") ...
- 简单cookie入侵
在当前网站,按下F12键进入开发者模式,在console控制台输入:document.cookie获取cookie值如: 复制你得到cookie值,你或通过每种方式获取Cookie,例如:当别人点击你 ...
- 原生js动态创建、获取、删除属性的几种方式
1.创建属性 <!DOCTYPE html> <html> <head> <meta charset="utf-8"> <ti ...