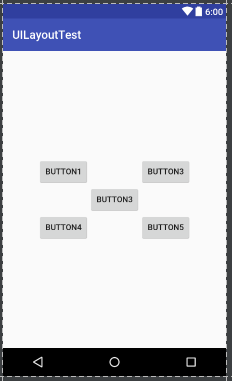
Android中相对布局的两个控件
<Button

    android:id="@+id/button3"

    android:layout_width="wrap_content"

    android:layout_height="wrap_content"

    android:layout_centerInParent="true"

    android:text="Button3"

    />

<Button

    android:id="@+id/button1"

    android:layout_width="wrap_content"

    android:layout_height="wrap_content"

    android:layout_above="@id/button3"

    android:layout_toLeftOf="@id/button3"

    android:text="Button1"

    />

<Button

    android:id="@+id/button2"

    android:layout_width="wrap_content"

    android:layout_height="wrap_content"

    android:layout_above="@id/button3"

    android:layout_toRightOf="@id/button3"

    android:text="Button3"

    />

<Button

    android:id="@+id/button4"

    android:layout_width="wrap_content"

    android:layout_height="wrap_content"

    android:layout_below="@id/button3"

    android:layout_toLeftOf="@id/button3"

    android:text="Button4"

    />

<Button

    android:id="@+id/button5"

    android:layout_width="wrap_content"

    android:layout_height="wrap_content"

    android:layout_below="@id/button3"

    android:layout_toRightOf="@id/button3"

    android:text="Button5"

    />
布局结果如下图:
代码更改一下:
<Button

    android:id="@+id/button3"

    android:layout_width="wrap_content"

    android:layout_height="wrap_content"

    android:layout_centerInParent="true"

    android:text="Button3"

    />

<Button

    android:id="@+id/button1"

    android:layout_width="wrap_content"

    android:layout_height="wrap_content"

    android:layout_above="@id/button3"

    android:layout_toLeftOf="@id/button3"

    android:text="Button1"

    />

<Button

    android:id="@+id/button2"

    android:layout_width="wrap_content"

    android:layout_height="wrap_content"

    android:layout_above="@id/button3"

    android:layout_toRightOf="@id/button3"

    android:text="Button3"

    />

<Button

    android:id="@+id/button4"

    android:layout_width="wrap_content"

    android:layout_height="wrap_content"

    android:layout_below="@id/button3"

    android:layout_alignRight="@id/button1"

    android:text="Button4"

    />

<Button

    android:id="@+id/button5"

    android:layout_width="wrap_content"

    android:layout_height="wrap_content"

    android:layout_below="@id/button3"

    android:layout_alignRight="@id/button3"

    android:text="Button5"

    />
布局结果如下图:

Android中相对布局的两个控件的更多相关文章
- Android中Chronometer 计时器和震动服务控件
Chronometer 计时器控件 首先在布局文件中添加chronometer控件:然后在mainActivity中获取到该控件 4 然后通过Button时间监听器中开启计时操作 5 chronome ...
- Android中的几个基本常用控件
Android 中常用的几大UI控件 1. TextView : 用于在界面中显示一段文本信息 <TextView android:id="@+id/text_view" / ...
- Android中的布局优化方法
http://blog.csdn.net/rwecho/article/details/8951009 Android开发中的布局很重要吗?那是当然.一切的显示样式都是由这个布局决定的,你说能不重要吗 ...
- Android 布局之LinearLayout 子控件weight权重的作用详析(转)
关于Android开发中的LinearLayout子控件权重android:layout_weigh参数的作用,网上关于其用法有两种截然相反说法: 说法一:值越大,重要性越高,所占用的空间越大: 说法 ...
- Android 布局之LinearLayout 子控件weight权重的作用详析
关于Android开发中的LinearLayout子控件权重android:layout_weigh参数的作用,网上关于其用法有两种截然相反说法: 说法一:值越大,重要性越高,所占用的空间越大: 说法 ...
- 我的Android进阶之旅------>Android中的布局优化 include、merge 、ViewStub
1.如何重用布局文件? 可以使用<include>标签引用其他的布局文件,并用android:id属性覆盖被引用布局文件中顶层节点的android:id属性值.代码如下: <!--引 ...
- Android笔记(七) Android中的布局——线性布局
我们的软件是由好多个界面组成的,而每个界面又由N多个控件组成,Android中借助布局来让各个空间有条不紊的摆放在界面上. 可以把布局看作是一个可以放置很多控件的容器,它可以按照一定的规律调整控件的位 ...
- Android中得到布局文件对象有三种方式
Android中得到布局文件对象有三种方式 第一种,通过Activity对象 View view = Activity对象.getLayoutInflater().inflater(R.layout. ...
- Android笔记(九) Android中的布局——框架布局
框架布局没有任何定位方式,所有的控件都会摆放在布局的左上角. 代码示例: framelayout.xml <?xml version="1.0" encoding=" ...
随机推荐
- Django:web认识,jinja2模块,如何安装Django
一内容概要 1.HTTP协议 1.1简介 超文本传输协议(英文:Hyper Text Transfer Protocol,HTTP)是一种用于分布式.协作式和超媒体信息系统的应用层协议.HTTP是 ...
- CentOS 7 - 里面如何以root身份使用图形界面管理文件?
nautilus 是gnome的文件管理器,但是如果不是root账号下,权限受限,我们可以通过以下方式以root权限使用! 启动shll,随后在shell里面输入下面命令: sudo nautilus
- There is no getter for property named 'PRODUCT_ID' in 'class java.lang.String'
背景:心血来潮之际,准备搭建以下多月未曾碰触过的Mybatis框架,体验一番原生之美.殊不知能力有限,错误百出.特抒此文以纪念此坑.问题:想在sql管理中来统一处理一些简单的判断,但是添加判断之后参数 ...
- 【转】TCP性能优化之避免慢启动
TCP协议中有个慢启动,在<TCP/IP详解卷一>中占据的篇幅很小,但是这个东西,在某些业务场景下,对性能的影响非常大. 什么是慢启动 最初的TCP的实现方式是,在连接建立成功后便会向网络 ...
- HQL基本语法及应用案例
HQL基本语法及应用案例 摘自:<大数据技术体系详解:原理.架构与实践> 一.HQL基本语法 HQL是Hive提供的数据查询语言,由于Hive巨大的影响力,HQL已被越来越多的Hive O ...
- SOAP知识点
SOAP简介: SOAP 是基于 XML 的简易协议,可使应用程序在 HTTP 之上进行信息交换. 或者更简单地说:SOAP 是用于访问网络服务的协议. 1.什么是 SOAP? SOAP 指简易对象访 ...
- spring常用的事务传播属性说明
事务Transaction,就是一组操作数据库的动作集合.事务是现代数据库理论中的核心概念之一.如果一组处理步骤或者全部发生或者一步也不执行,我们称该组处理步骤为一个事务.当所有的步骤像一个操作一样被 ...
- python中的嵌套类
python中的嵌套类 在.NET和JAVA语言中看到过嵌套类的实现,作为外部类一个局部工具还是很有用的,今天在python也看到了很不错支持一下.动态语言中很好的嵌套类的实现,应该说嵌套类解决设计问 ...
- linux简单的命令
本文转自 https://www.cnblogs.com/pyyu/articles/9314206.html Linux命令行的组成结构 [root@oldboy_python ~]# [root@ ...
- django知识点回顾
1.web应用 本质是基于socket实现的应用程序 浏览器-----------服务器 2.http协议:应用层协议 1.基于TCP协议 2.基于请求响应 3.短连接 4.无状态保存(引入了cook ...