Spring的Bean的生命周期方法执行顺序测试
通过一个简单的Maven工程来演示Spring的Bean生命周期函数的执行顺序.
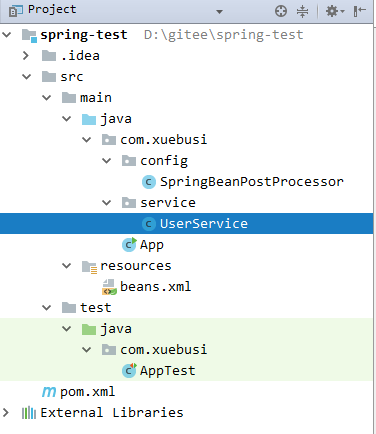
下面是工程的目录结构:
直接贴代码:
pom.xml文件内容:
 <?xml version="1.0" encoding="UTF-8"?>

 <project xmlns="http://maven.apache.org/POM/4.0.0"

          xmlns:xsi="http://www.w3.org/2001/XMLSchema-instance"

          xsi:schemaLocation="http://maven.apache.org/POM/4.0.0 http://maven.apache.org/xsd/maven-4.0.0.xsd">

     <modelVersion>4.0.0</modelVersion>

     <groupId>com.xuebusi</groupId>

     <artifactId>spring-test</artifactId>

     <version>1.0-SNAPSHOT</version>

     <dependencies>

         <dependency>

             <groupId>org.springframework</groupId>

             <artifactId>spring-context</artifactId>

             <version>4.3.12.RELEASE</version>

         </dependency>

         <dependency>

             <groupId>junit</groupId>

             <artifactId>junit</artifactId>

             <version>4.12</version>

             <scope>test</scope>

         </dependency>

     </dependencies>

 </project>
beans.xml配置文件:
该配置文件主要用于演示init-method和destory-method两个方法的执行时机.
 <?xml version="1.0" encoding="UTF-8"?>

 <beans xmlns="http://www.springframework.org/schema/beans"

        xmlns:xsi="http://www.w3.org/2001/XMLSchema-instance"

        xmlns:context="http://www.springframework.org/schema/context"

        xsi:schemaLocation="http://www.springframework.org/schema/beans http://www.springframework.org/schema/beans/spring-beans.xsd http://www.springframework.org/schema/context http://www.springframework.org/schema/context/spring-context.xsd">

     <context:component-scan base-package="com.xuebusi"></context:component-scan>

     <bean id="userService" class="com.xuebusi.service.UserService" init-method="init" destroy-method="destory"/>

 </beans>
SpringBeanPostProcessor类:
这个类继承了InstantiationAwareBeanPostProcessorAdapter类,重写了它的一些和Bean的实例化以及初始化有关的生命周期方法.
但是这些方法是针对Spring容器中的所有Bean的,所以加了个if判断,因为这里只是演示userService这个Bean的生命周期.
 import org.springframework.beans.BeansException;

 import org.springframework.beans.PropertyValues;

 import org.springframework.beans.factory.config.InstantiationAwareBeanPostProcessorAdapter;

 import org.springframework.stereotype.Component;

 import java.beans.PropertyDescriptor;

 @Component

 public class SpringBeanPostProcessor extends InstantiationAwareBeanPostProcessorAdapter {

     @Override

     public Object postProcessBeforeInstantiation(Class<?> beanClass, String beanName) throws BeansException {

         if ("userService".equals(beanName)) {

             System.out.println(">>>> postProcessBeforeInstantiation");

         }

         return super.postProcessBeforeInstantiation(beanClass, beanName);

     }

     @Override

     public boolean postProcessAfterInstantiation(Object bean, String beanName) throws BeansException {

         if ("userService".equals(beanName)) {

             System.out.println(">>>> postProcessAfterInstantiation");

         }

         return super.postProcessAfterInstantiation(bean, beanName);

     }

     @Override

     public PropertyValues postProcessPropertyValues(PropertyValues pvs, PropertyDescriptor[] pds, Object bean, String beanName) throws BeansException {

         if ("userService".equals(beanName)) {

             System.out.println(">>>> postProcessPropertyValues");

         }

         return super.postProcessPropertyValues(pvs, pds, bean, beanName);

     }

     @Override

     public Object postProcessBeforeInitialization(Object bean, String beanName) throws BeansException {

         if ("userService".equals(beanName)) {

             System.out.println(">>>> postProcessBeforeInitialization");

         }

         return super.postProcessBeforeInitialization(bean, beanName);

     }

     @Override

     public Object postProcessAfterInitialization(Object bean, String beanName) throws BeansException {

         if ("userService".equals(beanName)) {

             System.out.println(">>>> postProcessAfterInitialization");

         }

         return super.postProcessAfterInitialization(bean, beanName);

     }

 }
UserService类:
这就是要演示的Bean,让它实现Spring的InitializingBean接口来测试afterPropertiesSet方法, 实现BeanNameAware接口来测试setBeanName方法,实现BeanFactoryAware接口来测试setBeanFactory方法.
 import org.springframework.beans.BeansException;

 import org.springframework.beans.factory.BeanFactory;

 import org.springframework.beans.factory.BeanFactoryAware;

 import org.springframework.beans.factory.BeanNameAware;

 import org.springframework.beans.factory.InitializingBean;

 import org.springframework.stereotype.Service;

 import javax.annotation.PostConstruct;

 import javax.annotation.PreDestroy;

 @Service

 public class UserService implements InitializingBean, BeanNameAware, BeanFactoryAware {

     private String userName;

     public UserService() {

         System.out.println(">>>> UserService");

     }

     public String getUserName() {

         return userName;

     }

     public void setUserName(String userName) {

         this.userName = userName;

     }

     @PostConstruct

     public void postConstruct() {

         System.out.println(">>>> postConstruct");

     }

     @PreDestroy

     public void preDestroy() {

         System.out.println(">>>> preDestroy");

     }

     public void init() {

         System.out.println(">>>> init");

     }

     public void destory() {

         System.out.println(">>>> destory");

     }

     public void setBeanFactory(BeanFactory beanFactory) throws BeansException {

         System.out.println(">>>> setBeanFactory");

     }

     public void setBeanName(String s) {

         System.out.println(">>>> setBeanName");

     }

     public void afterPropertiesSet() throws Exception {

         System.out.println(">>>> afterPropertiesSet");

     }

 }
AppTest类:
该类通过junit测试方法来启动一个Spring容器,并从容器中获取userService这个Bean对象.最后调用close方法销毁Spring容器.
 import com.xuebusi.service.UserService;

 import org.junit.Test;

 import org.springframework.context.support.ClassPathXmlApplicationContext;

 public class AppTest {

     @Test

     public void run() {

         ClassPathXmlApplicationContext context = new ClassPathXmlApplicationContext("beans.xml");

         UserService userService = context.getBean("userService", UserService.class);

         userService.setUserName("苍井空");

         String userName = userService.getUserName();

         System.out.println(userName);

         context.close();

     }

 }
运行AppTest的测试方法run()然后观察控制台,日志展示出了"userService"这个Bean的生命周期函数执行顺序:
 >>>> postProcessBeforeInstantiation

 >>>> UserService

 >>>> postProcessAfterInstantiation

 >>>> postProcessPropertyValues

 >>>> setBeanName

 >>>> setBeanFactory

 >>>> postProcessBeforeInitialization

 >>>> postConstruct

 >>>> afterPropertiesSet

 >>>> init

 >>>> postProcessAfterInitialization

 苍井空

 >>>> preDestroy

 >>>> destory
总结一个Bean的生命周期方法执行顺序:
. 实例化前                postProcessBeforeInstantiation()

. 构造方法                构造方法

. 实例化后                postProcessAfterInstantiation()

. 设置属性                postProcessProperties()

. 设置Bean名称            setBeanName()

. 设置BeanFactory        setBeanFactory()

. 初始化前                postProcessBeforeInitialization()

. 构造之后                加了 @PostConstruct 的方法

. 所有属性赋值之后         afterPropertiesSet()

.初始化方法              配置文件中指定的 init-method 方法

.初始化后                postProcessAfterInitialization()

.销毁之前                加了 @PreDestroy 的方法

.销毁方法                配置文件中指定的 destroy-method 方法
Spring的Bean的生命周期方法执行顺序测试的更多相关文章
- Spring中Bean的生命周期方法
Bean的生命周期方法 src\dayday\Car.java package dayday;import com.sun.org.apache.xpath.internal.SourceTree;i ...
- Spring(十二):IOC容器中Bean的生命周期方法
IOC容器中Bean的生命周期方法 1)Spring IOC容器可以管理Bean的声明周期,Spring允许在Bean生命周期的特定点执行定制的任务. 2)Spring IOC容器对Bean的生命周期 ...
- 一次性讲清楚spring中bean的生命周期之一:getSingleton方法
要想讲清楚spring中bean的生命周期,真的是不容易,以AnnotationConfigApplicationContext上下文为基础来讲解bean的生命周期,AnnotationConfigA ...
- JAVA面试题:Spring中bean的生命周期
Spring 中bean 的生命周期短暂吗? 在spring中,从BeanFactory或ApplicationContext取得的实例为Singleton,也就是预设为每一个Bean的别名只能维持一 ...
- Spring中Bean的生命周期及其扩展点
原创作品,可以转载,但是请标注出处地址http://www.cnblogs.com/V1haoge/p/6106456.html Spring中Bean的管理是其最基本的功能,根据下面的图来了解Spr ...
- 简:Spring中Bean的生命周期及代码示例
(重要:spring bean的生命周期. spring的bean周期,装配.看过spring 源码吗?(把容器启动过程说了一遍,xml解析,bean装载,bean缓存等)) 完整的生命周期概述(牢记 ...
- 通过BeanPostProcessor理解Spring中Bean的生命周期
通过BeanPostProcessor理解Spring中Bean的生命周期及AOP原理 Spring源码解析(十一)Spring扩展接口InstantiationAwareBeanPostProces ...
- 使用外部属性文件配置Bean以及Bean的生命周期方法
1.使用外部属性文件配置Bean 在配置文件里配置 Bean 时, 有时需要在 Bean 的配置里混入系统部署的细节信息(例如: 文件路径, 数据源配置信息等). 而这些部署细节实际上需要和 Bean ...
- 一分钟掌握Spring中bean的生命周期!
Spring 中bean 的生命周期短暂吗? 在spring中,从BeanFactory或ApplicationContext取得的实例为Singleton,也就是预设为每一个Bean 的别名只能维持 ...
随机推荐
- [LeetCode] 0279. Perfect Squares 完全平方数
题目 Given a positive integer n, find the least number of perfect square numbers (for example, 1, 4, 9 ...
- LeetCode - 86、分隔链表
给定一个链表和一个特定值 x,对链表进行分隔,使得所有小于 x 的节点都在大于或等于 x 的节点之前. 你应当保留两个分区中每个节点的初始相对位置. 示例: 输入: head = 1->4-&g ...
- BOM常用属性与方法
BOMBrowser Object Modelwindow浏览器窗口window方法locationlocation常用属性screen显示器屏幕screen常用属性navigator浏览器软件nav ...
- SQL Server视频总结
经过这几天艰苦卓绝的奋斗,我终于把视频看完了,可是不知道自己看了什么,下面就来总结一下,看看都学到了那些. 数据库和VB中有很多地方相似,我们可以直接搬过来,而不必再当做新知识给自己增加难度,要调动自 ...
- Keras神经网络data generators解决数据内存
在使用kears训练model的时候,一般会将所有的训练数据加载到内存中,然后喂给网络,但当内存有限,且数据量过大时,此方法则不再可用.此博客,将介绍如何在多核(多线程)上实时的生成数据,并立即的送入 ...
- vue 标签页以及标签页赋值
背景: 使用vue增加了标签页,点击不同标签页传给后端的值不一样,用来做区分,如图: vue代码如下: 使用 form.PageA form.PageB ,后端接收到的值 first.second ...
- HTTP头部
10-URI的基本格式以及与URL的区别 HTTP连接的常见流程 从TCP编程上看HTTP请求处理 长连接与短连接 补充一下代理的知识 什么是正向代理,什么是反向代理? 想在外部公网访问公司内部局域网 ...
- 编程判断输入的字符是否为‘y’或‘Y’,若是,则输出‘yes’,否则输出‘no’
#include<stdio.h>void main(){ char ch; ch=getchar(); ch == 'y' || ch == 'Y' ? printf("yes ...
- 学习Spring-Data-Jpa(三)---关联关系常用注解
1.@JoinColumn: 用于指定 连接实体关联或元素集合的列. 属性 name: 外键列的名称,它所在的表取决于上下文. 如果连接是使用外键映射策略的一对一或多对一映射,则外键列位于源实体或可嵌 ...
- SP10707 COT2 - Count on a tree II 莫队上树
题意:求一条链 \((u,v)\) 上不同的颜色数. 我们可以求出树的出栈入栈序(or 括号序?我也不确定). 图(from attack) 然后有一个很优美的性质: 设点 \(u\) 的入栈时间为 ...