iView学习笔记(四):Form表单操作
1.后端准备
环境说明
python版本:3.6.6

Django版本:1.11.8

数据库:MariaDB 5.5.60
新建Django项目,在项目中新建app,配置好数据库
2.后端代码(基于CBV方式)
api_test/app01/models.py文件内容
from django.db import models

from .utils.parse_time import parse_datetime_to_string

class HostInfo(models.Model):

    hostname = models.CharField("主机名", max_length=32)

    ip = models.CharField("IP地址", max_length=16)

    status = models.CharField("主机状态", max_length=16)

    date = models.DateTimeField("主机添加时间", auto_now_add=True)

    def to_dict(self):

        return {

            "hostname": self.hostname,

            "id": self.pk,

            "ip": self.ip,

            "status": self.status,

            "when_insert": parse_datetime_to_string(self.date),

        }
app01/utils/parse_time.py文件内容
def parse_datetime_to_string(datetime_str, flag=True):

    """

    把datetime时间转化成时间字符串

    :param datetime_str: datetime生成的时间,例子:datetime.datetime.now()

    或者: datetime.datetime.now() - datetime.timedelta(hours=1)       # 一个小时之前

    或者: datetime.datetime.now() - datetime.timedelta(days=1)        # 一天之前

    :return:

    """

    # 将日期转化为字符串 datetime => string

    # 在数据库中定义字段信息时为:models.DateTimeField(auto_now_add=True)

    # 查询数据库之后,使用此方法把查询到的时间转换成可用的时间字符串

    # when_insert__range=(an_hour_time, now_time)

    # an_hour_time和 now_time 都是 datetime时间字符串,查询两个datetime时间字符串之间的数据

    if flag:

        return datetime_str.strftime('%Y-%m-%d %H:%M:%S')

    else:

        return datetime_str.strftime('%Y-%m-%d')
api_test/urls.py文件内容
from django.conf.urls import url

from django.contrib import admin

from django.views.decorators.csrf import csrf_exempt

urlpatterns = [

    url(r'^admin/', admin.site.urls),

    url(r'^host/$', csrf_exempt(views.HostInfoView.as_view())),

]
api_test/app01/views.py文件内容
class HostInfoView(View):

    def get(self, request):

        res_list = []

        host_list = HostInfo.objects.all()

        for i in host_list:

            res_list.append(i.to_dict())

        return JsonResponse({"data": res_list, "result": True}, safe=False)

    def post(self, request):

        data = json.loads(request.body)

        res = {"result": False}

        id = data.get("id")

        hostname = data.get("hostname")

        ip = data.get("ip")

        status = data.get("status")

        operate = data.get("operate")

        if operate == "delete":

            try:

                HostInfo.objects.filter(id=id).delete()

                res = {"result": True}

            except Exception:

                res = {"result": False}

        elif operate == "create":

            try:

                HostInfo.objects.create(hostname=hostname, ip=ip, status=status)

                res = {"result": True}

            except Exception:

                res = {"result": False}

        elif operate == "edit":

            try:

                HostInfo.objects.filter(id=id).update(hostname=hostname, ip=ip, status=status)

                res = {"result": True}

            except Exception:

                res = {"result": False}

        return JsonResponse(res, safe=False)
3.前端代码
首先新建一个项目,然后引入iView插件,配置好router
npm安装iView
npm install iview --save

cnpm install iview --save
src/main.js文件内容
import Vue from 'vue'

import App from './App.vue'

import router from './router'

import iView from 'iview';

import 'iview/dist/styles/iview.css';

Vue.use(iView);

Vue.config.productionTip = false

new Vue({

  router,

  render: h => h(App)

}).$mount('#app')
src/router.js文件内容
import Vue from 'vue'

import Router from 'vue-router'

Vue.use(Router)

export default new Router({

    routes: [

        {

            path: '/form1',

            component: () => import('./views/Form1.vue')

        },

        {

            path:'/',

            redirect:'/form1'

        }

    ]

})
src/views/Form1.vue文件内容
<template>

    <div style="padding: 32px 200px;">

        <h1>Form组件实践</h1>

        <br><br>

        <Table border :columns="tableColumns" :data="tableData"></Table>

        <Button @click="handleOpenCreate">添加</Button>

        <Modal :title="type === 'create' ? '新增主机':'修改主机'" v-model="openModal" @on-ok="handleOk" @on-cancel="handleCancel">

            <Form :model="ModelForm" :label-width="70">

                <FormItem label="主机名称">

                    <Input v-model="ModelForm.hostname"/>

                </FormItem>

                <FormItem label="IP地址">

                    <Input v-model="ModelForm.ip"/>

                </FormItem>

                <FormItem label="主机状态">

                    <Select v-model="ModelForm.status">

                        <Option label="processing" value="processing"/>

                        <Option label="error" value="error"/>

                    </Select>

                </FormItem>

            </Form>

        </Modal>

    </div>

</template>

<script>

    import axios from 'axios'

    export default {

        data() {

            return {

                tableData: [],

                openModal: false,

                deleteModal: false,

                type: 'create', // create || edit

                editIndex: -1,

                ModelForm: {

                    id: '',

                    hostname: '',

                    ip: '',

                    status: '',

                    operate: ''

                },

                tableColumns: [

                    {

                        title: '主机名称',

                        key: 'hostname'

                    },

                    {

                        title: 'IP地址',

                        key: 'ip'

                    },

                    {

                        title: '主机状态',

                        key: 'status'

                    },

                    {

                        title: '最后修改时间',

                        key: 'when_insert'

                    },

                    {

                        title: '操作',

                        render: (h, params) => {

                            return h('div', [

                                h('Button', {

                                    props: {

                                        type: 'primary',

                                    },

                                    on: {

                                        click: () => {

                                            this.handleOpenEdit(params.row)

                                        }

                                    }

                                }, '修改'),

                                h('Button', {

                                    props: {

                                        type: 'error',

                                    },

                                    style: {

                                        marginLeft: '10px'

                                    },

                                    on: {

                                        click: () => {

                                            // this.$router.push({path: '/hostperforms', query: {host_id: Number(params.row.host_id)}})

                                            this.handleDelete(params.row)

                                        }

                                    }

                                }, '删除'),

                            ]);

                        }

                    }

                ]

            }

        },

        mounted() {

            this.getData()

        },

        methods: {

            handleOpenEdit(row) {

                this.openModal = true;

                this.type = 'edit';

                this.ModelForm = row;

            },

            handleOpenCreate() {

                this.openModal = true;

                this.type = 'create';

            },

            handleCancel() {

                this.openModal = false;

                this.ModelForm = {

                    hostname: '',

                    ip: '',

                    status: '',

                }

            },

            handleOk() {

                this.ModelForm.operate = this.type

                axios.post('http://127.0.0.1:8000/host/',this.ModelForm).then(res => {

                    if (res.data.result) {

                        this.$Message.success('请求成功');

                        this.hostRow.status = this.ModelForm.status

                    } else {

                        this.$Message.error('请求失败');

                    }

                })

                this.openModal = false;

                this.ModelForm = {

                    hostname: '',

                    ip: '',

                    status: '',

                }

                this.getData();

            },

            getData() {

                axios.get('http://127.0.0.1:8000/host/').then(res => {

                    if (res.data.result) {

                        this.tableData = res.data.data;

                    } else {

                        this.$Message.error('请求失败');

                    }

                })

            },

            handleDelete(row) {

                this.$Modal.confirm({

                    title: '警告',

                    content: '正在删除主机信息,是否继续?',

                    onOk: () => {

                        row.operate = "delete"

                        axios.post('http://127.0.0.1:8000/host/', row).then(res => {

                            if (res.data.result) {

                                this.$Message.success('删除主机成功');

                                this.getData();

                            } else {

                                this.$Message.error('删除主机失败');

                            }

                        })

                    },

                    onCancel: () => {

                        this.$Message.info('取消删除');

                    }

                });

            }

        }

    }

</script>

<style scoped>

</style>
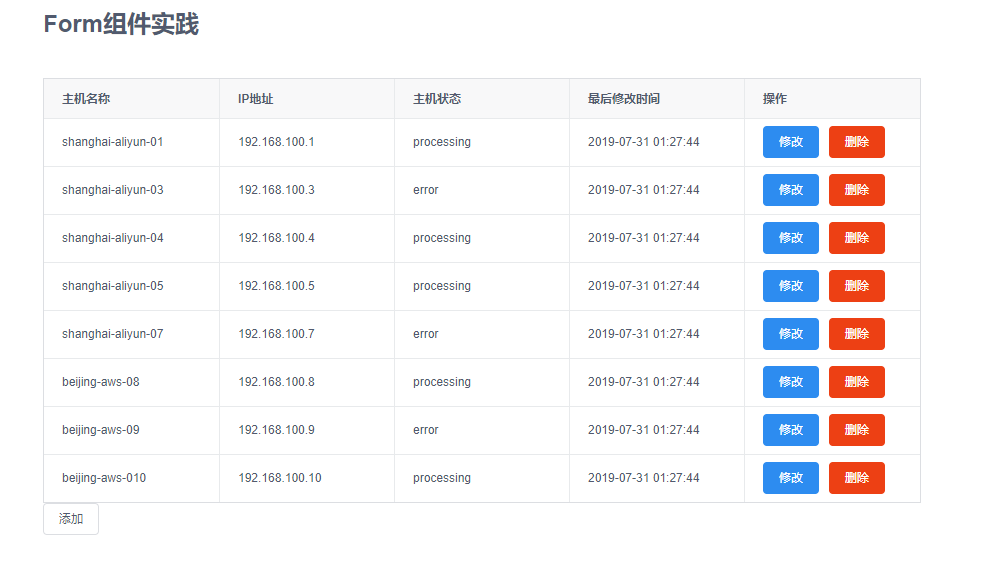
分别运行前后端代码,浏览器打开URL:http://127.0.0.1:8080/#/form1,会在页面列出所有主机
点击某台主机主机后的修改按钮,弹出模态框,模态框的title为:修改主机

点击页面的新增按钮,弹出模态框,模态框的title为:新增主机

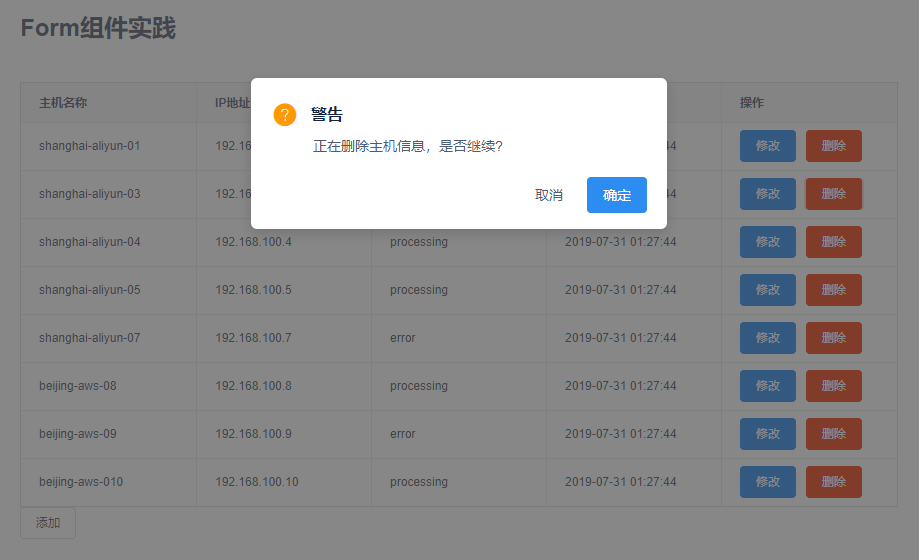
点击某台主机后的删除按钮,弹出对话框,提示用户正在删除主机
iView学习笔记(四):Form表单操作的更多相关文章
- 学习笔记之form表单
form表单提交的数据 是字典类型 这样 方便在create时候 直接解压
- Ext JS4 学习笔记之发送表单(Form)时也将表单下的表格(Grid)数据一同发送的方法
Ext JS4 学习笔记之发送表单(Form)时也将表单下的表格(Grid)数据一同发送的方法 昨天在开发的时候遇到个小问题,就是如何将Grid的内容与Form一起发送到服务器端.默认情况下,表单(F ...
- Django之form表单操作
小白必会三板斧 from django.shortcuts import render,HttpResponse,redirect HttpRespone:返回字符串 render:返回html页面 ...
- PHP全栈开发(四): HTML 学习(3. form 表单)
form 表单标签 它表的是一个区域,而非是一个具体的某个元素,它也是作为一个容器的存在. 表单域主要是允许用户在表单域中输入内容,比如文本框,下拉列表,单选框,复选框,等等. <!DOCTYP ...
- java:JavaScript2:(setTimeout定时器,history.go()前进/后退,navigator.userAgent判断浏览器,location.href,五种方法获取标签属性,setAttribute,innerHTML,三种方法获取form表单信息,JS表单验证,DOM对象,form表单操作)
1.open,setTimeout,setInterval,clearInterval,clearTimeout <!DOCTYPE> <html> <head> ...
- HTML5学习笔记<五>: HTML表单和PHP环境搭建
HTML表单 1. 表单用于不同类型的用户输入 2. 常用的表单标签: 标签 说明 <form> 表单 <input> 输入域 <textarea> 文本域 < ...
- 基于JQuery的前端form表单操作
Jquery的前端表单操作: jquery提供了良好的方法封装,在一些基本的操作的时候,能节省很多的麻烦,其中,在具体使用时,form表单的数据提交是最频繁也最常见的前后数据交换方式,所以在前 ...
- redux-form的学习笔记二--实现表单的同步验证
(注:这篇博客参考自redux-form的官方英文文档)左转http://redux-form.com/6.5.0/examples/syncValidation/ 在这篇博客里,我将用redux-f ...
- Django学习系列之Form表单结合ajax
Forms结合ajax Forms的验证流程: 定义用户输入规则的类,字段的值必须等于html中name属性的值(pwd= forms.CharField(required=True)=<i ...
- HTML 学习笔记 JQuery(表单,表格 操作)
表单应用 一个表单有3个基本组成部分 (1)表单标签:包含处理表单数据所用的服务器端程序URL 以及数据提交到服务器的方法 (2)表单域:包含文本框 密码框 隐藏框 多行文本框 复选框 单选框 下拉选 ...
随机推荐
- Linux 中【./】和【/】和【.】之间有什么区别?
/是指根目录,就和Windows的我的电脑那个位置差不多../是指用户所在的当前目录.如下所示:[root~]# cd /etc[root etc]# pwd/etc[rootetc]# cd /[r ...
- Centos7之搜索命令locate
locate命令[1] 1.#locate命令 所搜索的后台数据库 2.updatedb 更新数据库 3.操作 [root@localhost ~]# ls 222 anaconda-ks.cfg ...
- cad 一个小技巧--复制视口带冻结信息
cad使用 ctrl+c 和 ctrl+v 进行跨文件复制视口的时候,会出现复制视口冻结信息丢失,因为你只选择了视口进行复制, 如果要实现带上冻结信息,那么要把含有相关图层的图元一起 ctrl+c/v ...
- AQS4源码
@SuppressWarnings("restriction") public abstract class AbstractQueuedSynchronizer1 extends ...
- OpenMark
what's open mark??? http://www.open.ac.uk/openmarkexamples/
- 记:使用IScroll.js 开发picker日历组件遇到的问题及经验总结
IScroll中文文档 第一个问题: 边界留白 就是这种,上边界(最小),下边界(最大)有两个列表的位置是不能选择的.解决的办法是: 在HTML中,添加空白节点就行了. 第二个问题:初始化之后的滚动停 ...
- 概述UML——UML系列篇一
前言 作为Java应用开发者,日益感觉到对象建模的重要性.系统的复杂性,对于不能全局掌握的我和编程时没有对象模型指导时,编写实现代码时,感觉甚是困难.处于这些原因,这里想借助学习UML建模,在分析需求 ...
- spring cloud应用
1.什么是注册中心 (1)就是首先有一个eureka server,服务的注册与发现的中心(2)你如果写好了一个服务,就可以将其注册到eureka server上去(3)然后别人的服务如果要调用你的服 ...
- Web前端推荐学习站点
http://javascript.ruanyifeng.com/ JavaScript参考标准教程,写的很不错. https://www.xiaohuochai.cc/ 小火柴前端站 http ...
- pytest之mark功能
pytest系列(一)中给大家介绍了pytest的特性,以及它的编写用例的简单至极. 那么在实际工作当中呢,我们要写的自动化用例会比较多,不会都放在一个py文件里. 如下图所示,我们编写的用例存放在不 ...