3、modleForm组件
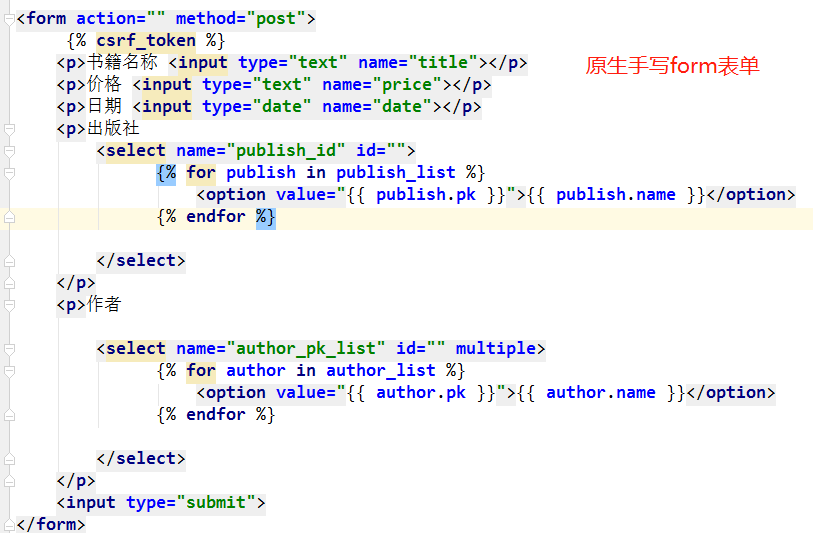
1、原生form表单
步骤:
1.models.py ...
    makemigrations
    migrate
3.createsuperuser
    yuan yuan1234
    1.addbook:(getlist)
        ...
        publish_id = request.POST.get('publish_id')
        auhtor_pk_list = request.POST.getlist('auhtor_pk_list')  # ['1', '2']
        book_obj = Book.objects.create(title=title,price=price,date=date,publish_id=publish_id)
        book_obj.authors.add(*auhtor_pk_list)

    2.editbook:(set)
        ...
         <p>价格 <input type="text" name="price" value="{{ edit_book.price }}"></p>
        {% if author in edit_book.authors.all %}
            <option selected value="{{ author.pk }}">{{ author.name }}</option>
        {% else %}
            <option value="{{ author.pk }}">{{ author.name }}</option>
        {% endif %}

        ...
        ret = Book.objects.filter(pk=edit_book_id).update(title=title, price=price, date=date, publish_id=publish_id)
        print('ret---', ret)  # 1

        book_obj = Book.objects.filter(pk=edit_book_id).first()
        print('book_obj---', book_obj)  # 对象

        book_obj.authors.set(auhtor_pk_list)
code代码
models
from django.db import models

# Create your models here.

class Book(models.Model):

    title=models.CharField(max_length=32)

    price=models.DecimalField(max_digits=8,decimal_places=2)  # 999999.99

    date=models.DateField()

    publish=models.ForeignKey(to="Publish",on_delete=True)

    authors=models.ManyToManyField("Author")

    def __str__(self):

        return self.title

class Publish(models.Model):

    name=models.CharField(max_length=32)

    def __str__(self):

        return self.name

class Author(models.Model):

    name=models.CharField(max_length=32)

    def __str__(self):

        return self.name
admin.py
from django.contrib import admin

# Register your models here.

from .models import *

admin.site.register(Book)

admin.site.register(Author)

admin.site.register(Publish)
urls
"""formsDemo URL Configuration

The `urlpatterns` list routes URLs to views. For more information please see:

    https://docs.djangoproject.com/en/1.11/topics/http/urls/

Examples:

Function views

    1. Add an import:  from my_app import views

    2. Add a URL to urlpatterns:  url(r'^$', views.home, name='home')

Class-based views

    1. Add an import:  from other_app.views import Home

    2. Add a URL to urlpatterns:  url(r'^$', Home.as_view(), name='home')

Including another URLconf

    1. Import the include() function: from django.conf.urls import url, include

    2. Add a URL to urlpatterns:  url(r'^blog/', include('blog.urls'))

"""

from django.conf.urls import url

from django.contrib import admin

from app01 import views

urlpatterns = [

    url(r'^admin/', admin.site.urls),

    url(r'^books/', views.books),

    url(r'^book/add', views.addbook),

    url(r'^book/edit/(\d+)', views.editbook),

]
views
from django.shortcuts import render,redirect

# Create your views here.

from .models import *

def books(request):

    book_list=Book.objects.all()

    return render(request,"books.html",locals())

def addbook(request):

    if request.method=="POST":

        title=request.POST.get("title")

        price=request.POST.get("price")

        date=request.POST.get("date")

        publish_id=request.POST.get("publish_id")

        author_pk_list=request.POST.getlist("author_pk_list") # [1,2]

        book_obj=Book.objects.create(title=title,price=price,date=date,publish_id=publish_id)

        book_obj.authors.add(*author_pk_list)

        return redirect("/books/")

    publish_list=Publish.objects.all()

    author_list=Author.objects.all()

    return render(request,"add.html",locals())

def editbook(request,edit_book_id):

    if request.method=="POST":

        title=request.POST.get("title")

        price=request.POST.get("price")

        date=request.POST.get("date")

        publish_id=request.POST.get("publish_id")

        author_pk_list=request.POST.getlist("author_pk_list") # [1,2]

        Book.objects.filter(pk=edit_book_id).update(title=title,price=price,date=date,publish_id=publish_id)

        book_obj=Book.objects.filter(pk=edit_book_id).first()

        book_obj.authors.set(author_pk_list)

        return redirect("/books/")

    edit_book=Book.objects.filter(pk=edit_book_id).first()

    publish_list = Publish.objects.all()

    author_list = Author.objects.all()

    return render(request,"edit.html",locals())
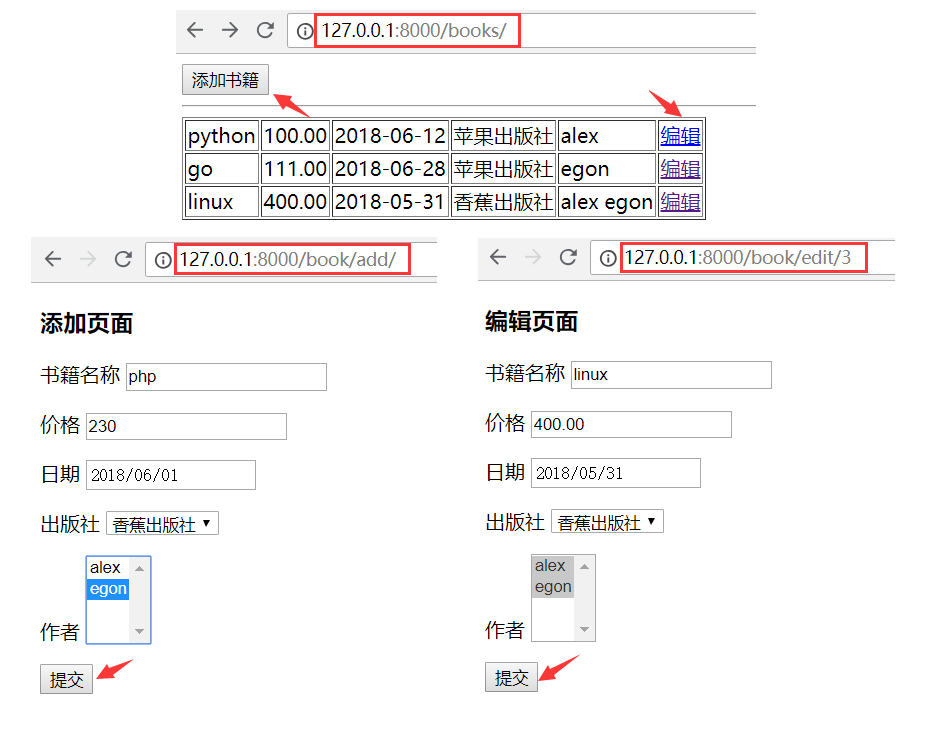
books.html
<!DOCTYPE html>

<html lang="zh-CN">

<head>

    <meta charset="UTF-8">

    <title>Title</title>

    <meta name="viewport" content="width=device-width, initial-scale=1">

</head>

<body>

<a href="/book/add"><button>添加书籍</button></a>

<hr>

<table border="">

    {% for book in book_list %}

       <tr>

           <td>{{ book.title }}</td>

           <td>{{ book.price }}</td>

           <td>{{ book.date|date:"Y-m-d" }}</td>

           <td>{{ book.publish.name }}</td>

           <td>{{ book.authors.all }}</td>

            <td><a href="/book/edit/{{book.pk}}"><button>编辑</button></a></td>

       </tr>

    {% endfor %}

</table>

</body>

</html>
add.html
<!DOCTYPE html>

<html lang="zh-CN">

<head>

    <meta charset="UTF-8">

    <title>Title</title>

    <meta name="viewport" content="width=device-width, initial-scale=1">

</head>

<body>

<h3>添加页面</h3>

<form action="" method="post">

     {% csrf_token %}

    <p>书籍名称 <input type="text" name="title"></p>

    <p>价格 <input type="text" name="price"></p>

    <p>日期 <input type="date" name="date"></p>

    <p>出版社

        <select name="publish_id" id="">

              {% for publish in publish_list %}

                  <option value="{{ publish.pk }}">{{ publish.name }}</option>

              {% endfor %}

        </select>

    </p>

    <p>作者

        <select name="author_pk_list" id="" multiple>

              {% for author in author_list %}

                  <option value="{{ author.pk }}">{{ author.name }}</option>

              {% endfor %}

        </select>

    </p>

    <input type="submit">

</form>

</body>

</html>
edit.html
<!DOCTYPE html>

<html lang="zh-CN">

<head>

    <meta charset="UTF-8">

    <title>Title</title>

    <meta name="viewport" content="width=device-width, initial-scale=1">

</head>

<body>

<h3>编辑页面</h3>

<form action="" method="post">

     {% csrf_token %}

    <p>书籍名称 <input type="text" name="title" value="{{ edit_book.title }}"></p>

    <p>价格 <input type="text" name="price" value="{{ edit_book.price }}"></p>

    <p>日期 <input type="date" name="date" value="{{ edit_book.date|date:'Y-m-d' }}"></p>

    <p>出版社

        <select name="publish_id" id="">

              {% for publish in publish_list %}

                  {% if edit_book.publish == publish %}

                     <option selected value="{{ publish.pk }}">{{ publish.name }}</option>

                  {% else %}

                      <option value="{{ publish.pk }}">{{ publish.name }}</option>

                  {% endif %}

              {% endfor %}

        </select>

    </p>

    <p>作者

        <select name="author_pk_list" id="" multiple>

              {% for author in author_list %}

                  {% if author in edit_book.authors.all %}

                     <option selected value="{{ author.pk }}">{{ author.name }}</option>

                  {% else %}

                     <option value="{{ author.pk }}">{{ author.name }}</option>

                  {% endif %}

              {% endfor %}

        </select>

    </p>

    <input type="submit">

</form>

</body>

</html>
2、forms组件2
forms组件1:https://www.cnblogs.com/venicid/p/9308074.html
https://www.cnblogs.com/yuanchenqi/articles/7614921.html
https://www.cnblogs.com/wupeiqi/articles/6144178.html
form组件1:forms组件添加,编辑用原生form表单
form组件2:实现了编辑也用form表单
1、针对form表单设计form组件
ChoiceField(Field)
ModelChoiceField(ChoiceField)
ModelMultipleChoiceField(ModelChoiceField)
2、form组件能做的事情:
form组件能做的事情:
    1.能渲染页面
    2.能做校验用
    3.拿到错误信息显示

3、code
views
from django.shortcuts import render,redirect # Create your views here. from .models import * from django import forms
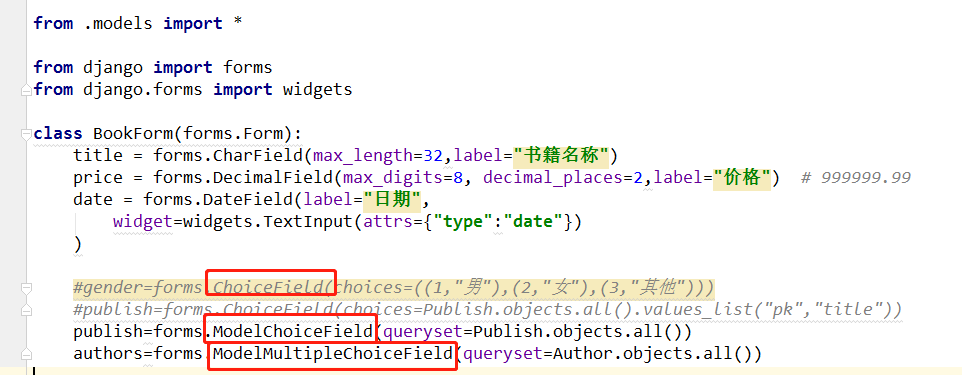
from django.forms import widgets class BookForm(forms.Form):
title = forms.CharField(max_length=32,label="书籍名称")
price = forms.DecimalField(max_digits=8, decimal_places=2,label="价格") # 999999.99
date = forms.DateField(label="日期",
widget=widgets.TextInput(attrs={"type":"date"})
) #gender=forms.ChoiceField(choices=((1,"男"),(2,"女"),(3,"其他")))
#publish=forms.ChoiceField(choices=Publish.objects.all().values_list("pk","title"))
publish=forms.ModelChoiceField(queryset=Publish.objects.all())
authors=forms.ModelMultipleChoiceField(queryset=Author.objects.all()) def books(request):
book_list=Book.objects.all()
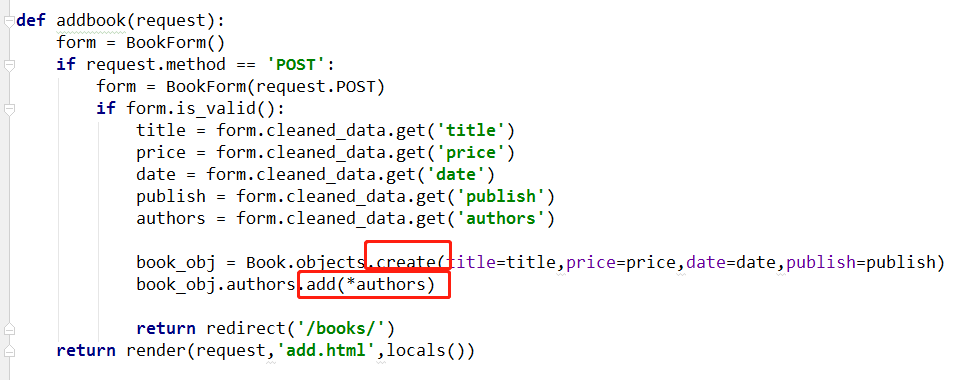
return render(request,"books.html",locals()) def addbook(request):
form = BookForm()
if request.method == 'POST':
form = BookForm(request.POST)
if form.is_valid():
print(form.cleaned_data)
"""
clean_date: {'title': '书1', 'price': Decimal('1111'),
'date': datetime.date(2018, 6, 7),
'publish': <Publish: 香蕉出版社>, # 对象
'authors': <QuerySet [<Author: alex>, <Author: egon>]>} """
title = form.cleaned_data.get('title')
price = form.cleaned_data.get('price')
date = form.cleaned_data.get('date')
publish = form.cleaned_data.get('publish')
authors = form.cleaned_data.get('authors') book_obj = Book.objects.create(title=title,price=price,date=date,publish=publish)
book_obj.authors.add(*authors) return redirect('/books/')
print(form)
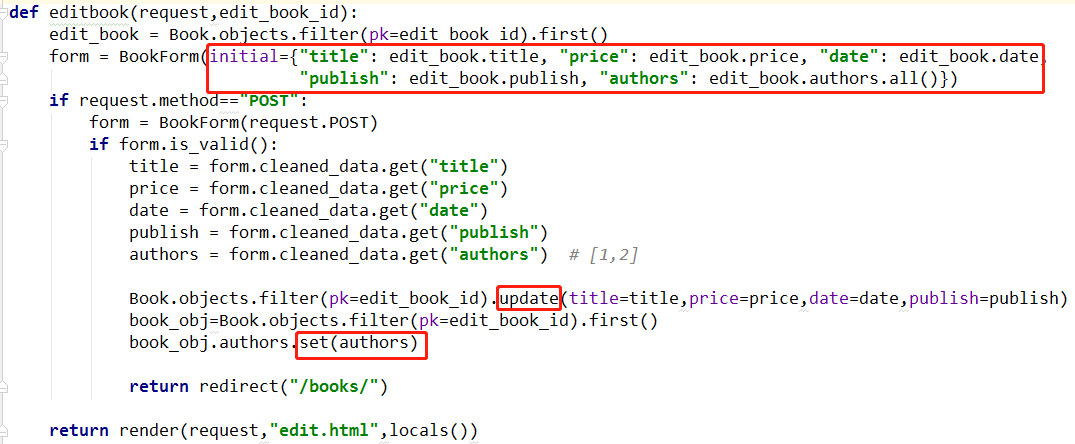
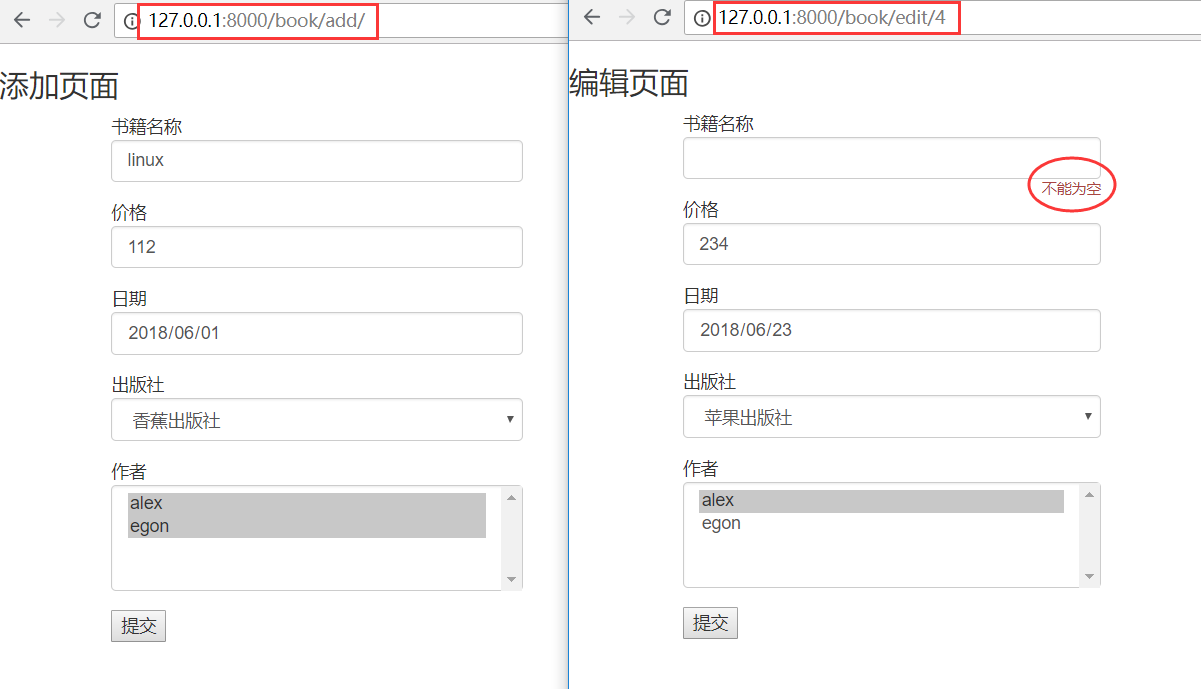
return render(request,'add.html',locals()) def editbook(request,edit_book_id):
edit_book = Book.objects.filter(pk=edit_book_id).first()
form = BookForm(initial={"title": edit_book.title, "price": edit_book.price, "date": edit_book.date,
"publish": edit_book.publish, "authors": edit_book.authors.all()})
if request.method=="POST":
form = BookForm(request.POST)
if form.is_valid():
title = form.cleaned_data.get("title")
price = form.cleaned_data.get("price")
date = form.cleaned_data.get("date")
publish = form.cleaned_data.get("publish")
authors = form.cleaned_data.get("authors") # [1,2] Book.objects.filter(pk=edit_book_id).update(title=title,price=price,date=date,publish=publish)
book_obj=Book.objects.filter(pk=edit_book_id).first()
book_obj.authors.set(authors) return redirect("/books/") return render(request,"edit.html",locals())
add
<!DOCTYPE html>
<html lang="zh-CN">
<head>
<meta charset="UTF-8">
<title>Title</title>
<meta name="viewport" content="width=device-width, initial-scale=1">
</head>
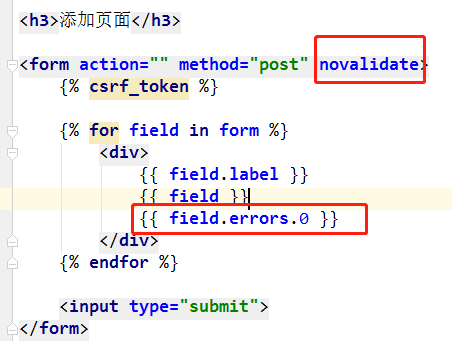
<body> <h3>添加页面</h3> <form action="" method="post" novalidate>
{% csrf_token %} {% for field in form %}
<div>
{{ field.label }}
{{ field }}
{{ field.errors.0 }}
</div>
{% endfor %} <input type="submit">
</form>
</body>
</html>
edit
<!DOCTYPE html>

<html lang="zh-CN">

<head>

    <meta charset="UTF-8">

    <title>Title</title>

    <meta name="viewport" content="width=device-width, initial-scale=1">

</head>

<body>

<h3>编辑页面</h3>

<form action="" method="post" novalidate>

    {% csrf_token %}

    {% for field in form %}

        <div>

            {{ field.label }}

            {{ field }}

            {{ field.errors.0 }}

        </div>

    {% endfor %}

    <input type="submit">

</form>

</body>

</html>
4、form组件补充
1、Django内置字段如下:
Field

    required=True,               是否允许为空

    widget=None,                 HTML插件

    label=None,                  用于生成Label标签或显示内容

    initial=None,                初始值

    help_text='',                帮助信息(在标签旁边显示)

    error_messages=None,         错误信息 {'required': '不能为空', 'invalid': '格式错误'}

    show_hidden_initial=False,   是否在当前插件后面再加一个隐藏的且具有默认值的插件(可用于检验两次输入是否一直)

    validators=[],               自定义验证规则

    localize=False,              是否支持本地化

    disabled=False,              是否可以编辑

    label_suffix=None            Label内容后缀

CharField(Field)

    max_length=None,             最大长度

    min_length=None,             最小长度

    strip=True                   是否移除用户输入空白

IntegerField(Field)

    max_value=None,              最大值

    min_value=None,              最小值

FloatField(IntegerField)

    ...

DecimalField(IntegerField)

    max_value=None,              最大值

    min_value=None,              最小值

    max_digits=None,             总长度

    decimal_places=None,         小数位长度

BaseTemporalField(Field)

    input_formats=None          时间格式化

DateField(BaseTemporalField)    格式:2015-09-01

TimeField(BaseTemporalField)    格式:11:12

DateTimeField(BaseTemporalField)格式:2015-09-01 11:12

DurationField(Field)            时间间隔:%d %H:%M:%S.%f

    ...

RegexField(CharField)

    regex,                      自定制正则表达式

    max_length=None,            最大长度

    min_length=None,            最小长度

    error_message=None,         忽略,错误信息使用 error_messages={'invalid': '...'}

EmailField(CharField)

    ...

FileField(Field)

    allow_empty_file=False     是否允许空文件

ImageField(FileField)

    ...

    注:需要PIL模块,pip3 install Pillow

    以上两个字典使用时,需要注意两点:

        - form表单中 enctype="multipart/form-data"

        - view函数中 obj = MyForm(request.POST, request.FILES)

URLField(Field)

    ...

BooleanField(Field)

    ...

NullBooleanField(BooleanField)

    ...

ChoiceField(Field)

    ...

    choices=(),                选项,如:choices = ((0,'上海'),(1,'北京'),)

    required=True,             是否必填

    widget=None,               插件,默认select插件

    label=None,                Label内容

    initial=None,              初始值

    help_text='',              帮助提示

ModelChoiceField(ChoiceField)

    ...                        django.forms.models.ModelChoiceField

    queryset,                  # 查询数据库中的数据

    empty_label="---------",   # 默认空显示内容

    to_field_name=None,        # HTML中value的值对应的字段

    limit_choices_to=None      # ModelForm中对queryset二次筛选

ModelMultipleChoiceField(ModelChoiceField)

    ...                        django.forms.models.ModelMultipleChoiceField

TypedChoiceField(ChoiceField)

    coerce = lambda val: val   对选中的值进行一次转换

    empty_value= ''            空值的默认值

MultipleChoiceField(ChoiceField)

    ...

TypedMultipleChoiceField(MultipleChoiceField)

    coerce = lambda val: val   对选中的每一个值进行一次转换

    empty_value= ''            空值的默认值

ComboField(Field)

    fields=()                  使用多个验证,如下:即验证最大长度20,又验证邮箱格式

                               fields.ComboField(fields=[fields.CharField(max_length=20), fields.EmailField(),])

MultiValueField(Field)

    PS: 抽象类,子类中可以实现聚合多个字典去匹配一个值,要配合MultiWidget使用

SplitDateTimeField(MultiValueField)

    input_date_formats=None,   格式列表:['%Y--%m--%d', '%m%d/%Y', '%m/%d/%y']

    input_time_formats=None    格式列表:['%H:%M:%S', '%H:%M:%S.%f', '%H:%M']

FilePathField(ChoiceField)     文件选项,目录下文件显示在页面中

    path,                      文件夹路径

    match=None,                正则匹配

    recursive=False,           递归下面的文件夹

    allow_files=True,          允许文件

    allow_folders=False,       允许文件夹

    required=True,

    widget=None,

    label=None,

    initial=None,

    help_text=''

GenericIPAddressField

    protocol='both',           both,ipv4,ipv6支持的IP格式

    unpack_ipv4=False          解析ipv4地址,如果是::ffff:192.0.2.1时候,可解析为192.0.2.1, PS:protocol必须为both才能启用

SlugField(CharField)           数字,字母,下划线,减号(连字符)

    ...

UUIDField(CharField)           uuid类型

    ...
2、Django内置插件:
TextInput(Input)

NumberInput(TextInput)

EmailInput(TextInput)

URLInput(TextInput)

PasswordInput(TextInput)

HiddenInput(TextInput)

Textarea(Widget)

DateInput(DateTimeBaseInput)

DateTimeInput(DateTimeBaseInput)

TimeInput(DateTimeBaseInput)

CheckboxInput

Select

NullBooleanSelect

SelectMultiple

RadioSelect

CheckboxSelectMultiple

FileInput

ClearableFileInput

MultipleHiddenInput

SplitDateTimeWidget

SplitHiddenDateTimeWidget

SelectDateWidget
3、常用选择插件:
# 单radio,值为字符串

# user = fields.CharField(

#     initial=2,

#     widget=widgets.RadioSelect(choices=((1,'上海'),(2,'北京'),))

# )

# 单radio,值为字符串

# user = fields.ChoiceField(

#     choices=((1, '上海'), (2, '北京'),),

#     initial=2,

#     widget=widgets.RadioSelect

# )

# 单select,值为字符串

# user = fields.CharField(

#     initial=2,

#     widget=widgets.Select(choices=((1,'上海'),(2,'北京'),))

# )

# 单select,值为字符串

# user = fields.ChoiceField(

#     choices=((1, '上海'), (2, '北京'),),

#     initial=2,

#     widget=widgets.Select

# )

# 多选select,值为列表

# user = fields.MultipleChoiceField(

#     choices=((1,'上海'),(2,'北京'),),

#     initial=[1,],

#     widget=widgets.SelectMultiple

# )

# 单checkbox

# user = fields.CharField(

#     widget=widgets.CheckboxInput()

# )

# 多选checkbox,值为列表

# user = fields.MultipleChoiceField(

#     initial=[2, ],

#     choices=((1, '上海'), (2, '北京'),),

#     widget=widgets.CheckboxSelectMultiple

# )
3、modleForm组件
https://www.cnblogs.com/yuanchenqi/articles/7614921.html
https://www.cnblogs.com/yuanchenqi/articles/8034442.html
1、modleform组件
  1.modelform 组件
        中间转换的组件, 不用自己去写form组件。
        将模型表转换成, 具体的form组件。
2.fields
3.一对多,多对多,不用考虑! form.save()
4.BookForm(instance=edit_book) # 接收一个对象
5、 {{ field.label }}{{ field }} {{ field.errors.0 }}
6、扩展modleform
https://www.cnblogs.com/yuanchenqi/articles/8034442.html
from django.shortcuts import render,HttpResponse,redirect

from django.forms import ModelForm

# Create your views here.

from app01 import models

def test(request):

    # model_form = models.Student

    model_form = models.Student.objects.all()

    return render(request,'test.html',{'model_form':model_form})

class StudentList(ModelForm):

    class Meta:

        model = models.Student #对应的Model中的类

        fields = "__all__" #字段,如果是__all__,就是表示列出所有的字段

        exclude = None #排除的字段

        labels = None #提示信息

        help_texts = None #帮助提示信息

        widgets = None #自定义插件

        error_messages = None #自定义错误信息

        #error_messages用法:

        error_messages = {

        'name':{'required':"用户名不能为空",},

        'age':{'required':"年龄不能为空",},

        }

        #widgets用法,比如把输入用户名的input框给为Textarea

        #首先得导入模块

        from django.forms import widgets as wid #因为重名,所以起个别名

        widgets = {

        "name":wid.Textarea

        }

        #labels,自定义在前端显示的名字

        labels= {

        "name":"用户名"

        }

def student(request):

    if request.method == 'GET':

        student_list = StudentList()

        return render(request,'student.html',{'student_list':student_list})

    else:

        student_list = StudentList(request.POST)

        if student_list.is_valid():

            student_list.save()

            return render(request,'student.html',{'student_list':student_list})

def student_edit(request,pk):

    obj = models.Student.objects.filter(pk=pk).first()

    if not obj:

        return redirect('test')

    if request.method == "GET":

        student_list = StudentList(instance=obj)

        return render(request,'student_edit.html',{'student_list':student_list})

    else:

        student_list = StudentList(request.POST,instance=obj)

        if student_list.is_valid():

            student_list.save()

            return render(request,'student_edit.html',{'student_list':student_list})

扩展 modelform
7、modle.EmialField()
       models.CharFiled()
        models.EmailField()  # 为什么,不写charField? 因为在使用 modelForm 时,可以校验!!这时EmailField才有意义!
        eg:
            models.URLField
            models.UUIDField
8、code
views
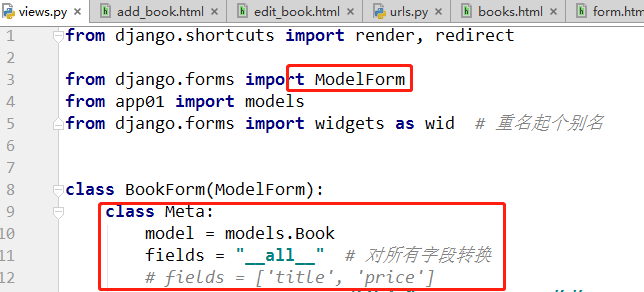
from django.shortcuts import render,HttpResponse,redirect # Create your views here. from .models import * from django.forms import ModelForm
from django.forms import widgets as wid # 因为重名,所以起个别名! wid_text = wid.TextInput(attrs={'class':'form-control'})
required_msg = {'required':'不能为空'}
class BookForm(ModelForm):
class Meta:
model = Book
fields = "__all__" # 对所有字段转换
# fields = ['title','price'] labels = {"title":"书籍名称","price":"价格","date":"日期","publish":"出版社","authors":"作者"}
widgets = {
'title':wid_text,
'price':wid_text,
'date':wid.TextInput(attrs={'class':'form-control','type':'date'}),
'publish':wid.Select(attrs={'class':'form-control'}),
'authors':wid.SelectMultiple(attrs={'class':'form-control'})
}
error_messages = {
'title':required_msg,
'price':required_msg,
'date':{'required':'不能为空','invalid':'格式错误'},
'publish':required_msg,
'authors':required_msg,
} def books(request):
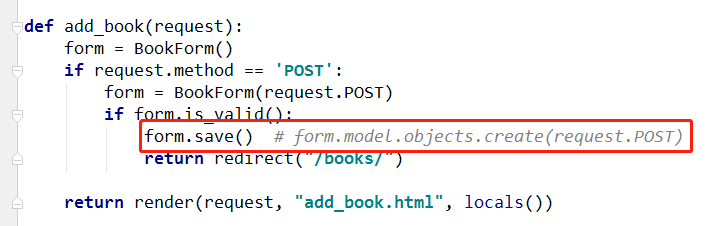
book_list = Book.objects.all() return render(request,'books.html',locals()) def addbook(request):
form = BookForm()
if request.method == 'POST':
form = BookForm(request.POST)
if form.is_valid():
form.save() # form.model.objects.create(request.POST)
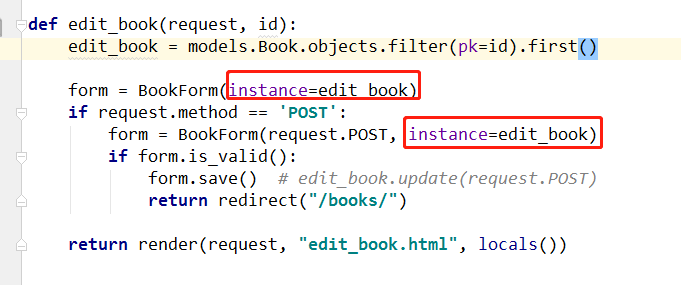
return redirect('/books/') return render(request,'add.html',locals()) def editbook(request, edit_book_id):
edit_book = Book.objects.filter(pk=edit_book_id).first()
form = BookForm(instance=edit_book) if request.method == 'POST':
form = BookForm(request.POST,instance=edit_book)
if form.is_valid():
form.save() # edit_book.update(request.POST)
return redirect('/books/') return render(request, 'edit.html', locals())
add.html
<!DOCTYPE html>

<html lang="en">

<head>

    <meta charset="UTF-8">

    <title>Title</title>

     <!-- 最新版本的 Bootstrap 核心 CSS 文件 -->

    <link rel="stylesheet" href="https://cdn.bootcss.com/bootstrap/3.3.7/css/bootstrap.min.css" integrity="sha384-BVYiiSIFeK1dGmJRAkycuHAHRg32OmUcww7on3RYdg4Va+PmSTsz/K68vbdEjh4u" crossorigin="anonymous">

</head>

<body>

<h3>添加页面</h3>

<div class="row">

    <div class="col-md-4 col-md-offset-1">

        {% include 'form.html' %}

    </div>

</div>

</body>

</html>

add.html
edit
<!DOCTYPE html>

<html lang="en">

<head>

    <meta charset="UTF-8">

    <title>Title</title>

    <!-- 最新版本的 Bootstrap 核心 CSS 文件 -->

    <link rel="stylesheet" href="https://cdn.bootcss.com/bootstrap/3.3.7/css/bootstrap.min.css"

          integrity="sha384-BVYiiSIFeK1dGmJRAkycuHAHRg32OmUcww7on3RYdg4Va+PmSTsz/K68vbdEjh4u" crossorigin="anonymous">

</head>

<body>

<h3>编辑页面</h3>

<div class="row">

    <div class="col-md-4 col-md-offset-1">

        {% include 'form.html' %}

    </div>

</div>

</body>

</html>
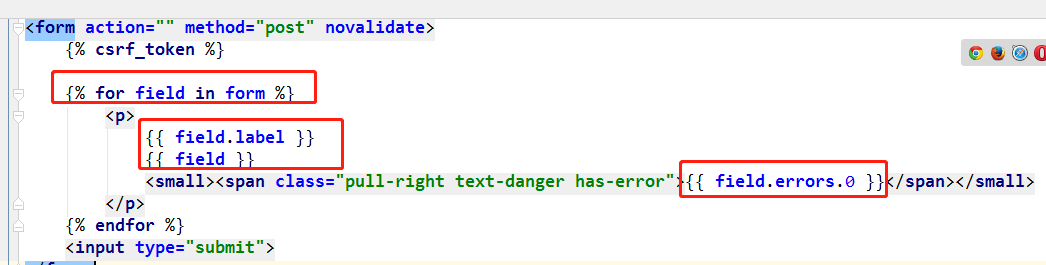
form.html
<form action="" method="post" novalidate>

    {% csrf_token %}

    {% for field in form %}

        <p>

            {{ field.label }}

            {{ field }}

            <small><span class="pull-right text-danger has-error">{{ field.errors.0 }}</span></small>

        </p>

    {% endfor %}

    <input type="submit">

</form>
4、前端form表单,后台form组件(可以没有数据库)
前端手写一个form表单,后台使用form组件,进行校验,也是可以的!!
注意: <p>名称 <input type="text" name="title"></p> 和 title = forms.CharField()
name和title对应
views。py
from django import forms

class BookForms(forms.Form):

    title = forms.CharField()

    price = forms.FloatField()

def addbook(request):

    form = BookForms()

    if request.method == 'POST':

        form = BookForms(request.POST)

        # form = BookForm({'title':'php','price':111,'xxx':'egon'})

        if form.is_valid():

            print('clean_data',form.cleaned_data)

            # clean_data {'title': '水浒传', 'price': 123.0}

        else:

            print('error',form.errors)

    return render(request,'addbook.html',locals())
addbook.html
<!DOCTYPE html>

<html lang="en">

<head>

    <meta charset="UTF-8">

    <title>Title</title>

</head>

<body>

<h3>添加书籍</h3>

<form action="" method="post" novalidate>

    {% csrf_token %}

    <p>名称 <input type="text" name="title"></p>

    <p>价格 <input type="text" name="price"></p>

    <p>xxx <input type="text" name="xxx"></p>

    <input type="submit">

</form>

<form action="" method="post" novalidate>

    {% csrf_token %}

    {{ form.as_p }}

    {{ form.as_table }}

    {{ form.as_ul }}

    <input type="submit">

</form>

</body>

</html>
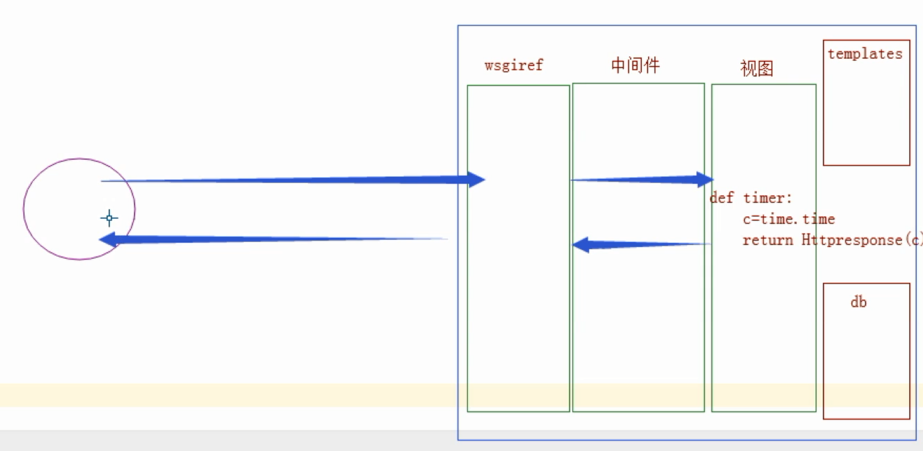
5、django补充 - 请求流程
说明:
django 请求流程图--流程最重要!

http协议
请求协议:请求首行,请求头,请求体!
响应协议: 响应首行,响应头,响应体!

我们发给浏览器的响应体(html)是一堆 str 浏览器解析(html)才能看到数据!

render 对templates 模板渲染!
没有模板 就 httpresponse 返回str
打开文件 捕获是否模板语法,嵌入{{}} 数据 返回 html(str) response

只要到了 中间件 交给浏览器的 一定已经是一些 html(str)
1、什么是WSGI?什么是wsgiref?
WSGI(Web Server Common Interface)是专门为Python语言制定的web服务器与应用程序之间的网关接口规范,通俗的来说,只要一个服务器拥有一个实现了WSGI标准规范的模块(例如apache的mod_wsgi模块),那么任意的实现了WSGI规范的应用程序都能与它进行交互。因此,WSGI也主要分为两个程序部分:服务器部分和应用程序部分。
wsgiref则是官方给出的一个实现了WSGI标准用于演示用的简单Python内置库,它实现了一个简单的WSGI Server和WSGI Application(在simple_server模块中),主要分为五个模块:simple_server, util, headers, handlers, validate。
wsgiref源码地址:https://pypi.python.org/pypi/wsgiref
3、modleForm组件的更多相关文章
- ExtJS 4.2 评分组件
上一文章是扩展ExtJS自带的Date组件.在这里将创建一个评分组件. 目录 1. 介绍 2. 示例 3. 资源下载 1. 介绍 代码参考的是 Sencha Touch 2上的一个RatingStar ...
- react组件的生命周期
写在前面: 阅读了多遍文章之后,自己总结了一个.一遍加强记忆,和日后回顾. 一.实例化(初始化) var Button = React.createClass({ getInitialState: f ...
- react-router 组件式配置与对象式配置小区别
1. react-router 对象式配置 和 组件式配置 组件式配置(Redirect) ----对应---- 对象式配置(onEnter钩子) IndexRedirect -----对应-- ...
- Angular2入门系列教程3-多个组件,主从关系
上一篇 Angular2项目初体验-编写自己的第一个组件 好了,前面简单介绍了Angular2的基本开发,并且写了一个非常简单的组件,这篇文章我们将要学会编写多个组件并且有主从关系 现在,假设我们要做 ...
- Angular2入门系列教程2-项目初体验-编写自己的第一个组件
上一篇 使用Angular-cli搭建Angular2开发环境 Angular2采用组件的编写模式,或者说,Angular2必须使用组件编写,没有组件,你甚至不能将Angular2项目启动起来 紧接着 ...
- .NET Core 首例 Office 开源跨平台组件(NPOI Core)
前言 最近项目中,需要使用到 Excel 导出,找了一圈发现没有适用于 .NET Core的,不依赖Office和操作系统限制的 Office 组件,于是萌生了把 NPOI 适配并移植到 .NET C ...
- .NetCore中的日志(1)日志组件解析
.NetCore中的日志(1)日志组件解析 0x00 问题的产生 日志记录功能在开发中很常用,可以记录程序运行的细节,也可以记录用户的行为.在之前开发时我一般都是用自己写的小工具来记录日志,输出目标包 ...
- BootStrap_02之全局样式及组件
1.BootStrap指定的四种屏幕尺寸: ①超大PC屏幕--lg(large):w>=1200px: ②中等PC屏幕--md(medium):1200px>w>=992px: ③P ...
- ExtJS 4.2 组件介绍
目录 1. 介绍 1.1 说明 1.2 组件分类 1.3 组件名称 1.4 组件结构 2. 组件的创建方式 2.1 Ext.create()创建 2.2 xtype创建 1. 介绍 1.1 说明 Ex ...
随机推荐
- 显示脉冲效果的PulsingView
显示脉冲效果的PulsingView 效果如下: 源码: PulsingView.h 与 PulsingView.m // // PulsingView.h // PulsingView // // ...
- 封装简单的mvc框架
MVC模式(Model-View-Controller)是软件工程中的一种软件架构模式. MVC把软件系统分为三个基本部分:模型(Model).视图(View)和控制器(Controller). PH ...
- zabbix 监控wind登录状态
参考博文:http://blog.51cto.com/qicheng0211/1694583 需求:监控win 2008 的用户登录状态,无论用户登录成功与否都要告警(也可以刷选指定用户.指定时间内) ...
- C++ new和delete重载
C++ new和delete重载 2012-02-15 23:25:33| 分类: C/C++|举报|字号 订阅 首先,new和delete是运算符,重载new和delete是可 ...
- java枚举学习入门
一.前言 在java编程过程中,我们通常需要定义一些固定数量的常量,在jdk1.5以前,通常的做法是定义一个静态常量类,但自jdk1.5后,java引入了枚举(关键字enum,全称为 enumera ...
- 团队作业1——团队展示&教辅宝
1.队名:PHILOSOPHER 2.队员学号: [组长]金盛昌(201421122043).刘文钊(20142112255).陈笑林(201421122042). 张俊逸(201421122044) ...
- js检测密码强度
<script> function AuthPasswd(string) { if(string.length >=6) { if(/[a-zA-Z]+/.t ...
- 【CF809E】Surprise me!
题目 这是一道神仙题 看到这样一个鬼畜的柿子 \[\sum_{i=1}^n\sum_{j=1}^n\varphi(a_i\times a_j)\times dis(i,j)\] 又是树上距离又是\(\ ...
- Day1 Java编程环境和变量
什么是软件? 软件的基本组成部分是完成其功能的程序. 在日程生活中,可以将程序看成对一系列动作的执行过程的描述. 什么是计算机程序? 为了让计算机执行某些操作或解决某个问题二编写的一系列有序指令的集合 ...
- [luogu1080] 国王游戏
题面 这是一个比较经典(害人不浅)的题目啊, 很早就听说过这个题目的大名, 今日得见, 果然非凡题所可以比拟的啊, 行了, 瞎扯就先扯到这里, 题目大意应该是很好解释的, 我就不解释了, 要使得最 ...