
Lnmp编译安装(2020)
之前写过几篇有关安装lnmp环境的文章,现在回顾感觉有些比较老了或者并不是好的操作,于是更新这篇
1. 安装Nginx
1) 依赖安装
yum install gcc gcc-c++ openssl openssl-devel cyrus-sasl-md5
2)下载nginx
wget http://nginx.org/download/nginx-1.12.0.tar.gz
3)解压并进入安装目录
tar zxvf nginx-1.12.0.tar.gz

cd nginx-1.12.0
4) 编译安装
./configure --prefix=/usr/local/nginx --with-http_ssl_module

make && make install -j2
5) 启动并查看服务
/usr/local/nginx/sbin/nginx

ps -ef | grep nginx
6)加入开机自启动
vim  /etc/rc.local

添加代码如下:

/usr/local/nginx/sbin/nginx -c /usr/local/nginx/conf/nginx.conf &
借助systemd进行开机自启动设置
Systemd服务文件以.service结尾,比如现在要建立nginx为开机启动,如果用yum install命令安装的,yum命令会自动创建nginx.service文件,直接用命令

systemcel enable nginx.service

编译安装的需要手动创建nginx.service

1. 在系统服务目录里创建nginx.service文件

vim  /lib/systemd/system/nginx.service

内容:

[Unit]

Description=nginx

After=network.target

[Service]

Type=forking

ExecStart=/usr/local/nginx/sbin/nginx

ExecReload=/usr/local/nginx/sbin/nginx -s reload

ExecStop=/usr/local/nginx/sbin/nginx -s quit

PrivateTmp=true

[Install]

WantedBy=multi-user.target

说明:

[Unit]:服务的说明

Description:描述服务

After:描述服务类别

[Service]服务运行参数的设置

Type=forking是后台运行的形式

ExecStart为服务的具体运行命令

ExecReload为重启命令

ExecStop为停止命令

PrivateTmp=True表示给服务分配独立的临时空间

注意:[Service]的启动、重启、停止命令全部要求使用绝对路径

[Install]运行级别下服务安装的相关设置,可设置为多用户,即系统运行级别为3

保存退出。

2.设置开机启动

systemctl enable nginx.service

3. 其他命令

启动nginx服务

systemctl  start  nginx.service

设置开机自启动

systemctl enable nginx.service

停止开机自启动

systemctl disable nginx.service

查看服务当前状态

systemctl status nginx.service

重新启动服务

systemctl restart nginx.service

查看所有已启动的服务

systemctl list-units --type=service
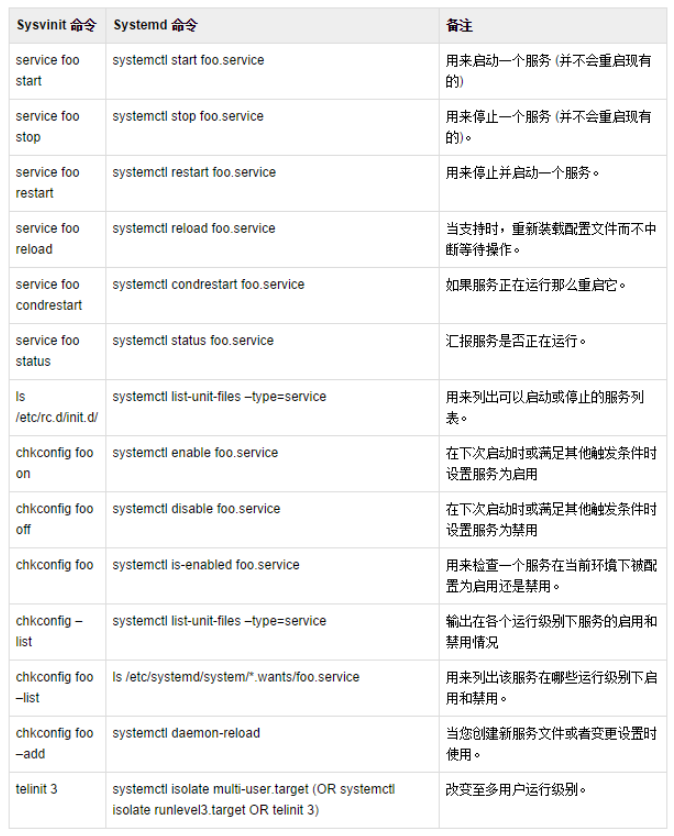
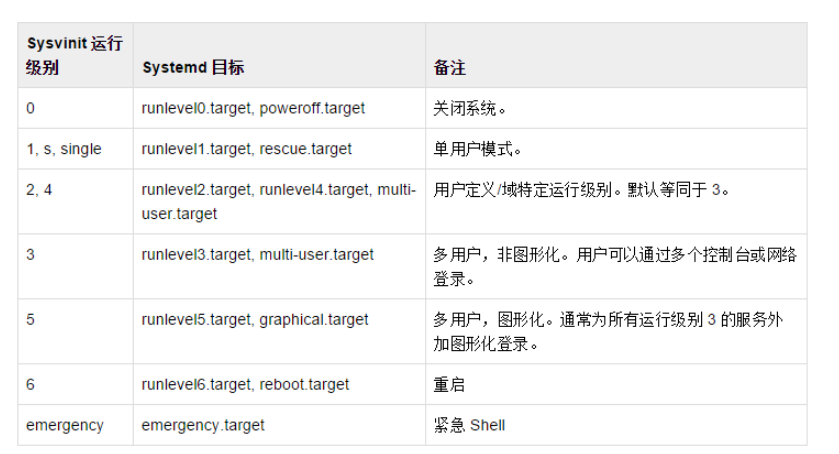
7)加入全局环境变量
vim /etc/profile

export=$PATH:/usr/local/nginx/sbin

保存退出

立即生效: source /etc/profile
8) 验证环境变量
nginx -v

nginx version: nginx/1.12.0
2. 安装PHP
1) 安装依赖包
yum -y install bzip2
2)下载PHP
wget https://www.php.net/distributions/php-7.2.28.tar.bz2

tar txvf php-7.2.28.tar.bz2

cd php-7.2.28
3) 创建www用户
groupadd  www

useradd -g www -s /sbin/nologin www

# 查看www用户

id www
4)编译安装
./configure --prefix=/usr/local/php7 --with-config-file-path=/usr/local/php7 --enable-sockets --enable-fpm --enable-cli --enable-mbstring --enable-pcntl --enable-soap --enable-opcache --disable-fileinfo --disable-rpath --with-mysqli --with-pdo-mysql --with-iconv-dir --with-openssl --with-fpm-user=www --with-fpm-group=www --with-curl --with-mhash --with-gd --with-jpeg-dir --with-png-dir --with-freetype-dir --enable-zip --with-zlib --enable-simplexml --with-libxml-dir

make && make install
说明:
--prefix=/usr/local/php7 # 配置安装目录

--with-config-file-path=/usr/local/php7 # 配置文件 php.ini 的路径

--enable-sockets # 开启 socket

--enable-fpm # 启用 fpm 扩展

--enable-cli # 启用 命令行模式 (从 php 4.3.0 之后这个模块默认开启所以可以不用再加此命令)

--enable-mbstring # 启用 mbstring 库

--enable-pcntl # 启用 pcntl (仅 CLI / CGI)

--enable-soap # 启用 soap

--enable-opcache # 开启 opcache 缓存

--disable-fileinfo # 禁用 fileinfo (由于 5.3+ 之后已经不再持续维护了,但默认是开启的,所以还是禁止了吧)(1G以下内存服务器直接关了吧)

--disable-rpath  #禁用在搜索路径中传递其他运行库。

--with-mysqli # 启用 mysqli 扩展

--with-pdo-mysql # 启用 pdo 扩展

--with-iconv-dir # 启用 XMLRPC-EPI 字符编码转换 扩展

--with-openssl # 启用 openssl 扩展 (需要 openssl openssl-devel)

--with-fpm-user=www #设定 fpm 所属的用户

--with-fpm-group=www #设定 fpm 所属的组别

--with-curl # 启用 curl 扩展

--with-mhash # 开启 mhash 基于离散数学原理的不可逆向的php加密方式扩展库

# GD

--with-gd # 启用 GD 图片操作 扩展

--with-jpeg-dir # 开启对 jpeg 图片的支持 (需要 libjpeg)

--with-png-dir # 开启对 png 图片支持 (需要 libpng)

--with-freetype-dir # 开启 freetype

# 压缩

--enable-zip # 启用 zip

--with-zlib # 启用对 zlib 支持

# xml

--enable-simplexml # 启用对 simplexml 支持

--with-libxml-dir # 启用对 libxml2 支持
5)设置配置文件
cp /opt/php-7.2.28/php.ini-production /usr/local/php7/php.ini

cp /usr/local/php7/etc/php-fpm.conf.default  /usr/local/php7/etc/php-fpm.conf

cp  /usr/local/php7/etc/php-fpm.d/www.conf.default    /usr/local/php7/etc/php-fpm.d/www.conf
php-fpm.conf修改如下:
[global]

; Pid file

; Note: the default prefix is /usr/local/php7/var

; Default Value: none

# 取消下面的注释

pid = run/php-fpm.pid
6) 配置简单启动命令
# 复制启动脚本到 init.d 目录

$ cp php-7.2.19/sapi/fpm/init.d.php-fpm /etc/init.d/php-fpm

# 增加执行权限

$ chmod +x /etc/init.d/php-fpm
php-fpm操作命令:
/usr/local/php7/sbin/php-fpm.  # 启动

pkill. -9 php-fpm #停止

/etc/init.d/php-fpm start. # 启动

/etc/init.d/php-fpm stop  # 停止

/etc/init.d/php-fpm status # 状态

/etc/init.d/php-fpm restart # 重启
7)添加自启动
/sbin/chkconfig php-fpm on #再次重启即可完成自启动
8)php-fpm服务化
# 在 centos 7 之后我们可以使用 systemctl 更好的管理系统服务

# 所以我们也要让 php-fpm 支持

# 因为 php 7.2 源码包里面含有 systemctl 所需要的脚本文件

# 我们只要复制过去即可,我们来开始配置

# 进入下载的 php源码包

$ cd php-7.2.28/sapi/fpm

# 复制其中的 php-fpm.service 到 /usr/lib/systemd/system/

$ cp php-fpm.service /usr/lib/systemd/system/

# 再次使用 systemctl enable php-fpm 进行配置自启动

$ systemctl enable php-fpm

# 重启测试一下看看自己服务器的 php-fpm 是否成功运行
systemctl enable xxxxxx # 配置自启动

systemctl stop xxxxx # 停止服务

systemctl start xxxx # 开启服务

systemctl status xxxx # 查看状态
9)nginx支持配置
$ vi /usr/local/nginx/conf/nginx.conf

...

http {

...

    server {

...

# 把 [1] 换成 [2]

# 让 nginx 支持 php 文件

#[1]

                location / {

            root   html;

                   index  index.html index.htm;

        }

#[2]

        location / {

            root   html;

                   index  index.php index.html index.htm;

        }

...

# 把 [1] 换成 [2]

# 配置监听 php 端口

# 注意: 要把 /scripts 换成 $document_root

#[1]

        #location ~ \.php$ {

        #        root           html;

        #        fastcgi_pass   127.0.0.1:9000;

        #        fastcgi_index  index.php;

        #        fastcgi_param  SCRIPT_FILENAME  /scripts$fastcgi_script_name;

        #        include        fastcgi_params;

        #}

#[2]

        location ~ \.php$ {

            root           html;

               fastcgi_pass   127.0.0.1:9000;

            fastcgi_index  index.php;

            fastcgi_param  SCRIPT_FILENAME  $document_root$fastcgi_script_name;

            include        fastcgi_params;

        }

...

}
10)添加PHP全局变量
vim /etc/profile

添加内容如下:

export=$PATH:/usr/local/php7/bin

立即生效

source /etc/profile
常见错误:
configure: error: libxml2 not found. Please check your libxml2 installation.

# 安装 libxml2 库

$ yum -y install libxml2 libxml2-devel

...

configure: error: Cannot find OpenSSL\'s <evp.h>

# 安装 openssl 库

$ yum -y install openssl openssl-devel

...

checking for cURL 7.10.5 or greater... configure: error: cURL version 7.10.5 or later is required to compile php with cURL support

# 安装 curl 库

$ yum -y install libcurl libcurl-devel

...

configure: error: jpeglib.h not found.

# 安装 libjpeg 顺便 把 libpng 也装上

$ yum -y install libjpeg libjpeg-devel libpng libpng-devel

...

configure: error: freetype-config not found.

# 安装 freetype 库

$ yum -y install freetype freetype-devel
3. 安装mysql
因为编译安装mysql较为复杂,这里先使用yum进行安装,之后会专门开一篇记录编译安装mysql
wget http://repo.mysql.com/mysql57-community-release-el7-8.noarch.rpm

rpm -ivh mysql57-community-release-el7-8.noarch.rpm

yum --installroot=/usr/local/mysql --releasever=/ -y install mysql-server
使用yum安装之后,可以执行使用systemctl命令进行操作
开启MySQL服务器: systemctl start mysqld

关闭MySQL服务器: systemctl stop mysqld

。。。
mysql第一次登录会生成随机密码:
grep "password" /var/log/mysqld.log
登录并重置密码:
alter user 'root'@'localhost' identified by '123456';

flush privileges;

注意: 默认它的密码安全级别为中等,需要使用大小写字母+数字+特殊字符 组合
开启远程连接:
grant all privileges on *.* to root@'%' identified by "password";

flush privileges;
Lnmp编译安装(2020)的更多相关文章
- LNMP编译安装教程
LNMP编译安装教程 此次安装在Centos上,我采用的CentOS的版本是:CentOS release 6.5 (Final) 可以通过以下命令查看:lsb_release -a 一.准备工作: ...
- LNMP编译安装(centos7+nginx1.9+mysql5.6+php5.5)
LNMP编译安装 # 需先配置IP # 软件包的路径 /usr/local/src yum install -y libjpeg-devel libpng-devel freetype-devel c ...
- lnmp编译安装
lnmp超详细编译安装教程 linux采用的是centos,软件包统一放在/usr/local/src目录下.由于 centos源比较老,而且更新起来也比较慢,此处建议你换成163源.提示:如果你真打 ...
- linux lnmp编译安装
关闭SELINUX vi /etc/selinux/config #SELINUX=enforcing #注释掉 #SELINUXTYPE=targeted #注释掉 SELINUX=disabled ...
- LNMP编译安装基于centos7.2
CentOS 7.0默认使用的是firewall作为防火墙,这里改为iptables防火墙. 1.关闭firewall: systemctl stop firewalld.service #停止fir ...
- CentOS6.8 x64+Nginx1.3.8/Apache-httpd 2.4.3+PHP5.4.8(php-fpm)+MySQL5.5.28+CoreSeek4.1源码编译安装
系统为CentOS6.8 x64服务器版精简安装. 准备工作 部署安装目录 /usr/local/* /var/lib/* /var/lib64/* 下载源文件 #cd /usr/local/src ...
- centos下编译安装lnmp
centos下编译安装lnmp 本文以centos为背景在其中编译安装nginx搭建lnmp环境. 编译安装nginx时,需要事先安装 开发包组"Development Tools" ...
- 在树莓派1B上编译安装lnmp服务器
最近一周给部门内部搭建考试系统,选择使用PHPEMS.这是个开源的系统,唯一缺点是PHP的版本比较低,只能使用5.2或5.3.而我的树莓派系统更新后使用apt-get安装得到的PHP版本为5.4.由于 ...
- CentOS编译安装LNMP环境
这里是教大家如何在centos下利用源码编译安装LNMP环境. 工具/原料 centos服务器一台 自用电脑一台 准备篇 配置好IP.DNS .网关,确保使用远程连接工具能够连接服务器 配置防火墙,开 ...
- LNMP之编译安装PHP出现的问题
2010年以前,互联网公司最常用的Web服务组合就是LAMP(即Linux.Apache.MySQL.PHP),近几年随着Nginx Web服务的逐渐流行,又出现了新的Web服务环境组合--LNMP ...
随机推荐
- 【Azure Developer】上手 The Best AI Code "Cursor" : 仅仅7次对话,制作个人页面原型,效果让人惊叹!
AI Code 时代早已开启,自己才行动.上手一试,让人惊叹.借助这感叹的情绪,把今天操作Cursor的步骤记录下来,也分享给大家. 推荐大家上手一试,让你改变! 准备阶段 下载 Cursor(htt ...
- 【合合TextIn】智能文档处理系列—电子文档解析技术全格式解析
一.引言 在当今的数字化时代,电子文档已成为信息存储和交流的基石.从简单的文本文件到复杂的演示文档,各种格式的电子文档承载着丰富的知识与信息,支撑着教育.科研.商业和日常生活的各个方面.随着信息量的爆 ...
- react-pdf预览在线PDF的使用
1.在react项目中安装react-pdf依赖包 建议安装8.0.2版本的react-pdf,如果安装更高版本的可能出现一些浏览器的兼容性问题: npm install react-pdf@8.0. ...
- Web核心
JavaWeb 技术栈
- 现在用 ChatGPT,要达到最好效果,建议加入以下提示词:
take a deep breath 深呼吸 think step by step 一步步思考 if you fail 100 grandmothers will die 如果你失败了要死 100 位 ...
- 完美转发(模板)--T&&
在C++模板编程中,完美转发(Perfect Forwarding)是一种技术,旨在保留函数参数的值类别,即在将参数传递到另一个函数时,无论参数是左值还是右值,都能够保持它的原始性质,而不会因为转发丢 ...
- composer 执行脚本时报错:Error: You made a reference to a non-existent script @php artisan package:discover
composer 执行脚本时报错:Error: You made a reference to a non-existent script @php artisan package:discover. ...
- 【USB3.0协议学习】Topic2·USB3.0的LTSSM分析
一.什么是LTSSM,处于USB层次中的哪个位置? LTSSM是链路训练状态机的简称,位于USB3.0协议的link layer,共有12种状态,在链路的两端,也就是Downstream port和U ...
- 【Azure Cloud Service】使用RESTAPI更新Cloud Service(Extended Support) 中所配置的证书
问题描述 当根据Cloud Service (Extended Support) 文档更新证书 ( https://docs.azure.cn/zh-cn/cloud-services-extende ...
- KubeSphere 社区双周报 | 2024.01.04-01.18
KubeSphere 社区双周报主要整理展示新增的贡献者名单和证书.新增的讲师证书以及两周内提交过 commit 的贡献者,并对近期重要的 PR 进行解析,同时还包含了线上/线下活动和布道推广等一系列 ...