
PRESTO安装部署和参数说明(一)
PRESTO部署和参数说明(一)
一,概要
在部署和使用presto的过程中,在此记录一下部署记录和使用记录以及需要注意的事项。本人使用的presto版本是0.214,3台redhat虚拟机。使用背景:客户需要定期查询大批量的数据,最后选择了sqoop工具定期导入hive,并且定期删除定期更新,因为没有找到是个实时增量导入的工具,批量执行mapreduce任务,然后使用分布式查询引擎presto查询数据。
二,安装部署
在官网下载最新的安装包和客户端包:
server安装包:https://prestodb.io/docs/current/installation/deployment.html
client连接包:https://prestodb.io/docs/current/installation/cli.html
我们有三台测试机器,测试机器的版本类型为:
LSB Version: :base-4.0-amd64:base-4.0-noarch:core-4.0-amd64:core-4.0-noarch:graphics-4.0-amd64:graphics-4.0-noarch:printing-4.0-amd64:printing-4.0-noarch
Distributor ID: RedHatEnterpriseServer
Description: Red Hat Enterprise Linux Server release 6.7 (Santiago)
Release: 6.7
Codename: Santiago
我们要部署3个worker和一个Coordinator(附带一个Discovery Server节点)节点,并且这个master节点和一个worker节点部署同一台机器上。
第一步:下载完成之后,解压压缩包
tar -zxvf presto-server-0.214.tar.gz
第二步:解压之后,在目录presto-server-0.214中创建etc文件夹。进去etc文件夹,建立配置文件,我这里建立配置文件如下
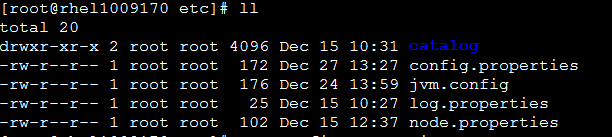
config.properties: presto服务配置
node.properties:每个节点特定配置
jvm.properties:java虚拟机的命令行选项
log.properties:输出的日志级别
catalog目录:每个连着者配置
咱们一个一个的讲解:
config.properties
如果是Coordinator节点:注意 EXAMPLE.COM是指Coordinator节点的域名或者IP
coordinator=true

node-scheduler.include-coordinator=true

http-server.http.port=8080

query.max-memory=10GB

query.max-memory-per-node=3GB

query.max-total-memory-per-node=3GB

discovery-server.enabled=true

discovery.uri=http://EXAMPLE.COM:8080
如果是worker节点:
coordinator=false

http-server.http.port=8080

query.max-memory=10GB

query.max-memory-per-node=3GB

query.max-total-memory-per-node=3GB

discovery.uri=http://EXAMPLE.COM:8080
参数解释:
coordinator: 是否运行该实例为coordinator(接受client的查询和管理查询执行)。
node-scheduler.include-coordinator:coordinator是否也作为work。对于大型集群来说,在coordinator里做worker的工作会影响查询性能。
http-server.http.port:指定HTTP端口。Presto使用HTTP来与外部和内部进行交流。
query.max-memory: 查询能用到的最大总内存
query.max-memory-per-node: 查询能用到的最大单结点内存
discovery-server.enabled:
Presto使用Discovery服务去找到集群中的所有结点。每个Presto实例在启动时都会在Discovery服务里注册。这样可以简化部署,
不需要额外的服务,Presto的coordinator内置一个Discovery服务。也是使用HTTP端口。
discovery.uri: Discovery服务的URI。将example.net:8080替换为coordinator的host和端口。这个URI不能以斜杠结尾,这个错误需特别注意,不然会报404错误。
另外还有以下属性:
jmx.rmiregistry.port: 指定JMX RMI的注册。JMX client可以连接此端口
jmx.rmiserver.port: 指定JXM RMI的服务器。可通过JMX监听。
node.properties
node.environment=production

node.id=node01

node.data-dir=/var/presto/data
解释:
node.environment: 环境名字,Presto集群中的结点的环境名字都必须是一样的。
node.id: 唯一标识,每个结点的标识都必须是为一的。就算重启或升级Presto都必须还保持原来的标识。
node.data-dir: 数据目录,Presto用它来保存log和其他数据
jvm.properties
-server

-Xmx5G

-XX:+UseG1GC

-XX:G1HeapRegionSize=32M

-XX:+UseGCOverheadLimit

-XX:+ExplicitGCInvokesConcurrent

-XX:+HeapDumpOnOutOfMemoryError

-XX:OnOutOfMemoryError=kill -9 %p
JVM配置文件etc/jvm.config,包含启动Java虚拟机时的命令行选项。格式是每一行是一个命令行选项。此文件数据是由shell解析,所以选项中包含空格或特殊字符会被忽略。
log.properties
com.facebook.presto=INFO
备注:日志级别有四种,DEBUG, INFO, WARN and ERROR
catalog目录
在这里以hive为例子,我在客户端的配置如下:
connector.name=hive-hadoop2

hive.metastore.uri=thrift://10.18.14.170:9083

hive.config.resources=/etc/alternatives/hadoop-conf/core-site.xml,/etc/alternatives/hadoop-conf/hdfs-site.xml
第三步:启动presto服务和客户端命令
启动presto-server,进入目录bin目录执行。
./launcher start
其余选项可供参考:
Usage: launcher [options] command

Commands: run, start, stop, restart, kill, status

Options:

  -h, --help            show this help message and exit

  -v, --verbose         Run verbosely

  --etc-dir=DIR         Defaults to INSTALL_PATH/etc

  --launcher-config=FILE

                        Defaults to INSTALL_PATH/bin/launcher.properties

  --node-config=FILE    Defaults to ETC_DIR/node.properties

  --jvm-config=FILE     Defaults to ETC_DIR/jvm.config

  --config=FILE         Defaults to ETC_DIR/config.properties

  --log-levels-file=FILE

                        Defaults to ETC_DIR/log.properties

  --data-dir=DIR        Defaults to INSTALL_PATH

  --pid-file=FILE       Defaults to DATA_DIR/var/run/launcher.pid

  --launcher-log-file=FILE

                        Defaults to DATA_DIR/var/log/launcher.log (only in

                        daemon mode)

  --server-log-file=FILE

                        Defaults to DATA_DIR/var/log/server.log (only in

                        daemon mode)

  -D NAME=VALUE         Set a Java system property
启动presto-cli客户端:
把下载的jar包:presto-cli-0.214-executable.jar 重命名为:presto 并且赋予权限
chmod +x presto
执行进去命令以hive为例子:
/presto --server localhost:8080 --catalog hive --schema default
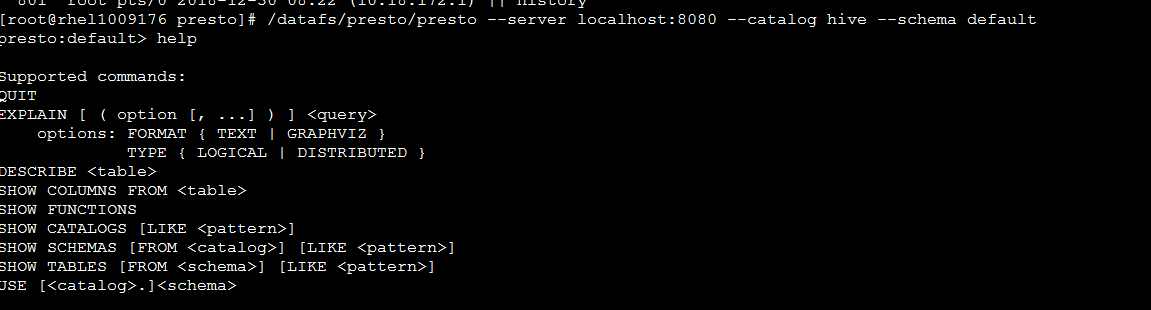
客户端其他命令供参考:
NAME

        presto - Presto interactive console

SYNOPSIS

        presto [--access-token <access token>] [--catalog <catalog>]

                [--client-info <client-info>]

                [--client-request-timeout <client request timeout>]

                [--client-tags <client tags>] [--debug] [--execute <execute>]

                [(-f <file> | --file <file>)] [(-h | --help)]

                [--http-proxy <http-proxy>] [--ignore-errors]

                [--keystore-password <keystore password>]

                [--keystore-path <keystore path>]

                [--krb5-config-path <krb5 config path>]

                [--krb5-credential-cache-path <krb5 credential cache path>]

                [--krb5-disable-remote-service-hostname-canonicalization]

                [--krb5-keytab-path <krb5 keytab path>]

                [--krb5-principal <krb5 principal>]

                [--krb5-remote-service-name <krb5 remote service name>]

                [--log-levels-file <log levels file>] [--output-format <output-format>]

                [--password] [--resource-estimate <resource-estimate>...]

                [--schema <schema>] [--server <server>] [--session <session>...]

                [--socks-proxy <socks-proxy>] [--source <source>]

                [--truststore-password <truststore password>]

                [--truststore-path <truststore path>] [--user <user>] [--version]

OPTIONS

        --access-token <access token>

            Access token

        --catalog <catalog>

            Default catalog

        --client-info <client-info>

            Extra information about client making query

        --client-request-timeout <client request timeout>

            Client request timeout (default: 2m)

        --client-tags <client tags>

            Client tags

        --debug

            Enable debug information

        --execute <execute>

            Execute specified statements and exit

        -f <file>, --file <file>

            Execute statements from file and exit

        -h, --help

            Display help information

        --http-proxy <http-proxy>

            HTTP proxy to use for server connections

        --ignore-errors

            Continue processing in batch mode when an error occurs (default is

            to exit immediately)

        --keystore-password <keystore password>

            Keystore password

        --keystore-path <keystore path>

            Keystore path

        --krb5-config-path <krb5 config path>

            Kerberos config file path (default: /etc/krb5.conf)

        --krb5-credential-cache-path <krb5 credential cache path>

            Kerberos credential cache path

        --krb5-disable-remote-service-hostname-canonicalization

            Disable service hostname canonicalization using the DNS reverse

            lookup

        --krb5-keytab-path <krb5 keytab path>

            Kerberos key table path (default: /etc/krb5.keytab)

        --krb5-principal <krb5 principal>

            Kerberos principal to be used

        --krb5-remote-service-name <krb5 remote service name>

            Remote peer's kerberos service name

        --log-levels-file <log levels file>

            Configure log levels for debugging using this file

        --output-format <output-format>

            Output format for batch mode [ALIGNED, VERTICAL, CSV, TSV,

            CSV_HEADER, TSV_HEADER, NULL] (default: CSV)

        --password

            Prompt for password

        --resource-estimate <resource-estimate>

            Resource estimate (property can be used multiple times; format is

            key=value)

        --schema <schema>

            Default schema

        --server <server>

            Presto server location (default: localhost:8080)

        --session <session>

            Session property (property can be used multiple times; format is

            key=value; use 'SHOW SESSION' to see available properties)

        --socks-proxy <socks-proxy>

            SOCKS proxy to use for server connections

        --source <source>

            Name of source making query

        --truststore-password <truststore password>

            Truststore password

        --truststore-path <truststore path>

            Truststore path

        --user <user>

            Username

        --version

            Display version information and exit
查看web界面 http://EXAMPLE.COM:8080/ui/,举例说明:至此部署成功

PRESTO安装部署和参数说明(一)的更多相关文章
- presto 0.166安装部署
系统:linux java:jdk 8,64-bit Connector:hive 分布式,node1-3 node1:Coordinator . Discovery service node2-3: ...
- Zabbix agent 在windows上安装部署
Zabbix agent 在windows上安装部署 1.下载与解压 地址: http://www.zabbix.com/downloads/2.4.4/zabbix_agents_2.4.4.win ...
- Sqoop-1.4.6安装部署及详细使用介绍
之所以选择Sqoop1是因为Sqoop2目前问题太多.无法正常使用,综合比较后选择Sqoop1. Sqoop1安装配置比较简单 一.安装部署 (1).下载安装包 下载地址:http://archive ...
- ArcGIS Enterprise 10.5.1 静默安装部署记录(Centos 7.2 minimal)- 4、安装 ArcGIS for Server
安装ArcGIS for Server 解压server安装包,tar -xzvf ArcGIS_Server_Linux_1051_156429.tar.gz 切换到arcgis账户静默安装serv ...
- ArcGIS Enterprise 10.5.1 静默安装部署记录(Centos 7.2 minimal)- 3、安装Portal for ArcGIS
安装Portal for ArcGIS 解压portal安装包,tar -xzvf Portal_for_ArcGIS_Linux_1051_156440.tar.gz 切换到arcgis账户静默安装 ...
- ArcGIS Enterprise 10.5.1 静默安装部署记录(Centos 7.2 minimal)- 2、安装WebAdapter
解压webadapter安装包,tar -xzvf Web_Adaptor_Java_Linux_1051_156442.tar.gz 进入下Webadapter目录下静默安装 ./Setup -m ...
- Ranger安装部署
1. 概述 Apache Ranger是大数据领域的一个集中式安全管理框架,目的是通过制定策略(policies)实现对Hadoop组件的集中式安全管理.用户可以通过Ranger实现对集群中数据的安全 ...
- 数据库中间件之mycat安装部署(一)
在学习数据库中间件前,我们先抛出三个问题 1.数据库数据量不大,但并发读写操作很大,应该怎么办? 此时我们首先考虑使用缓存中间件来减轻读压力,如果不能满足则考虑数据库读写分离,此时就会引入新的问题,这 ...
- 2-MySQL DBA笔记-MySQL安装部署和入门
第2章 MySQL安装部署和入门 第1章介绍了MySQL的一些基础知识,本章将为读者介绍MySQL的部署.安装及一些常用命令和参数的设置.2.1 如何选择MySQL版本 在选择MySQL的版本时,要根 ...
随机推荐
- 《JavaScript Dom 编程艺术》读书笔记-第10章
用JS实现动画~内容包括: 1. 动画基础知识 2. 用动画丰富网页的浏览效果 动画就是让元素的位置随时间而不断变化. 位置: //CSSelement{ position:absolute; top ...
- 每天一点Linux系列之—vim
- 【亲测】Asp.net Mvc5 + EF6 code first 方式连接MySQL总结
本文原文地址为:https://www.cnblogs.com/summit7ca/p/5423637.html 原文测试环境为windows 8.1+Vs2013+MySql5.7.12 本人在wi ...
- mysql无法安装,报 The older version of MySQL Installer - Community cannot be removed. Contact your technical support group
解决办法: C:\Users\Administrator>msiexec /i C:\Users\Administrator\Downloads\mysql-installer-web-comm ...
- java后端的知识学习
有良好的计算机基础知识,熟悉计算机网络技术以及常用的设计模式:有扎实的 Java 语言基础,熟悉 Java 多线程编程技术.JVM 虚拟机原理:熟悉J2EE体系架构,熟悉WebService.Spri ...
- linux安装虚拟机ping不通网关,ping不通外网问题解决(nat模式)
1.将网关字段改成自己想要的字段
- Android日常问题整理
1.系统语言切换后Activity布局刷新问题 4.2增加了一个layoutDirection属性,当改变语言设置后,该属性也会成newConfig中的一个mask位.所以ActivityManage ...
- React相关:npm,ES6,
1.NPM: 参考:npm使用入门 npm 学习笔记整理 2.ES6参考:ES6 let命令:ES6新增了let命令,用来声明变量.它的用法类似于var,但是所声明的变量,只在let命令所在的代码块 ...
- compareTo的用法
在java编程中,我们会偶尔遇到字符串大小比较的问题,compareTo()方法很简单就实现这种功能.该方法用于判断一个字符串是否大于.等于还是小于另一个字符串.判断字符串大小的依据是根据它们在字典表 ...
- rm: cannot remove ' xxx': Permission denied
一般出现这个问题的原因是权限被改变了,使用chown 修改即可 可参考:chmod.chgrp.chown详解 linux chmod命令和chown命令