
ssh整合之六管理我们的配置文件
1.我们的ssh搭建已经搭建好了,之前是纯xml方式,而且我们的配置文件,是一个框架一个配置文件。这样的话,配置文件中的内容就会很多,这样以后修改起来也会很麻烦,因 此,我们尝试着把这些配置文件引入进来,进行一个分类管理,这样,再修改的话就会方便很多,对于我们快速查阅配置文件也有好处
2.下面我们对之前的配置文件进行改造,先来看看我们的一个大体上的结构,这里我们的hibernate的核心配置文件,即hibernate.cfg.xml,我们是直接交给了spring进行管理
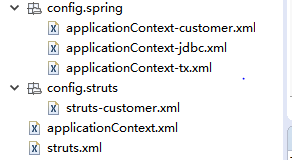
3.这里我们把spring的核心配置文件分开,这样的话,易于维护和查看,最后,我们可以在spring的核心文件中引入其他配置文件即可
config/spring/applicationContext-customer.xml
<?xml version="1.0" encoding="UTF-8"?>

<!-- spring的配置文件:导入约束 -->

<beans xmlns="http://www.springframework.org/schema/beans"

    xmlns:xsi="http://www.w3.org/2001/XMLSchema-instance"

    xmlns:context="http://www.springframework.org/schema/context"

    xmlns:aop="http://www.springframework.org/schema/aop"

    xmlns:tx="http://www.springframework.org/schema/tx"

    xsi:schemaLocation="

        http://www.springframework.org/schema/beans

        http://www.springframework.org/schema/beans/spring-beans.xsd

        http://www.springframework.org/schema/context

        http://www.springframework.org/schema/context/spring-context.xsd

        http://www.springframework.org/schema/aop

        http://www.springframework.org/schema/aop/spring-aop.xsd

        http://www.springframework.org/schema/tx

        http://www.springframework.org/schema/tx/spring-tx.xsd

        ">

    <!-- 自定义的java对象交给spring进行管理 -->

   <bean id="customerAction" scope="prototype" class="com.itheima.action.CustomerAction">

        <property name="customerService" ref="customerService"></property>

   </bean>

   <bean id="customerService" class="com.itheima.service.impl.CustomerServiceImpl">

           <property name="customerDao" ref="customerDao"></property>

   </bean>

   <bean id="customerDao" class="com.itheima.dao.impl.CustomerDaoImpl">

           <property name="hibernateTemplate" ref="hibernateTemplate"></property>

   </bean>

</beans>
config/spring/applicationContext-jdbc.xml
<?xml version="1.0" encoding="UTF-8"?>

<!-- spring的配置文件:导入约束 -->

<beans xmlns="http://www.springframework.org/schema/beans"

    xmlns:xsi="http://www.w3.org/2001/XMLSchema-instance"

    xmlns:context="http://www.springframework.org/schema/context"

    xmlns:aop="http://www.springframework.org/schema/aop"

    xmlns:tx="http://www.springframework.org/schema/tx"

    xsi:schemaLocation="

        http://www.springframework.org/schema/beans

        http://www.springframework.org/schema/beans/spring-beans.xsd

        http://www.springframework.org/schema/context

        http://www.springframework.org/schema/context/spring-context.xsd

        http://www.springframework.org/schema/aop

        http://www.springframework.org/schema/aop/spring-aop.xsd

        http://www.springframework.org/schema/tx

        http://www.springframework.org/schema/tx/spring-tx.xsd

        ">

   <!--  第三方的jar包中的java对象交给spring进行管理 -->

   <!--  创建一个hibernateTemplate对象 -->

   <bean id="hibernateTemplate" class="org.springframework.orm.hibernate5.HibernateTemplate">

         <!-- 注入sessionFactory -->

         <property name="sessionFactory" ref="sessionFactory"></property>

   </bean>

   <bean id="sessionFactory" class="org.springframework.orm.hibernate5.LocalSessionFactoryBean">

           <!-- 配置数据库连接池 -->

           <property name="dataSource" ref="dataSource"></property>

           <!-- hibernate的配置文件 -->

           <property name="hibernateProperties">

               <props>

                   <prop key="hibernate.dialect">org.hibernate.dialect.MySQLDialect</prop>

                   <prop key="hibernate.hbm2ddl.auto">update</prop>

                   <prop key="hibernate.show_sql">true</prop>

                   <prop key="hibernate.format_sql">true</prop>

               </props>

           </property>

           <!-- 映射文件 -->

           <property name="mappingLocations" value="classpath:com/itheima/entity/*.hbm.xml"></property>

   </bean>

   <bean id="dataSource" class="org.springframework.jdbc.datasource.DriverManagerDataSource">

           <property name="driverClassName" value="com.mysql.jdbc.Driver"></property>

           <property name="url" value="jdbc:mysql:///ssh_280"></property>

           <property name="username" value="root"></property>

           <property name="password" value="root"></property>

   </bean>

</beans>
config/spring/applicationContext-tx.xml
<?xml version="1.0" encoding="UTF-8"?>

<!-- spring的配置文件:导入约束 -->

<beans xmlns="http://www.springframework.org/schema/beans"

    xmlns:xsi="http://www.w3.org/2001/XMLSchema-instance"

    xmlns:context="http://www.springframework.org/schema/context"

    xmlns:aop="http://www.springframework.org/schema/aop"

    xmlns:tx="http://www.springframework.org/schema/tx"

    xsi:schemaLocation="

        http://www.springframework.org/schema/beans

        http://www.springframework.org/schema/beans/spring-beans.xsd

        http://www.springframework.org/schema/context

        http://www.springframework.org/schema/context/spring-context.xsd

        http://www.springframework.org/schema/aop

        http://www.springframework.org/schema/aop/spring-aop.xsd

        http://www.springframework.org/schema/tx

        http://www.springframework.org/schema/tx/spring-tx.xsd

        ">

    <!--配置hibernate的事务管理 -->

   <bean id="transactionManager" class="org.springframework.orm.hibernate5.HibernateTransactionManager">

           <property name="sessionFactory" ref="sessionFactory"></property>

   </bean>

   <!-- 配置事务管理通知 -->

   <tx:advice id="txAdvice">

           <tx:attributes>

               <tx:method name="*" propagation="REQUIRED" read-only="false"/>

               <tx:method name="get*" propagation="SUPPORTS" read-only="true"/>

           </tx:attributes>

   </tx:advice>

   <!-- 配置事务的AOP -->

   <aop:config>

           <aop:pointcut expression="execution(* com.itheima.service.impl.*.*(..))" id="pt"/>

           <aop:advisor advice-ref="txAdvice" pointcut-ref="pt"/>

   </aop:config>

</beans>
applicationContext.xml
<?xml version="1.0" encoding="UTF-8"?>

<!-- spring的配置文件:导入约束 -->

<beans xmlns="http://www.springframework.org/schema/beans"

    xmlns:xsi="http://www.w3.org/2001/XMLSchema-instance"

    xmlns:context="http://www.springframework.org/schema/context"

    xmlns:aop="http://www.springframework.org/schema/aop"

    xmlns:tx="http://www.springframework.org/schema/tx"

    xsi:schemaLocation="

        http://www.springframework.org/schema/beans

        http://www.springframework.org/schema/beans/spring-beans.xsd

        http://www.springframework.org/schema/context

        http://www.springframework.org/schema/context/spring-context.xsd

        http://www.springframework.org/schema/aop

        http://www.springframework.org/schema/aop/spring-aop.xsd

        http://www.springframework.org/schema/tx

        http://www.springframework.org/schema/tx/spring-tx.xsd

        ">

      <!--  引入其他的配置文件 -->

      <import resource="classpath:config/spring/applicationContext-customer.xml"/>

      <import resource="classpath:config/spring/applicationContext-jdbc.xml"/>

      <import resource="classpath:config/spring/applicationContext-tx.xml"/>

</beans>
4.我们的struts也分开管理
config/struts/struts-customer.xml
<!DOCTYPE struts PUBLIC

    "-//Apache Software Foundation//DTD Struts Configuration 2.3//EN"

    "http://struts.apache.org/dtds/struts-2.3.dtd">

<struts>

    <package name="customer" extends="struts-default" namespace="/customer">

        <action name="addCustomerUI" class="customerAction" method="addCustomerUI">

            <result name="success">/jsp/customer/add.jsp</result>

        </action>

        <action name="getAllCustomer" class="customerAction" method="getAllCustomer">

            <result name="success">/jsp/customer/list.jsp</result>

        </action>

    </package>

</struts>
struts的狠心配置文件struts.xml
<!DOCTYPE struts PUBLIC

    "-//Apache Software Foundation//DTD Struts Configuration 2.3//EN"

    "http://struts.apache.org/dtds/struts-2.3.dtd">

<struts>

    <constant name="devMode" value="true"></constant>

    <!-- 引入其他的struts的动作类配置文件 -->

    <include file="config/struts/struts-customer.xml"></include>

</struts>
这样的话,我们就把配置文件分门别类了,到时候再修改或查看时就一目了然了!
ssh整合之六管理我们的配置文件的更多相关文章
- 三大框架 之 SSH整合
目录 SSH整合 Spring整合web项目 在Servlet当中直接加载配置文件,获取对象 存在问题 解决方案 SSH整合 引入Jar包 引入配置文件 创建包结构 创建相关类 创建Customer业 ...
- ssh整合hibernate 使用spring管理hibernate二级缓存,配置hibernate4.0以上二级缓存
ssh整合hibernate 使用spring管理hibernate二级缓存,配置hibernate4.0以上二级缓存 hibernate : Hibernate是一个持久层框架,经常访问物理数据库 ...
- 三大框架SSH整合
三大框架SSH整合 -------------------------------Spring整合Hibernate------------------------------- 一.为什么要整合Hi ...
- 【Java EE 学习 67 下】【OA项目练习】【SSH整合JBPM工作流】【JBPM项目实战】
一.SSH整合JBPM JBPM基础见http://www.cnblogs.com/kuangdaoyizhimei/p/4981551.html 现在将要实现SSH和JBPM的整合. 1.添加jar ...
- SSH整合(struts2.3.24+hibernate3.6.10+spring4.3.2+mysql5.5+myeclipse8.5+tomcat6+jdk1.6)
终于开始了ssh的整合,虽然现在比较推崇的是,ssm(springmvc+spring+mybatis)这种框架搭配确实比ssh有吸引力,因为一方面springmvc本身就是遵循spring标准,所以 ...
- SSH整合之spring整合hibernate
SSH整合要导入的jar包: MySQL中创建数据库 create database ssh_db; ssh_db 一.spring整合hibernate带有配置文件hibernate.cfg.xml ...
- 【转载】Ssh整合开发介绍和简单的登入案例实现
Ssh整合开发介绍和简单的登入案例实现 Ssh整合开发介绍和简单的登入案例实现 一 介绍: Ssh是strtus2-2.3.1.2+ spring-2.5.6+hibernate-3.6.8整合的开 ...
- SSH整合,applicationContext.xml中配置hibernate映射文件问题
今天在applicationContext.xml中配置sessionFactory时遇到了各种头疼的问题,现在总结一下: 1.<property name="mappingDirec ...
- SSH整合方案2
[案例3]SSH整合_方案2 ** 案例描述 两个知识点的演示 其一,SSH整合的第二个方案 其二,Spring+JDBC+Struts2 参考代码 31) 使用工程spring4 32 ...
随机推荐
- NYOJ 题目12喷水装置(二)
#include<iostream> #include<algorithm> #include<cmath> using namespace std; struct ...
- 深度剖析PHP序列化和反序列化
序列化 序列化格式 在PHP中,序列化用于存储或传递 PHP 的值的过程中,同时不丢失其类型和结构. 序列化函数原型如下: string serialize ( mixed $value ) 先看下面 ...
- 学习ASP.NET Core Razor 编程系列二——添加一个实体
在Razor页面应用程序中添加一个实体 在本篇文章中,学习添加用于管理数据库中的书籍的实体类.通过实体框架(EF Core)使用这些类来处理数据库.EF Core是一个对象关系映射(ORM)框架,它简 ...
- C语言第一次博客作业
一,PTA实验作业 题目1.温度转换 本题要求编写程序,计算华氏温度150°F对应的摄氏温度.计算公式:C=5×(F−32)/9,式中:C表示摄氏温度,F表示华氏温度,输出数据要求为整型. 1.实验代 ...
- 9.FileWriter 和 BufferWriter
FileWriter 和 BufferWriter的使用场景 http://www.cnblogs.com/xjyh/p/4529809.html
- webpack4新特性介绍
导语: webpack是一个JS应用打包器, 它将应用中的各个模块打成一个或者多个bundle文件.借助loaders和plugins,它可以改变.压缩和优化各种各样的文件.它的输入是不同的资源,比如 ...
- Ajax与服务器(JSON)通信介绍
本文主要介绍使用Ajax与服务器(JSON)通信方法,谈谈Ajax提供的两类服务器通信手段:同步通信和异步通信.有需要的可以了解一下.毕竟这个时代出了很多东西,自动化构建工具,mvvm框架等等.Jav ...
- wipefs进程
wipefs进程是啥,占用了百分之90多的cpu wipefs进程是啥,占用了百分之90多的cpu,把这个进程干掉了,过了一天又自动启动了,很多朋友应该遇到过类似的问题. wipefs是linux自带 ...
- 实现Windows程序的更新
实现Windows程序的更新 一.使用枚举避免不合理的赋值 1.使用枚举的好处: 使用常量类中Student类中加入一个特别属性,StudentGender,而且这个属性只能接受两个有效值," ...
- Hook 无侵入式埋点(页面统计)
一.技术原理 Method-Swizzling 黑魔法 方法交换(不懂的可以查) 二.页面统计 某盟页面统计SDK需要开发者在APP基类里实现ViewDidAppear和viewDidDisappea ...