Qt与FFmpeg联合开发指南(三)——编码(1):代码流程演示
前两讲演示了基本的解码流程和简单功能封装,今天我们开始学习编码。编码就是封装音视频流的过程,在整个编码教程中,我会首先在一个函数中演示完成的编码流程,再解释其中存在的问题。下一讲我们会将编码功能进行封装并解释针对不同的输出环境代码上需要注意的地方。最后我们还会把之前做好的解码器添加进开发环境,实现PC屏幕和摄像头录制然后再通过播放器播放。
首先说明一下本章的目标:
- 通过Qt进行视频采集
- 通过Qt进行音频采集
- 对音视频编码成mp4文件并能够通过vlc播放
一、通过Qt进行视频采集
Qt提供了对桌面录屏的支持,我们可以很轻松的完成开发
// 首先获取到完整桌面的窗口句柄已经宽高信息

WId wid = QApplication::desktop()->winId();

int width = QApplication::desktop()->width();

int height = QApplication::desktop()->height();

// 截屏获得图片

static QScreen *screen = NULL;

if (!screen) {

    screen = QGuiApplication::primaryScreen();

}

QPixmap pix = screen->grabWindow(wid);

const uchar *rgb = pix.toImage().bits();
这里有一点需要特别注意,当我们把上面的代码封装进函数以后,我们无法直接通过返回值获取到rgb数据。这个地方曾经卡了我好几天,原因在于经过grabWindow(wid)函数获取到的QPixmap对象是属于函数的局部变量,在函数结束以后这个该变量包括bits()包含的数据都会被清理掉。所以如果我们想在函数外部继续使用图片数据就必须对QImage进行一次深拷贝。我提供两条思路,一是直接将QImage对象进行深拷贝,然后使用它的bits()数据。但是这样的话如果我们只在外部析构bits()中的数据其实对内存的清理工作并不完整。另一个方法是我们直接对bits()里的数据进行拷贝,但是由于QImage对图片的保存数据并非是连续的寻址空间所以我们需要做一次转换。为了方便起见我们先按照第一种思路设计。
const uchar* VideoAcquisition::getRGB()

{

    static QScreen *screen = NULL;

    if (!screen) {

        screen = QGuiApplication::primaryScreen();

    }

        WId wid = QApplication::desktop()->winId();

    int width = QApplication::desktop()->width();

    int height = QApplication::desktop()->height();

    QPixmap pix = screen->grabWindow(wid);

    QImage *image = new QImage(pix.toImage().copy(, , width, height));

    return image->bits();

}
二、通过Qt进行音频采集
与视频采集的图片不同,音频数据对应的是一段时间的录音。虽然Qt也提供了统一的音频录制接口,不过我们首先需要对录音设备进行初始化。主要是设置录音的参数和控制每次从音频缓存中读取的数据大小。这里我们以CD音质为标准,即采样率:44100Hz,通道数:2,采样位数:16bit,编码格式:audio/pcm。
首先初始化一个录音设备:QIODevice
QAudioFormat fmt;

fmt.setSampleRate();

fmt.setChannelCount();

fmt.setSampleSize(); // 采样大小 = 采样位数 * 8

fmt.setSampleType(QAudioFormat::UnSignedInt);

fmt.setByteOrder(QAudioFormat::LittleEndian);

fmt.setCodec("audio/pcm");

QAudioInput *audioInput = new QAudioInput(fmt);

QIODevice *device = audioInput->start();
假设我们每次从音频缓存中读取1024个采样点的数据,已知采样的其它条件为双通道和每个采样点两位。则我们用于保存数据的数组大小为:char *pcm = new char[1024 * 2 * 2]
const char* AudioAcquisition::getPCM()

{

    int readOnceSize = ; // 每次从音频设备中读取的数据大小

    int offset = ; // 当前已经读到的数据大小,作为pcm的偏移量

    int pcmSize =  *  * ;

    char *pcm = new char[pcmSize];

    while (audioInput) {

        int remains = pcmSize - offset; // 剩余空间

        int ready = audioInput->bytesReady(); // 音频采集设备目前已经准备好的数据大小

        if (ready < readOnceSize) { // 当前音频设备中的数据不足

            QThread::msleep();

            continue;

        }

        if (remains < readOnceSize) { // 当帧存储(pcmSize)的剩余空间(remainSize)小于单次读取数据预设(readSizeOnce)时

            device->read(pcm + offset, remains); // 从设备中读取剩余空间大小的数据

            // 读满一帧数据退出

            break;

        }

        int len = device->read(pcm + offset, readOnceSize);

        offset += len;

    }

    return pcm;

}
完成了音视频采集工作以后,接下来是本章的重点——编码——也就是调用FFmpeg库的过程。
三、对音视频编码成mp4文件
(1)初始化FFmpeg
av_register_all();

avcodec_register_all();

avformat_network_init();
(2)设置三个参数分别用于保存错误代码、错误信息和输出文件路径
int errnum = ;

char errbuf[] = {  };

char *filename = "D:/test.mp4";

// 视频采集对象

VideoAcquisition *va = new VideoAcquisition();

// 音频采集对象

AudioAcquisition *aa = new AudioAcquisition();
(3)创建输出的包装器
AVFormatContext *pFormatCtx = NULL;

errnum = avformat_alloc_output_context2(&pFormatCtx, NULL, NULL, filename);

if (errnum < ) {

    av_strerror(errnum, errbuf, sizeof(errbuf));

}
(4)创建这对h264的编码器和编码器上下文,并向编码器上下文中配置参数
// h264视频编码器

const AVCodec *vcodec = avcodec_find_encoder(AVCodecID::AV_CODEC_ID_H264);

if (!vcodec) {

    cout << "avcodec_find_encoder failed!" << endl;

}

// 创建编码器上下文

AVCodecContext *pVideoCodecCtx = avcodec_alloc_context3(vcodec);

if (!pVideoCodecCtx) {

    cout << "avcodec_alloc_context3 failed!" << endl;

}

// 比特率、宽度、高度

pVideoCodecCtx->bit_rate = ;

pVideoCodecCtx->width = va->getWidth(); // 视频宽度

pVideoCodecCtx->height = va->getHeight(); // 视频高度

// 时间基数、帧率

pVideoCodecCtx->time_base = { ,  };

pVideoCodecCtx->framerate = { ,  };

// 关键帧间隔

pVideoCodecCtx->gop_size = ;

// 不使用b帧

pVideoCodecCtx->max_b_frames = ;

// 帧、编码格式

pVideoCodecCtx->pix_fmt = AVPixelFormat::AV_PIX_FMT_YUV420P;

pVideoCodecCtx->codec_id = AVCodecID::AV_CODEC_ID_H264;

// 预设:快速

av_opt_set(pVideoCodecCtx->priv_data, "preset", "superfast", );

// 全局头

pVideoCodecCtx->flags |= AV_CODEC_FLAG_GLOBAL_HEADER;
(5)开启编码器
errnum = avcodec_open2(pVideoCodecCtx, vcodec, NULL);

if (errnum < ) {

    cout << "avcodec_open2 failed!" << endl;

}
(6)为封装器创建视频流
// 为封装器创建视频流

AVStream *pVideoStream = avformat_new_stream(pFormatCtx, NULL);

if (!pVideoStream) {

    cout << "avformat_new_stream video stream failed!" << endl;

}

pVideoStream->codec->codec_tag = ;

pVideoStream->codecpar->codec_tag = ;

// 配置视频流的编码参数

avcodec_parameters_from_context(pVideoStream->codecpar, pVideoCodecCtx);
(7)创建从RGB格式到YUV420格式的转码器
SwsContext *pSwsCtx = sws_getContext(

    va->getWidth(), va->getHeight(), AVPixelFormat::AV_PIX_FMT_BGRA, // 输入

    va->getWidth(), va->getHeight(), AVPixelFormat::AV_PIX_FMT_YUV420P, // 输出

    SWS_BICUBIC, // 算法

    , , );

if (!pSwsCtx) {

    cout << "sws_getContext failed" << endl;

}
(8)初始化一个视频帧的对象并分配空间
// 编码阶段的视频帧结构

AVFrame *vframe = av_frame_alloc();

vframe->format = AVPixelFormat::AV_PIX_FMT_YUV420P;

vframe->width = va->getWidth();

vframe->height = va->getHeight();

vframe->pts = ;

// 为视频帧分配空间

errnum = av_frame_get_buffer(vframe, );

if (errnum < ) {

    cout << "av_frame_get_buffer failed" << endl;

}
以上8个步骤是对视频部分的代码演示,下面是音频部分。基本的操作过程和视频一致。
(9)创建aac的音频编码器和编码器上下文
// 创建音频编码器,指定类型为AAC

const AVCodec *acodec = avcodec_find_encoder(AVCodecID::AV_CODEC_ID_AAC);

if (!acodec) {

    cout << "avcodec_find_encoder failed!" << endl;

}

// 根据编码器创建编码器上下文

AVCodecContext *pAudioCodecCtx = avcodec_alloc_context3(acodec);

if (!pAudioCodecCtx) {

    cout << "avcodec_alloc_context3 failed!" << endl;

}

// 比特率、采样率、采样类型、音频通道、文件格式

pAudioCodecCtx->bit_rate = ;

pAudioCodecCtx->sample_rate = ;

pAudioCodecCtx->sample_fmt = AVSampleFormat::AV_SAMPLE_FMT_FLTP;

pAudioCodecCtx->channels = ;

pAudioCodecCtx->channel_layout = av_get_default_channel_layout(); // 根据音频通道数自动选择输出类型(默认为立体声)

pAudioCodecCtx->flags |= AV_CODEC_FLAG_GLOBAL_HEADER;
(10)开启编码器
// 打开编码器

errnum = avcodec_open2(pAudioCodecCtx, acodec, NULL);

if (errnum < ) {

    avcodec_free_context(&pAudioCodecCtx);

    cout << "avcodec_open2 failed" << endl;

}
(11)向封装器添加音频流
// 添加音频流

AVStream *pAudioStream = avformat_new_stream(pFormatCtx, NULL);

if (!pAudioStream) {

    cout << "avformat_new_stream failed" << endl;

    return -;

}

pAudioStream->codec->codec_tag = ;

pAudioStream->codecpar->codec_tag = ;

// 配置音频流的编码器参数

avcodec_parameters_from_context(pAudioStream->codecpar, pAudioCodecCtx);
(12)创建从FLTP到S16的音频重采样上下文
SwrContext *swrCtx = NULL;

swrCtx = swr_alloc_set_opts(swrCtx,

    av_get_default_channel_layout(), AVSampleFormat::AV_SAMPLE_FMT_FLTP, , // 输出

    av_get_default_channel_layout(), AVSampleFormat::AV_SAMPLE_FMT_S16, , // 输入

    , );

errnum = swr_init(swrCtx);

if (errnum < ) {

    cout << "swr_init failed" << endl;

}
(13)初始化音频帧的结构
// 创建音频帧

AVFrame *aframe = av_frame_alloc();

aframe->format = AVSampleFormat::AV_SAMPLE_FMT_FLTP;

aframe->channels = ;

aframe->channel_layout = av_get_default_channel_layout();

aframe->nb_samples = ;

// 为音频帧分配空间

errnum = av_frame_get_buffer(aframe, );

if (errnum < ) {

    cout << "av_frame_get_buffer failed" << endl;

}
音频部分的代码演示完成。下面是开启输出流,并循环进行音视频采集编码。
(14)打开输出的IO
// 打开输出流IO

errnum = avio_open(&pFormatCtx->pb, filename, AVIO_FLAG_WRITE); // 打开AVIO流

if (errnum < ) {

    avio_close(pFormatCtx->pb);

    cout << "avio_open failed" << endl;

}
(15)写头文件
// 写文件头

errnum = avformat_write_header(pFormatCtx, NULL);

if (errnum < ) {

    cout << "avformat_write_header failed" << endl;

}
(16)编码并将数据写入文件,由于我们还没有设计出控制功能,暂且只编码200帧视频帧。按25帧/秒计算,应该生成长度为8秒视频文件。可由于缓存的缘故,最后往往会丢几帧数据。因此实际长度不足8秒。
int vpts = ;

int apts = ;

while (vpts < ) {

    // 视频编码

    const uchar *rgb = va->getRGB();

    // 固定写法:配置1帧原始视频画面的数据结构通常为RGBA的形式

    uint8_t *srcSlice[AV_NUM_DATA_POINTERS] = {  };

    srcSlice[] = (uint8_t *)rgb;

    int srcStride[AV_NUM_DATA_POINTERS] = {  };

    srcStride[] = va->getWidth() * ;

    // 转换

    int h = sws_scale(pSwsCtx, srcSlice, srcStride, , va->getHeight(), vframe->data, vframe->linesize);

    if (h < ) {

        cout << "sws_scale failed" << endl;

        break;

    }

    // pts递增

    vframe->pts = vpts++;

    errnum = avcodec_send_frame(pVideoCodecCtx, vframe);

    if (errnum < ) {

        cout << "avcodec_send_frame failed" << endl;

        continue;

    }

    // 视频编码报文

    AVPacket *vpkt = av_packet_alloc();

    errnum = avcodec_receive_packet(pVideoCodecCtx, vpkt);

    if (errnum <  || vpkt->size <= ) {

        av_packet_free(&vpkt);

        cout << "avcodec_receive_packet failed" << endl;

        continue;

    }

    // 转换pts

    av_packet_rescale_ts(vpkt, pVideoCodecCtx->time_base, pVideoStream->time_base);

    vpkt->stream_index = pVideoStream->index;

    // 向封装器中写入压缩报文,该函数会自动释放pkt空间,不需要调用者手动释放

    errnum = av_interleaved_write_frame(pFormatCtx, vpkt);

    if (errnum < ) {

        av_strerror(errnum, errbuf, sizeof(errbuf));

        cout << errbuf << endl;

        cout << "av_interleaved_write_frame failed" << endl;

        continue;

    }

    // 析构图像数据:注意这里只析构了图片的数据,实际的QImage对象还在内存中

    delete rgb;

    // 音频编码

    // 固定写法:配置一帧音频的数据结构

    const char *pcm = aa->getPCM();

    if (!pcm) {

        continue;

    }

    const uint8_t *in[AV_NUM_DATA_POINTERS] = {  };

    in[] = (uint8_t *)pcm;

    // 音频重采样

    int len = swr_convert(swrCtx,

        aframe->data, aframe->nb_samples, // 输出

        in, aframe->nb_samples); // 输入

    if (len < ) {

        cout << "swr_convert failed" << endl;

        continue;

    }

    // 音频编码

    errnum = avcodec_send_frame(pAudioCodecCtx, aframe);

    if (errnum < ) {

        cout << "avcodec_send_frame failed" << endl;

        continue;

    }

    // 音频编码报文

    AVPacket *apkt = av_packet_alloc();

    errnum = avcodec_receive_packet(pAudioCodecCtx, apkt);

    if (errnum < ) {

        av_packet_free(&apkt);

        cout << "avcodec_receive_packet failed" << endl;

        continue;

    }

    apkt->stream_index = pAudioStream->index;

    apkt->pts = apts;

    apkt->dts = apts;

    apts += av_rescale_q(aframe->nb_samples, { , pAudioCodecCtx->sample_rate }, pAudioCodecCtx->time_base);

    // 写音频帧

    errnum = av_interleaved_write_frame(pFormatCtx, apkt);

    if (errnum < ) {

        av_strerror(errnum, errbuf, sizeof(errbuf));

        cout << errbuf << endl;

        cout << "av_interleaved_write_frame failed" << endl;

        continue;

    }

    delete pcm;

}
(17)写入文件尾和关闭IO
// 写入文件尾

errnum = av_write_trailer(pFormatCtx);

if (errnum != ) {

    cout << "av_write_trailer failed" << endl;

}

errnum = avio_closep(&pFormatCtx->pb); // 关闭AVIO流

if (errnum != ) {

    cout << "avio_close failed" << endl;

}
(18)清理
if (pFormatCtx) {

    avformat_close_input(&pFormatCtx); // 关闭封装上下文

}

// 关闭编码器和清理上下文的所有空间

if (pVideoCodecCtx) {

    avcodec_close(pVideoCodecCtx);

    avcodec_free_context(&pVideoCodecCtx);

}

if (pAudioCodecCtx) {

    avcodec_close(pAudioCodecCtx);

    avcodec_free_context(&pAudioCodecCtx);

}

// 音视频转换上下文

if (pSwsCtx) {

    sws_freeContext(pSwsCtx);

    pSwsCtx = NULL;

}

if (swrCtx) {

    swr_free(&swrCtx);

}

// 清理音视频帧

if (vframe) {

    av_frame_free(&vframe);

}

if (aframe) {

    av_frame_free(&aframe);

}
四、遗留问题
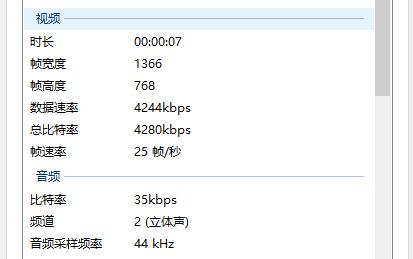
运行代码我们可以在设置的盘符下找到生成的mp4文件。查看文件属性,我们可以看到音视频数据都与我们之前的设置完全一致。也可以被播放器正常播放。
但是我们发现,音视频并不同步。另外就是视频采集的时候,QImage也没有被正确析构。我们将在下一章提供解决方案。
项目源码地址:
https://gitee.com/learnhow/ffmpeg_studio/blob/master/_64bit/src/screen_vcr_v12/demo.cpp
Qt与FFmpeg联合开发指南(三)——编码(1):代码流程演示的更多相关文章
- Qt与FFmpeg联合开发指南(四)——编码(2):完善功能和基础封装
上一章我用一个demo函数演示了基于Qt的音视频采集到编码的完整流程,最后经过测试我们也发现了代码中存在的问题.本章我们就先处理几个遗留问题,再对代码进行完善,最后把编码功能做基础封装. 一.遗留问题 ...
- Qt与FFmpeg联合开发指南(二)——解码(2):封装和界面设计
与解码相关的主要代码在上一篇博客中已经做了介绍,本篇我们会先讨论一下如何控制解码速度再提供一个我个人的封装思路.最后回归到界面设计环节重点看一下如何保证播放器界面在缩放和拖动的过程中保证视频画面的宽高 ...
- Qt与FFmpeg联合开发指南(一)——解码(1):功能实现
前言:对于从未接触过音视频编解码的同学来说,使用FFmpeg的学习曲线恐怕略显陡峭.本人由于工作需要,正好需要在项目中使用.因此特地将开发过程总结下来.只当提供给有兴趣的同学参考和学习. 由于FFmp ...
- ReadHub项目Kotlin版开发指南(三、MVP架构)
ReadHub项目Kotlin版转换指南(一.环境搭建) ReadHub项目Kotlin版转换指南(二.数据库和网络请求) ReadHub项目Kotlin版转换指南(三.MVP架构) Android ...
- axis1,xfire,jUnit 测试案列+开Web Service开发指南+axis1.jar下载 代码
axis1,xfire,jUnit 测试案列+Web Service开发指南(中).pdf+axis1.jar下载 代码 项目和资源文档+jar 下载:http://download.csdn. ...
- nodejs 开发指南 书中小项目 代码
最近 在学习node.js 先看了下语法 ,然后就看这个开发指南感觉书还是很有用,但是代码太旧了,网上也没有最新的,所以就自己查着前人的痕迹和自己修改,现在可以跑了. https://github.c ...
- kotlin 语言入门指南(三)--编码习惯
这章主要讲当前 kotlin 的一些编码习惯. 命名 如无疑问,kotlin 的命名风格与以下的java风格一样: --驼峰命名法(不要使用下划线) --类名首字母大写 --方法和属性名首字母小写 - ...
- Qt版本中国象棋开发(三)
实现功能:棋子初始化及走棋规则 棋子类: #ifndef STONE_H #define STONE_H #include <QString> class Stone { public: ...
- 基于GBT28181:SIP协议组件开发-----------第三篇SIP注册流程分析实现
原创文章,引用请保证原文完整性,尊重作者劳动,原文地址http://www.cnblogs.com/qq1269122125/p/3941172.html,qq:1269122125. 上两章节简要的 ...
随机推荐
- UNIX网络编程——僵尸进程
在fork()/exec()过程中,假设子进程结束时父进程仍存在,而父进程fork()之前既没安装SIGCHLD信号处理函数调用waitpid()等待子进程结束,又没有显式忽略该信号,则子进 ...
- Socket编程实践(13) --UNIX域协议
UNIX域协议 UNIX域套接字与TCP相比, 在同一台主机上, UNIX域套接字更有效率, 几乎是TCP的两倍(由于UNIX域套接字不需要经过网络协议栈,不需要打包/拆包,计算校验和,维护序号和应答 ...
- Cocos2D:塔防游戏制作之旅(十六)
编译运行你的app,放置一些炮塔在你的地图上吧!你将看到炮塔在敌人移动如攻击范围时如何立即开始攻击,并且敌人的血条将随着攻击不断减少知道它们被人道毁灭!胜利即将来临了! 哦!Okay,这里只有少数细节 ...
- 【Android 多媒体开发】 MediaPlayer 网络视频播放器
作者 : 万境绝尘 (octopus_truth@163.com) 转载请著名出处 : http://blog.csdn.net/shulianghan/article/details/3889514 ...
- 使用go reflect实现一套简易的rpc框架
go jsonrpc 在实际项目中,我们经常会碰到服务之间交互的情况,如何方便的与远端服务进行交互,就是一个需要我们考虑的问题. 通常,我们可以采用restful的编程方式,各个服务提供相应的web接 ...
- numpy教程:统计函数Statistics
http://blog.csdn.net/pipisorry/article/details/48770785 , , ] , '\n') 输出: True 当然可以设置度参数bias : int, ...
- OJ题:字符串最后一个单词的长度
题目描述 计算字符串最后一个单词的长度,单词以空格隔开. 输入描述: 一行字符串,非空,长度小于5000. 输出描述: 整数N,最后一个单词的长度. 输入例子: hello world 输出例子: 5 ...
- [信号处理技术]关于EMD的产生
通俗易懂,有助于理解EMD和HHT,就原封不动的搬过来了. 原文链接:关于EMD的产生 自傅里叶变换与频谱分析技术产生,人们得以从另外一个角度观察时域信号,信号里各个点的密集程度,得以确定性地度量.之 ...
- SpriteBuilder中CCMotionStreak坐标类型不匹配
在SpriteBuilder需要被跟随的(或是说被拖尾的)节点坐标类型是父百分比,先是将CCMotionStreak本身位置设置为百分比类型,但是无效. 将节点坐标改为正常点类型后,MotionStr ...
- 中国梦 每个农大人的梦
历经百年风霜,苦经岁月沧桑.农大,一个中原沃土上生长起来的大树,它在用它那不倒的生命力展示着农大的顽强与坚持,而这份苍劲和顽强,却来自于每个农大人,来自于他们的梦想,来自于他们的坚持,来自于他们的努力 ...