
Spring WebSocket实现消息推送
第一步: 添加Spring WebSocket的依赖jar包
(注:这里使用maven方式添加 手动添加的同学请自行下载相应jar包放到lib目录)
        <!-- 使用spring websocket依赖的jar包 -->

        <dependency>

            <groupId>org.springframework</groupId>

            <artifactId>spring-websocket</artifactId>

            <version>${spring.version}</version>

        </dependency>

        <dependency>

            <groupId>org.springframework</groupId>

            <artifactId>spring-messaging</artifactId>

            <version>${spring.version}</version>

        </dependency>
第二步:建立一个类实现WebSocketConfigurer接口
package com.quicksand.push;

import org.springframework.context.annotation.Bean;

import org.springframework.context.annotation.Configuration;

import org.springframework.web.servlet.config.annotation.EnableWebMvc;

import org.springframework.web.servlet.config.annotation.WebMvcConfigurerAdapter;

import org.springframework.web.socket.config.annotation.EnableWebSocket;

import org.springframework.web.socket.config.annotation.WebSocketConfigurer;

import org.springframework.web.socket.config.annotation.WebSocketHandlerRegistry;

import org.springframework.web.socket.handler.TextWebSocketHandler;

@Configuration

@EnableWebMvc

@EnableWebSocket

public class SpringWebSocketConfig extends WebMvcConfigurerAdapter implements WebSocketConfigurer {

    public void registerWebSocketHandlers(WebSocketHandlerRegistry registry) {

        registry.addHandler(webSocketHandler(),"/websocket/socketServer.do").addInterceptors(new SpringWebSocketHandlerInterceptor());

        registry.addHandler(webSocketHandler(), "/sockjs/socketServer.do").addInterceptors(new SpringWebSocketHandlerInterceptor()).withSockJS();

    }

    @Bean

    public TextWebSocketHandler webSocketHandler(){

        return new SpringWebSocketHandler();

    }

}
第三步:继承WebSocketHandler对象。该对象提供了客户端连接,关闭,错误,发送等方法,重写这几个方法即可实现自定义业务逻辑
package com.quicksand.push;

import java.io.IOException;

import java.util.ArrayList;

import org.apache.log4j.Logger;

import org.springframework.web.socket.CloseStatus;

import org.springframework.web.socket.TextMessage;

import org.springframework.web.socket.WebSocketSession;

import org.springframework.web.socket.handler.TextWebSocketHandler;

public class SpringWebSocketHandler extends TextWebSocketHandler {

    private static final ArrayList<WebSocketSession> users;//这个会出现性能问题,最好用Map来存储,key用userid

    private static Logger logger = Logger.getLogger(SpringWebSocketHandler.class);

    static {

        users = new ArrayList<WebSocketSession>();

    }

    public SpringWebSocketHandler() {

        // TODO Auto-generated constructor stub

    }

    /**

     * 连接成功时候,会触发页面上onopen方法

     */

    public void afterConnectionEstablished(WebSocketSession session) throws Exception {

        // TODO Auto-generated method stub

        System.out.println("connect to the websocket success......当前数量:"+users.size());

        users.add(session);

        //这块会实现自己业务,比如,当用户登录后,会把离线消息推送给用户

        //TextMessage returnMessage = new TextMessage("你将收到的离线");

        //session.sendMessage(returnMessage);

    }

    /**

     * 关闭连接时触发

     */

    public void afterConnectionClosed(WebSocketSession session, CloseStatus closeStatus) throws Exception {

        logger.debug("websocket connection closed......");

        String username= (String) session.getAttributes().get("WEBSOCKET_USERNAME");

        System.out.println("用户"+username+"已退出!");

        users.remove(session);

        System.out.println("剩余在线用户"+users.size());

    }

    /**

     * js调用websocket.send时候,会调用该方法

     */

    @Override

    protected void handleTextMessage(WebSocketSession session, TextMessage message) throws Exception {

        super.handleTextMessage(session, message);

    }

    public void handleTransportError(WebSocketSession session, Throwable exception) throws Exception {

        if(session.isOpen()){session.close();}

        logger.debug("websocket connection closed......");

        users.remove(session);

    }

    public boolean supportsPartialMessages() {

        return false;

    }

    /**

     * 给某个用户发送消息

     *

     * @param userName

     * @param message

     */

    public void sendMessageToUser(String userName, TextMessage message) {

        for (WebSocketSession user : users) {

            if (user.getAttributes().get("WEBSOCKET_USERNAME").equals(userName)) {

                try {

                    if (user.isOpen()) {

                        user.sendMessage(message);

                    }

                } catch (IOException e) {

                    e.printStackTrace();

                }

                break;

            }

        }

    }

    /**

     * 给所有在线用户发送消息

     *

     * @param message

     */

    public void sendMessageToUsers(TextMessage message) {

        for (WebSocketSession user : users) {

            try {

                if (user.isOpen()) {

                    user.sendMessage(message);

                }

            } catch (IOException e) {

                e.printStackTrace();

            }

        }

    }

}
第四步:继承HttpSessionHandshakeInterceptor对象。该对象作为页面连接websocket服务的拦截器,代码如下:
package com.quicksand.push;

import java.util.Map;

import javax.servlet.http.HttpSession;

import org.springframework.http.server.ServerHttpRequest;

import org.springframework.http.server.ServerHttpResponse;

import org.springframework.http.server.ServletServerHttpRequest;

import org.springframework.web.socket.WebSocketHandler;

import org.springframework.web.socket.server.support.HttpSessionHandshakeInterceptor;

/**

 * WebSocket拦截器

 * @author WANG

 *

 */

public class SpringWebSocketHandlerInterceptor extends HttpSessionHandshakeInterceptor {

    @Override

    public boolean beforeHandshake(ServerHttpRequest request, ServerHttpResponse response, WebSocketHandler wsHandler,

            Map<String, Object> attributes) throws Exception {

        // TODO Auto-generated method stub

        System.out.println("Before Handshake");

        if (request instanceof ServletServerHttpRequest) {

            ServletServerHttpRequest servletRequest = (ServletServerHttpRequest) request;

            HttpSession session = servletRequest.getServletRequest().getSession(false);

            if (session != null) {

                //使用userName区分WebSocketHandler,以便定向发送消息

                String userName = (String) session.getAttribute("SESSION_USERNAME");

                if (userName==null) {

                    userName="default-system";

                }

                attributes.put("WEBSOCKET_USERNAME",userName);

            }

        }

        return super.beforeHandshake(request, response, wsHandler, attributes);

    }

    @Override

    public void afterHandshake(ServerHttpRequest request, ServerHttpResponse response, WebSocketHandler wsHandler,

            Exception ex) {

        // TODO Auto-generated method stub

        super.afterHandshake(request, response, wsHandler, ex);

    }

}
第5步 让SpringWebSocketConfig配置类随spring容器启动 spring文件中加入如下代码:
<!-- websocket相关扫描,主要扫描:WebSocketConfig  如果前面配置能扫描到此类则可以不加 -->

<context:component-scan base-package="com.quicksand.push"/>
-------------------------------------------------------------------------到这里就算完成啦 下面准备测试-------------------------------------------------------------
1.定义一个控制器用来做连接标识和发送消息
package com.quicksand.controller;

import javax.servlet.http.HttpServletRequest;

import javax.servlet.http.HttpServletResponse;

import javax.servlet.http.HttpSession;

import org.springframework.context.annotation.Bean;

import org.springframework.stereotype.Controller;

import org.springframework.web.bind.annotation.RequestMapping;

import org.springframework.web.bind.annotation.ResponseBody;

import org.springframework.web.servlet.ModelAndView;

import org.springframework.web.socket.TextMessage;

import com.quicksand.push.SpringWebSocketHandler;

@Controller

public class WebsocketController {

    @Bean//这个注解会从Spring容器拿出Bean

    public SpringWebSocketHandler infoHandler() {

        return new SpringWebSocketHandler();

    }

    @RequestMapping("/websocket/login")

    public ModelAndView login(HttpServletRequest request, HttpServletResponse response) throws Exception {

        String username = request.getParameter("username");

        System.out.println(username+"登录");

        HttpSession session = request.getSession(false);

        session.setAttribute("SESSION_USERNAME", username);

        //response.sendRedirect("/quicksand/jsp/websocket.jsp");

        return new ModelAndView("websocket");

    }

    @RequestMapping("/websocket/send")

    @ResponseBody

    public String send(HttpServletRequest request) {

        String username = request.getParameter("username");

        infoHandler().sendMessageToUser(username, new TextMessage("你好,测试!!!!"));

        return null;

    }

}
2.建立登录页面
<%@ page language="java" contentType="text/html; charset=utf-8"

    pageEncoding="utf-8"%>

<!DOCTYPE html PUBLIC "-//W3C//DTD HTML 4.01 Transitional//EN" "http://www.w3.org/TR/html4/loose.dtd">

<html>

<body>

<h2>Hello World!</h2>

<body>

    <!-- ship是我的项目名-->

    <form action="websocket/login.do">

        登录名:<input type="text" name="username"/>

        <input type="submit" value="登录"/>

    </form>

</body>

</body>

</html>
3.建立发消息页面
<%@ page language="java" contentType="text/html; charset=utf-8"

    pageEncoding="utf-8"%>

<!DOCTYPE html PUBLIC "-//W3C//DTD HTML 4.01 Transitional//EN" "http://www.w3.org/TR/html4/loose.dtd">

<html>

<head>

<meta http-equiv="Content-Type" content="text/html; charset=utf-8">

<title>Insert title here</title>

</head>

<body>

<script type="text/javascript" src="http://cdn.bootcss.com/jquery/3.1.0/jquery.min.js"></script>

<script type="text/javascript" src="http://cdn.bootcss.com/sockjs-client/1.1.1/sockjs.js"></script>

<script type="text/javascript">

    var websocket = null;

    if ('WebSocket' in window) {

        websocket = new WebSocket("ws://localhost:8080/quicksand/websocket/socketServer.do");

    }

    else if ('MozWebSocket' in window) {

        websocket = new MozWebSocket("ws://localhost:8080/quicksand/websocket/socketServer.do");

    }

    else {

        websocket = new SockJS("http://localhost:8080/quicksand/sockjs/socketServer.do");

    }

    websocket.onopen = onOpen;

    websocket.onmessage = onMessage;

    websocket.onerror = onError;

    websocket.onclose = onClose;

    function onOpen(openEvt) {

        //alert(openEvt.Data);

    }

    function onMessage(evt) {

        alert(evt.data);

    }

    function onError() {}

    function onClose() {}

    function doSend() {

        if (websocket.readyState == websocket.OPEN) {

            var msg = document.getElementById("inputMsg").value;

            websocket.send(msg);//调用后台handleTextMessage方法

            alert("发送成功!");

        } else {

            alert("连接失败!");

        }

    }
window.close=function()
{
websocket.onclose();
}
</script>

请输入:<textarea rows="5" cols="10" id="inputMsg" name="inputMsg"></textarea>

<button onclick="doSend();">发送</button>

</body>

</html>
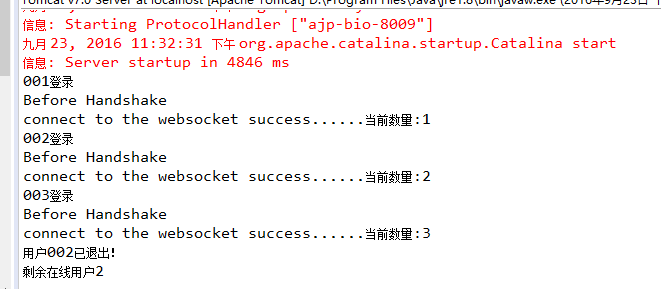
测试结果如下图:
文章参考:http://www.myexception.cn/web/1775480.html
Spring WebSocket实现消息推送的更多相关文章
- WebSocket 学习教程(二):Spring websocket实现消息推送
=============================================== 环境介绍: Jdk 1.7 (1.6不支持) Tomcat7.0.52 (支持Websocket协议) ...
- 在Spring Boot框架下使用WebSocket实现消息推送
Spring Boot的学习持续进行中.前面两篇博客我们介绍了如何使用Spring Boot容器搭建Web项目(使用Spring Boot开发Web项目)以及怎样为我们的Project添加HTTPS的 ...
- WebSocket与消息推送
B/S结构的软件项目中有时客户端需要实时的获得服务器消息,但默认HTTP协议只支持请求响应模式,这样做可以简化Web服务器,减少服务器的负担,加快响应速度,因为服务器不需要与客户端长时间建立一个通信链 ...
- HTML5 学习总结(五)——WebSocket与消息推送
B/S结构的软件项目中有时客户端需要实时的获得服务器消息,但默认HTTP协议只支持请求响应模式,这样做可以简化Web服务器,减少服务器的负担,加快响应速度,因为服务器不需要与客户端长时间建立一个通信链 ...
- HTML5 学习笔记(五)——WebSocket与消息推送
B/S结构的软件项目中有时客户端需要实时的获得服务器消息,但默认HTTP协议只支持请求响应模式,这样做可以简化Web服务器,减少服务器的负担,加快响应速度,因为服务器不需要与客户端长时间建立一个通信链 ...
- 使用websocket进行消息推送服务
Websocket主要做消息推送,简单,轻巧,比comet好用 入门了解:https://www.cnblogs.com/xdp-gacl/p/5193279.html /** * A Web Soc ...
- 实现websocket 主动消息推送,用laravel+Swoole
近来有个需求:想实现一个可以主动触发消息推送的功能,这个可以实现向模板消息那个,给予所有成员发送自定义消息,而不需要通过客户端发送消息,服务端上message中监听传送的消息进行做相对于的业务逻辑. ...
- 【转】SpringMVC整合websocket实现消息推送及触发
1.创建websocket握手协议的后台 (1)HandShake的实现类 /** *Project Name: price *File Name: HandShake.java *Packag ...
- 用图解&&实例讲解php是如何实现websocket实时消息推送的
WebSocket是 HTML5 开始提供的一种在单个 TCP 连接上进行全双工通讯的协议. 以前的推送技术使用 Ajax 轮询,浏览器需要不断地向服务器发送http请求来获取最新的数据,浪费很多的带 ...
随机推荐
- Atitit.注解解析(1)---------词法分析 attilax总结 java .net
Atitit.注解解析(1)---------词法分析 attilax总结 java .net 1. 应用场景:::因为要使用ui化的注解 1 2. 流程如下::: 词法分析(生成token流) & ...
- Cocos2d-x 3.x 如何编译成安卓程序
1.安装JDK 2.安装eclipse,安卓官方现在不提供eclipse for android,只好自己配置了.首先安装一个eclipse,在Help——Install New SoftWare中安 ...
- IE6支持兼容min-width、max-width CSS样式属性
IE6支持兼容min-width.max-width CSS样式属性 让IE6支持max-width.IE6支持min-width样式 我们在写CSS的时候,常常会遇到让一个图片或一个布局不能超出设定 ...
- Nginx设置expires设定页面缓存时间 不缓存或一直使用缓存
配置expires expires起到控制页面缓存的作用,合理的配置expires可以减少很多服务器的请求 要配置expires,可以在http段中或者server段中或者location段中加入 l ...
- layui单文件上传
function imguload(cls) { var taskId = $("#model-taskId").val(); var processInstanceId = $( ...
- Eclipse报Caused by: java.lang.OutOfMemoryError: PermGen space解决思路
一.修改tomcat/bin目录下的catalina.bat 在“rem ----- Execute The Requested Command ----------------------”下加入 ...
- HTTP Content-Disposition Explanation [ from MDN ]
在常规的HTTP应答中,Content-Disposition 消息头指示回复的内容该以何种形式展示,是以内联的形式(即网页或者页面的一部分),还是以附件的形式下载并保存到本地. 在multipart ...
- zend Studio10.6.2破解注册码
下载破解包:http://download.csdn.net/detail/gsls200808/7982115 安装方法:破解的jar文件com.zend.verifier_10.6.2.v2014 ...
- java----内部类与匿名内部类的各种注意事项与知识点
Java 内部类分四种:成员内部类.局部内部类.静态内部类和匿名内部类.1.成员内部类: 即作为外部类的一个成员存在,与外部类的属性.方法并列.注意:成员内部类中不能定义静态变量,但可以访问外部类的所 ...
- php -- 判断文件是否存在
file_exists is_file is_dir 基本上,PHP的 file_exists = is_dir + is_file 写程序验证一下: 分别执行1000次,记录所需时间. ------ ...