SpingCloud:Gateway+Nginx+Stomp+Minio构建聊天室并进行文件传输
注:本人使用阿里云服务器(安装mino)+本地虚拟机(安装nginx)进行,理论上完全在本地进行也可以。
1、前期准备:
1、将本地虚拟机设置为静态ip且能ping通外网,参考网址:https://www.cnblogs.com/wsongl/p/14534170.html(完全照做就行)
2、安装nginx:
#创建文件夹

mkdir -p /mydata/nginx

#下载并启动

docker run -p 80:80 --name nginx -d nginx:1.10

#将容器内的配置文件拷贝到当前nginx目录(注意此时我们的位置在mydata文件夹下,不要忘了后面有个点)

docker container cp nginx:/etc/nginx .

#停止nginx容器并删除nginx镜像

docker stop nginx

docker rm nginx

#重命名nginx为conf

mv nginx conf

#再次创建nginx文件夹

mkdir nginx

#将conf移动到nginx

mv conf nginx/

#创建实例

docker run -p 80:80 --name nginx \

-v /mydata/nginx/html:/usr/share/nginx/html \

-v /mydata/nginx/logs:/var/log/nginx \

-v /mydata/nginx/conf:/etc/nginx \

-d nginx:1.10
3、安装minio:
docker run -it -p 9000:9000 -p 9001:9001

--name minio \

-d --restart=always \

-e "MINIO_ROOT_USER=admin" \

-e "MINIO_ROOT_PASSWORD=123456" \

-v /mydata/minio/data:/data \

-v /mydata/minio/config:/root/.minio \

minio/minio server /data \

--console-address ":9001"

MINIO_ROOT_USER:登录账号

MINIO_ROOT_PASSWORD:登陆密码
2、Nginx反向代理配置:
2.1:官方文档参考:
1、minio官方文档:https://docs.min.io/(不要看中文文档,方法已经过期了)
2、gateway官方文档:https://spring.io/projects/spring-cloud-gateway
2.2:引入包:
gateway网关服务的pom.xml
<?xml version="1.0" encoding="UTF-8"?>

<project xmlns="http://maven.apache.org/POM/4.0.0" xmlns:xsi="http://www.w3.org/2001/XMLSchema-instance"

         xsi:schemaLocation="http://maven.apache.org/POM/4.0.0 https://maven.apache.org/xsd/maven-4.0.0.xsd">

    <modelVersion>4.0.0</modelVersion>

    <parent>

        <groupId>org.springframework.boot</groupId>

        <artifactId>spring-boot-starter-parent</artifactId>

        <version>2.5.4</version>

        <relativePath/> <!-- lookup parent from repository -->

    </parent>

    <groupId>com.social</groupId>

    <artifactId>whales-gateway</artifactId>

    <version>0.0.1-SNAPSHOT</version>

    <name>whales-gateway</name>

    <description>Demo project for Spring Boot</description>

    <properties>

        <java.version>1.8</java.version>

        <spring-cloud.version>2020.0.3</spring-cloud.version>

    </properties>

    <dependencies>

        <dependency>

            <groupId>com.alibaba.cloud</groupId>

            <artifactId>spring-cloud-starter-alibaba-nacos-discovery</artifactId>

            <version>2.2.1.RELEASE</version>

            <!-- 使用spring loadbalancer,弃用ribbon -->

            <exclusions>

                <exclusion>

                    <groupId>org.springframework.cloud</groupId>

                    <artifactId>spring-cloud-starter-netflix-ribbon</artifactId>

                </exclusion>

            </exclusions>

        </dependency>

        <dependency>

            <groupId>com.alibaba.cloud</groupId>

            <artifactId>spring-cloud-starter-alibaba-nacos-config</artifactId>

            <version>2.2.1.RELEASE</version>

        </dependency>

        <dependency>

            <groupId>org.springframework.cloud</groupId>

            <artifactId>spring-cloud-loadbalancer</artifactId>

        </dependency>

        <dependency>

            <groupId>org.springframework.boot</groupId>

            <artifactId>spring-boot-starter-webflux</artifactId>

        </dependency>

        <dependency>

            <groupId>org.springframework.cloud</groupId>

            <artifactId>spring-cloud-starter-gateway</artifactId>

        </dependency>

        <dependency>

            <groupId>org.springframework.cloud</groupId>

            <artifactId>spring-cloud-starter-openfeign</artifactId>

        </dependency>

        <dependency>

            <groupId>org.springframework.boot</groupId>

            <artifactId>spring-boot-starter-test</artifactId>

            <scope>test</scope>

        </dependency>

        <dependency>

            <groupId>io.projectreactor</groupId>

            <artifactId>reactor-test</artifactId>

            <scope>test</scope>

        </dependency>

    </dependencies>

    <dependencyManagement>

        <dependencies>

            <dependency>

                <groupId>org.springframework.cloud</groupId>

                <artifactId>spring-cloud-dependencies</artifactId>

                <version>${spring-cloud.version}</version>

                <type>pom</type>

                <scope>import</scope>

            </dependency>

        </dependencies>

    </dependencyManagement>

    <build>

        <plugins>

            <plugin>

                <groupId>org.springframework.boot</groupId>

                <artifactId>spring-boot-maven-plugin</artifactId>

            </plugin>

        </plugins>

    </build>

</project>
gateway的application.yml部分配置:
spring:

  cloud:

    gateway:

      routes:

        - id: community_host_route

          uri: lb://whales-community

          predicates:

            - Host=community.whales.com
本人使用nacos为服务注册中心,在gateway的application.properties文件中配置:
spring.cloud.nacos.discovery.server-addr=119.xx.xx.xx:8848   #nacos安装的地址

spring.application.name= whales-gateway

server.port=88
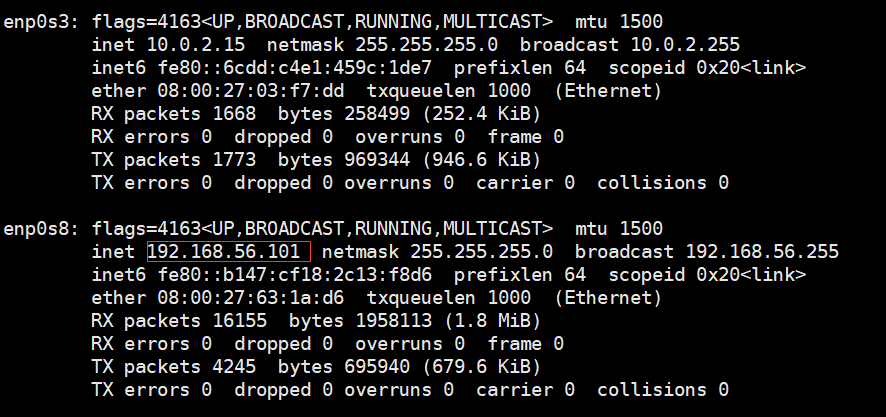
2.3:nginx配置:
在linux上使用ifconfig检测其IP地址:
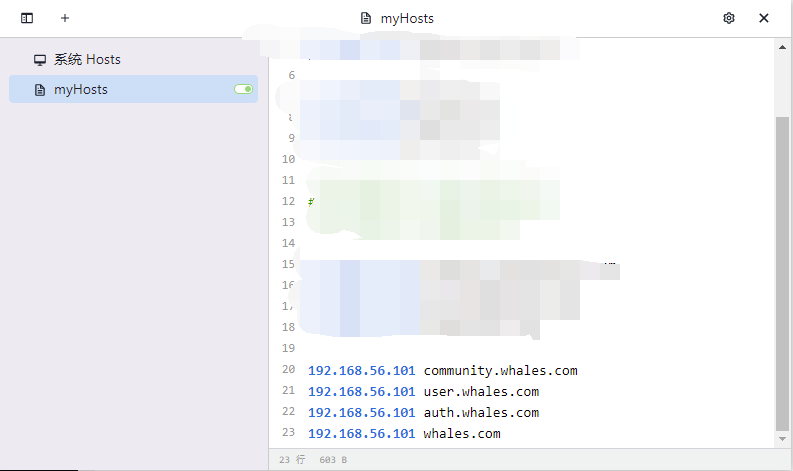
我们选取先前配置好的静态IP地址,在win10的hosts上配置相关域名,本人使用SwitchHosts软件直接进行配置:
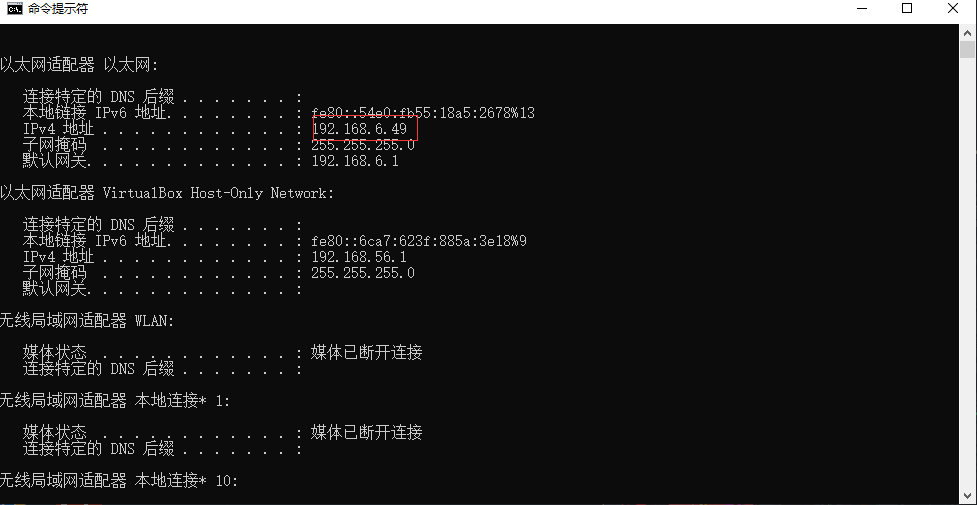
随后在win上检查ip:
在linux上打开nginx.config进行配置,whales是可以替换成其他自己喜欢的命名,但必须与之后conf.d配置文件内容里的proxy_pass后的名字相同:
#进入nginx配置文件夹,打开nginx.config

cd /mydata/nginx/conf/

vi nginx.conf

#编辑文件内容:添加黄色部分字体

user  nginx;

worker_processes  1;

error_log  /var/log/nginx/error.log warn;

pid        /var/run/nginx.pid;

events {

    worker_connections  1024;

}

http {

    include       /etc/nginx/mime.types;

    default_type  application/octet-stream;


    log_format  main  '$remote_addr - $remote_user [$time_local] "$request" '

                      '$status $body_bytes_sent "$http_referer" '

                      '"$http_user_agent" "$http_x_forwarded_for"';

    access_log  /var/log/nginx/access.log  main;

    sendfile        on;

    #tcp_nopush     on;

    keepalive_timeout  65;

    #gzip  on;

    upstream whales{

      server 192.168.6.49:88;

    }

    include /etc/nginx/conf.d/*.conf;

}
配置conf.d下的配置文件:
#进入conf.d文件下

cd /mydata/nginx/conf/conf.d/

#复制一份default.conf并进行编辑

cp default.conf whales.conf

vi whales.conf

#编辑文件内容:加量部分

server {

    listen       80;

    server_name  whales.com  *.whales.com;

    #charset koi8-r;

    #access_log  /var/log/nginx/log/host.access.log  main;

    location / {

        proxy_set_header Host $host;

        proxy_pass http://whales;

    }

    #error_page  404              /404.html;

    # redirect server error pages to the static page /50x.html

    #

    error_page   500 502 503 504  /50x.html;

    location = /50x.html {

        root   /usr/share/nginx/html;

    }

    # proxy the PHP scripts to Apache listening on 127.0.0.1:80

    #

    #location ~ \.php$ {

    #    proxy_pass   http://127.0.0.1;

    #}

    # pass the PHP scripts to FastCGI server listening on 127.0.0.1:9000

    #

    #location ~ \.php$ {

    #    root           html;

    #    fastcgi_pass   127.0.0.1:9000;

    #    fastcgi_index  index.php;

    #    fastcgi_param  SCRIPT_FILENAME  /scripts$fastcgi_script_name;

    #    include        fastcgi_params;

    #}
截止目前nginx+gateway的反向代理完成。
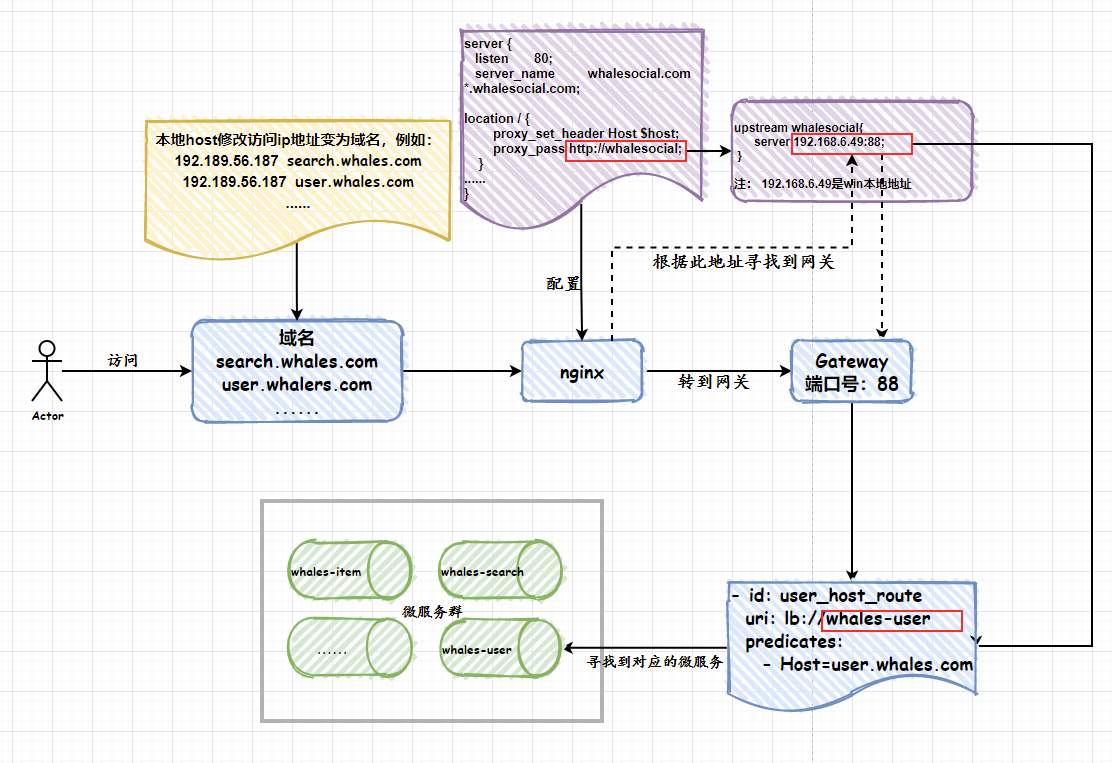
2.4:nginx反向代理原理图:
3、minio配置实现
3.1:MinioConfig配置类
@Data

@Component

@ConfigurationProperties(prefix = "minio")

public class MinioConfig {

    private String endpoint;

    private String accessKey;

    private String secretKey;

    private String bucketName;

    @Bean

    public MinioClient minioClient(){

        MinioClient minioClient =

                MinioClient.builder()

                        .endpoint(endpoint)

                        .credentials(accessKey, secretKey)

                        .build();

        return minioClient;

    }

}
进入Minio控制台生成密钥:

生成存储桶:

3.2:编写Minio工具类
/**

 * 实体类

 * 爪哇笔记:https://blog.52itstyle.vip

 */

@Data

@Configuration

@ConfigurationProperties(prefix = "min.io")

public class MinIoComponent{

    private String endpoint;

    private String accessKey;

    private String secretKey;

    @Bean

    public MinioClient minClient(){

        // 使用MinIO服务的URL,端口,Access key和Secret key创建一个MinioClient对象

        MinioClient minioClient = new MinioClient.Builder().endpoint(endpoint).credentials(accessKey, secretKey).build();

        return minioClient;

    }

}
工具类中的方法可以在官方文档中找到然后进行实际应用的修改
@Component

public class MinioUtils {

    @Autowired

    MinioClient minioClient;

    @SneakyThrows

    public void putObject(MultipartFile file, String bucket, String pathObject) {

        InputStream stream = file.getInputStream();

        String type = file.getContentType();

        //System.out.println(type);

        minioClient.putObject(

                PutObjectArgs.builder().bucket(bucket).object(pathObject).stream(

                        stream, file.getSize(), -1)

                        .contentType(type)

                        .build());

    }

    @SneakyThrows

    public void putObject(File file, String bucket, String pathObject) {

        InputStream stream = new FileInputStream(file);

        String type = file.getName().split("\\.")[1];

        System.out.println(type);

        minioClient.putObject(

                PutObjectArgs.builder().bucket(bucket).object(pathObject).stream(

                        stream, file.length(), -1)

                        .contentType(type)

                        .build());

    }

}
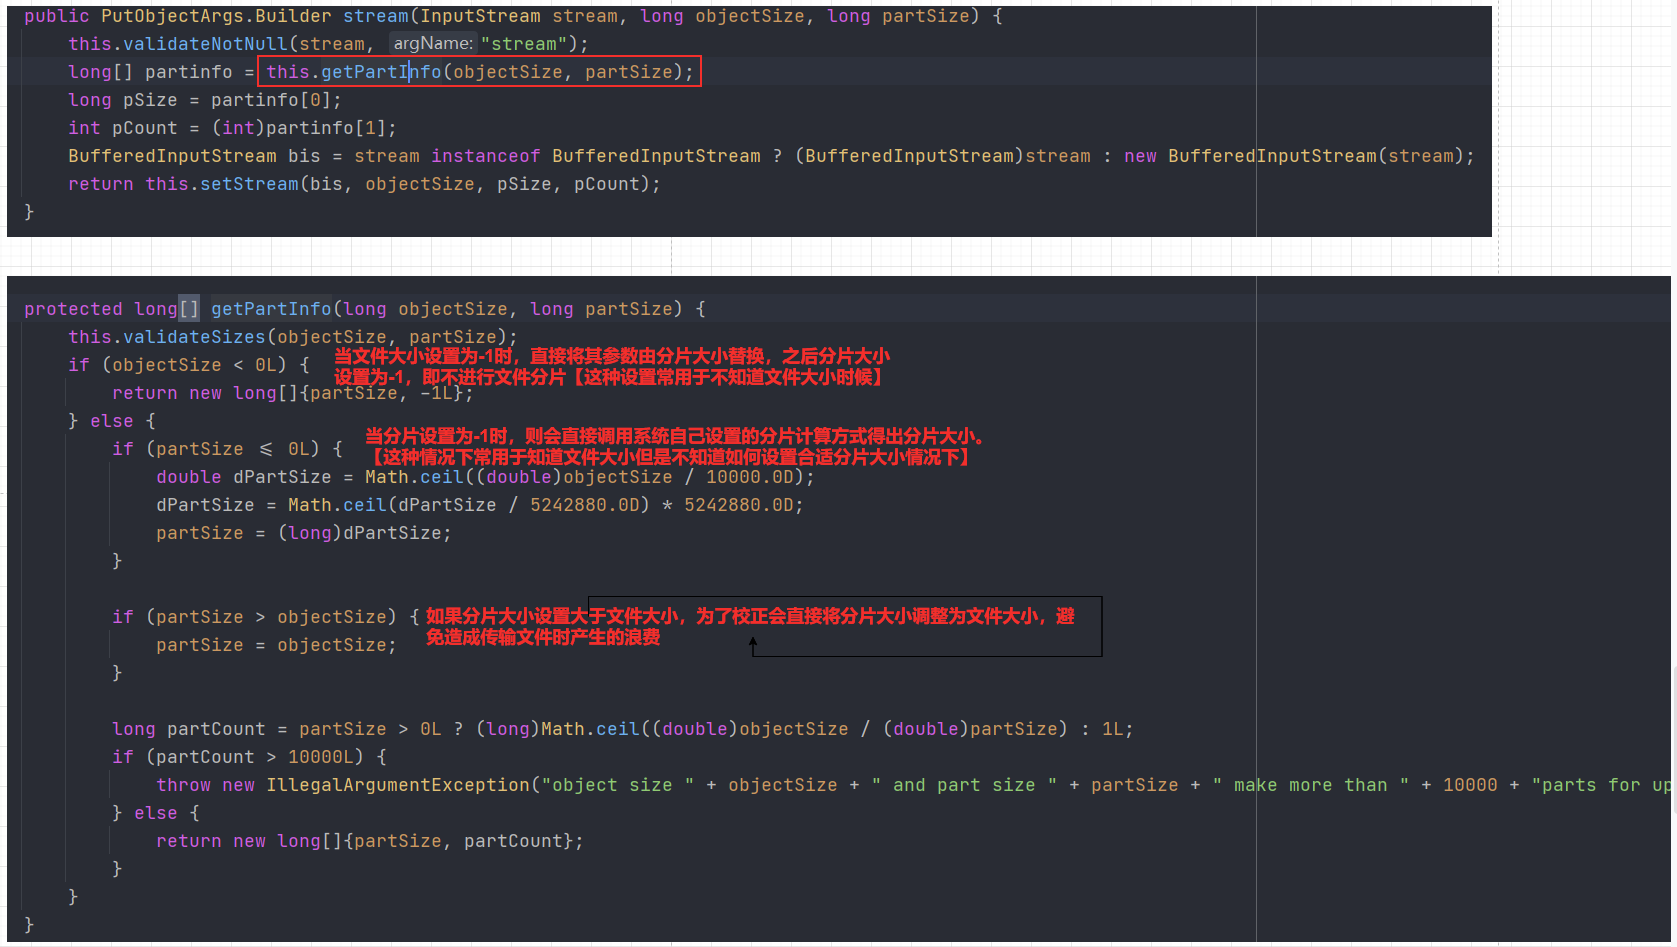
这里着重讲解下stream中的意义,有文件流、文件大小、分块大小。由于minio在传输中是将文件分块传输,所以有分块大小设置:
application.properties进行参数配置:
min.io.endpoint = http://119.23.57.189:9000
#生成密钥
min.io.accessKey =3B-----------------61
min.io.secretKey =+ANgi6S+----------------------2pqff3gS
#生成存储桶
min.io.bucket = whales-picture
3.3:实际代码
@Override

    public void sendPhotoToGroup(String groupId, String userId, MultipartFile file) throws ExecutionException, InterruptedException {

        //设置组与当日时间:文件夹命名方式:groupxxxxxxx/yyyyMMdd

        SimpleDateFormat s = new SimpleDateFormat("yyyyMMdd");//设置日期格式

        String name = file.getOriginalFilename();

        String type = file.getContentType();

        String format = s.format(new Date());

        //设置存储在minio的文件路径

        String pathObject = "/Group" + groupId + "/" + format + "/" + name;

        minioUtils.putObject(file, MINIO_BUCKET, pathObject);
  }
4、基于Stomp协议搭建Websocket聊天室:
4.1:WebSocketStompConfig配置
@Configuration

@EnableWebSocketMessageBroker

public class WebSocketStompConfig implements WebSocketMessageBrokerConfigurer {

    // 这个方法的作用是添加一个服务端点,来接收客户端的连接。

    @Override

    public void registerStompEndpoints(StompEndpointRegistry registry){

        registry.addEndpoint("/whaleSocial").withSockJS();

    }

    @Override

    // 这个方法的作用是定义消息代理,通俗一点讲就是设置消息连接请求的各种规范信息。

    public void configureMessageBroker(MessageBrokerRegistry registry){

        //服务端给客户端发消息的地址的前缀信息

        //@SenTo/subscribe

        registry.enableSimpleBroker("/member");

        //客户端给服务端发消息的地址的前缀

        //@SubscribeMapping/subscribe只接收此前缀的消息

        //@MessageMapping/send

        registry.setApplicationDestinationPrefixes("/group");

    }

}
4.2:Controller类
@Controller

/*@RequestMapping("/")*/

public class CommunityController {

    @ResponseBody

    @PostMapping("/photos/{groupId}/{userId}")

    public GraceJSONResult sendPhoto(@PathVariable String groupId, @PathVariable String userId, MultipartFile file) throws ExecutionException, InterruptedException{

        sendMessageService.sendPhotoToGroup(groupId, userId, file);

        return GraceJSONResult.ok();

    }

}
4.3:Service类
@Service

public class CommunitySendMessageServiceServiceImpl implements CommunitySendMessageService {

    private final static String REDIS_MESSAGE_USER = "redis_message_user";

    private final static String GROUP_MEMBER = "redis_group_member";

    private final static String GROUP_MESSAGES = "redis_messages";

    private final static String MINIO_BUCKET = "whales-picture";

    @Resource

    private SimpMessagingTemplate simpMessagingTemplate;

    @Autowired

    private StringRedisTemplate redisTemplate;

    @Resource

    private GroupMembersMapper groupMembersMapper;

    @Autowired

    MinioUtils minioUtils;

    @Autowired

    ThreadPoolExecutor executor;

    @Override

    public void sendPhotoToGroup(String groupId, String userId, MultipartFile file) throws ExecutionException, InterruptedException {

        //设置组与当日时间:文件夹命名方式:groupxxxxxxx/yyyyMMdd

        SimpleDateFormat s = new SimpleDateFormat("yyyyMMdd");//设置日期格式

        String name = file.getOriginalFilename();

        String type = file.getContentType();

        String format = s.format(new Date());

        //设置存储在minio的文件路径

        String pathObject = "/Group" + groupId + "/" + format + "/" + name;

        minioUtils.putObject(file, MINIO_BUCKET, pathObject);

        //获取可访问的url文件路径

        //TODO 将地址更换为域名,photosUrl是将回显地址给传前端

        String photosUrl = "http://119.xx.xx.189:9000/" + MINIO_BUCKET + pathObject;

        simpMessagingTemplate.convertAndSend("/member/photos/" + groupId, photosUrl);

    }

}
4.4:前端测试页面:
<!DOCTYPE html>

<html xmlns:th="http://www.thymeleaf.org">

<head>

    <meta charset="UTF-8" />

    <title>Spring Boot+WebSocket+广播式</title>

    <script src="https://cdn.bootcdn.net/ajax/libs/sockjs-client/1.5.1/sockjs.min.js"></script>

    <script src="https://cdn.bootcdn.net/ajax/libs/stomp.js/2.3.3/stomp.min.js"></script>

    <script src="https://ajax.aspnetcdn.com/ajax/jQuery/jquery-3.5.1.min.js"></script>

</head>

<body onload="disconnect()">

<noscript><h2 style="color: #ff0000">貌似你的浏览器不支持websocket</h2></noscript>

<div>

<!--    <div>

        <button id="enter" onclick="enter();">进入群聊</button>

        <button id="esc" disabled="disabled" onclick="disconnect();">退出群聊</button>

    </div>-->

    <div>

        <button id="connect" onclick="connect();">进入群聊</button>

        <button id="disconnect" disabled="disabled" onclick="disconnect();">退出群聊</button>

    </div>

    <div id="conversationDiv">

        <form action="/photos/1148973713/18819776464" method="post" enctype="multipart/form-data" target="rfFrame">

            <input type="file" id="file" name="file">

            <input type="submit" value="提交" /><p>

        </form>

        <img id="photos"/>

    </div>

</div>

<script type="text/javascript">

    var stompClient = null;

    function setConnected(connected) {

        document.getElementById('connect').disabled = connected;

        document.getElementById('disconnect').disabled = !connected;

        document.getElementById('conversationDiv').style.visibility = connected ? 'visible' : 'hidden';

        $('#response').html();

    }

    function connect() {

        // 连接 SockJs 的 endpoint 名称为 "/whaleSocial"

        var socket = new SockJS('/whaleSocial',null,{timeout: 15000});

        // 使用 STOMP 子协议的 WebSocket 客户端

        stompClient = Stomp.over(socket);

        stompClient.connect({}, function(frame) {

            setConnected(true);

            console.log('Connected: ' + frame);// 通过 stompClient.subscribe 订阅

            stompClient.subscribe('/member/photos/1148973713', function(respnose){

                console.log("This is:"+respnose.body)

                showPhotosResponse(respnose.body);

            });

        });

    }function disconnect() {

        // 断开连接

        if (stompClient != null) {

            stompClient.disconnect();

        }

        setConnected(false);

        console.log("Disconnected");

    }function showPhotosResponse(message){

        $("#photos").attr("src",message)

    }

</script>

</body>

</html>
此时如果使用域名访问会报错:Incompatibile SockJS! Main site uses: "1.1.5", the iframe: "1.0.0",因为websoket必须要使用HTTP/1.1通信协议,所以要到nginx再新增配置:
server {

    listen       80;

    server_name  whales.com  *.whales.com;

    #charset koi8-r;

    #access_log  /var/log/nginx/log/host.access.log  main;

    location / {

        proxy_set_header Host $host;

        proxy_pass http://whalesocial;

    }

   #前缀whaleSocial必须与WebSocketConfig中Stomp服务端设置的节点名字相同

    location /whaleSocial/{

        proxy_pass http://192.168.6.49:11000;

        proxy_set_header Host $host;

        proxy_set_header   X-Real-IP        $remote_addr;

        proxy_set_header   X-Forwarded-For  $proxy_add_x_forwarded_for;

        proxy_http_version 1.1;

        proxy_set_header Upgrade $http_upgrade;

        proxy_set_header Connection "upgrade";

    }

    #error_page  404              /404.html;

    # redirect server error pages to the static page /50x.html

    #

    error_page   500 502 503 504  /50x.html;

    location = /50x.html {

        root   /usr/share/nginx/html;

    }
配置完后就能使用域名进入网页发送websocket消息,并将图片上传Minio并进行回显。
SpingCloud:Gateway+Nginx+Stomp+Minio构建聊天室并进行文件传输的更多相关文章
- 使用Beetle简单构建聊天室程序
之前已经讲解了Beetle简单地构建网络通讯程序,那程序紧紧是讲述了如何发送和接收数据:这一章将更深入的使用Beetle的功能,主要包括消息制定,协议分析包括消息接管处理等常用的功能.为了更好的描述所 ...
- 使用Angular和Nodejs搭建聊天室
一,利用Node搭建静态服务器 这个是这个项目的底层支撑部分.用来支持静态资源文件像html, css, gif, jpg, png, javascript, json, plain text等等静态 ...
- 真刀实战地搭建React+Webpack+Express搭建一个简易聊天室
一.前面bb两句 因为自惭(自残)webpack配置还不够熟悉,想折腾着做一个小实例熟悉.想着七夕快到了,做一个聊天室自己和自己聊天吧哈哈.好了,可以停止bb了,说一下干货. 二. 这个项目能学到啥? ...
- Python实现网络多人聊天室
网络多人聊天室 文件结构: chatroom ├── client.py # 客户端代码 ├── language.py # 语言文件 ├── server.py # 服务端代码 └── set ...
- 使用SignalR构建一个最基本的web聊天室
What is SignalR ASP.NET SignalR is a new library for ASP.NET developers that simplifies the process ...
- 百行go代码构建p2p聊天室
百行go代码构建p2p聊天室 百行go代码构建p2p聊天室 1. 上手使用 2. whisper 原理 3. 源码解读 3.1 参数说明 3.1 连接主节点 3.2 我的标识 3.2 配置我的节点 3 ...
- .net core下使用FastHttpApi构建web聊天室
一般在dotnet core下构建使用web服务应用都使用asp.net core,但通过FastHttpApi组建也可以方便地构建web服务应用,在FastHttpApi功能的支持下构建多人聊天室是 ...
- 以太坊系列之十八: 百行go代码构建p2p聊天室
百行go代码构建p2p聊天室 百行go代码构建p2p聊天室 1. 上手使用 2. whisper 原理 3. 源码解读 3.1 参数说明 3.1 连接主节点 3.2 我的标识 3.2 配置我的节点 3 ...
- 利用socket.io构建一个聊天室
利用socket.io来构建一个聊天室,输入自己的id和消息,所有的访问用户都可以看到,类似于群聊. socket.io 这里只用来做一个简单的聊天室,官网也有例子,很容易就做出来了.其实主要用的东西 ...
- BeetleX之快速构建Web多房间聊天室
其实构建一个Web多房间聊天室也并不是什么困难的技术,借助于websocket就可以轻松实现多用户在线实时通讯交互:在这里主要介绍一下在BeetleX和BeetleXjs的支持下如何让这个功能实现的更 ...
随机推荐
- CSharp初体验
入门 初来乍到了解一门新的语言,它可能和熟悉的c/c++有不小差别,整体上需要首先了解下语法文件的整体结构.例如,源文件整体结构如何. 乍看CSharp源文件(compile unit)的结构,官网主 ...
- 代码随想录算法训练营Day24 回溯算法| 理论基础 77. 组合
代码随想录算法训练营 回溯 什么是回溯法 回溯法也可以叫做回溯搜索法,它是一种搜索的方式. 在二叉树系列中,我们已经不止一次,提到了回溯,例如二叉树:以为使用了递归,其实还隐藏着回溯. 回溯是递归的副 ...
- Kubernetes 研究笔记
Kubernetes 研究笔记 在接下来的这篇笔记中,我将会介绍 Kubernetes 这一强大的容器编排工具,并学习其基本使用方法.该笔记将会被存储在https://github.com/owlma ...
- How to use the shell command to get the version of Linux Distributions All In One
How to use the shell command to get the version of Linux Distributions All In One 如何使用 shell 命令获取 Li ...
- 聊聊Spring Cloud Gateway
网关概述 整体来看,网关有点类似于门面,所有的外部请求都会先经过网关这一层. 网关不仅只是做一个请求的转发及服务的整合,有了网关这个统一的入口之后,它还能提供以下功能. 针对所有请求进行统一鉴权.限流 ...
- wireshark基本使用
Wireshark 是一种开源.跨平台的网络数据包分析工具,能够嗅探和调查实时流量并检查数据包捕获 (PCAP).它通常 被用作最好的数据包分析工具之一. 数据包过滤操作 ip过滤器 IP 过滤器帮助 ...
- python学习框架
Python简介与安装 Python的历史与特点 Python的安装与配置 Python基础语法 变量与数据类型 运算符与表达式 控制结构(条件判断与循环) 函数与模块 错误处理与异常 Python数 ...
- 【技术积累】Java中的JVM【一】
什么是JVM JVM英文全称为Java Virtual Machine,中文意为Java虚拟机.JVM是一种能够执行Java语言编写的程序的虚拟机器,它首次作为Java语言的一部分,后来又被移植到了许 ...
- 技术选型|K歌App中的实时合唱如何进行选型
摘要 在线K歌软件的开发有许多技术难点,需考虑到音频录制和处理.实时音频传输和同步.音频压缩和解压缩.设备兼容性问题等技术难点外,此外,开发者还应关注音乐版权问题,确保开发的应用合规合法. 前言 前面 ...
- spring cloud zuul实践
一. 描述 Spring Cloud Zuul是基于Netflix开源的Zuul项目构建而成,它作为微服务架构中的网关服务,主要用于实现动态路由.负载均衡和请求过滤等功能. 动态路由:Zuul根据预设 ...