【Mac + Appium + Java1.8(三)】之IOS自动化环境安装配置以及简单测试用例编写(模拟器、真机)
前提条件:
===========================================
1.Xcode版本为Xcode10及以上
2.Appium版本必须为1.9及以上,因为Xcode为10.0
3.appium-desktop
4.安装所需依赖库,包括:
a.Homebrew
b.Git
c.node (brew install node)
d.npm (brew install npm)
e.carthage (brew install carthage)
f.libimobiledevice(真机测试需要)(brew install libimobiledevice)
g.ios-deploy(真机测试需要)(brew install ios-deploy)
5、WDA配置
===========================================
上面的环境配置具体参考:
《【Mac + Appium学习(一)】之安装Appium环境前提准备》
《【Mac + Appium + Python3.6学习(三)】之IOS自动化测试环境配置》
环境:
- MacOS:10.13.6
- Appium:1.9.1
- Appium-desktop:1.7.1
- Java:1.8
- XCode:10.0
一、安装测试环境
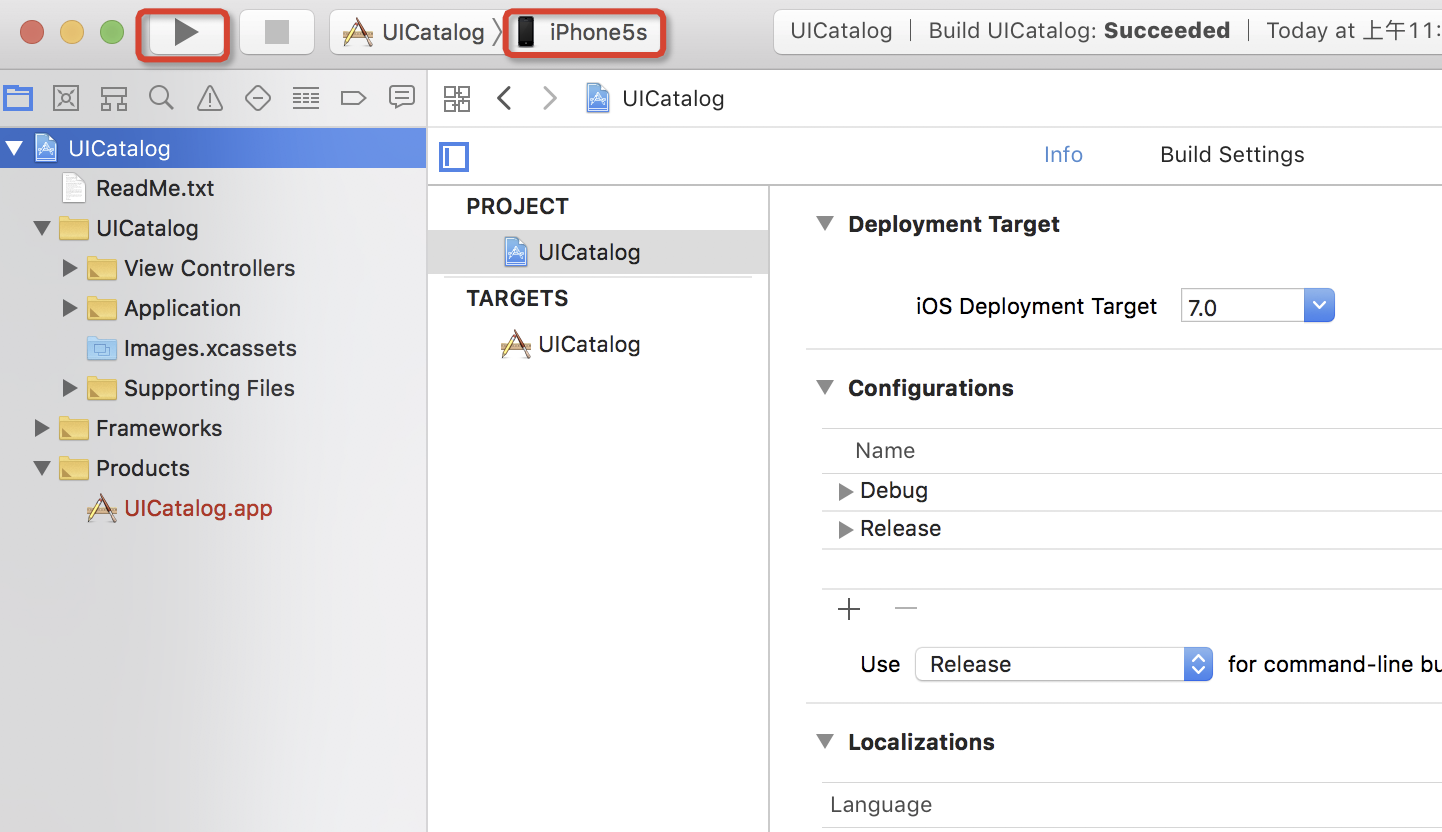
1、配置上面都有就不一一描述了,下面来看一下IOS模拟器:
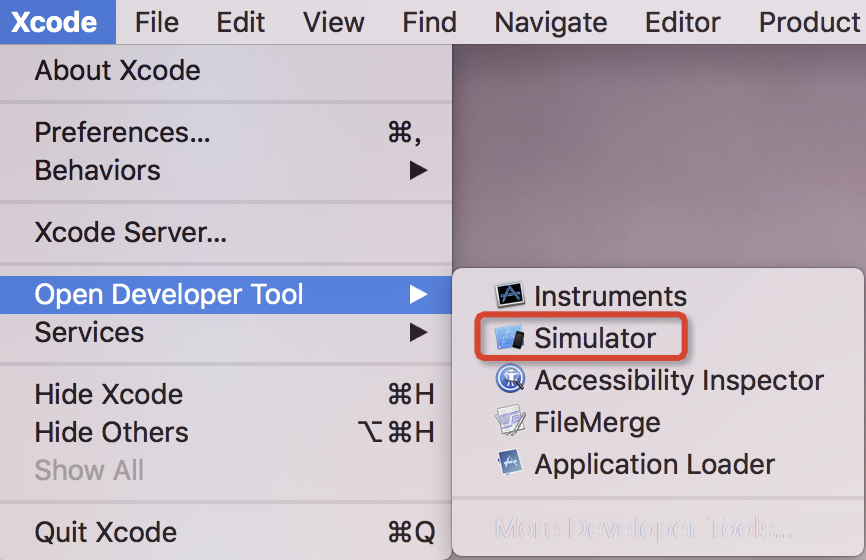
1)打开Xcode,选择如下图所示,打开模拟器:
会启动一个模拟器:
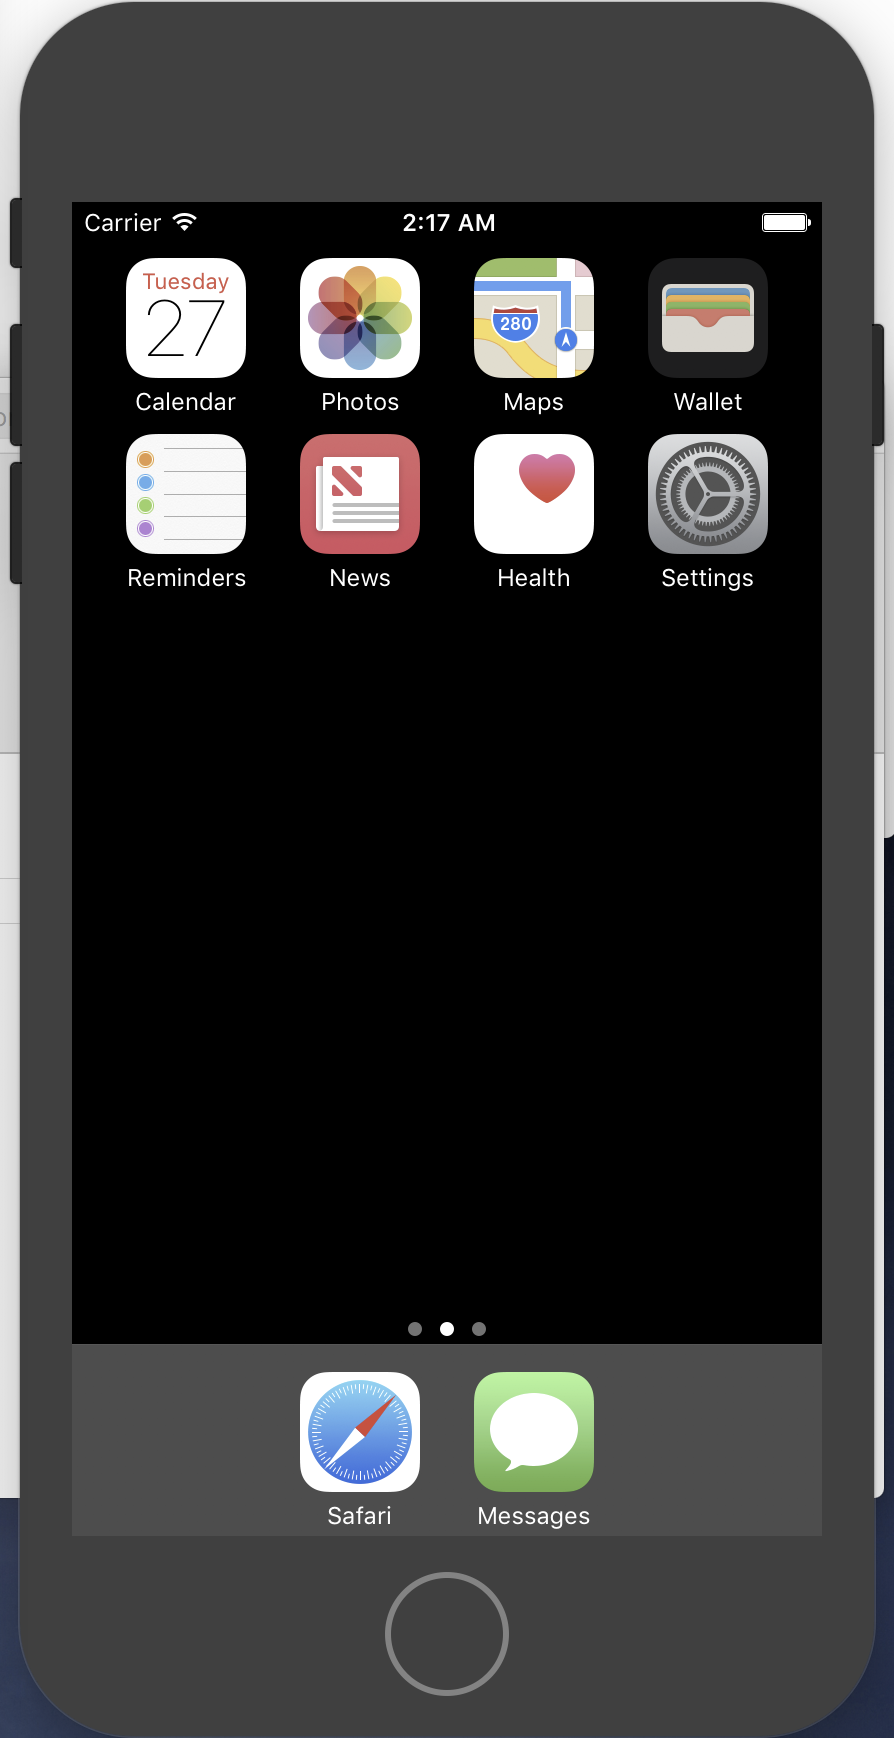
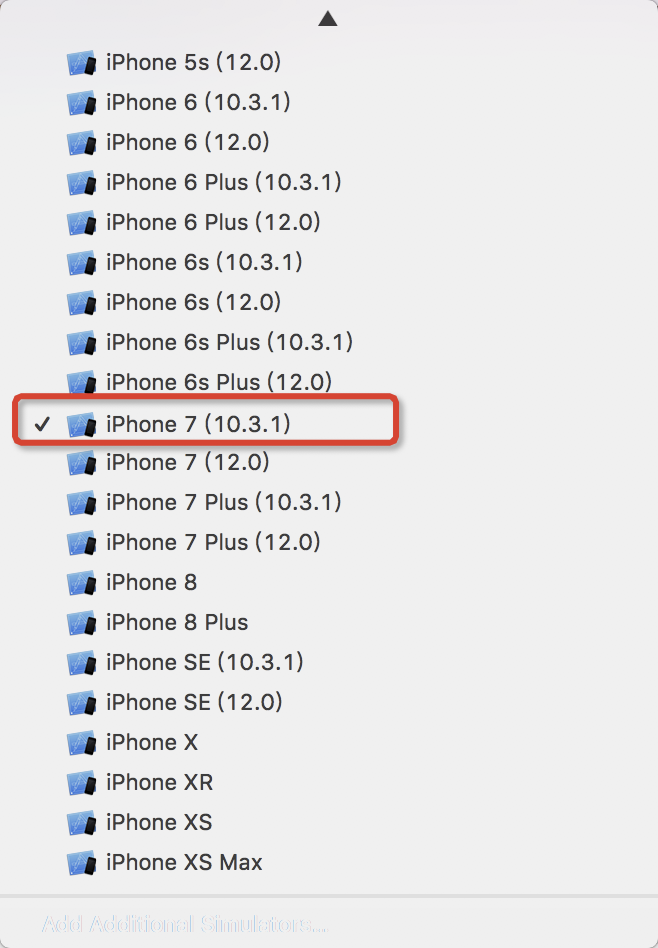
模拟器的版本可以自行选择,这里我选择iPhone7:

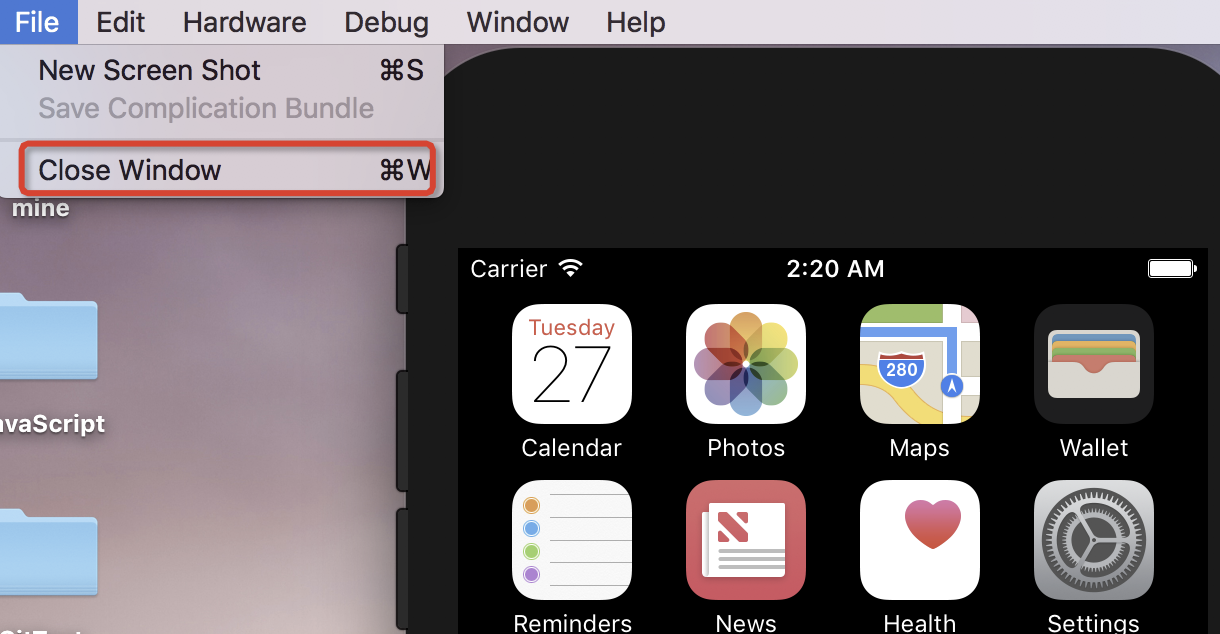
如果想关闭某个模拟器,则点击要关闭的窗口再关闭,如下图:
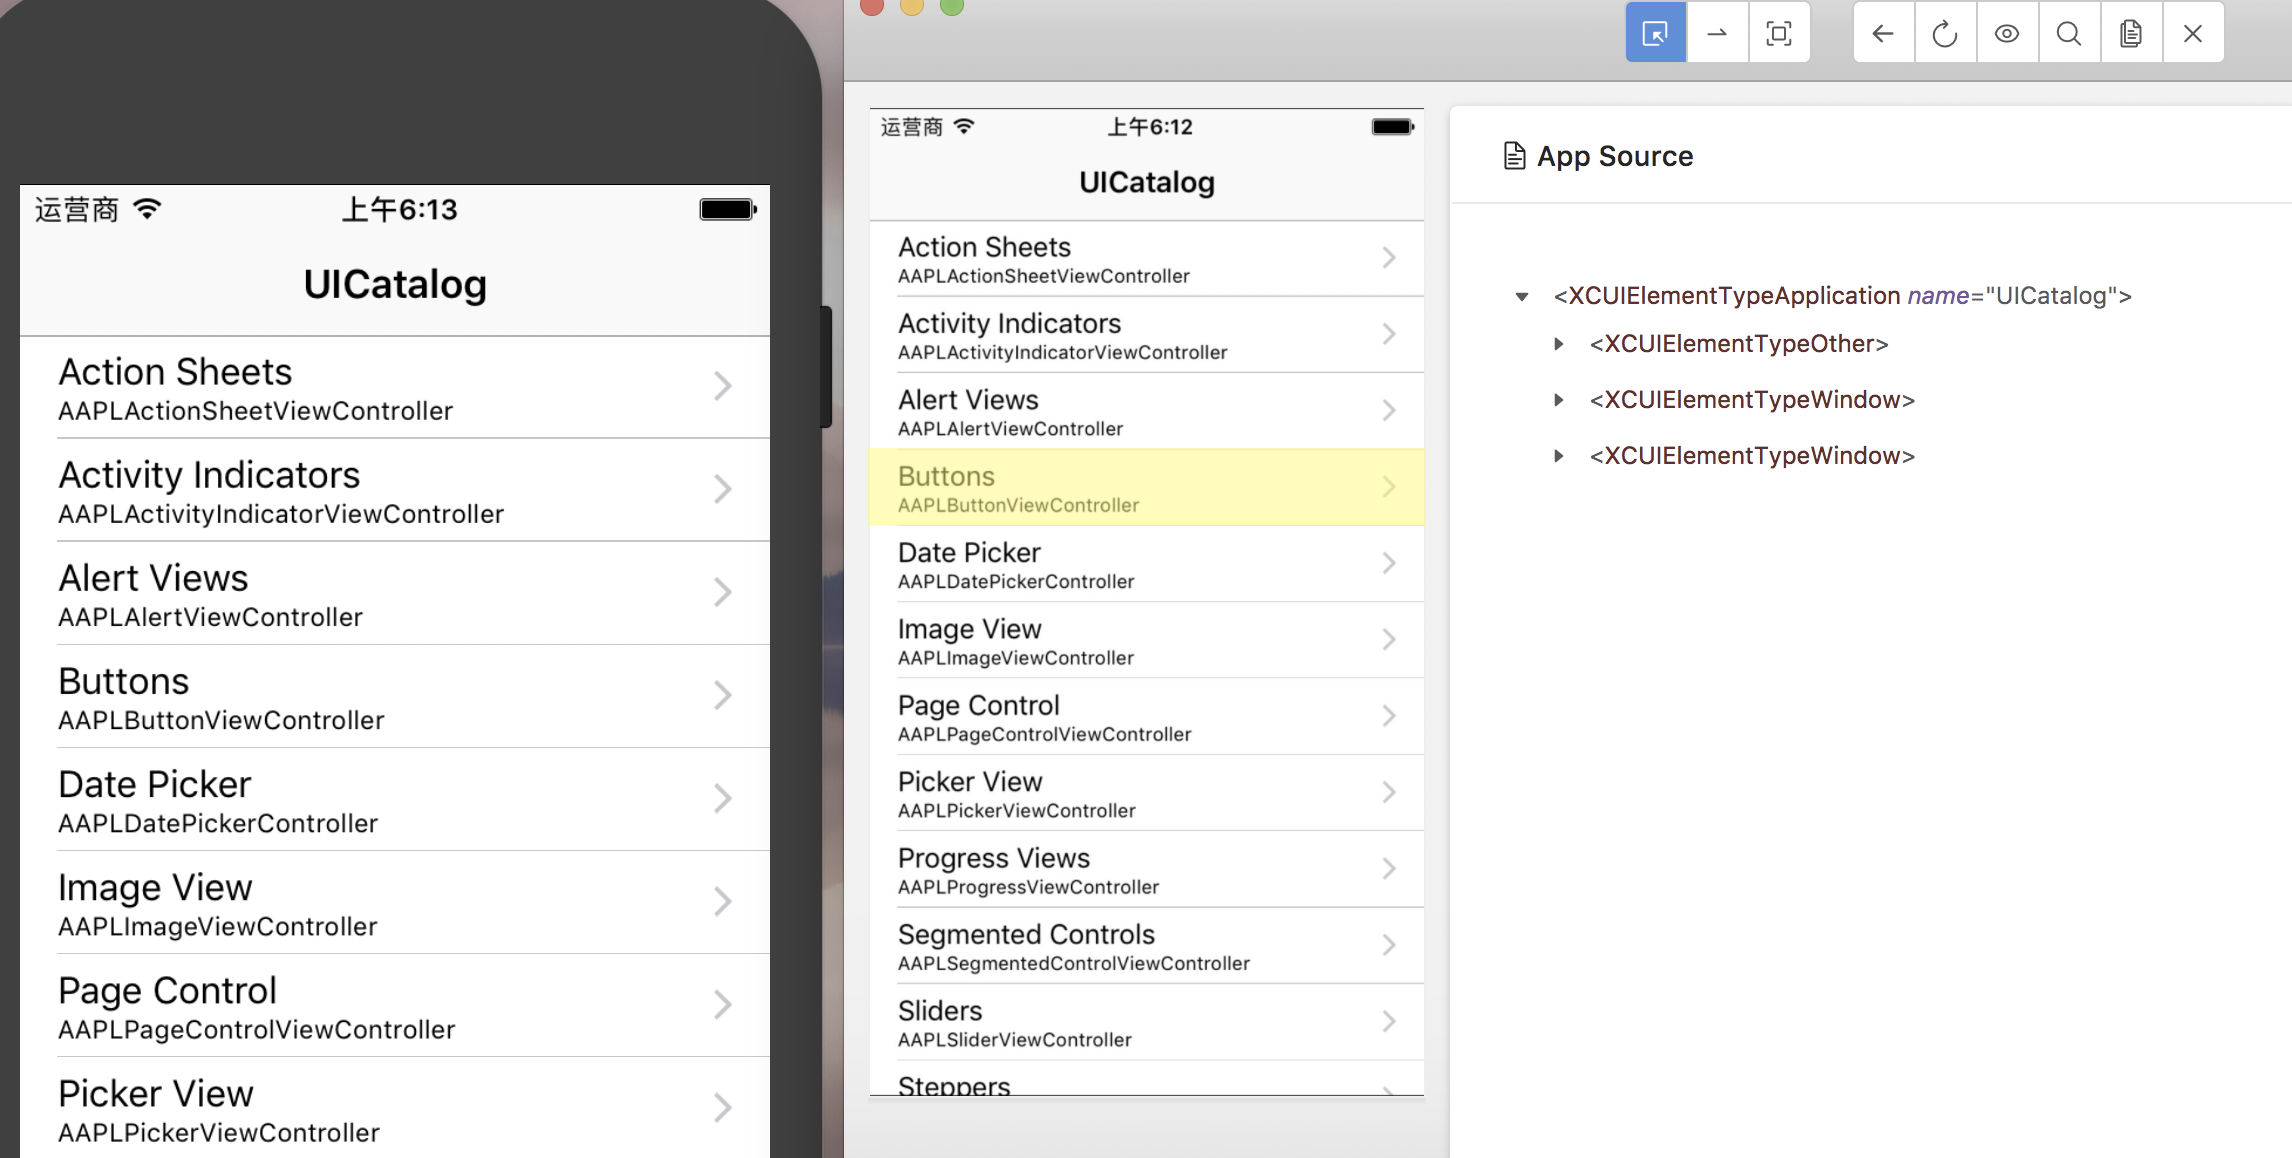
下面去appium官网下载IOS演示程序:
地址:https://github.com/appium/ios-uicatalog
项目clone到本地环境:
$ git clone https://github.com/appium/ios-uicatalog.git

Cloning into 'ios-uicatalog'...

remote: Enumerating objects: 294, done.

remote: Total 294 (delta 0), reused 0 (delta 0), pack-reused 294

Receiving objects: 100% (294/294), 6.63 MiB | 1.35 MiB/s, done.

Resolving deltas: 100% (159/159), done.
命令打开项目:
$ open UICatalog.xcodeproj/
2、模拟器上跑自动化
1)刚刚的项目在模拟器中进行编译:
点击红框
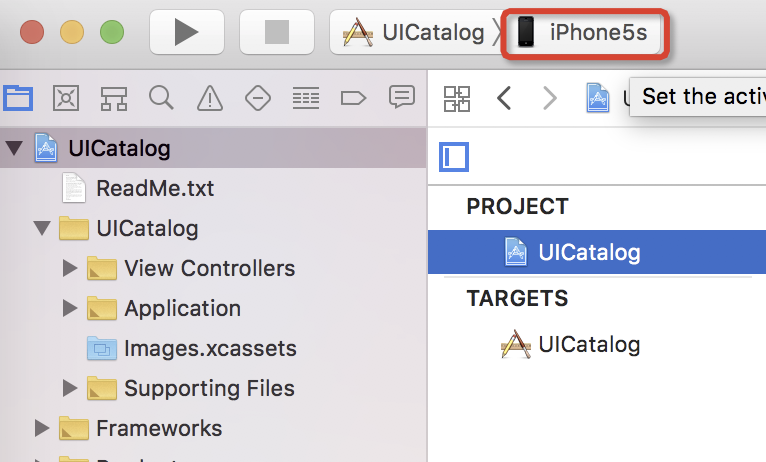
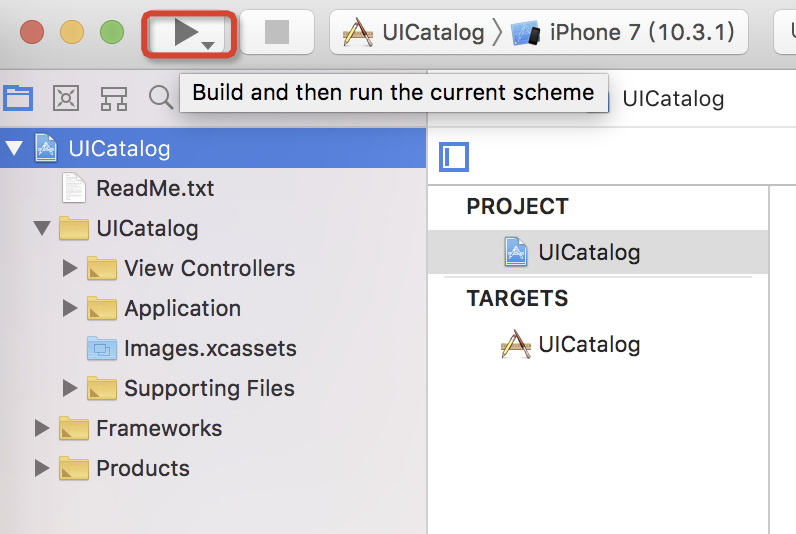
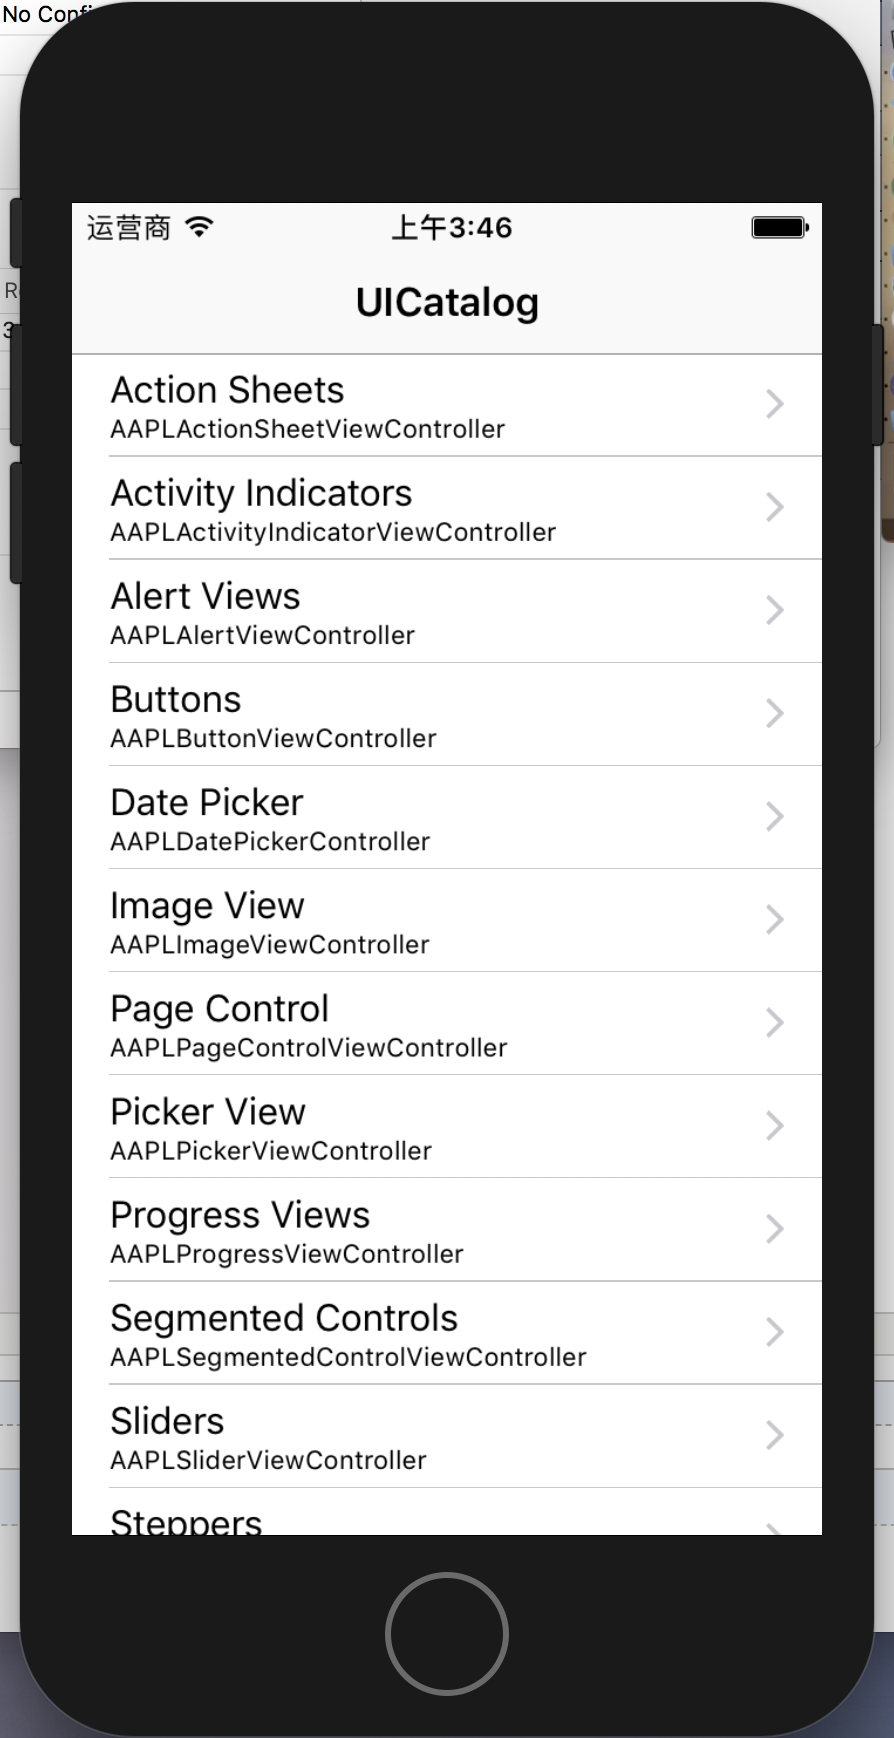
会自动启动模拟器:
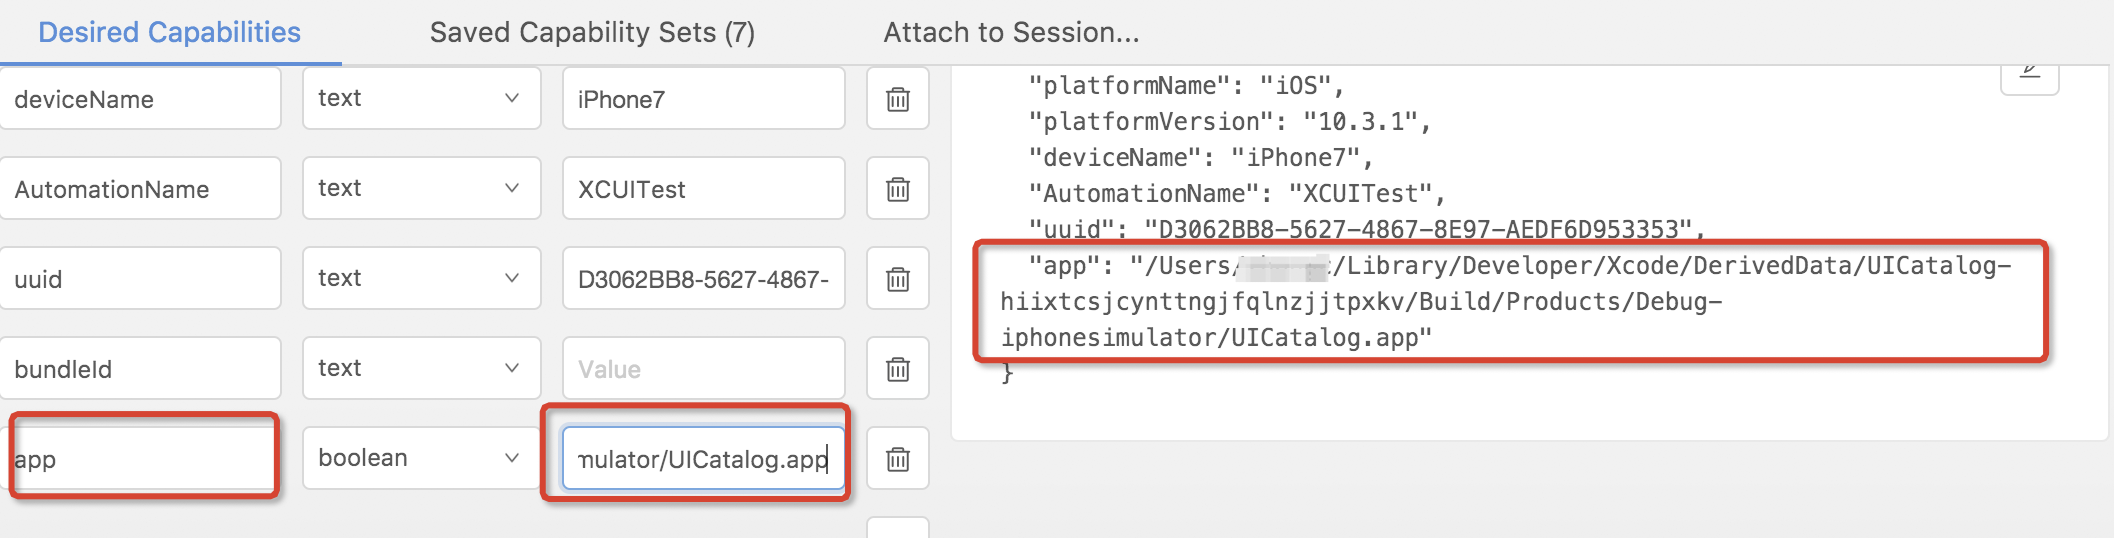
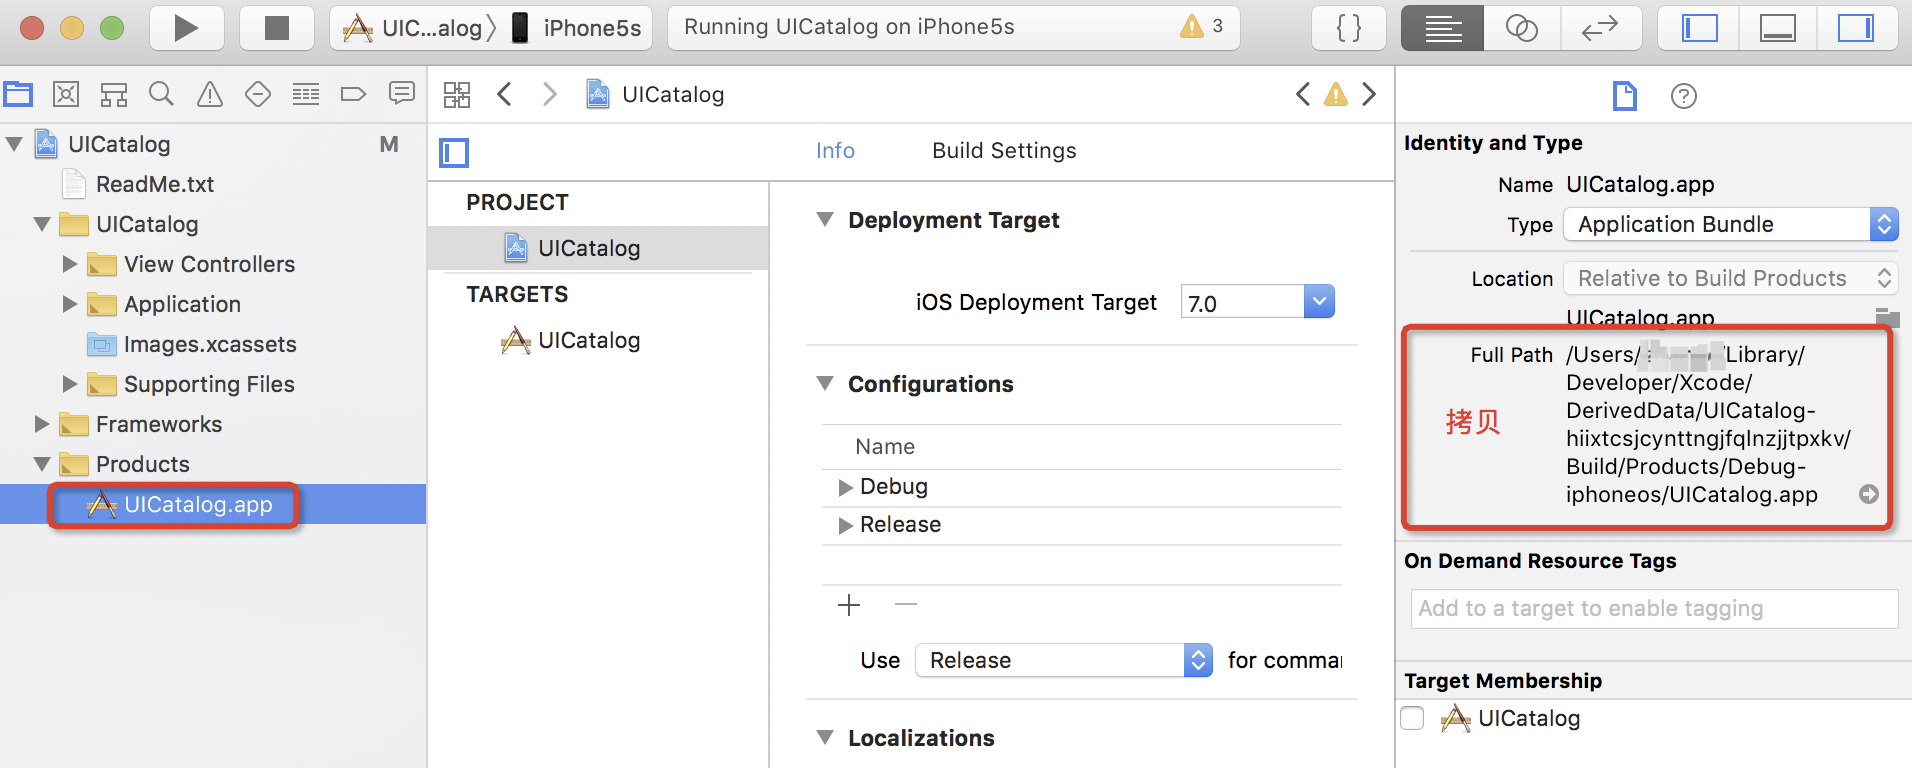
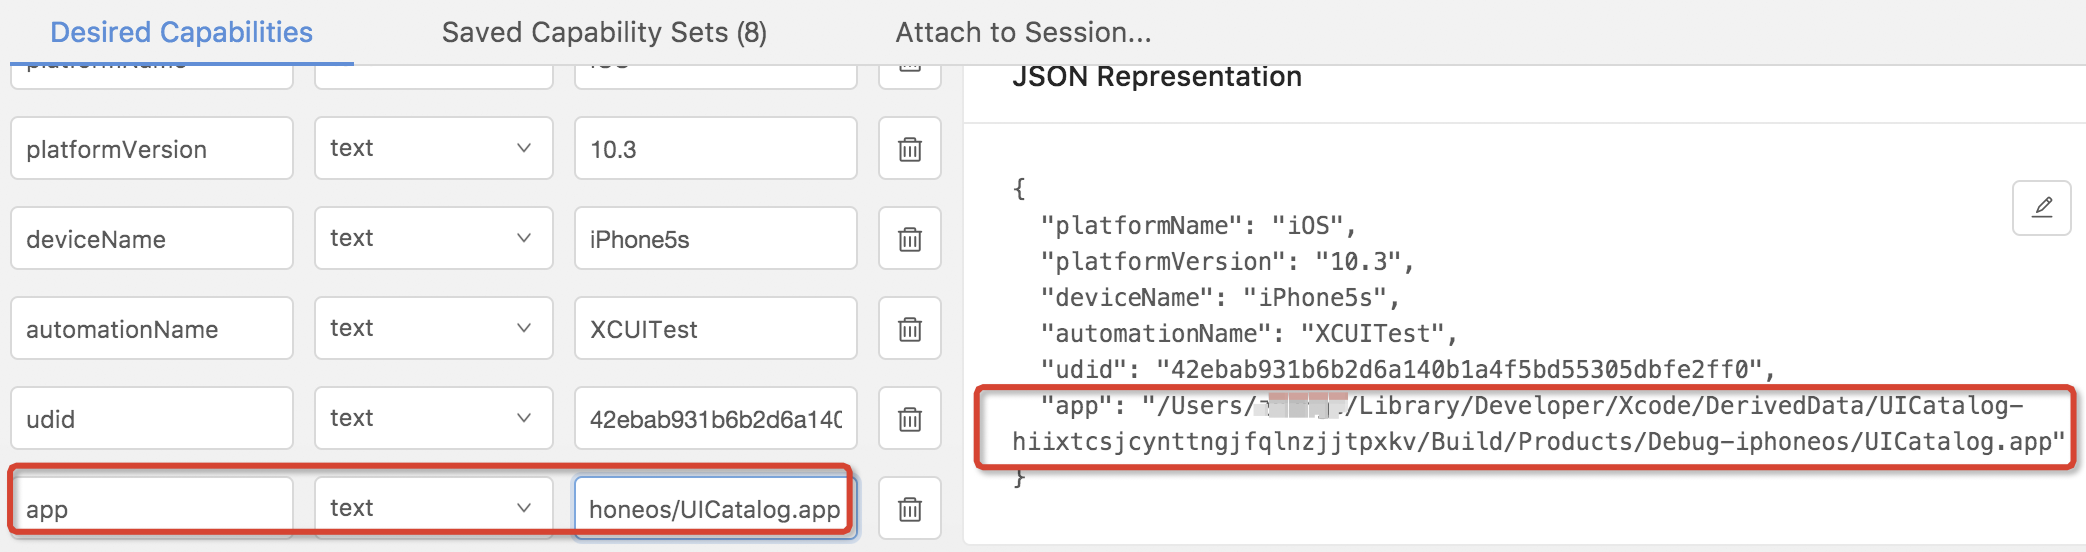
2)然后拷贝项目app的xpath,来配置在参数中:
①拷贝到参数中

会报错:
Original error: '10.3.1' does not exist in the list of simctl SDKs. Only the following Simulator SDK versions are available on your system: 10.3, 12.0
意思是没有'10.3.1',只有'10.3、12.0'版本的SDK,所以手动修改:

又报错:
Original error: Could not create simulator with name 'appiumTest-iPhone7', device type id 'iPhone7' and runtime id '10.3.1'. Reason: 'simctl error running 'create': Invalid device type: iPhone7'
经过查询得知:
感谢:每天1990:《Appium1.6启动iOS真机》*很重要
②udid通过命令获取:
instruments -s devices
获取你打开的模拟器的id。
再运行session:
完整参数如下:
{

  "platformName": "iOS",

  "platformVersion": "10.3",

  "deviceName": "iPhone7",

  "automationName": "XCUITest",

  "app": "/Users/xxx/Library/Developer/Xcode/DerivedData/UICatalog-hiixtcsjcynttngjfqlnzjjtpxkv/Build/Products/Debug-iphonesimulator/UICatalog.app",

  "udid": "D3062BB8-5627-4867-8E97-AEDF6D953353"

}
3)并且输入地址:http://localhost:8100/inspector,也会有检查器显示。
4)设置log路径,如图:
①第一种在appium桌面程序设置log路径:
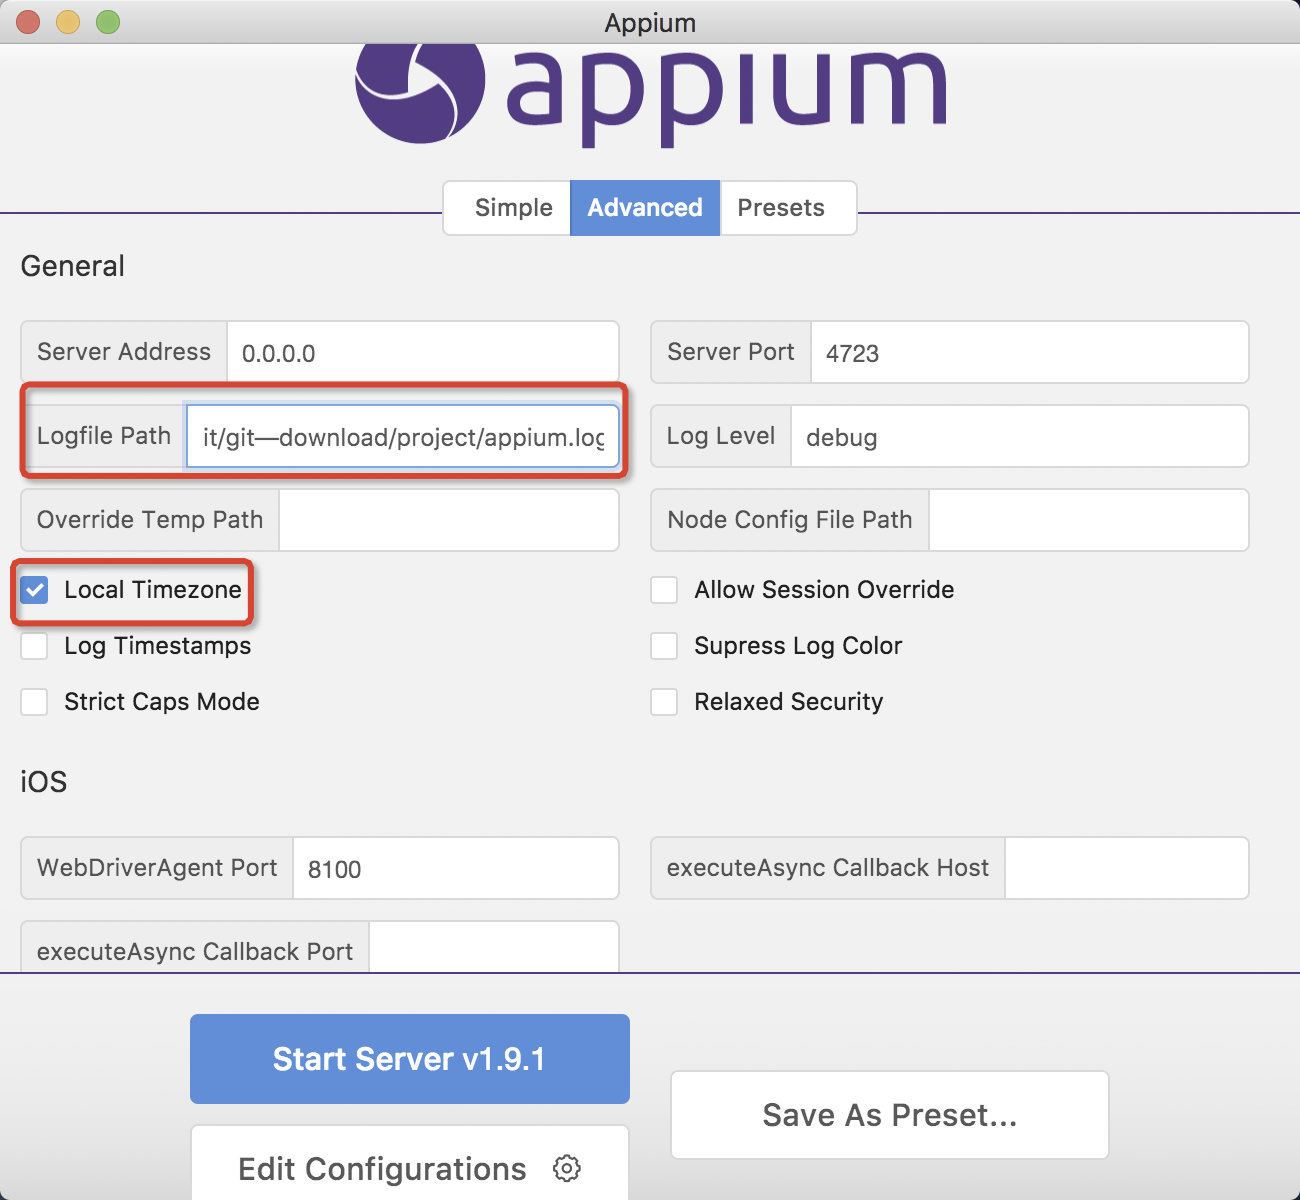
②第二种用命令行重新启动一个自己的appium(相当于新建一个appium服务5723)
输入命令:
$ appium -g /Users/xxx/Desktop/mine/Stu资料/Git/git—download/project/appium2.log -p 5723

[Appium] Welcome to Appium v1.9.1

[Appium] Non-default server args:

[Appium]   port: 5723

[Appium]   log: /Users/xxx/Desktop/mine/Stu资料/Git/git—download/project/appium2.log

[Appium] Appium REST http interface listener started on 0.0.0.0:5723
再设置参数启动:
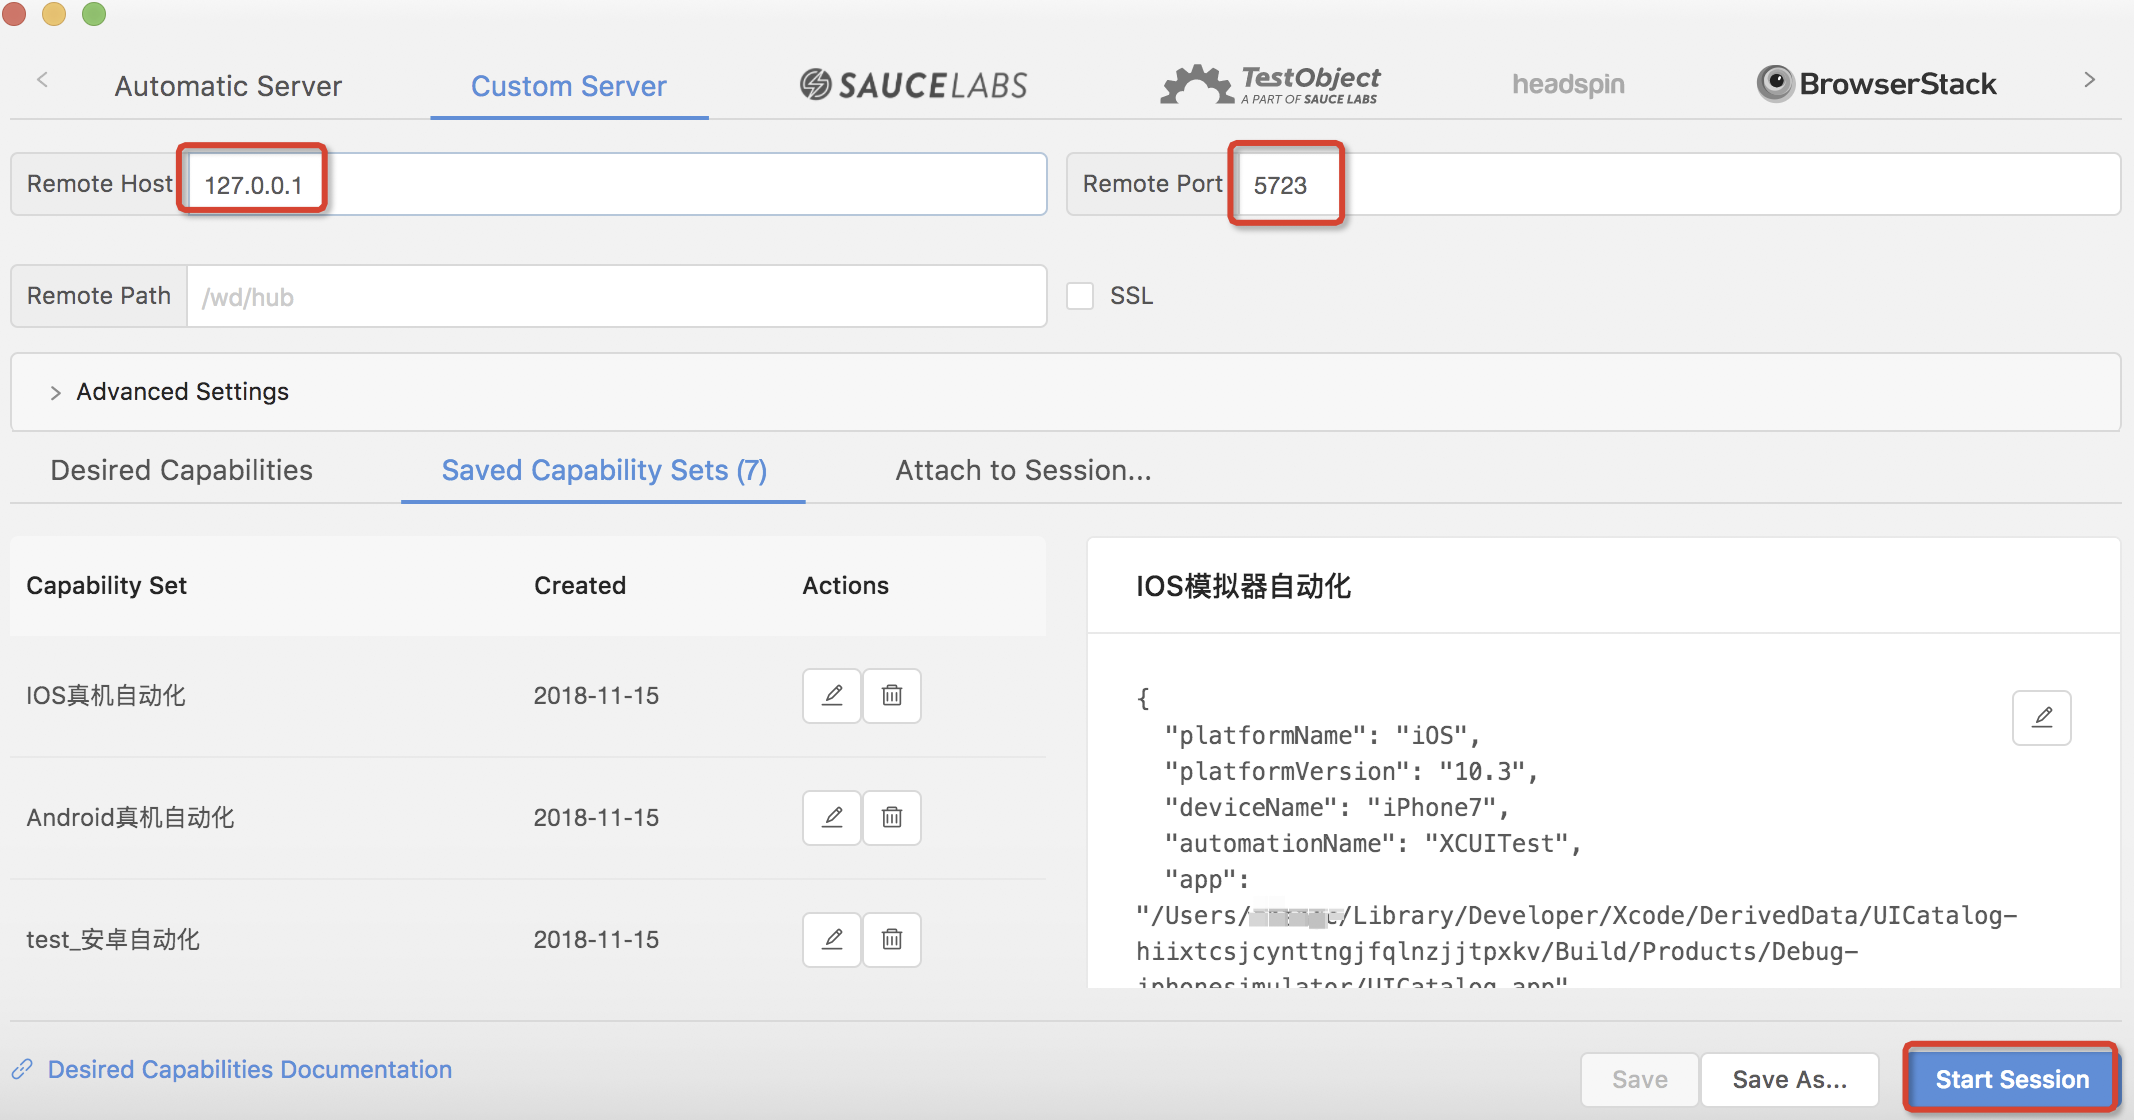
同样可以启动app,并且生成appium2.log文件。
5)扩展:对Simulator控制
https://github.com/facebook/FBSimulatorControl/blob/master/fbsimctl/README.md
6)编写用例
利用IDEA编辑器,在之前《【Mac + Appium + Java1.8学习(一)】之Android自动化环境安装配置以及IDEA配置(附录扩展Selenium+Java自动化)》已经介绍如何使用配置IDEA。
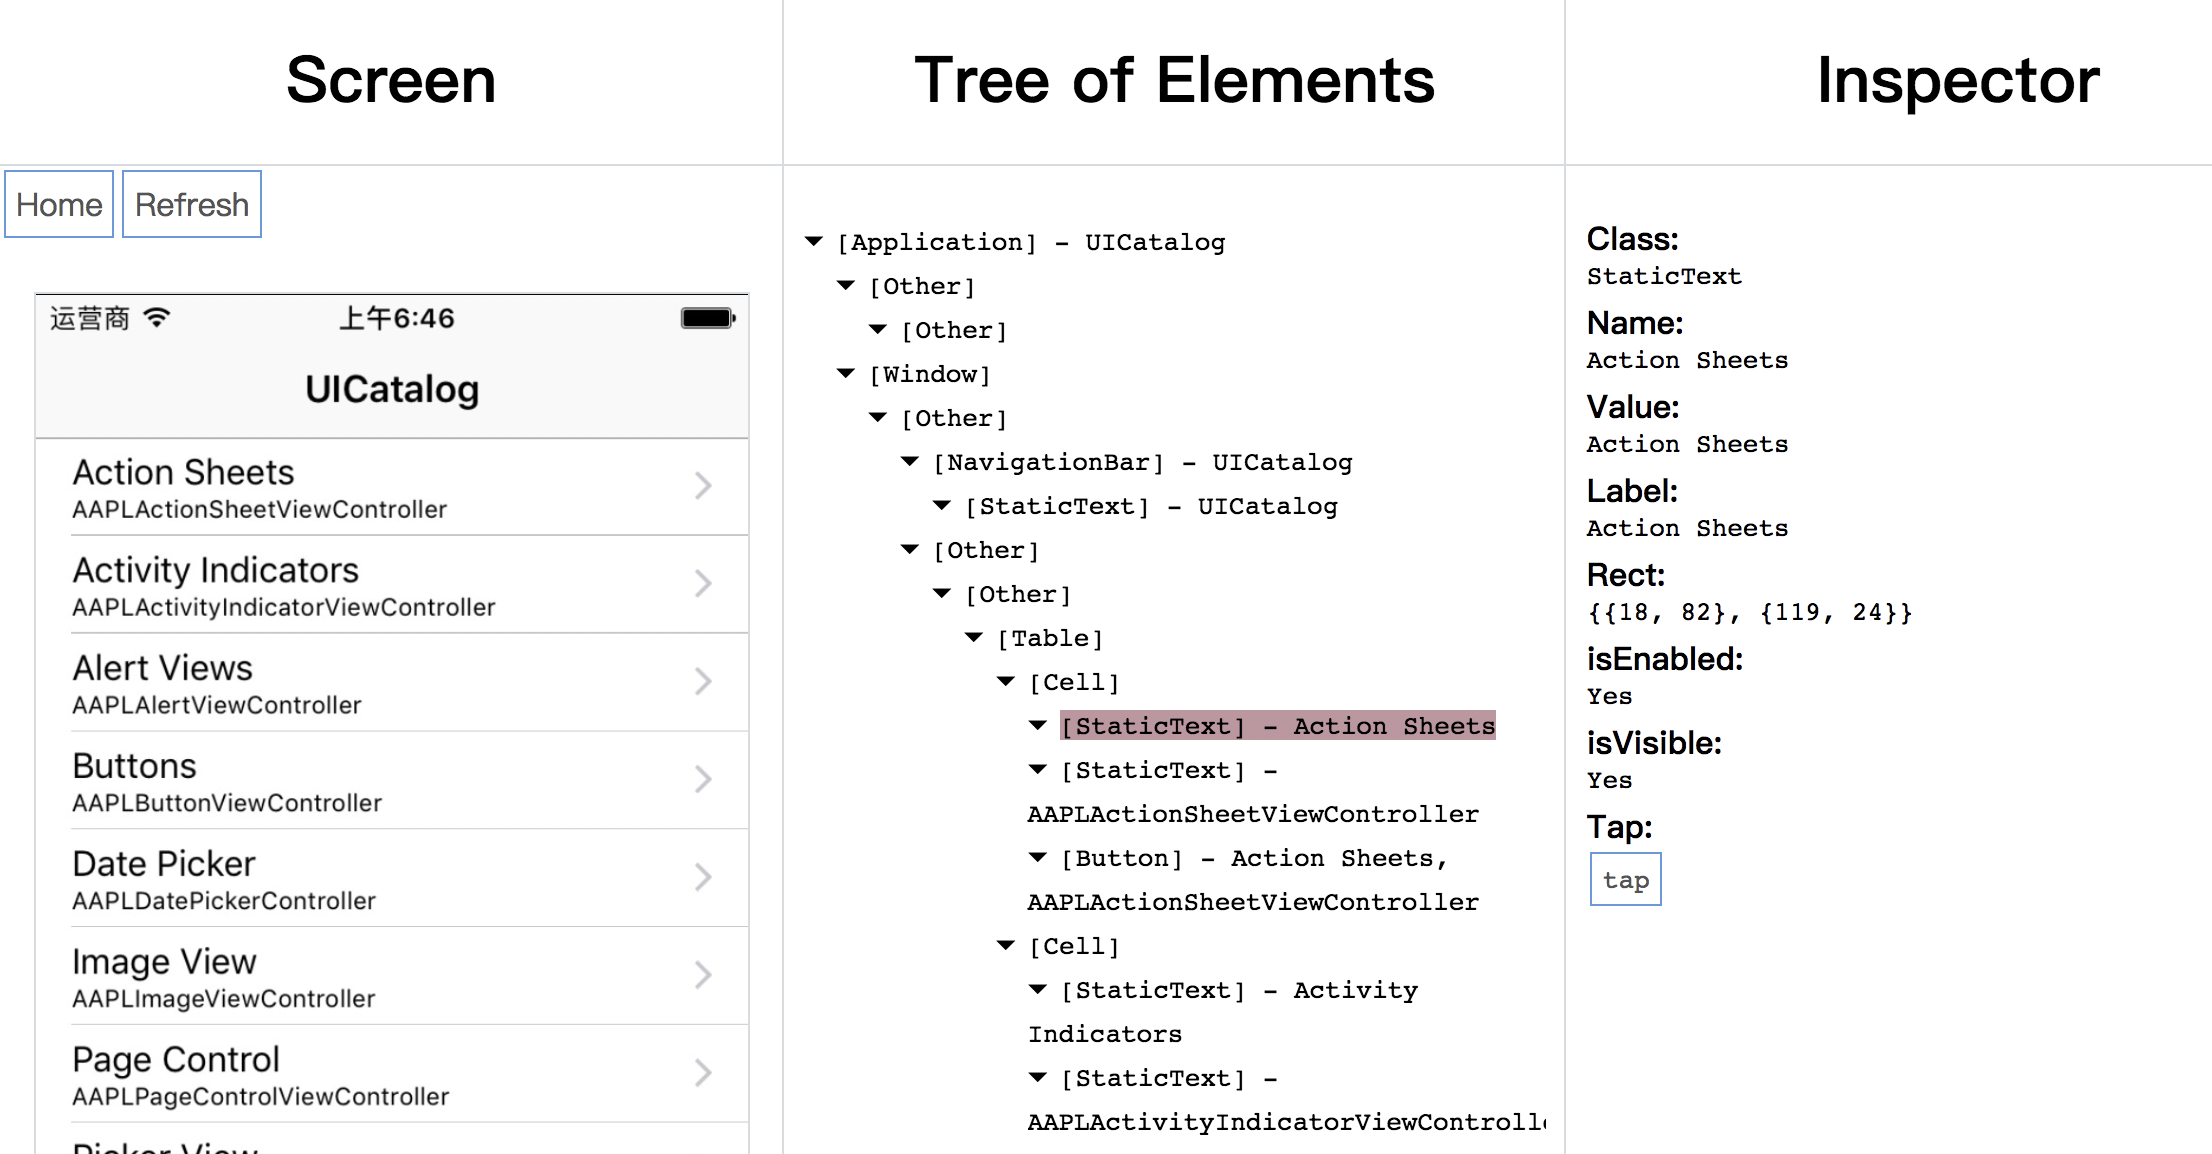
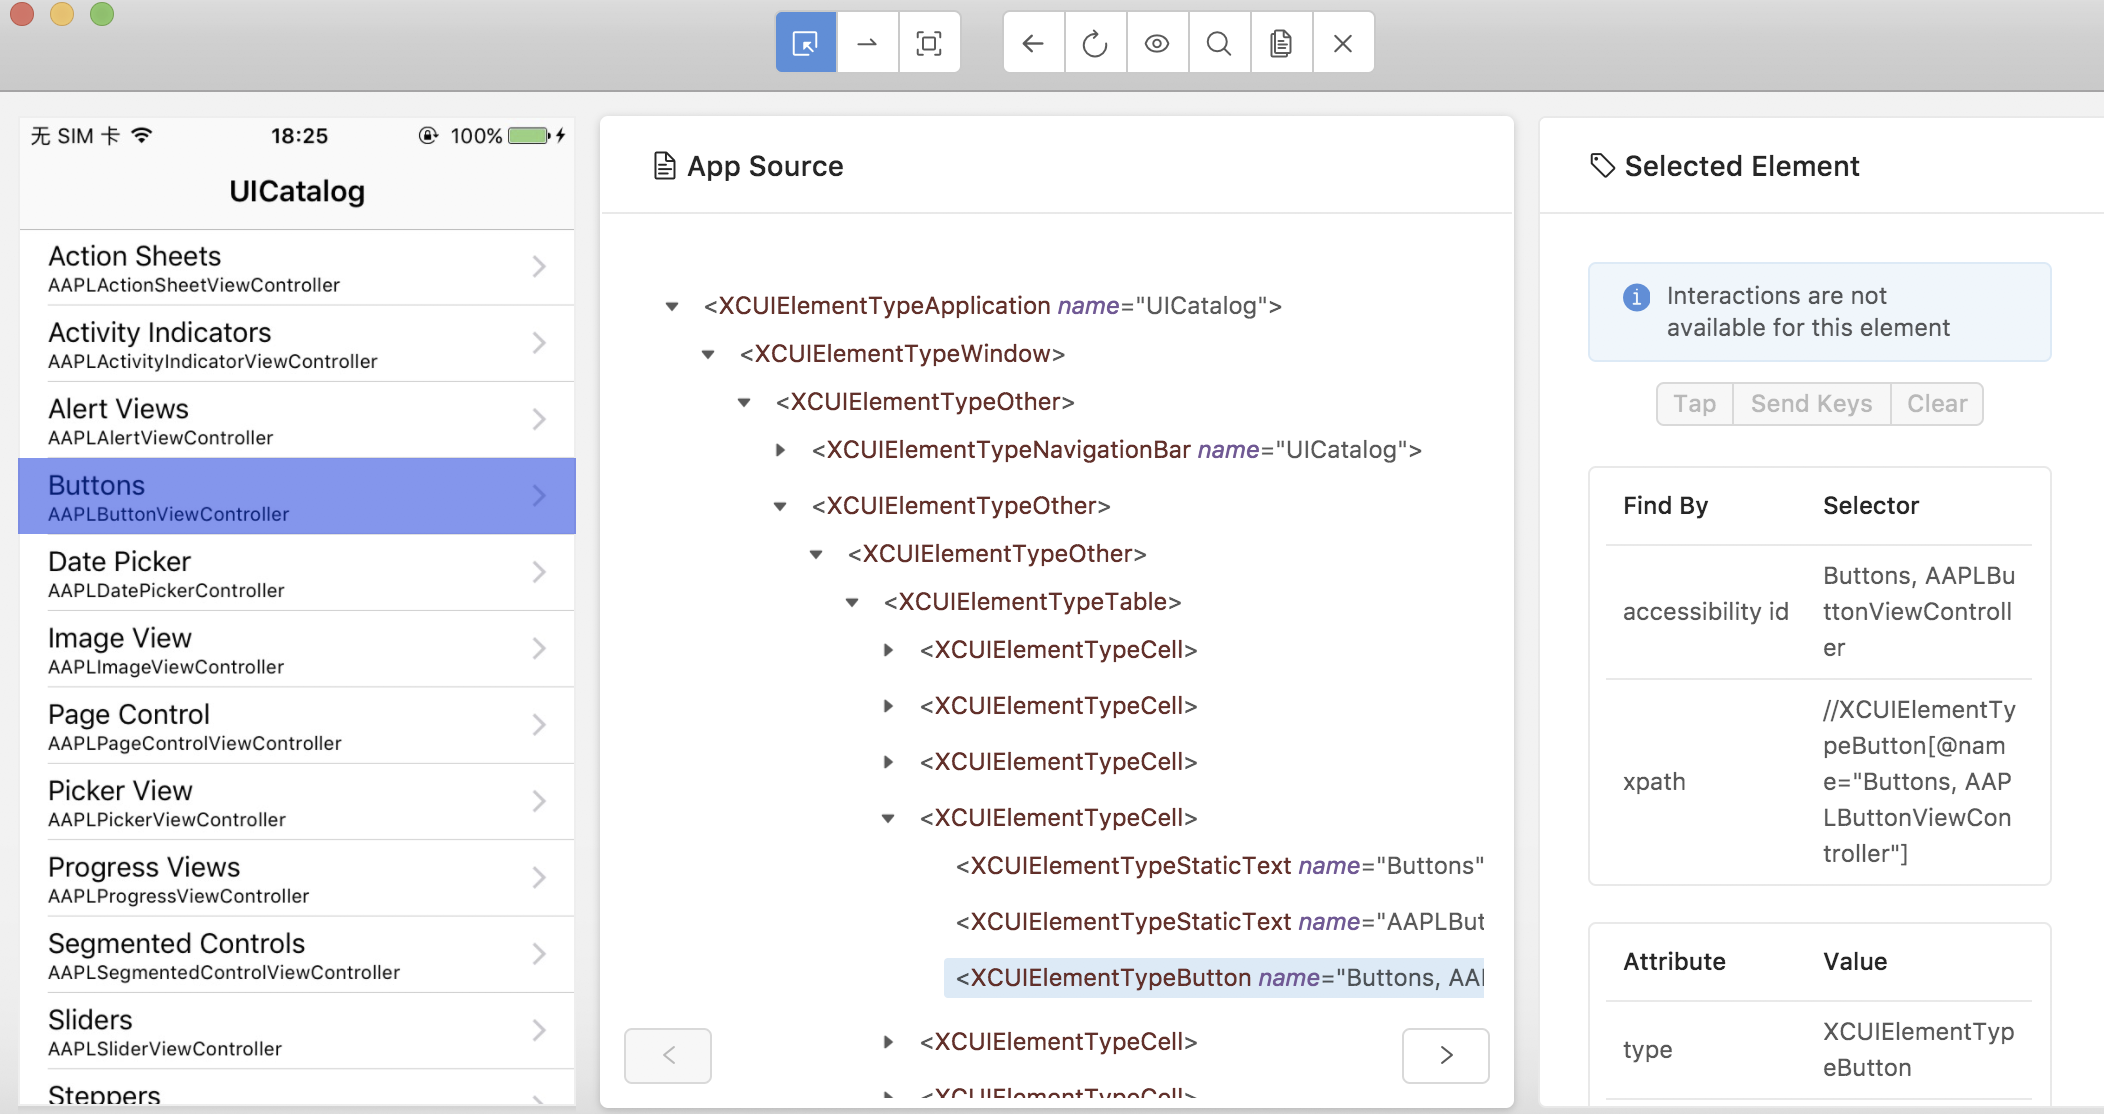
之前在appium-desktop中可以自动生成代码,把它复制到IDEA中,如图:
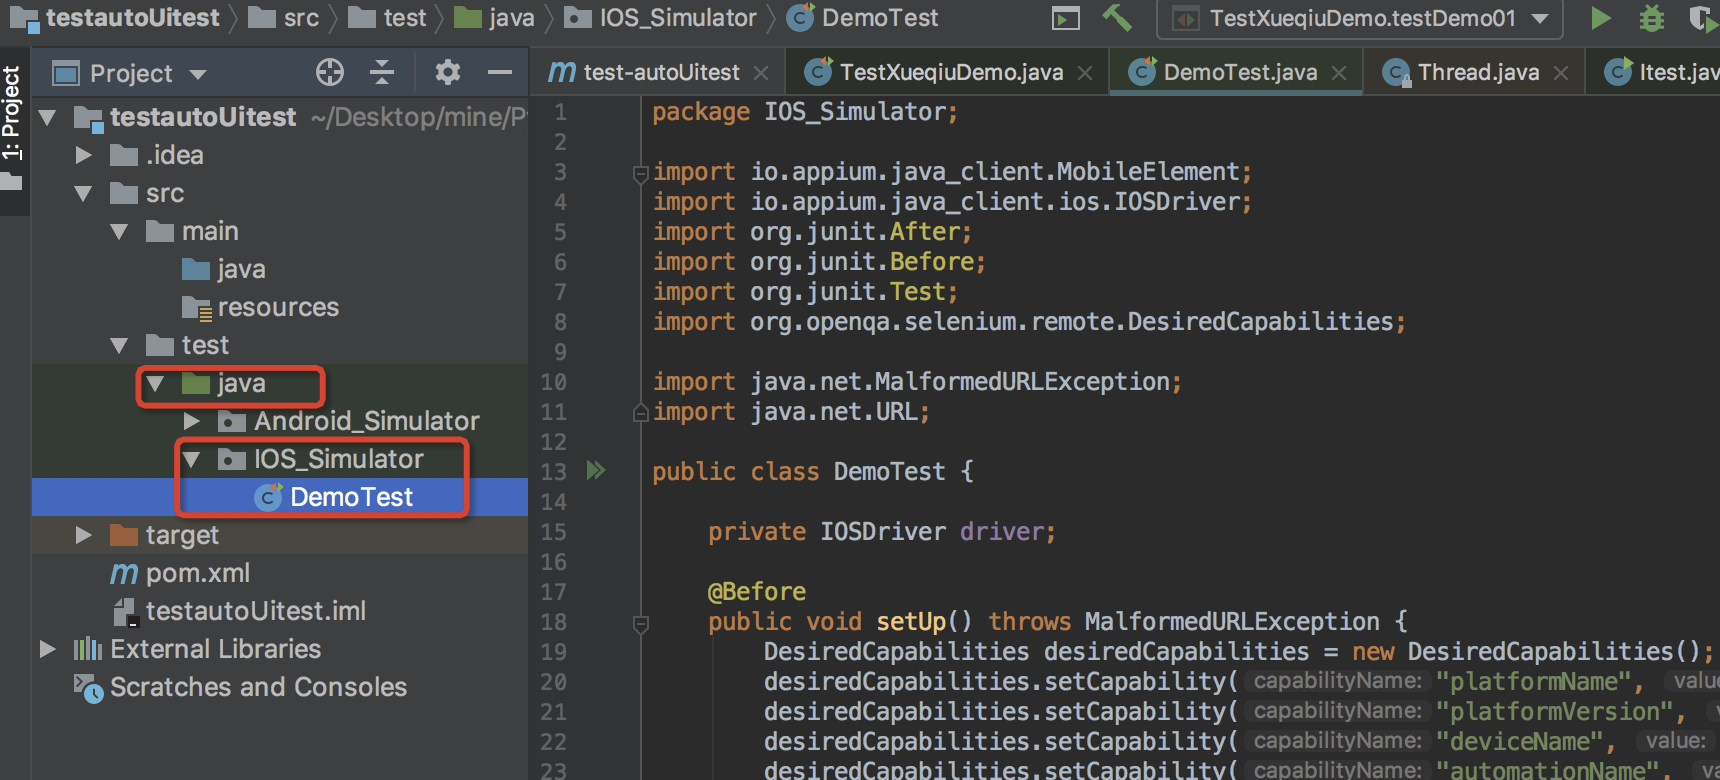
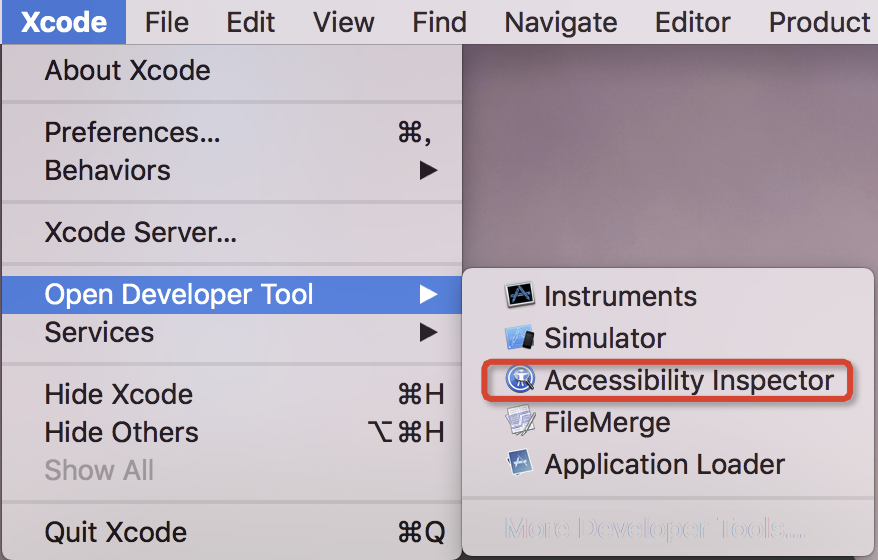
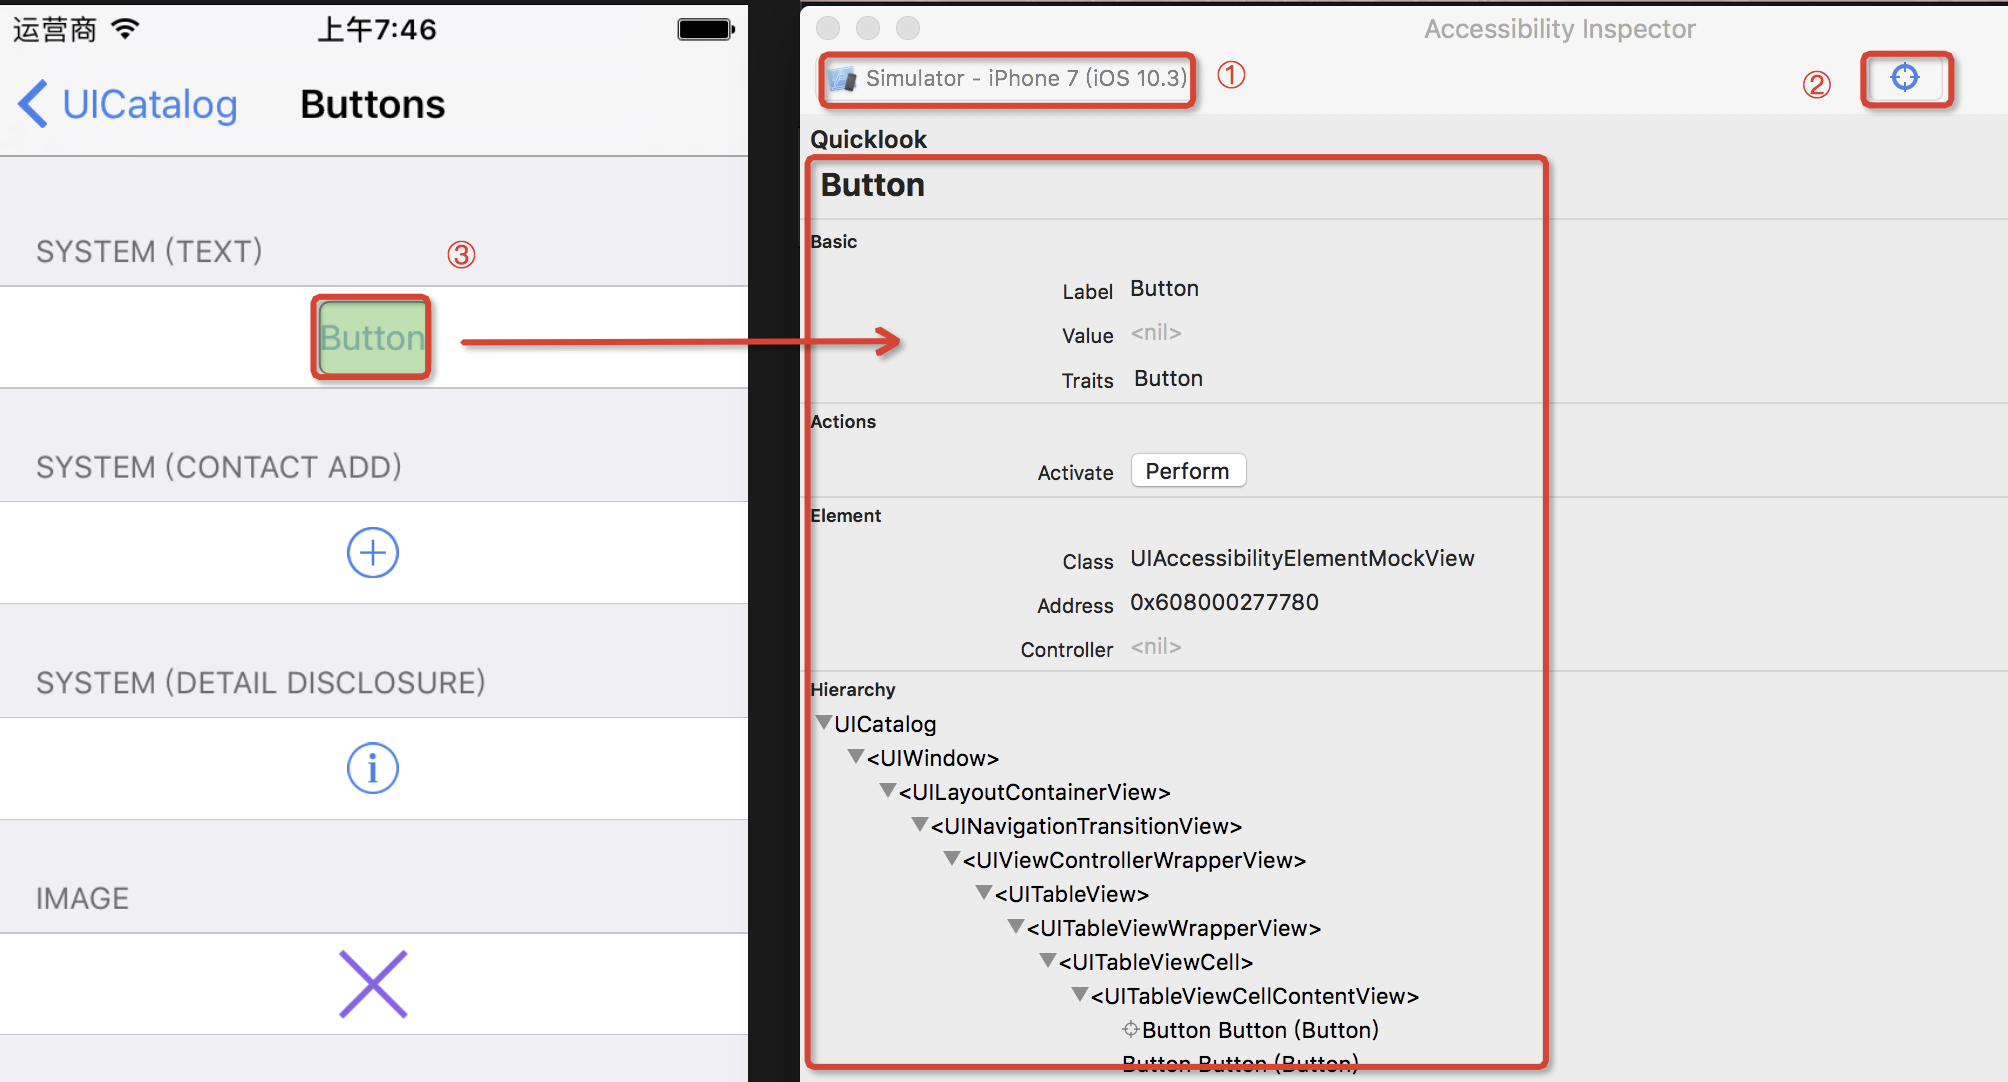
但是,从现在开始先暂时不用appium-desktop,用XCode自带的查看元素工具。
如图步骤:
上代码:
解释=>findElementByAccessibilityId,如果包含name属性则可以使用。
参考官网:http://appium.io/docs/en/writing-running-appium/finding-elements/
package IOS_Simulator;

import io.appium.java_client.ios.IOSDriver;

import org.junit.After;

import org.junit.Before;

import org.junit.Test;

import org.openqa.selenium.remote.DesiredCapabilities;

import java.net.MalformedURLException;

import java.net.URL;

public class DemoTest {

    private IOSDriver driver;

    @Before

    public void setUp() throws MalformedURLException {

        DesiredCapabilities desiredCapabilities = new DesiredCapabilities();

        desiredCapabilities.setCapability("platformName", "iOS");

        desiredCapabilities.setCapability("platformVersion", "10.3");

        desiredCapabilities.setCapability("deviceName", "iPhone7");

        desiredCapabilities.setCapability("automationName", "XCUITest");

        desiredCapabilities.setCapability("app", "/Users/xxx/Library/Developer/Xcode/DerivedData/UICatalog-hiixtcsjcynttngjfqlnzjjtpxkv/Build/Products/Debug-iphonesimulator/UICatalog.app");

        desiredCapabilities.setCapability("udid", "D3062BB8-5627-4867-8E97-AEDF6D953353");

        URL remoteUrl = new URL("http://127.0.0.1:4723/wd/hub");

        driver = new IOSDriver(remoteUrl, desiredCapabilities);

    }

    @Test

    public void sampleTest() {

//        MobileElement el1 = (MobileElement) driver.findElementByXPath("//XCUIElementTypeApplication[@name=\"UICatalog\"]/XCUIElementTypeWindow[1]/XCUIElementTypeOther/XCUIElementTypeOther/XCUIElementTypeOther/XCUIElementTypeTable/XCUIElementTypeCell[4]");

//        el1.click();

//        MobileElement el2 = (MobileElement) driver.findElementByXPath("(//XCUIElementTypeButton[@name=\"Button\"])[2]");

//        el2.click();

        driver.findElementByAccessibilityId("Buttons").click();

//        driver.getPageSource().sout ===> System.out.println(driver.getPageSource());

        System.out.println(driver.getPageSource());

        driver.findElementByXPath("//*[@label='Button']").click();

        driver.findElementByAccessibilityId("UICatalog").click();

    }

    @After

    public void tearDown() {

//        driver.quit();

    }

}
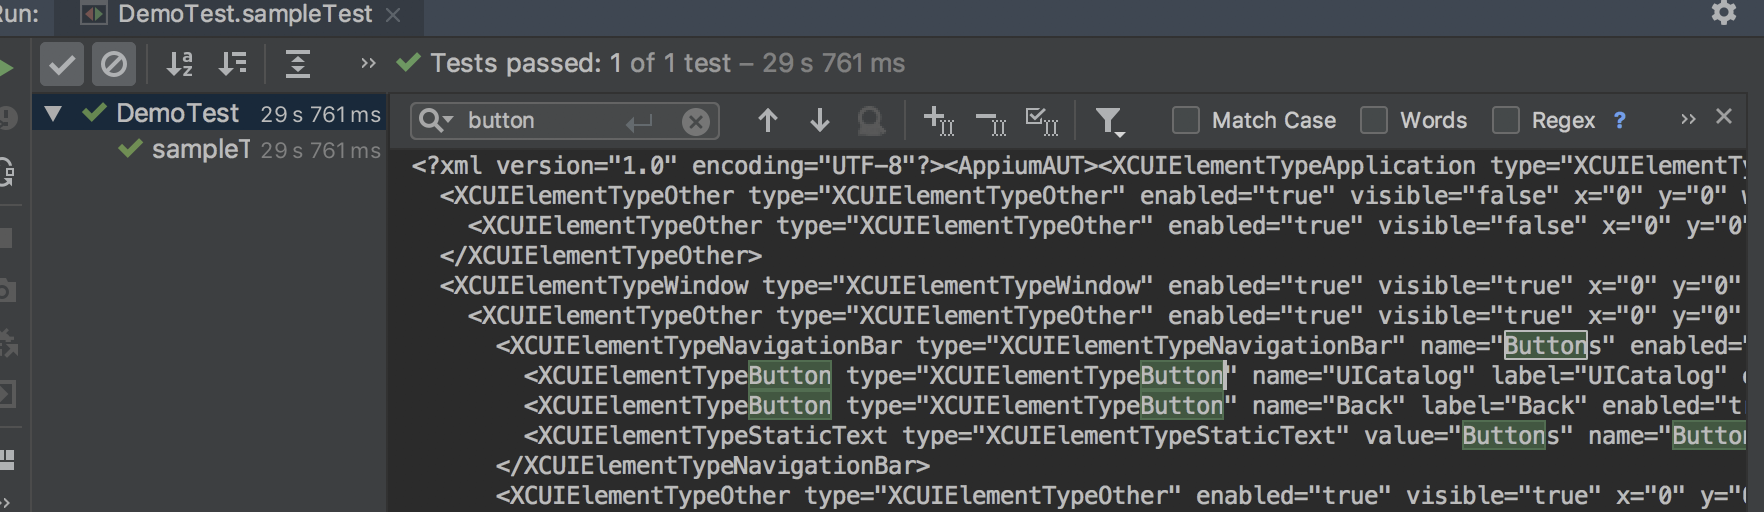
运行结果:
3、真机上跑自动化
真机官网地址说明:http://appium.io/docs/en/drivers/ios-xcuitest-real-devices/
1)配置参数
为了入门学习,还是要启动appium-desktop,完整参数:app参数有坑
{

  "platformName": "iOS",

  "platformVersion": "10.3",

  "deviceName": "iPhone5s",

  "automationName": "XCUITest",

  "app": "/Users/xxx/Library/Developer/Xcode/DerivedData/UICatalog-hiixtcsjcynttngjfqlnzjjtpxkv/Build/Products/Debug-iphonesimulator/UICatalog.app",

  "udid": "42ebab931b6b2d6a140b1a4f5bd55305dbfe2ff0"

}
启动session,报错:
Original error: Could not install app: 'Command 'ios-deploy --id 42ebab931b6b2d6a140b1a4f5bd55305dbfe2ff0 --bundle /Users/zhangc/Library/Developer/Xcode/DerivedData/UICatalog-hiixtcsjcynttngjfqlnzjjtpxkv/Build/Products/Debug-iphonesimulator/UICatalog.app' exited with code 253'
因为这个app当时是在模拟器进行的配置,所以我们还要配置真机,如下:
但是报错:
Signing for "UICatalog" requires a development team. Select a development team in the project editor. (in target 'UICatalog')
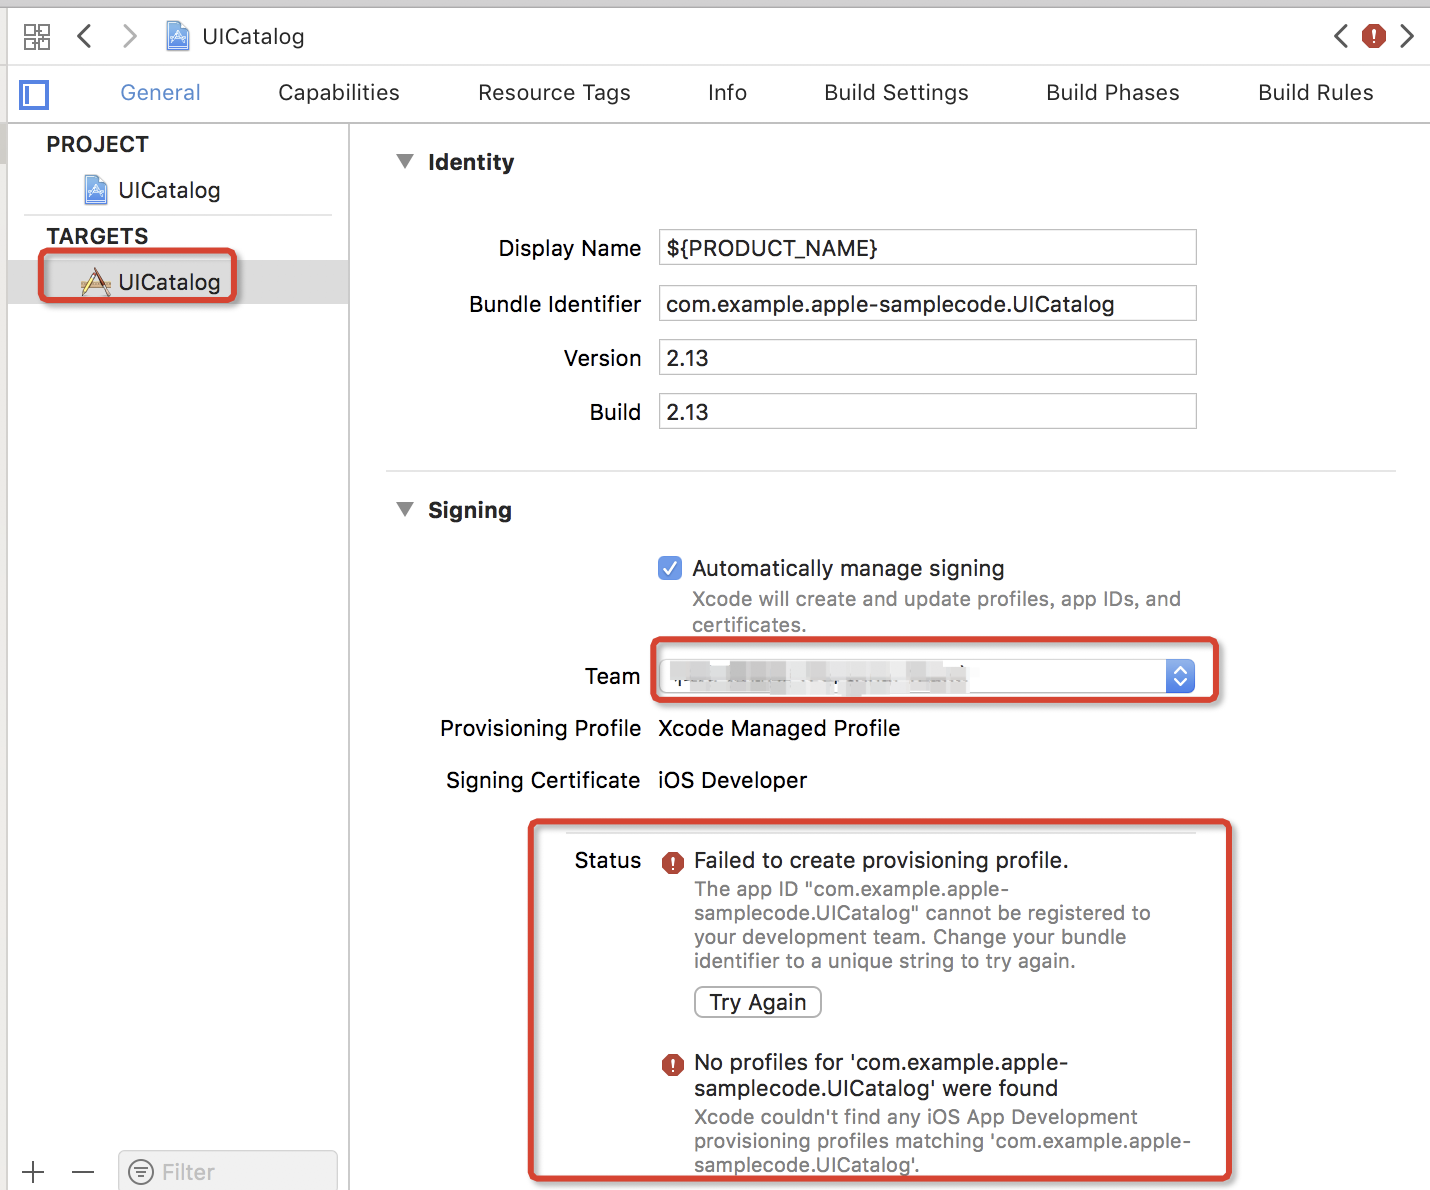
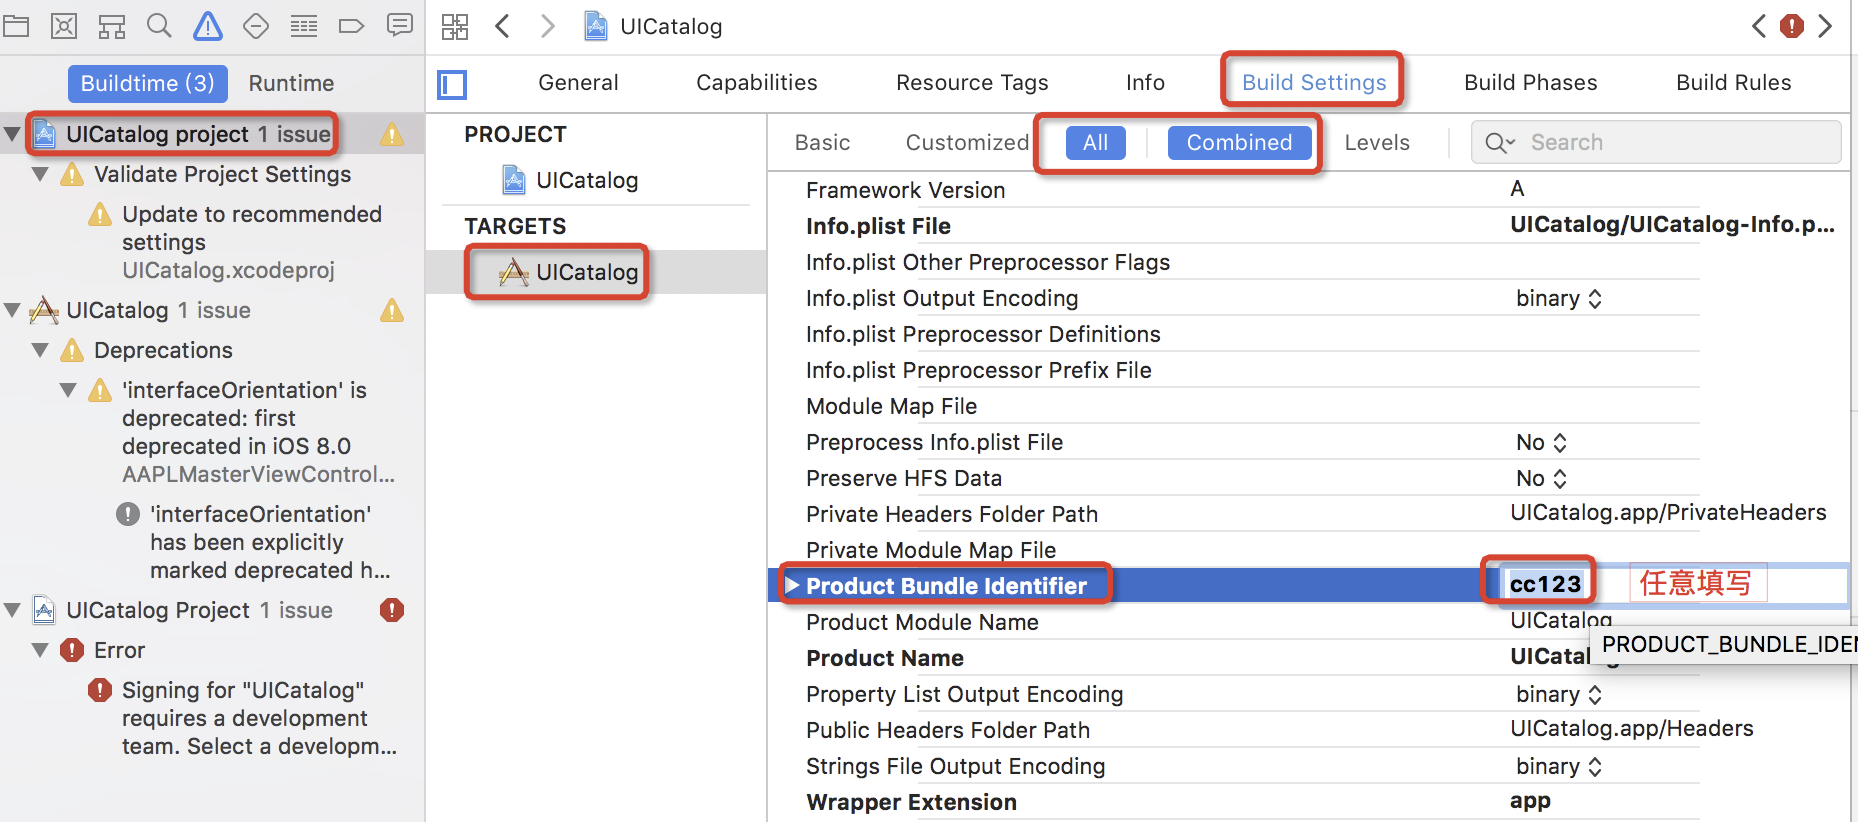
如图修改就不报错了:
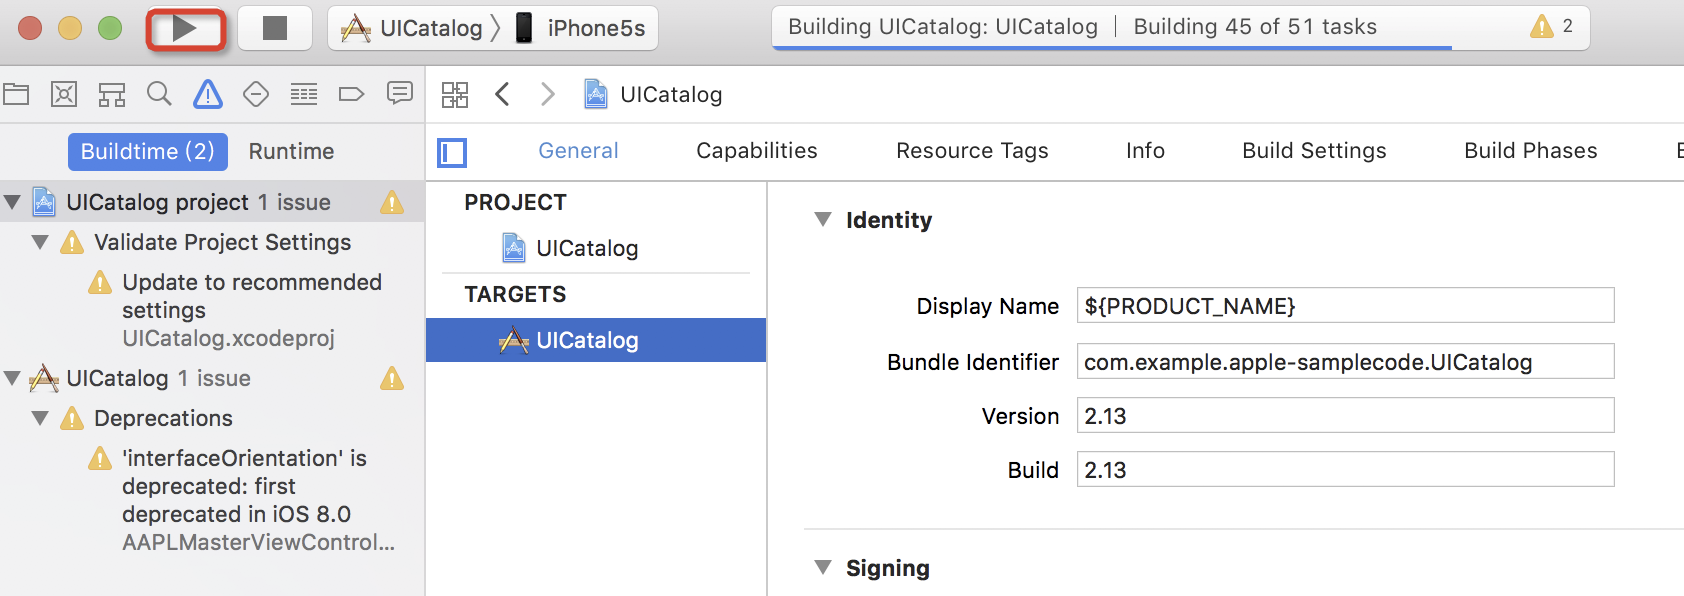
再一次运行,真机配置安装app成功:
复制app的Path到appium-desktop的参数中:
启动session后,可以加载app,如图:
2)编写自动化脚本
(1)WebView自动化
需要安装以下几个命令:
①安装依赖库:libimobiledevice
brew install libimobiledevice --HEAD
②安装ios-webkit-debug-proxy:
官网为:
https://github.com/google/ios-webkit-debug-proxy
http://appium.io/docs/en/writing-running-appium/web/ios-webkit-debug-proxy/
# 调试转换

brew install ios-webkit-debug-proxy
并且IOS手机设置一下Web检查器:设置->safari浏览器->高级->Web检查器->打开
# 扩展:手机截图

idevicescreenshot
安装完成后,进行appium-desktop参数配置:
{

  "platformName": "iOS",

  "platformVersion": "10.3",

  "deviceName": "iPhone5s",

  "automationName": "XCUITest",

  "udid": "auto",  # 默认第一台连接设备

  "startIWDP": true,

  "browserName": "Safari"

}
启动session后,成功:
③编写脚本
package IOS.Real;

import io.appium.java_client.ios.IOSDriver;

import org.junit.After;

import org.junit.Before;

import org.junit.Test;

import org.openqa.selenium.remote.DesiredCapabilities;

import java.net.MalformedURLException;

import java.net.URL;

public class DemoTest_WebView {

    private IOSDriver driver;

    @Before

    public void setUp() throws MalformedURLException {

        DesiredCapabilities desiredCapabilities = new DesiredCapabilities();

        desiredCapabilities.setCapability("platformName", "iOS");

//        desiredCapabilities.setCapability("platformVersion", "10.3");

        desiredCapabilities.setCapability("deviceName", "auto");

        desiredCapabilities.setCapability("automationName", "XCUITest");

        desiredCapabilities.setCapability("udid", "auto");

        desiredCapabilities.setCapability("startIWDP", true);

        desiredCapabilities.setCapability("browserName", "Safari");

//        42ebab931b6b2d6a140b1a4f5bd55305dbfe2ff0

        URL remoteUrl = new URL("http://localhost:4723/wd/hub");

        driver = new IOSDriver(remoteUrl, desiredCapabilities);

    }

    @Test

    public void web(){

        driver.get("https://testerhome.com");

        driver.findElementByXPath("//*[contains(@title,'北京管理沙龙')]").click();

//        driver.get("https://appium.io/");

//        driver.findElementByXPath("(//XCUIElementTypeOther[@name=\"导航\"])[1]").click();

    }

    @After

    public void tearDown() {

//        driver.quit();

    }

}
运行代码后一直报错,后来经过痛苦的查询得知:
参考解决地址:《AppiumDriver driver = new AppiumDriver 的AppiumDriver报错问题解决》
WebDriverException: An unknown server-side error occurred while processing the command. Original error: Unhandled endpoint

错误日志:org.openqa.selenium.WebDriverException: An unknown server-side error occurred while processing the command. Original error: Unhandled endpoint: /session/763C2E9E-9078-4931-BDF3-A05C2E3AF2E5/wda/screen -- http://localhost:8100/ with parameters {

wildcards = (

"session/763C2E9E-9078-4931-BDF3-A05C2E3AF2E5/wda/screen"

);

}
代码执行到这里就报错:
driver = new IOSDriver(remoteUrl, desiredCapabilities);
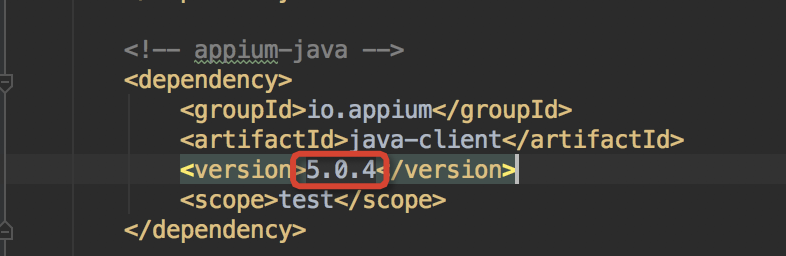
因为使用的appium-client版本太高导致的,后来在Maven中由6.1.0版本降到5.0.4版本再运行就好了
p.p1 { margin: 0 0 0 12px; text-indent: -12px; font: 11px Menlo; color: rgba(0, 0, 0, 0.85); min-height: 13px }
p.p2 { margin: 0 0 0 12px; text-indent: -12px; font: 11px Menlo; color: rgba(0, 0, 0, 0.85) }
【Mac + Appium + Java1.8(三)】之IOS自动化环境安装配置以及简单测试用例编写(模拟器、真机)的更多相关文章
- 解决MAC Appium设备连不上IOS的的问题'idevice_id' program is not installed
解决MAC Appium设备连不上IOS的的问题 错误的: [XCUITest] The 'idevice_id' program is not installed. If you are runni ...
- iOS自动化环境搭建——macaca
macaca-java for ios 自动化环境搭建 基础原理解析:https://testerhome.com/topics/6608 一.环境搭建 1.安装eclipse; -----Java开 ...
- iOS 11开发教程(九)iOS11数据线连接真机测试
iOS 11开发教程(九)iOS11数据线连接真机测试 在Xcode 7.0之后,苹果公司在开发许可权限上做了很多的改变,在测试App方面取消了一些限制.在Xcode7.0之前的版本,苹果公司只向注册 ...
- python-web自动化环境安装
web自动化环境安装 1.安装selenium 命令行使用以下命令安装selenium:pip install -U selenium 2.安装chrome浏览器 3.chromedriver的下载 ...
- C#实现多级子目录Zip压缩解压实例 NET4.6下的UTC时间转换 [译]ASP.NET Core Web API 中使用Oracle数据库和Dapper看这篇就够了 asp.Net Core免费开源分布式异常日志收集框架Exceptionless安装配置以及简单使用图文教程 asp.net core异步进行新增操作并且需要判断某些字段是否重复的三种解决方案 .NET Core开发日志
C#实现多级子目录Zip压缩解压实例 参考 https://blog.csdn.net/lki_suidongdong/article/details/20942977 重点: 实现多级子目录的压缩, ...
- iOS自动化环境搭建(超详细)
1.macOS相关库安装 libimobiledevice > brew install libimobiledevice 使用本机与苹果iOS设备的服务进行通信的库. ideviceinsta ...
- appium 使用环境安装配置记录
一.安装配置Java (cmd输入java,回车,没有出现“不是内部或外部命令,也不是可运行的程序或批处理文件”,即为成功) 二.安装node.js (cmd输入node -v,显示版本号即为成功) ...
- Delphi IOS开发环境安装
RAD Delphi XE/10 Seattle 安装IOS.OSX环境安装,IOS模拟器,MAC X 真机可以调试 http://community.embarcadero.com/blogs/en ...
- iOS系列 基础篇 01 构建HelloWorld,剖析并真机测试
iOS基础 01 构建HelloWorld,剖析并真机测试 前言: 从控制台输出HelloWorld是我们学习各种语言的第一步,也是我们人生中非常重要的一步. 多年之后,我希望我们仍能怀有学习上进的心 ...
- iOS - MySQL 的安装配置
前言 提前下载好相关软件,且安装目录最好安装在全英文路径下.如果路径有中文名,那么可能会出现一些莫名其妙的问题. 提前准备好的软件: mysql-5.7.17-macos10.12-x86_64.dm ...
随机推荐
- 详细讲解 Keil Pack Installer,以及通过 Keil 官网获取 Pack
前言 大家好,我是梁国庆. 收到粉丝留言,说 Keil 安装 Pack 不太明白,可不可以详细演示一下? 当然可以有,直接视频+文章全部安排,我就是宠粉. PS:第一次录视频有些紧张,见谅哈. 微信视 ...
- Codeforces Global Round 26 A~C2
惹啊啊啊啊,这场做得我发昏,最近总感觉不在状态,但还是再在冲击1600-1800的题目. A. Strange Splitting ---------------------------------题 ...
- [WUSTCTF2020]朴实无华(命令执行)
请求头问题 去查了一下资料了解了一下没有什莫用 robots.txt 中有东西 假flag 但是请求头里有重要消息 访问页面/fl4g.php <img src="/img.jpg&q ...
- 阅读翻译Mathematics for Machine Learning之2.8 Affine Subspaces
阅读翻译Mathematics for Machine Learning之2.8 Affine Subspaces 关于: 首次发表日期:2024-07-24 Mathematics for Mach ...
- 基于vue.js 移动可视化,拖拽生成H5系统
效果预览 功能简介 基于Vue.js(2.0)版本开发的,通过拖拽可视化的操作,生成H5的页面,类似易企秀的工具,前端展示页面运用了之前发布的 vue-animate-fullpage 插件进行动画渲 ...
- 新年切红包-scratch小游戏
程序说明: <新年切红包>是一款Scratch制作的小游戏,灵感来源于流行的切水果游戏.在这个游戏中,玩家需要用鼠标切割屏幕上不断飞出的红包,切割到红包将获得金币奖励,而切割到爆竹则会导致 ...
- 轻量级SpringBoot Office文档在线预览框架
框架简介 介绍:基于开源项目KkFileView源码提取出,封装成仅用于 Office文档预览(格式转换) 功能的一个通用组件; 原理是把Word转成PDF,PPT转成PDF,Excel转成HTML; ...
- Gradle配置文件解析和使用Meven本地仓库
Gradle配置文件 使用Gradle创建好项目之后,项目的根目录下会有一个build.gradle文件,该文件就是Gradle的核心配置文件 对应的信息: plugins { id 'java' } ...
- 对比python学julia(第四章:人工智能)--(第一节)OpenCV编程初步(3)
1.4. 人脸检测 (续上) 3.检测视频中的人脸 在VSCode环境中,新建一个空白源文件,以detect_video.jl作为文件名保存到项目文件夹中,然后编写程序检测视频流中的人脸(正脸).由 ...
- 【Vue】NPM构建的一些问题解决
9418端口已经不再支持未授权的GIT协议 C:\Users\Administrator\Desktop\wss-taskcore-web>npm install npm ERR! Error ...