Prometheus+Grafana+alertmanager构建企业级监控系统(三)
七、Prometheus监控扩展
7.1 Promethues 采集tomcat监控数据
# 1.制作tomcat 镜像

[root@monitor ~]# mkdir /root/tomcat_image && cd tomcat_image

[root@monitor tomcat_image]# cat Dockfile

from tomcat

ADD metrics.war /usr/local/tomcat/webapps/

ADD simpleclient-0.8.0.jar  /usr/local/tomcat/lib/

ADD simpleclient_common-0.8.0.jar /usr/local/tomcat/lib/

ADD simpleclient_hotspot-0.8.0.jar /usr/local/tomcat/lib/

ADD simpleclient_servlet-0.8.0.jar /usr/local/tomcat/lib/

ADD tomcat_exporter_client-0.0.12.jar /usr/local/tomcat/lib/

# 上传jar文件到/root/tomcat_image目录

[root@monitor tomcat_image]# docker build -t="tomcat:v1" .

Sending build context to Docker daemon    128kB

Step 1/7 : from tomcat

 ---> fb5657adc892

Step 2/7 : ADD metrics.war /usr/local/tomcat/webapps/

 ---> 70bebb443fa6

Step 3/7 : ADD simpleclient-0.8.0.jar  /usr/local/tomcat/lib/

 ---> 2c037ca1a4e8

Step 4/7 : ADD simpleclient_common-0.8.0.jar /usr/local/tomcat/lib/

 ---> 60a1a9fffbcb

Step 5/7 : ADD simpleclient_hotspot-0.8.0.jar /usr/local/tomcat/lib/

 ---> ac58a0695b53

Step 6/7 : ADD simpleclient_servlet-0.8.0.jar /usr/local/tomcat/lib/

 ---> 0f592584df8a

Step 7/7 : ADD tomcat_exporter_client-0.0.12.jar /usr/local/tomcat/lib/

 ---> 1911921b4169

Successfully built 1911921b4169

Successfully tagged tomcat:v1

# 2.基于上面的镜像创建一个tomcat实例

[root@master tomcat_image]# cat tomcat-deploy.yaml

apiVersion: apps/v1

kind: Deployment

metadata:

  name: tomcat-deployment

  namespace: default

spec:

  selector:

    matchLabels:

     app: tomcat

  replicas: 2 # tells deployment to run 2 pods matching the template

  template: # create pods using pod definition in this template

    metadata:

      labels:

        app: tomcat

      annotations:

        prometheus.io/scrape: 'true'

    spec:

      containers:

      - name: tomcat

        image: tomcat:v1

        imagePullPolicy: IfNotPresent

        ports:

        - containerPort: 8080

        securityContext:

          privileged: true

[root@master tomcat_image]# kubectl apply -f tomcat-deploy.yaml
[root@master tomcat_image]# kubectl get pods -o wide
NAME READY STATUS RESTARTS AGE IP NODE NOMINATED NODE READINESS GATES
tomcat-deployment-685fcb974f-plbh9 1/1 Running 0 11s 10.244.75.214 monitor <none> <none>
tomcat-deployment-685fcb974f-z8jdp 1/1 Running 0 11s 10.244.75.215 monitor <none> <none>
# 3.创建一个service(可操作也可不操作,prometheus通过内网链接)

[root@master tomcat_image]# cat tomcat_svc.yaml

kind: Service  #service 类型

apiVersion: v1

metadata:

#  annotations:

#  #    prometheus.io/scrape: 'true'

  name: tomcat-service

spec:

  selector:

    app: tomcat

  ports:

  - nodePort: 31360

    port: 8080

    protocol: TCP

    targetPort: 8080

  type: NodePort
[root@master tomcat_image]# kubectl apply -f tomcat_svc.yaml
tomcat没有进行配置,所以显示这样,可以看出在prometheus中出现了

7.2 Promethues 采集 Nginx监控数据---nginx-vts-export
监控Nginx主要用到以下三个模块:

nginx-module-vts:Nginx的监控模块,能够提供JSON格式的数据产出。

nginx-vts-exporter:主要用于收集Nginx的监控数据,并给Prometheus提供监控接口,默认端口号9913。

Prometheus:监控Nginx-vts-exporter提供的Nginx数据,并存储在时序数据库中,可以使用PromQL对时序数据进行查询和聚合。
grafana nginx监控模板下载:请根据grafana版本需求下载
https://grafana.com/grafana/dashboards/?pg=community&plcmt=topnav&search=nginx
# 环境:centos 7.9,nginx-1.22.0,grafana 5.0.4,nginx-vts-export-0.10.3

1.安装依赖包

yum install -y yum-utils wget pcre-devel gcc gcc-c++ ncurses-devel perl openssl openssl-devel libssl-dev mysql-devel geoip-devel

./configure --prefix=/usr/local/nginx-1.20.0 --conf-path=/usr/local/nginx-1.20.0/conf/nginx.conf --http-client-body-temp-path=/usr/local/nginx-1.20.0/cache/client_temp --http-proxy-temp-path=/usr/local/nginx-1.20.0/cache/proxy_temp --http-fastcgi-temp-path=/usr/local/nginx-1.20.0/cache/fastcgi_temp --http-uwsgi-temp-path=/usr/local/nginx-1.20.0/cache/uwsgi_temp --http-scgi-temp-path=/usr/local/nginx-1.20.0/cache/scgi_temp --with-http_geoip_module=dynamic --with-http_ssl_module --with-http_v2_module --with-http_realip_module --with-http_addition_module --with-http_sub_module --with-http_dav_module --with-http_flv_module --with-http_mp4_module --with-http_gunzip_module --with-http_gzip_static_module --with-http_random_index_module --with-http_secure_link_module --with-http_stub_status_module --with-http_degradation_module --with-http_slice_module --with-http_auth_request_module --with-mail --with-mail_ssl_module --with-pcre --with-pcre-jit --with-stream --with-stream_ssl_module --with-threads --with-file-aio --with-ipv6 --with-cc-opt='-O2 -g -pipe -Wp,-D_FORTIFY_SOURCE=2 -fexceptions -fstack-protector --param=ssp-buffer-size=4 -m64 -mtune=generic' --add-module=/usr/local/nginx-module-vts-master/

make && make install

# nginx.conf中增加

http {
  ....

  vhost_traffic_status_zone;

  vhost_traffic_status_filter_by_host on;
  ...

}

# server_name中添加

    location /status {

        vhost_traffic_status_display;

        vhost_traffic_status_display_format html;

  }

# 解释:

打开vhost过滤

vhost_traffic_status_filter_by_host on

开启此功能,在Nginx配置有多个server_name的情况下,会根据不同的server_name进行流量的统计,否则默认会把流量全部计算到第一个server_name上。在不想统计流量的server区域禁vhost_traffic_status off;
vhost_traffic_status_zone; # 共享内存区域设置参数,默认32M共享内存大小
vhost_traffic_status_display; # 启用或禁用显示处理模块
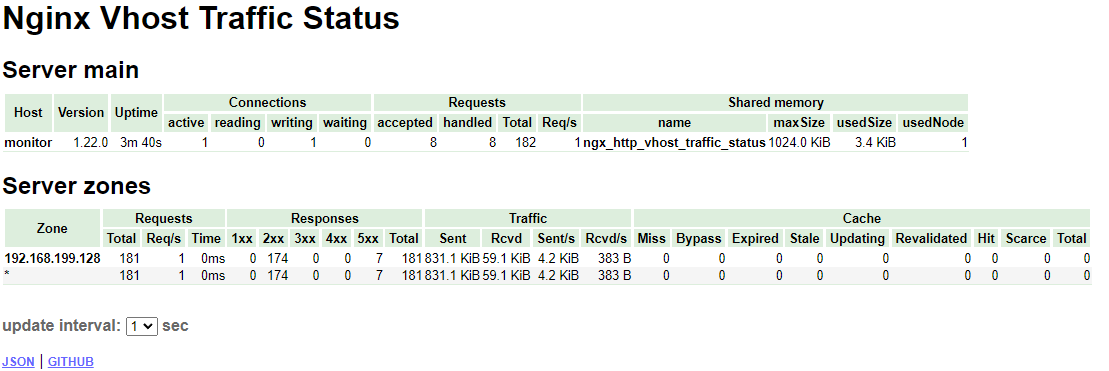
vhost_traffic_status_display_format html; # 设置显示处理模块输出的格式,<json\|html\|jsonp\|prometheus>,默认值为json
启动nginx后访问查看:http://192.168.199.128/status
tar -xzvf nginx-vts-exporter-0.10.3.linux-amd64.tar.gz

cd nginx-vts-exporter-0.10.3.linux-amd64

[root@monitor nginx-vts-exporter-0.10.3.linux-amd64]# nohup ./nginx-vts-exporter -nginx.scrape_uri http://192.168.199.128/status/format/json &
# 新增

vim prometheus-alertmanager-cfg.yaml

    - job_name: 'nginx'

      scrape_interval: 5s

      static_configs:

      - targets: ['192.168.199.128:9913']

kubectl delete -f alertmanager-cm.yaml
kubectl delete -f prometheus-alertmanager-cfg.yaml
kubectl delete -f prometheus-alertmanager-deploy.yaml
kubectl apply -f .

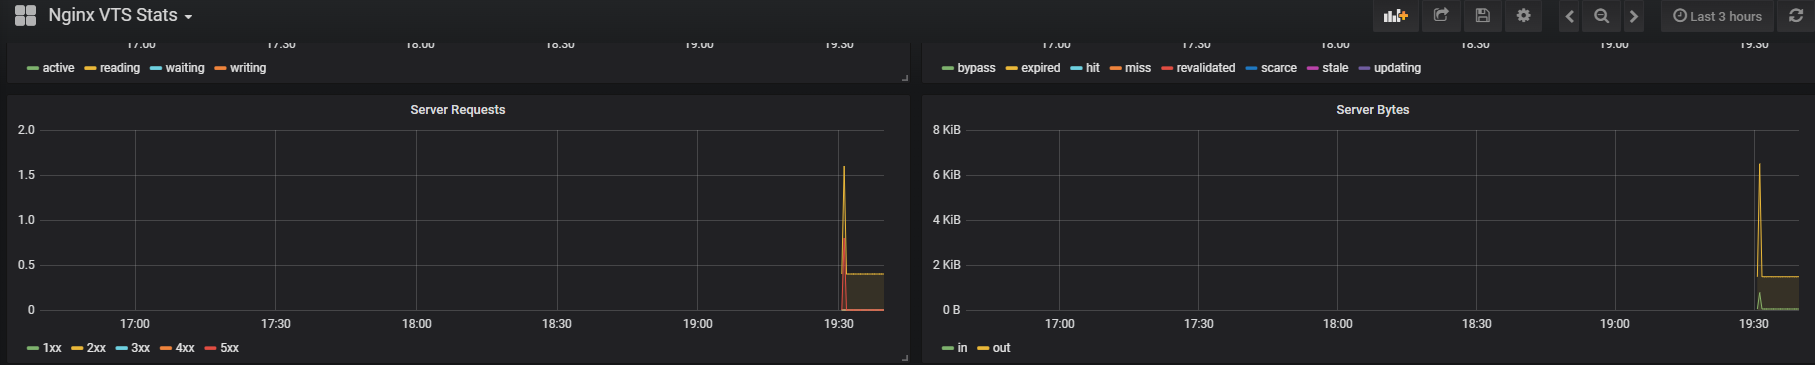
在grafana界面导入nginx-vts-stats_rev2.json
https://grafana.com/grafana/dashboards/2949
nginx-vts-exporter采用镜像安装
[root@monitor vhosts]# docker search nginx-vts-exporter

NAME                                   DESCRIPTION                                     STARS     OFFICIAL   AUTOMATED

sophos/nginx-vts-exporter              Simple server that scrapes Nginx vts stats a…   7                    [OK]

[root@monitor vhosts]# docker pull sophos/nginx-vts-exporter:v0.10.7

docker.io/sophos/nginx-vts-exporter:v0.10.7

[root@monitor vhosts]# docker images

sophos/nginx-vts-exporter                            v0.10.7   3524e3801c35   2 years ago     15MB

[root@monitor vhosts]# docker run -di -p 9913:9913 --env NGINX_STATUS=http://192.168.199.128/status/format/json --restart=always sophos/nginx-vts-exporter:v0.10.7

cefb0050c7fb2409f4b24640089478370a176724ab4719b01aa7cece5bc22906
Prometheus+Grafana+alertmanager构建企业级监控系统(三)的更多相关文章
- Prometheus+Grafana+Alertmanager实现告警推送教程 ----- 图文详解
前言 本文主要介绍的是Prometheus采集数据,通过Grafana加上PromQL语句实现数据可视化以及通过Alertmanage实现告警推送功能.温馨提示,本篇文章特长,2w多的文字加上几十张图 ...
- 使用Ubuntu系统编译安装Zabbix企业级监控系统
使用Ubuntu系统编译安装Zabbix企业级监控系统 作者:尹正杰 版权声明:原创作品,谢绝转载!否则将追究法律责任. Ubuntu系统部署笔记:https://www.cnblogs.com/ ...
- 使用Ubuntu系统管理包工具(apt)部署Zabbix企业级监控系统
使用Ubuntu系统管理包工具(apt)部署Zabbix企业级监控系统 作者:尹正杰 版权声明:原创作品,谢绝转载!否则将追究法律责任. Ubuntu系统部署笔记:https://www.cnblo ...
- Telegraf+InfluxDB+Grafana快速搭建实时监控系统 监控postgresql
Telegraf+InfluxDB+Grafana快速搭建实时监控系统 监控postgresql
- 互联网企业级监控系统 OpenFalcon
Open-Falcon 人性化的互联网企业级监控系统,Open-Falcon 整体可以分为两部分,即绘图组件.告警组件.其中: 安装绘图组件 负责数据的采集.收集.存储.归档.采样.查询.展示(Das ...
- 自动化监控系统(三) 搭建xadmin做网站后台
Django有个自带的admin后台,不过界面不怎么好看,这里我用xadmin 我的python版本是3.5,可以使用支持py3的xadmin:https://github.com/sshwsfc/x ...
- 基于Prometheus+Grafana+AlertManager的监控系统
一.Prometheus 1.1 简介 Prometheus是一套开源的监控&报警&时间序列数据库的组合,基于应用的metrics来进行监控的开源工具 . 1.2 下载&安装 ...
- Prometheus+Grafana+Alertmanager搭建全方位的监控告警系统
prometheus安装和配置 prometheus组件介绍 1.Prometheus Server: 用于收集和存储时间序列数据. 2.Client Library: 客户端库,检测应用程序代码,当 ...
- Open-Falcon第三步安装Agent (小米开源互联网企业级监控系统)
安装Agent 每台机器上,都需要部署agent,agent会自动采集预先定义的各种采集项,每隔60秒,push到transfer. cd $WORKSPACE/agent/ mv cfg.examp ...
- Grafana & Graphite & Collectd:监控系统
简介 监控是运维工作中的一个重要组成部分,今天介绍一套新的监控工具,方便好用,扩展性强,这套工具有三个组件,Grafana & Graphite & Collectd: Grafana ...
随机推荐
- 记录--微信小程序,uniapp,H5端发送,显示emoji表情
这里给大家分享我在网上总结出来的一些知识,希望对大家有所帮助 小伙伴们,在开发中有没有遇到过发布帖子或者实时聊天需要发送到一些emoji表情的. 但是每当我们直接将emoji表情提交到后台的接口又会报 ...
- k8s-master 设置调度污点
k8s master 调度污点 NoSchedule:K8Snode添加这个effecf类型污点,新的不能容忍的pod不能再调度过来,但是老的运行在node上不受影响 NoExecute:K8Snod ...
- [Java]小功能
[版权声明]未经博主同意,谢绝转载!(请尊重原创,博主保留追究权) https://blog.csdn.net/m0_69908381/article/details/130858061 出自[进步* ...
- CDC报错:invalid value null used for required field "null"
原因:数据库ceate_time时间字段设置为not null ,但是没有设置default值解决办法:1.修改ceate_time字段可以为null,即去掉 `create_time` dateti ...
- salesforce零基础学习(一百三十五)项目中的零碎知识点小总结(七)
本篇参考: https://trailhead.salesforce.com/content/learn/modules/flow-implementation-2/debug-flows-as-an ...
- 关于 kafka 消息的顺序问题一二
顺序就像就是 12345,任何 12354.12543.51234等都不行. 因为是 mq,所以必然涉及三个主体:发送方.消息服务器.消费方. 一.kafka 消息服务器 kafka brokers ...
- #搜索,计算几何#JZOJ 4016 圈地为王
题目 在\(n\)行\(m\)列的网格中,你要圈一些地. 你从左上角出发,最后返回左上角,路径内部的区域视为被你圈住. 你不可以进入网格内部, 只能在边上行走. 你的路径不能在左上角以外自交, 但是边 ...
- SAST-数据流分析方法-理论
引言 众所周知,数据流分析是实现污点分析的一种常用技术 数据流分析分为过程内的数据流分析与过程间的数据流分析.前者是对一个方法体内的数据流分析,主要是基于CFG分析,不涉及方法调用:后者是基于不同方法 ...
- std::thread 三:条件变量(condition_variable())
condition_variable . wait . notify_one . notify_all *:notify_one:通知(唤醒)一个线程 *:notify_all:通知( ...
- Qt信号槽
Qt 信号槽 Qt的信号槽,除了使用信号连接槽,还可以信号连接信号,断开信号,发送(转发)信号. 一个信号可以连接一个槽,也可以一个信号连接多个槽,还可以多个信号连接一个槽. // 信号连接槽 c ...