
Android学习05
AlertDialog(对话框)
它也是其他 Dialog的的父类!比如ProgressDialog,TimePickerDialog等,而AlertDialog的父类是:Dialog!
AlertDialog并不能直接new出来,构造方法是protected的,要创建AlertDialog的话,需要使用到该类中的一个静态内部类:public static class Builder,然后来调用AlertDialog 里的相关方法,来对AlertDialog进行定制,最后调用show()方法来显示AlertDialog对话框!
AlertDialog有几个基本方法,
例如:setTitile() setMessage() setCancelable() setPositiveButton() setNegativeButton() setNeutralButton() 等等。
1、带按钮的AlertDialog
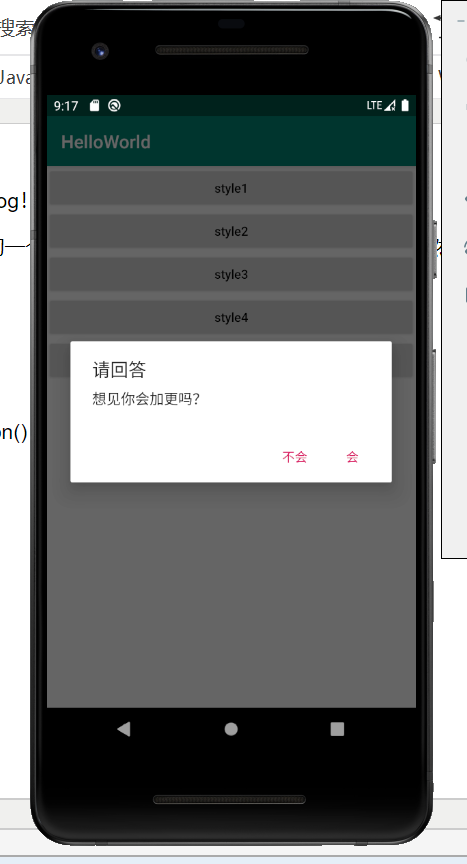
点击按钮弹出提示内容;
public void onClick(View v) {

            switch (v.getId()) {

                case R.id.btn_dialog1:

                    AlertDialog.Builder builder = new AlertDialog.Builder(DialogActivity.this);

                    builder.setTitle("请回答").setMessage("想见你会加更吗?")

                            .setPositiveButton("会", new DialogInterface.OnClickListener() {

                                @Override

                                public void onClick(DialogInterface dialog, int which) {

                                    Toast.makeText(DialogActivity.this, "你点击了会", Toast.LENGTH_SHORT).show();

                                }

                            }).setNegativeButton("不会", new DialogInterface.OnClickListener() {

                        @Override

                        public void onClick(DialogInterface dialog, int which) {

                            Toast.makeText(DialogActivity.this, "你点击了不会", Toast.LENGTH_SHORT).show();

                        }

                    }).show();

                    break;
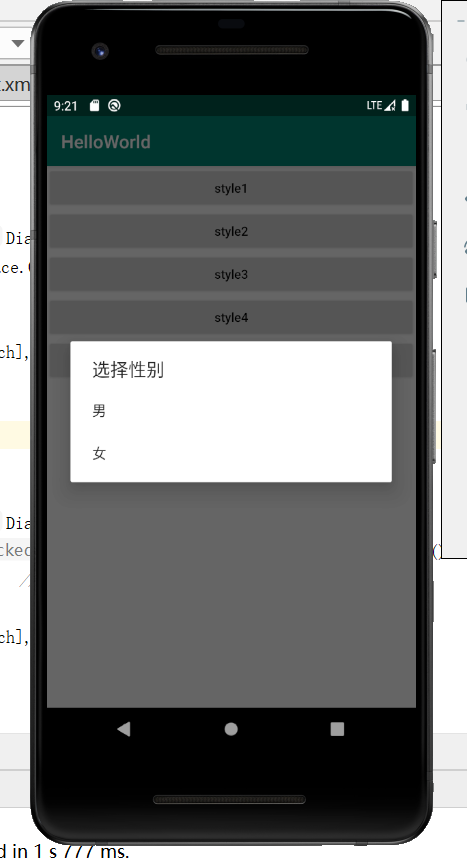
2.1、类似RadioButton的AlertDialog,单选
case R.id.btn_dialog2:

                    final String[] array2 = new String[]{"男", "女"};

                    AlertDialog.Builder builder2 = new AlertDialog.Builder(DialogActivity.this);

                    builder2.setTitle("选择性别").setItems(array2, new DialogInterface.OnClickListener() {

                        @Override

                        public void onClick(DialogInterface dialog, int which) {

                            Toast.makeText(DialogActivity.this, array2[which], Toast.LENGTH_SHORT).show();

                        }

                    }).show();

                    break;
2.2、与RadioButton一样的AlertDialog

case R.id.btn_dialog3:

                    final String[] array3 = new String[]{"男", "女"};

                    AlertDialog.Builder builder3 = new AlertDialog.Builder(DialogActivity.this);

                    builder3.setTitle("选择性别").setSingleChoiceItems(array3, 0, new DialogInterface.OnClickListener() {

                        @Override                                                     //默认选中第几个

                        public void onClick(DialogInterface dialog, int which) {

                            Toast.makeText(DialogActivity.this, array3[which], Toast.LENGTH_SHORT).show();

                            //选择之后对话框会消失

                            dialog.dismiss();

                        }//点框外对话框不会消失

                    }).setCancelable(false).show();

                    break;
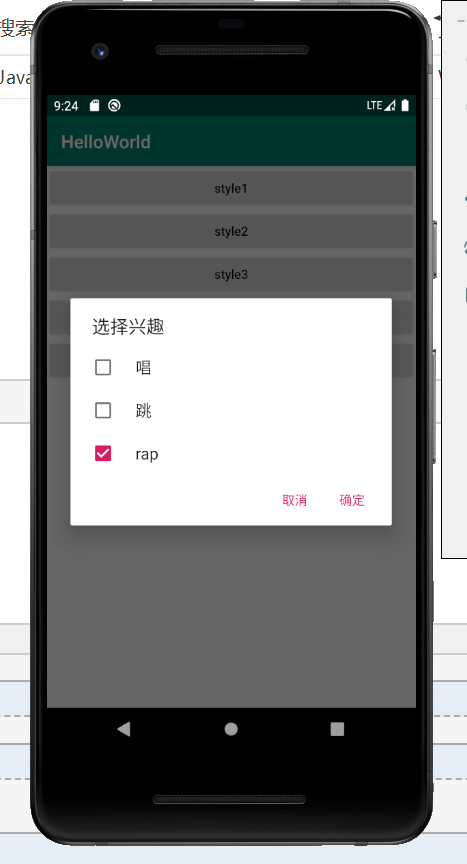
3、与CheckBox一样的AlertDialog
case R.id.btn_dialog4:

                    final String[] array4 = new String[]{"唱", "跳","rap"};

                    boolean[] isSelected = new boolean[]{false,false,true};

                    AlertDialog.Builder builder4 = new AlertDialog.Builder(DialogActivity.this);

                    builder4.setTitle("选择兴趣").setMultiChoiceItems(array4, isSelected, new DialogInterface.OnMultiChoiceClickListener() {

                        @Override

                        public void onClick(DialogInterface dialog, int which, boolean isChecked) {

                            //which表示当前选中第几个,isChecked表示选中或取消选中

                            Toast.makeText(DialogActivity.this, array4[which]+":"+isChecked, Toast.LENGTH_SHORT).show();

                        }

                    }).setPositiveButton("确定", new DialogInterface.OnClickListener() {

                        @Override

                        public void onClick(DialogInterface dialog, int which) {

                            //

                        }

                    }).setNegativeButton("取消", new DialogInterface.OnClickListener() {

                        @Override

                        public void onClick(DialogInterface dialog, int which) {

                            //

                        }

                    }).show();

                    break;
4、自定义View的AlertDialog
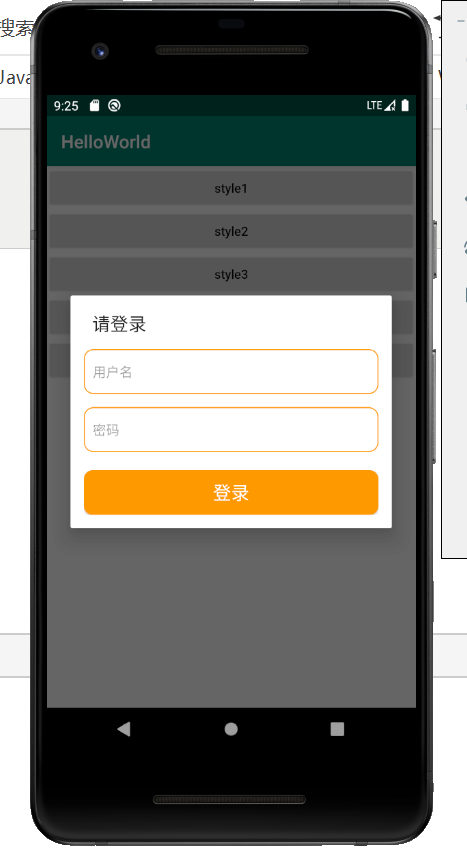
要实现一个Login画面,有用户名和密码,这时我们就要用到自定义View的AlertDialog,步骤如下:
- 先创建自定义登录框的布局文件layout_dialog.xml
- 在Activity中创建自定义的AlertDialog
layout_dialog.xml:
<?xml version="1.0" encoding="utf-8"?>

<LinearLayout xmlns:android="http://schemas.android.com/apk/res/android"

    android:orientation="vertical"

    android:layout_width="match_parent"

    android:layout_height="match_parent"

    android:padding="15dp">

    <EditText

        android:id="@+id/et_username"

        android:layout_width="match_parent"

        android:layout_height="50dp"

        android:textSize="15sp"

        android:textColor="#FF8F44"

        android:background="@drawable/bg_username"

        android:hint="用户名"

        android:paddingLeft="10dp"

        android:paddingRight="10dp"/>

    <EditText

        android:id="@+id/et_password"

        android:layout_width="match_parent"

        android:layout_height="50dp"

        android:textSize="15sp"

        android:textColor="#FF8F44"

        android:layout_below="@id/edit_1"

        android:background="@drawable/bg_username"

        android:hint="密码"

        android:inputType="textPassword"

        android:layout_marginTop="15dp"

        android:paddingLeft="10dp"

        android:paddingRight="10dp"/>

    <Button

        android:id="@+id/btn_login"

        android:layout_width="match_parent"

        android:layout_height="50dp"

        android:layout_below="@id/edit_2"

        android:layout_marginTop="20dp"

        android:background="@drawable/bg_btn4"

        android:text="登录"

        android:textSize="20sp"

        android:textColor="#fff"/>

</LinearLayout>
Activity:
case R.id.btn_dialog5:

                    AlertDialog.Builder builder5 = new AlertDialog.Builder(DialogActivity.this);

                    View view = LayoutInflater.from(DialogActivity.this).inflate(R.layout.layout_dialog,null);

                    //声明布局里的控件

                    EditText etUsername = view.findViewById(R.id.et_username);

                    EditText etPassword = view.findViewById(R.id.et_password);

                    Button btnLogin = view.findViewById(R.id.btn_login);

                    btnLogin.setOnClickListener(new View.OnClickListener() {

                        @Override

                        public void onClick(View v) {

                            //

                        }

                    });

                    builder5.setTitle("请登录").setView(view).show();

                    break;
完整代码:
DialogActivity:
package com.example.helloworld;

import androidx.appcompat.app.AlertDialog;

import androidx.appcompat.app.AppCompatActivity;

import android.content.DialogInterface;

import android.content.Intent;

import android.os.Bundle;

import android.view.LayoutInflater;

import android.view.View;

import android.widget.Button;

import android.widget.EditText;

import android.widget.Toast;

public class DialogActivity extends AppCompatActivity {

    private Button mBtnDialog1, mBtnDialog2, mBtnDialog3, mBtnDialog4,mBtnDialog5;

    @Override

    protected void onCreate(Bundle savedInstanceState) {

        super.onCreate(savedInstanceState);

        setContentView(R.layout.activity_dialog);

        mBtnDialog1 = findViewById(R.id.btn_dialog1);

        mBtnDialog2 = findViewById(R.id.btn_dialog2);

        mBtnDialog3 = findViewById(R.id.btn_dialog3);

        mBtnDialog4 = findViewById(R.id.btn_dialog4);

        mBtnDialog5 = findViewById(R.id.btn_dialog5);

        onClick onClick = new onClick();

        mBtnDialog1.setOnClickListener(onClick);

        mBtnDialog2.setOnClickListener(onClick);

        mBtnDialog3.setOnClickListener(onClick);

        mBtnDialog4.setOnClickListener(onClick);

        mBtnDialog5.setOnClickListener(onClick);

    }

    class onClick implements View.OnClickListener {

        @Override

        public void onClick(View v) {

            switch (v.getId()) {

                case R.id.btn_dialog1:

                    AlertDialog.Builder builder = new AlertDialog.Builder(DialogActivity.this);

                    builder.setTitle("请回答").setMessage("想见你会加更吗?")

                            .setPositiveButton("会", new DialogInterface.OnClickListener() {

                                @Override

                                public void onClick(DialogInterface dialog, int which) {

                                    Toast.makeText(DialogActivity.this, "你点击了会", Toast.LENGTH_SHORT).show();

                                }

                            }).setNegativeButton("不会", new DialogInterface.OnClickListener() {

                        @Override

                        public void onClick(DialogInterface dialog, int which) {

                            Toast.makeText(DialogActivity.this, "你点击了不会", Toast.LENGTH_SHORT).show();

                        }

                    }).show();

                    break;

                case R.id.btn_dialog2:

                    final String[] array2 = new String[]{"男", "女"};

                    AlertDialog.Builder builder2 = new AlertDialog.Builder(DialogActivity.this);

                    builder2.setTitle("选择性别").setItems(array2, new DialogInterface.OnClickListener() {

                        @Override

                        public void onClick(DialogInterface dialog, int which) {

                            Toast.makeText(DialogActivity.this, array2[which], Toast.LENGTH_SHORT).show();

                        }

                    }).show();

                    break;

                case R.id.btn_dialog3:

                    final String[] array3 = new String[]{"男", "女"};

                    AlertDialog.Builder builder3 = new AlertDialog.Builder(DialogActivity.this);

                    builder3.setTitle("选择性别").setSingleChoiceItems(array3, 0, new DialogInterface.OnClickListener() {

                        @Override                                                     //默认选中第几个

                        public void onClick(DialogInterface dialog, int which) {

                            Toast.makeText(DialogActivity.this, array3[which], Toast.LENGTH_SHORT).show();

                            //选择之后对话框会消失

                            dialog.dismiss();

                        }//点框外对话框不会消失

                    }).setCancelable(false).show();

                    break;

                case R.id.btn_dialog4:

                    final String[] array4 = new String[]{"唱", "跳","rap"};

                    boolean[] isSelected = new boolean[]{false,false,true};

                    AlertDialog.Builder builder4 = new AlertDialog.Builder(DialogActivity.this);

                    builder4.setTitle("选择兴趣").setMultiChoiceItems(array4, isSelected, new DialogInterface.OnMultiChoiceClickListener() {

                        @Override

                        public void onClick(DialogInterface dialog, int which, boolean isChecked) {

                            //which表示当前选中第几个,isChecked表示选中或取消选中

                            Toast.makeText(DialogActivity.this, array4[which]+":"+isChecked, Toast.LENGTH_SHORT).show();

                        }

                    }).setPositiveButton("确定", new DialogInterface.OnClickListener() {

                        @Override

                        public void onClick(DialogInterface dialog, int which) {

                            //

                        }

                    }).setNegativeButton("取消", new DialogInterface.OnClickListener() {

                        @Override

                        public void onClick(DialogInterface dialog, int which) {

                            //

                        }

                    }).show();

                    break;

                case R.id.btn_dialog5:

                    AlertDialog.Builder builder5 = new AlertDialog.Builder(DialogActivity.this);

                    View view = LayoutInflater.from(DialogActivity.this).inflate(R.layout.layout_dialog,null);

                    //声明布局里的控件

                    EditText etUsername = view.findViewById(R.id.et_username);

                    EditText etPassword = view.findViewById(R.id.et_password);

                    Button btnLogin = view.findViewById(R.id.btn_login);

                    btnLogin.setOnClickListener(new View.OnClickListener() {

                        @Override

                        public void onClick(View v) {

                            //

                        }

                    });

                    builder5.setTitle("请登录").setView(view).show();

                    break;

            }

        }

    }

}
activity_edit_text.xml:
<?xml version="1.0" encoding="utf-8"?>

<RelativeLayout xmlns:android="http://schemas.android.com/apk/res/android"

    android:layout_width="match_parent"

    android:layout_height="match_parent"

    android:padding="15dp">

    <EditText

        android:id="@+id/edit_1"

        android:layout_width="match_parent"

        android:layout_height="50dp"

        android:textSize="15sp"

        android:textColor="#FF8F44"

        android:background="@drawable/bg_username"

        android:hint="用户名"

        android:paddingLeft="10dp"

        android:paddingRight="10dp"/>

    <EditText

        android:id="@+id/edit_2"

        android:layout_width="match_parent"

        android:layout_height="50dp"

        android:textSize="15sp"

        android:textColor="#FF8F44"

        android:layout_below="@id/edit_1"

        android:background="@drawable/bg_username"

        android:hint="密码"

        android:inputType="textPassword"

        android:layout_marginTop="15dp"

        android:paddingLeft="10dp"

        android:paddingRight="10dp"/>

    <Button

        android:id="@+id/btn_login"

        android:layout_width="match_parent"

        android:layout_height="50dp"

        android:layout_below="@id/edit_2"

        android:layout_marginTop="20dp"

        android:background="@drawable/bg_btn4"

        android:text="登录"

        android:textSize="20sp"

        android:textColor="#fff"/>

</RelativeLayout>
Android学习05的更多相关文章
- Android学习第三天-打包常用命令
在前面<Android学习第一天-adb常用命令>和 <Android学习第二天-android常用命令>两篇博文中,我们重点讲解了adb和android的常用命令,下面我们讲 ...
- android学习笔记36——使用原始XML文件
XML文件 android中使用XML文件,需要开发者手动创建res/xml文件夹. 实例如下: book.xml==> <?xml version="1.0" enc ...
- Android学习链接大放送
虽然贴链接这种事情..真是一种很偷懒的做法... 但是我一个小菜鸟,果断还是要以多向别人学习为主... 好资源要和大家分享对不对! 况且..放博客里..比收藏夹的利用几率要大一点! 原作者应该也很喜欢 ...
- Android学习路线总结,绝对干货
title: Android学习路线总结,绝对干货 tags: Android学习路线,Android学习资料,怎么学习android grammar_cjkRuby: true --- 一.前言 不 ...
- Android 学习资源
下面这些资源对Android开发来说是很有帮助的! 最常用的: Android开发官方网站:http://developer.android.com/index.html 这个网站应该是Android ...
- Android学习资料收集
1.Android 学习之路 http://stormzhang.com/android/2014/07/07/learn-android-from-rookie/
- Android学习——第一个NDK程序
在前面的学习中,我们已经讲解了关于NDK编程的环境搭建流程,简单的使用我们也通过官网本身自带的例子进行说明了.可是相信大家一定还存在这么的一个疑惑:“如果我要自己利用NDK编写一个Android应用, ...
- Android学习——windows下搭建Cygwin环境
在上一篇博文<Android学习——windows下搭建NDK_r9环境>中,我们详细的讲解了在windows下进行Android NDK开发环境的配置,我们也讲到了在NDk r7以后,我 ...
- Android学习——windows下搭建NDK_r9环境
1. NDK(Native Development Kit) 1.1 NDK简介 Android NDK是一套允许开发人员使用本地代码(如C/C++)进行Android APP功能开发的工具,通过这个 ...
随机推荐
- Centsos7 aria2
wget -N --no-check-certificate https://raw.githubusercontent.com/ToyoDAdoubi/doubi/master/aria2.sh & ...
- (转)KMP算法
转自:http://blog.csdn.net/yutianzuijin/article/details/11954939 我们首先用一个图来描述kmp算法的思想.在字符串O中寻找f,当匹配到位置i时 ...
- 【转载】 __declspec(dllexport) 和__declspec(dllimport)
转自:http://www.cppblog.com/Dutyboy/archive/2010/11/15/133699.html __declspec(dllexport) __declspec( ...
- IntelliJ IDEA 2017.3百度-----文件树状结构
- 题解【洛谷P3662】[USACO17FEB]Why Did the Cow Cross the Road II S
本题是练习前缀和的好题!我们可以枚举前端点,确定一个长度为k的区间,然后利用前缀和统计区间内损坏的灯的数量,最后取最小值即可.AC代码: #include <bits/stdc++.h> ...
- Coloring Colorfully
问题 C: Coloring Colorfully 时间限制: 1 Sec 内存限制: 128 MB[提交] [状态] 题目描述 N块瓦片从左到右排成一行.每个块的初始颜色由长度为N的字符串S表示. ...
- springboot+jwt
大概了解下SpringMVC和jwt,百度 代码: 1.整体框架 2.controller package com.yiyezhiqiu.jwt.jwt.controller; import com. ...
- Android 获取手机的厂商、型号、Android系统版本号等工具类(转载)
Android 获取手机的厂商.型号.Android系统版本号等工具类 1.获取手机制造厂商 2.获取手机型号 3.获取手机系统当前使用的语言 4.获取Android系统版本号 5.获取手机IMEI串 ...
- Systemd 学习
转:http://www.ruanyifeng.com/blog/2016/03/systemd-tutorial-commands.html 原文链接:https://www.jianshu.com ...
- Object的rest和spread方法
//将多个对象合并到一个对象里 const input = { a: 1, b: 2 } const test = { d: 5 } const output = { ...input, ...tes ...