JS实现“隐藏与显示”功能(多种方法)
1,通过按钮实现隐藏与显示:
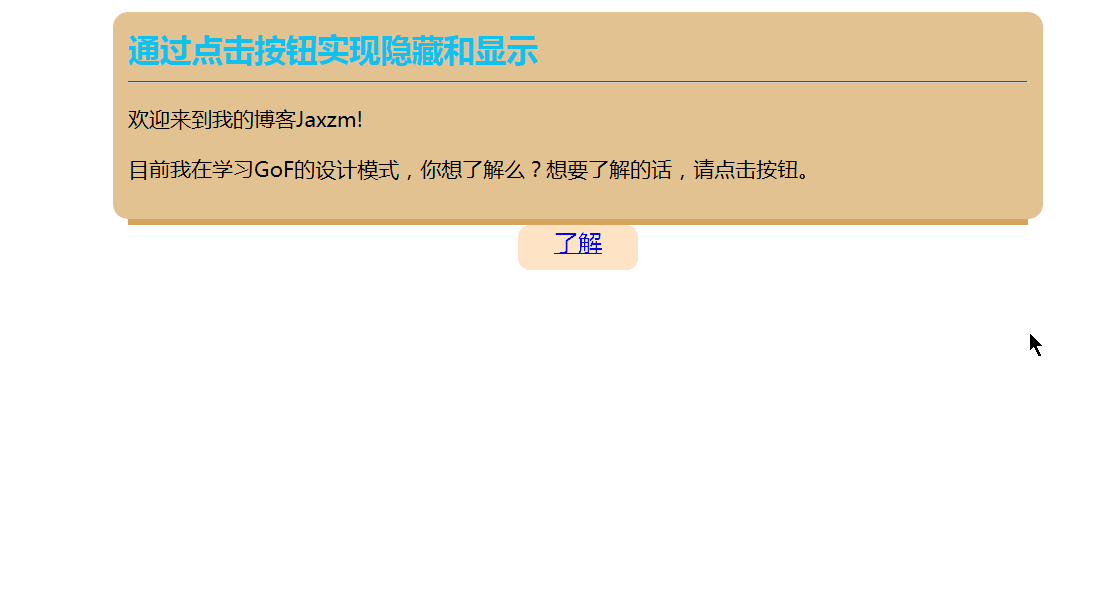
这个是通过按钮点击实现的隐藏与显示,具体代码如下:
|
1
2
3
4
5
6
7
8
9
10
11
12
13
14
15
16
17
18
19
20
21
22
23
24
25
26
27
28
29
30
31
32
33
34
35
36
37
38
39
40
41
42
43
44
45
46
47
48
49
50
51
52
53
54
55
56
57
58
59
60
61
62
63
64
65
66
67
68
69
70
71
72
73
74
75
76
77
|
<!DOCTYPE html><html><head><meta charset="UTF-8"><title>通过按钮实现隐藏和显示</title><style type="text/css">.body{margin: 0 auto;}#show{width: 600px;height: auto;font-size: 14px; padding: 0px 0px 0px 5px; background-image: initial; background-position: initial; background-size: initial; background-repeat: initial; background-attachment: initial; background-origin: initial; background-clip: initial; border-left: 3px solid rgb(108, 226, 108); line-height: 20px; width: 640px; clear: both; outline: 0px !important; border-radius: 0px !important; border-top: 0px !important; border-right: 0px !important; border-bottom: 0px !important; border-image: initial !important; bottom: auto !important; float: none !important; height: auto !important; left: auto !important; overflow: visible !important; position: static !important; right: auto !important; top: auto !important; vertical-align: baseline !important; box-sizing: content-box !important; font-family: Consolas, "Bitstream Vera Sans Mono", "Courier New", Courier, monospace !important; min-height: auto !important; color: gray !important;">#E4C392;display: block;padding: 10px;margin: 0 auto;border-radius: 10px;}#show h2{color: #11C2EE;margin: 0 auto;}.slide{margin: 0 auto;padding: 0;width: 600px;border-top: solid 4px #D6A55C;}.btn-slide{width: 80px;height:30px;text-align: center;margin: 0 auto;border-radius: 8px;margin: 0 auto;display: block;}</style><script type="text/javascript">function divShow(){document.getElementById("btnshow").style.display="block";document.getElementById("btnhref").innerHTML ="关闭";document.getElementById("btnhref").href ="javascript:divhidden()";}function divhidden(){document.getElementById("btnshow").style.display="none";document.getElementById("btnhref").innerHTML ="了解";document.getElementById("btnhref").href ="javascript:divShow()"; }</script></head><body><div id="show"><h2>通过点击按钮实现隐藏和显示</h2><hr /><p>欢迎来到我的博客Jaxzm!</p><p>目前我在学习GoF的设计模式,你想了解么?想要了解的话,请点击按钮。</p><div id="btnshow" style="display: none;"><p>GoF所描述的23种设计模式,总共可以分为三种类型:创建型模式,行为型模式,结构型模式。</p><p>我觉得比较难的是创建型模式,因为它说的比较抽象,所以我不容易理解它,然后我编码也比较少,所以就不太容易理解这个。</p></div></div><p class="slide"><a href="javascript:divShow();" id="btnhref" class="btn-slide">了解</a></p></body></html> |
其中,主要能够实现这个功能的是js代码,
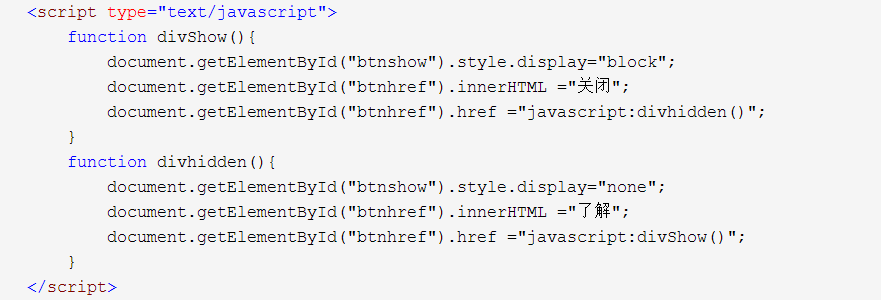
通过getElementById()这个方法找到对应元素,进而控制它的style,以此来做对应的功能。这是一个比较简单的方法。
接下来演示的是另外一种方式:
这个是通过具体的时间限制来控制其隐藏与显示,
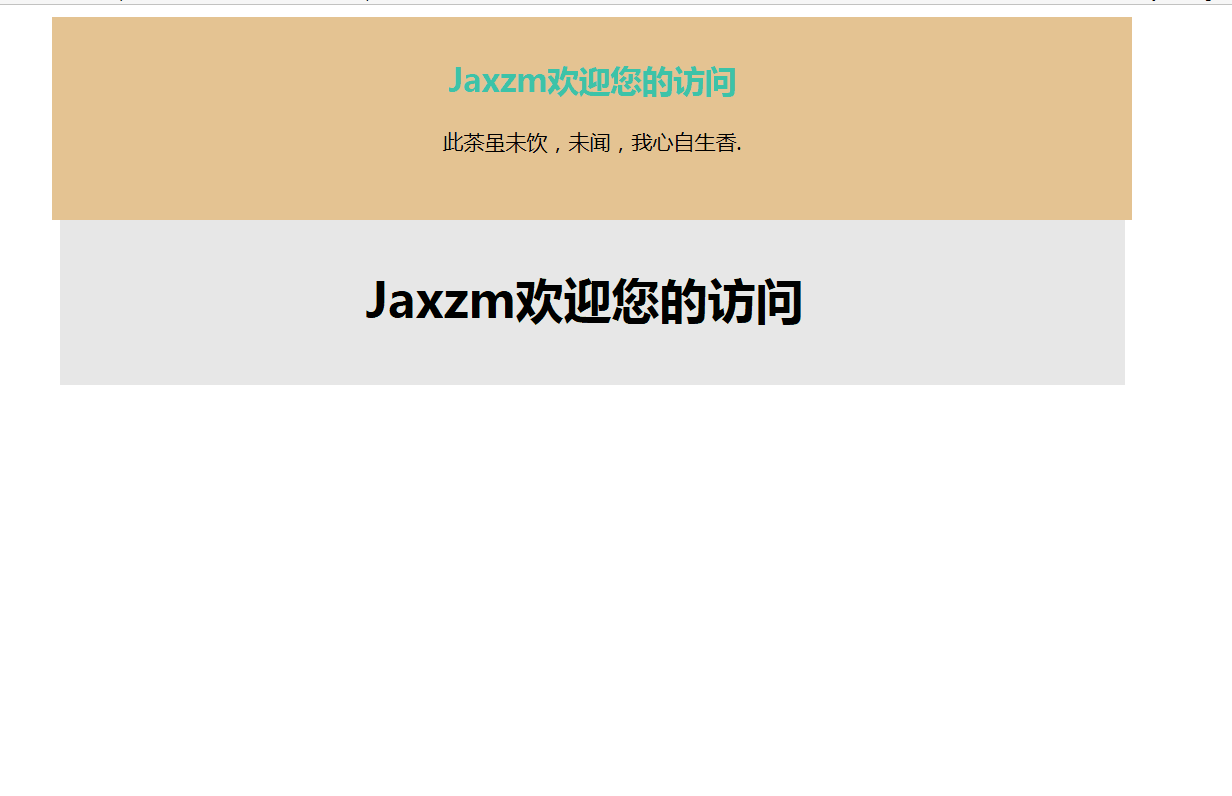
代码如下:
|
1
2
3
4
5
6
7
8
9
10
11
12
13
14
15
16
17
18
19
20
21
22
23
24
25
26
27
28
29
30
31
32
33
34
35
36
37
38
39
40
41
42
43
44
45
46
47
48
49
50
51
52
53
54
55
56
57
58
59
60
61
62
63
64
65
66
67
68
69
70
71
72
73
74
75
76
|
<!DOCTYPE html><html><head><meta charset="UTF-8"><title>通过定时实现隐藏和显示</title><style type="text/css">.body{margin: 0 auto;padding: 0; padding: 0px 0px 0px 5px; background-image: initial; background-position: initial; background-size: initial; background-repeat: initial; background-attachment: initial; background-origin: initial; background-clip: initial; border-left: 3px solid rgb(108, 226, 108); line-height: 20px; width: 640px; clear: both; outline: 0px !important; border-radius: 0px !important; border-top: 0px !important; border-right: 0px !important; border-bottom: 0px !important; border-image: initial !important; bottom: auto !important; float: none !important; height: auto !important; left: auto !important; overflow: visible !important; position: static !important; right: auto !important; top: auto !important; vertical-align: baseline !important; box-sizing: content-box !important; font-family: Consolas, "Bitstream Vera Sans Mono", "Courier New", Courier, monospace !important; min-height: auto !important; color: gray !important;">#D6A55C;}#show{ padding: 0px 0px 0px 5px; background-image: initial; background-position: initial; background-size: initial; background-repeat: initial; background-attachment: initial; background-origin: initial; background-clip: initial; border-left: 3px solid rgb(108, 226, 108); line-height: 20px; width: 640px; clear: both; outline: 0px !important; border-radius: 0px !important; border-top: 0px !important; border-right: 0px !important; border-bottom: 0px !important; border-image: initial !important; bottom: auto !important; float: none !important; height: auto !important; left: auto !important; overflow: visible !important; position: static !important; right: auto !important; top: auto !important; vertical-align: baseline !important; box-sizing: content-box !important; font-family: Consolas, "Bitstream Vera Sans Mono", "Courier New", Courier, monospace !important; min-height: auto !important; color: gray !important;">#E4C392;width: 700px;height: 100px;display: block;margin: 0 auto;padding: 10px;font-size: 14px;height: auto; text-align: center; }#show h2{color: #3CC4A9;}.hid{background: #E8E8E8;text-align: center;width: 700px;height: 100px;padding: 10px 10px 0 0;margin: 0 auto;display: block;text-decoration: none;}</style><script type="text/javascript">var h = 0;function addH(){if(h < 400){h=h+5;document.getElementById("show").style.height = h+"px";}else{return;}setTimeout("addH()",30);}window.onload = function showAds(){addH();setTimeout("subH()",5000);}function subH(){if(h >0){h -= 5;document.getElementById("show").style.height = h+"px";}else{document.getElementById("show").style.display = "none";return;}setTimeout("subH()",30);}</script></head><body><div id="show"><h2>Jaxzm欢迎您的访问</h2><span>此茶虽未饮,未闻,我心自生香.</span></div> <div class="hid"><h1>Jaxzm欢迎您的访问</h1></div></div></body></html> |
注意在这个js里面的setTimeout()函数,setTimeout(function,time).更加精准地用法:
执行一段代码:
|
1
2
|
var i=0;setTimeout("i+=1;alert(i)",1000); |
执行一个函数:
|
1
2
|
var i=0;setTimeout(function(){i+=1;alert(i);},1000); |
还有一种方式就是通过jQuery方法来实现,通过切换实现隐藏与显示;效果如下:
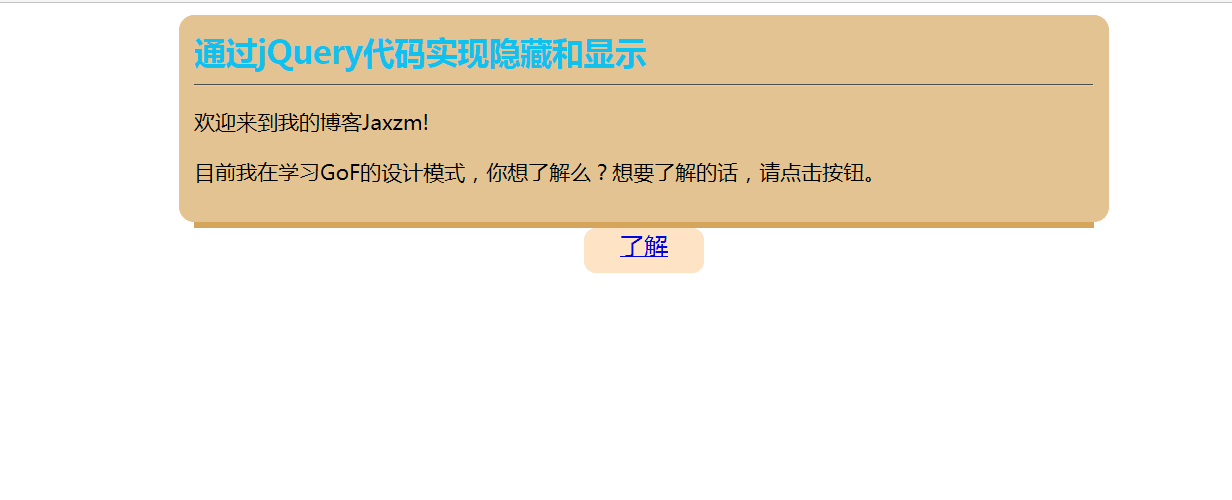
看到它的样子,是否会觉得和第一个很像,但是也会发现它和第一个是不一样的,具体代码如下:
|
1
2
3
4
5
6
7
8
9
10
11
12
13
14
15
16
17
18
19
20
21
22
23
24
25
26
27
28
29
30
31
32
33
34
35
36
37
38
39
40
41
42
43
44
45
46
47
48
49
50
51
52
53
54
55
56
57
58
59
60
61
62
63
64
65
66
67
68
69
70
71
72
73
|
<!DOCTYPE html><html><head><meta charset="UTF-8"><title>通过jQuery实现展开收缩</title><style type="text/css">.body{margin: 0 auto;}#show{width: 600px;height: auto;font-size: 14px; padding: 0px 0px 0px 5px; background-image: initial; background-position: initial; background-size: initial; background-repeat: initial; background-attachment: initial; background-origin: initial; background-clip: initial; border-left: 3px solid rgb(108, 226, 108); line-height: 20px; width: 640px; clear: both; outline: 0px !important; border-radius: 0px !important; border-top: 0px !important; border-right: 0px !important; border-bottom: 0px !important; border-image: initial !important; bottom: auto !important; float: none !important; height: auto !important; left: auto !important; overflow: visible !important; position: static !important; right: auto !important; top: auto !important; vertical-align: baseline !important; box-sizing: content-box !important; font-family: Consolas, "Bitstream Vera Sans Mono", "Courier New", Courier, monospace !important; min-height: auto !important; color: gray !important;">#E4C392;display: block;padding: 10px;margin: 0 auto;border-radius: 10px;}#show h2{color: #11C2EE;margin: 0 auto;}.slide{margin: 0 auto;padding: 0;width: 600px;border-top: solid 4px #D6A55C;}.btn-slide{width: 80px;height:30px;text-align: center;margin: 0 auto;border-radius: 8px;margin: 0 auto;display: block;}</style><script type="text/javascript">$(document).ready(function () {$(".btn-slide").click(function () {$("#btnshow").slideToggle();});});</script></head><body><div id="show"><h2>通过jQuery代码实现隐藏和显示</h2><hr /><p>欢迎来到我的博客Jaxzm!</p><p>目前我在学习GoF的设计模式,你想了解么?想要了解的话,请点击按钮。</p><div id="btnshow" style="display: none;"><p>GoF所描述的23种设计模式,总共可以分为三种类型:创建型模式,行为型模式,结构型模式。</p><p>我觉得比较难的是创建型模式,因为它说的比较抽象,所以我不容易理解它,然后我编码也比较少,所以就不太容易理解这个。</p></div></div><p class="slide"><a href="javascript:divShow();" id="btnhref" class="btn-slide">了解</a></p></body></html> |
这段代码和第一个唯一不同的便是这个js代码:
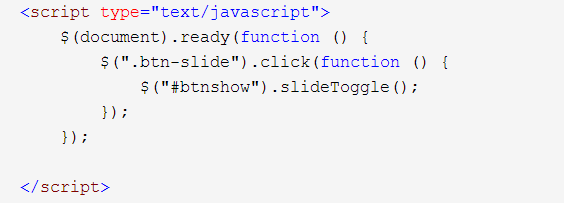
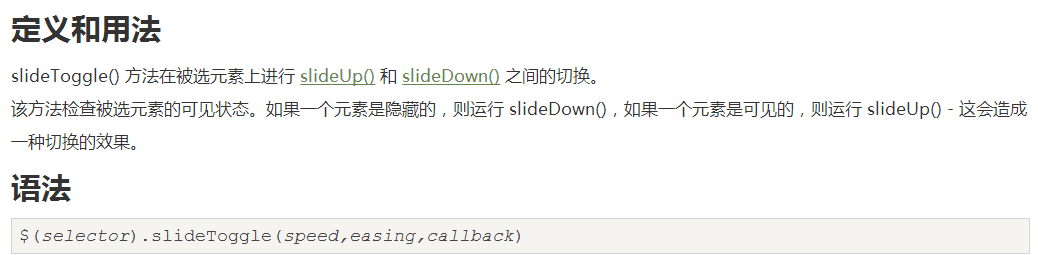
这里首先要引入jQuery库,然后才能调用jquery库里面的方法slideToggle(),方法的具体实现如下:
当点击了按钮,它就会将显示与隐藏进行切换。
学习了以上知识之后,就可以实现博客的页面显示。但是这里还需要了解nextSibling和previousSiling这两个属性。
nextSibling 它是返回某一元素后面紧跟的元素。previousSibling 它是返回某一元素之前紧跟的元素。
|
1
2
3
4
5
6
7
8
9
10
11
12
13
14
15
16
17
18
19
20
21
22
23
24
25
26
27
28
29
30
31
32
33
34
35
36
37
38
39
40
41
42
43
44
45
46
47
48
49
50
51
52
53
54
55
56
57
58
59
60
61
62
63
64
65
66
67
68
69
70
71
72
73
74
75
76
77
78
79
80
81
82
83
84
85
86
87
88
89
90
91
92
93
94
95
96
97
98
99
100
101
102
103
104
105
106
107
108
109
110
111
112
113
114
115
116
117
118
119
120
121
122
123
124
125
126
127
128
129
130
131
132
133
134
135
136
137
138
139
140
|
<!DOCTYPE html PUBLIC "-//W3C//DTD XHTML 1.0 Transitional//EN" "http://www.w3.org/TR/xhtml1/DTD/xhtml1-transitional.dtd"><head><meta http-equiv="Content-Type" content="text/html; charset=utf-8" /><title>鼠标控制动画展开</title><style type="text/css">body{margin: 0 auto;padding: 0;font-size: 9pt;line-height: 180%;}#pn{background: #f8f8f8;height: auto;width: 750px;display: block;margin: 0 auto;padding: 5px;}.btn{width: 80px;height: 20px;padding: 5px 3px 5px 3px;text-align: center;text-decoration: none;background: #f0f0f0;border: 1px solid #CCC;}.content{border: 1px solid #CCC;display: none;padding: 5px;}.title{font-weight: bold;color: #3030FF;font-size:11pt;}.subtitle{color: #CCC;}.btm{text-align: right;height: 30px;}</style><script type="text/javascript">var time = 300;var h = 40;function showdiv(obj) {//obj.parentNode.nextSibling.nextSibling.style.display = "block";var x = obj.parentNode.nextSibling;//包含众多空格作为文本节点,因此在我们使用nextSibling和previousSibling时就会出现问题。//因为FireFox会把文本节点误当做元素节点的兄弟节点来处理。我们可以添加nodeType来判断。//当上一节点或者是下一节点为文本节点时,就继续寻找,直到找到下一个元素节点。// 其中nodeType的值主要有以下几种:// // 元素节点的nodeType值为1// 属性节点的nodeType值为2// 文本节点的nodeType值为3if (x.nodeType != 1) {x = x.nextSibling;}x.style.display = "block";obj.parentNode.style.display = "none";}function hidediv(obj) {obj.parentNode.parentNode.style.display = "none";var x = obj.parentNode.parentNode.previousSibling;if (x.nodeType != 1) {x = x.previousSibling;}x.style.display = "block";}</script></head><body><div id="pn"><div><p class="title">原生js实现tooltip提示框的效果</p><p class="subtitle">2016年11月13日 </p><p>摘要: 在js的世界里面,每一个小的特效都那么微不足道,却又那么的令人向往与好奇。前端工程师的任务特别高大上,因为他们的一个小小的设计就会激发别人的求知欲。比如说我,只是随机一瞟,便看到了这个tooltip的特效,就有一种想要征服它的愿望。比如这个tooltip的效果展示: 这个便是tooltip提示框的... <a onclick="showdiv(this);" href="#">全文</a></p><div class="content"><p>摘要: 在js的世界里面,每一个小的特效都那么微不足道,却又那么的令人向往与好奇。前端工程师的任务特别高大上,因为他们的一个小小的设计就会激发别人的求知欲。比如说我,只是随机一瞟,便看到了这个tooltip的特效,就有一种想要征服它的愿望。比如这个tooltip的效果展示: 这个便是tooltip提示框的效果。</p><p>工具提示(Tooltip)插件根据需求生成内容和标记,默认情况下是把工具提示(tooltip)放在它们的触发元素后面。您可以有以下两种方式添加工具提示(tooltip):<p>通过 data 属性:如需添加一个工具提示(tooltip),只需向一个锚标签添加 data-toggle="tooltip" 即可。锚的 title 即为工具提示(tooltip)的文本。</p>默认情况下,插件把工具提示(tooltip)设置在顶部。 </p><div class="btm"><a href="#" class="btn" onclick="hidediv(this);">收起全文</a></div></div><hr /><div><p class="title">原生js实现tooltip提示框的效果</p><p class="subtitle">2016年11月13日 </p><p>摘要: 在js的世界里面,每一个小的特效都那么微不足道,却又那么的令人向往与好奇。前端工程师的任务特别高大上,因为他们的一个小小的设计就会激发别人的求知欲。比如说我,只是随机一瞟,便看到了这个tooltip的特效,就有一种想要征服它的愿望。比如这个tooltip的效果展示: 这个便是tooltip提示框的... <a onclick="showdiv(this);" href="#">全文</a></p><div class="content"><p>摘要: 在js的世界里面,每一个小的特效都那么微不足道,却又那么的令人向往与好奇。前端工程师的任务特别高大上,因为他们的一个小小的设计就会激发别人的求知欲。比如说我,只是随机一瞟,便看到了这个tooltip的特效,就有一种想要征服它的愿望。比如这个tooltip的效果展示: 这个便是tooltip提示框的效果。</p><p>工具提示(Tooltip)插件根据需求生成内容和标记,默认情况下是把工具提示(tooltip)放在它们的触发元素后面。您可以有以下两种方式添加工具提示(tooltip):<p>通过 data 属性:如需添加一个工具提示(tooltip),只需向一个锚标签添加 data-toggle="tooltip" 即可。锚的 title 即为工具提示(tooltip)的文本。</p>默认情况下,插件把工具提示(tooltip)设置在顶部。 </p><div class="btm"><a href="#" class="btn" onclick="hidediv(this);">收起全文</a></div></div></div></body></html> |
效果如下:

其实以上方法具体实现起来都是比较简单的。实用性也比较大。
以上所述是小编给大家介绍的JS实现“隐藏与显示”功能的多种方法,希望对大家有所帮助,如果大家有任何疑问请给我留言,小编会及时回复大家的。在此也非常感谢大家对脚本之家网站的支持!
JS实现“隐藏与显示”功能(多种方法)的更多相关文章
- js获取隐藏元素宽高的方法
网上有一些js获取隐藏元素宽高的方法,但是可能会存在某些情况获取不了. 例如: <!DOCTYPE html> <html lang="en"> <h ...
- (网页)JS实现alert中显示换行的方法
转自脚本之家: 这篇文章主要介绍了JS实现alert中显示换行的方法,实例分析了两种实现alert换行的实现技巧,非常简单实用,需要的朋友可以参考下 本文实例讲述了JS实现alert中显示换行的方法. ...
- css隐藏页面元素的多种方法
在平常的样式排版中,我们经常遇到将某个模块隐藏,下面我整理了一下隐藏元素的多种方法以及对比(有的占据空间,有的不占据空间.有的可以点击,有的不能点击.): ( 一 ) display: none; ...
- Android 隐藏、显示软键盘方法
隐藏软键盘的终极方法: public class SoftKeyboardUtil { /** * 隐藏软键盘(只适用于Activity,不适用于Fragment) */ public static ...
- Three.js模型隐藏或显示
材质属性.visible查看Three.js文档的基类Material,可以知道材质属性.visible的作用就是控制绑定该材质的模型对象是否可见,默认值是true,LineBasicMaterial ...
- Js删除数组重复元素的多种方法
js对数组元素去重有很多种处理的方法,本篇文章中为网络资源整理,当然每个方法我都去实现了:写下来的目的是希望自己活学活用,下次遇到问题后方便解决. 第一种 function oSort(arr){ v ...
- js获取IP地址多种方法实例教程
js获取IP地址方法总结 js代码获取IP地址的方法,如何在js中取得客户端的IP地址.原文地址:js获取IP地址的三种方法 http://www.jbxue.com/article/11338. ...
- HTML元素隐藏和显示
在web前端开发过程中,经常会用到隐藏和显示元素的方法 总结:1.通过JS或Jquery控制 2.通过CSS样式控制 一.Js或jquery (jquery为例) 1.隐藏元素 使用 ...
- MAC系统如何显示隐藏文件解决方法
苹果Mac OS 操作系统下,隐藏文件默认为隐藏状态,隐藏文件是否显示有多种方法可以设置. 方法一: 打开终端,输入命令行 1.显示Mac隐藏文件的命令: defaults write com.app ...
随机推荐
- JavaScript九九乘法表
JavaScript九九乘法表 <script> for (var i = 1; i < 10; i++) { for (var j = 1; j <= i; j++) { d ...
- python 语言打印直角三角形的几种方法
方法1:全部打印语句 print('*') print('**') print('***') print('****') 方法2:简单使用循环 for i in range(5): print('*' ...
- 关于apt-get remove 与 apt-get purge
今天在Ubuntu服务器上安装supervisor,部署没成功想卸载重来,sudo apt-get remove supervisor 后发现配置文件还在,便手动删除了配置文件.再次安装,提示配置文件 ...
- Node.js核心模块-net
net.Socket 类 socket.remotePort 访问服务器的远程端口 const http = require('http'); const server = http.createSe ...
- kaks calculator批量计算多个基因的选择压力kaks值
欢迎来到"bio生物信息"的世界 今天给大家带来"批量计算kaks值"的技能. 关于kaks的背景知识我就不介绍了,感兴趣的自行搜索,这里直接开始讲怎么批量计算 ...
- Elasticsearch配置集群环境
环境选择: 1.方案一:准备三台机器 每一台机器一个节点 2.方案二:准备一台机器 启动三个节点,用端口号区分即可 3.ES启 ...
- JavaScript使用MQTT
1.MQTT Server使用EMQTTD开源库,自行安装配置: 2.JS使用Websocket连接通信. 3.JS的MQTT库为paho-mqtt,git地址:https://github.com/ ...
- PHP0020:PHP 单文件上传 多文件上传
- Spring中@Value用法
Spring中可以通过@Value注解,将properties配置文件中的属性值注入到java成员变量,配置和使用方法如下(大部分转自csdn,也有自己实验部分): 一.配置 首先,@value需要参 ...
- opencv —— 在 VS 中的配置
添加一个新的 .cpp 文件到工程中 打开菜单栏视图中的属性管理器 选择 Debug|x64 ...