分布式配置管理--百度disconf搭建过程和详细使用
先说官方文档:http://disconf.readthedocs.io/zh_CN/latest/index.html
不管是否要根据官方文档来搭建disconf,都应该看一下这一份文档.精炼清晰地介绍了disconf的功能和其他一些包含的东西.看完至少对disconf已经有了大概的了解
- disconf: https://github.com/knightliao/disconf(管理端)
- demos: https://github.com/knightliao/disconf-demos-java(客户端)
- wiki: https://github.com/knightliao/disconf/wiki(wiki)
我搭建的页面:

开始步骤吧:
- 安装Mysql(Ver 14.12 Distrib 5.0.45, for unknown-linux-gnu (x86_64) using EditLine wrapper)
- 安装Tomcat(apache-tomcat-7.0.50)
- 安装Nginx(nginx/1.5.3)
- 安装 zookeeeper (zookeeper-3.3.0)
- 安装 Redis (2.4.5)
其中安装redis和nginx稍微麻烦一些,参考:
http://www.cnblogs.com/garfieldcgf/p/6438898.html
http://www.cnblogs.com/garfieldcgf/p/6438814.html
开始配置:
将你的配置文件放到此地址目录下(以下地址可自行设定):
/home/work/dsp/disconf-rd/online-resources
我的路径与这个不同,为了避免引起不必要的贴图错误,按照官方的来
拷贝/disconf-web/profile/rd/目录下的文件,拷贝过去后修改即可。
配置文件包括
- jdbc-mysql.properties (数据库配置)

- redis-config.properties (Redis配置,主要用于web登录使用)

- zoo.properties (Zookeeper配置)

- application.properties (应用配置)
cp application-demo.properties application.properties
注意,即使只有一个redis,也应该配置两个redis client,否则将造成内部错误。*
设置War包将要被部署的地址(以下地址可自行设定):
/home/work/dsp/disconf-rd/war
构建
ONLINE_CONFIG_PATH=/home/work/dsp/disconf-rd/online-resources

WAR_ROOT_PATH=/home/work/dsp/disconf-rd/war

export ONLINE_CONFIG_PATH

export WAR_ROOT_PATH

cd disconf-web

sh deploy/deploy.sh
这样会在 /home/work/dsp/disconf-rd/war 生成以下结果:
-disconf-web.war

-html

-META-INF

-WEB-INF
还有其他的配置文件也都会在这个目录下
上线前的初始化工作
初始化数据库:
里面默认有6个用户(请注意线上环境删除这些用户以避免潜在的安全问题)
| name | pwd |
|---|---|
| admin | admin |
| testUser1 | MhxzKhl9209 |
| testUser2 | MhxzKhl167 |
| testUser3 | MhxzKhl783 |
| testUser4 | MhxzKhl8758 |
| testUser5 | MhxzKhl112 |
如果想自己设置初始化的用户名信息,可以参考代码来自己生成用户:
src/main/java/com/baidu/disconf/web/tools/UserCreateTools.java
部署War
修改server.xml文件,在Host结点下设定Context:
<Context path="" docBase="/home/work/dsp/disconf-rd/war"></Context>
并设置端口为 8015
启动Tomcat,即可。
部署 前端
修改 nginx.conf
upstream disconf {

    server 127.0.0.1:8015;

}

server {

    listen   8081;

    server_name disconf.com;

    access_log /home/work/var/logs/disconf/access.log;

    error_log /home/work/var/logs/disconf/error.log;

    location / {

        root /home/work/dsp/disconf-rd/war/html;

        if ($query_string) {

            expires max;

        }

    }

    location ~ ^/(api|export) {

        proxy_pass_header Server;

        proxy_set_header Host $http_host;

        proxy_redirect off;

        proxy_set_header X-Real-IP $remote_addr;

        proxy_set_header X-Scheme $scheme;

        proxy_pass http://disconf;

    }

}
这里的配置没有贴全,有些人可能会配错.我贴一份全的(因为对nginx不熟悉,我也遇到了一些小麻烦)
user  root;

worker_processes  1;

#error_log  logs/error.log;

#error_log  logs/error.log  notice;

#error_log  logs/error.log  info;

#pid        logs/nginx.pid;

events {

    worker_connections  1024;

}

http {

    include       mime.types;

    default_type  application/octet-stream;

    #log_format  main  '$remote_addr - $remote_user [$time_local] "$request" '

    #                  '$status $body_bytes_sent "$http_referer" '

    #                  '"$http_user_agent" "$http_x_forwarded_for"';

    #access_log  logs/access.log  main;

    sendfile        on;

    #tcp_nopush     on;

    #keepalive_timeout  0;

    keepalive_timeout  65;

    gzip  on;

    gzip_http_version 1.0;

    gzip_disable "MSIE [1-6].";

    gzip_types text/plain application/x-javascript text/css text/javascript application/x-httpd-php image/jpeg image/gif image/png;

upstream disconf {

    server 10.10.10.10:8015;

}

server {

    listen   8081;

    server_name disconftest.com;

    access_log /home/work/dsp/access.log;

    error_log /home/work/dsp/error.log;

    location / {

        root /home/docker/garfield/war/html;

        if ($query_string) {

            expires max;

        }

    }

    location ~ ^/(api|export) {

        proxy_pass_header Server;

        proxy_set_header Host $http_host;

        proxy_redirect off;

        proxy_set_header X-Real-IP $remote_addr;

        proxy_set_header X-Scheme $scheme;

        proxy_pass http://disconf;

    }

}

}
这里我把server name改成了disconftest.com,跟application.properties里面的配置保持一样即可,
注意:
1.须保证日志文件的写入有权限哦,日志文件夹提前建好,否则会报错
2.开头是运行权限,这边因为没有用root运行会导致页面持续被拦截,报403,有遇到的人注意下
服务管理端的部署到这里就结束了,启动zookeeper,redis,tomcat,mysql和nginx就可以访问页面了,输入
http://10.10.10.10:8081/
看到如下页面就成功了:

输入admin/admin发现里面已经有一些配置,但是没有机器在运行,接下来进行客户端应用
其实git下载下来的demo直接运行就可以看到配置文件的下载了,当然要配置访问的服务端地址.这方面就不赘述了,记录一下我的两个实践
1.将xml下载到指定路径--将mybatis.xml文件从平台上下载,统一管理
先写一个简单的mybatis应用程序(打印出数据库所有用户表名称),主要类:
@Service

@Transactional

public class UserService {

    private static Logger  logger  = LogManager.getLogger(UserService.class);

    @Autowired

    private UserDao userMapper;

    public List<User> searchAll(){

        List<User> list = userMapper.findAll();

        for (User user : list) {

            System.out.println(user.getUsername());

        }

        return list;

    }

}
主函数:
/**

 * @author garfield

 * @version 2017-2-17

 */

public class DisconfDemoMain {

    private static String[] fn = null;

    // 初始化spring文档

    private static void contextInitialized() {

        fn = new String[] {"applicationContext.xml"};

    }

    /**

     * @param args

     *

     * @throws Exception

     */

    public static void main(String[] args) throws Exception {

        contextInitialized();

        ClassPathXmlApplicationContext ctx = new ClassPathXmlApplicationContext(fn);

        UserService userService = ctx.getBean("userService", UserService.class);

        while (true){

            userService.searchAll();

            Thread.sleep(10000);

        }

    }

}
配置类:
import com.baidu.disconf.client.common.annotations.DisconfFile;

import com.baidu.disconf.client.common.annotations.DisconfUpdateService;

import com.baidu.disconf.client.common.update.IDisconfUpdate;

import org.springframework.context.annotation.Scope;

import org.springframework.stereotype.Service;

/**

 * Created by garfield on 2017/2/23.

 */

@Service

@Scope("singleton")

@DisconfFile(filename = "UserMapper.xml",targetDirPath = "cloud/simple/service/dao")

@DisconfUpdateService(classes = {XMLConfig.class})

public class XMLConfig implements IDisconfUpdate {

    public void reload() throws Exception {

        System.out.println("=====================================================================");

    }

}
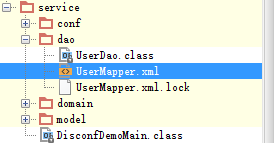
targetDirPath是配置下载到指定的路径中,这种情况下,profile里面的disconf.enable_local_download_dir_in_class_path配置项须置为true,运行后效果如下:
输出:
16:40:47.484 [main] DEBUG o.m.s.t.SpringManagedTransaction - JDBC Connection [ProxyConnection[PooledConnection[com.mysql.jdbc.JDBC4Connection@1f6f7075]]] will not be managed by Spring

16:40:47.489 [main] DEBUG c.simple.service.dao.UserDao.findAll - ==>  Preparing: select * from user

16:40:47.513 [main] DEBUG c.simple.service.dao.UserDao.findAll - ==> Parameters:

16:40:47.532 [main] DEBUG c.simple.service.dao.UserDao.findAll - <==      Total: 2

16:40:47.533 [main] DEBUG org.mybatis.spring.SqlSessionUtils - Closing non transactional SqlSession [org.apache.ibatis.session.defaults.DefaultSqlSession@7eadb544]

username = 1

username = 2
2.第二个实例,将log4j2.xml日志配置文件统一管理
这个例子其实关键在于手动加载日志,本身实际上也是一个下载xml文件的过程
配置类:
import com.baidu.disconf.client.common.annotations.DisconfFile;

import com.baidu.disconf.client.common.annotations.DisconfUpdateService;

import com.baidu.disconf.client.common.update.IDisconfUpdate;

import org.springframework.context.annotation.Scope;

import org.springframework.stereotype.Service;

/**

 * Created by garfield on 2017/2/23.

 */

@Service

@Scope("singleton")

@DisconfFile(filename = "log4j2.xml")

@DisconfUpdateService(classes = {XMLConfig.class})

public class LogConfig implements IDisconfUpdate {

    public void reload() throws Exception {

        System.out.println("=====================================================================");

    }

}
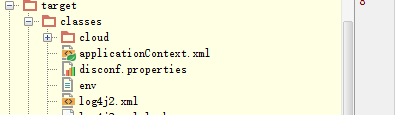
下载下来之后log4j.xml文件的位置:(与工程同级)
在主函数做一个加载动作:
import cloud.simple.service.domain.UserService;

import org.apache.logging.log4j.LogManager;

import org.apache.logging.log4j.Logger;

import org.apache.logging.log4j.core.config.Configurator;

import org.springframework.context.support.ClassPathXmlApplicationContext;

import org.apache.logging.log4j.core.config.ConfigurationSource;

import java.io.File;

import java.io.FileInputStream;

import java.net.URL;

/**

 * @author garfield

 * @version 2017-2-17

 */

public class DisconfDemoMain {

    private static String[] fn = null;

    private static Logger logger;

    // 初始化spring文档

    private static void contextInitialized() {

        fn = new String[] {"applicationContext.xml"};

    }

    /**

     * @param args

     *

     * @throws Exception

     */

    public static void main(String[] args) throws Exception {

        contextInitialized();

        ClassPathXmlApplicationContext ctx = new ClassPathXmlApplicationContext(fn);


        //此处加载日志文件

        URL url=DisconfDemoMain.class.getResource("/log4j2.xml");

        System.out.println(url.getPath());

        ConfigurationSource  source = new ConfigurationSource(new FileInputStream(new File(url.getPath())),url);

        Configurator.initialize(null, source);

        logger  = LogManager.getLogger(DisconfDemoMain.class);

        UserService userService = ctx.getBean("userService", UserService.class);

        logger.info("begin to search...");

        while (true){

            userService.searchAll();

            Thread.sleep(10000);

        }

    }

}
2017-02-24 16:46:01,467 INFO  main (cloud.simple.service.DisconfDemoMain) - begin to search...

2017-02-24 16:46:01,820 INFO  main (cloud.simple.service.domain.UserService) - =========================

2017-02-24 16:46:01,820 INFO  main (cloud.simple.service.domain.UserService) - username = 1

2017-02-24 16:46:01,820 INFO  main (cloud.simple.service.domain.UserService) - =========================

2017-02-24 16:46:01,820 INFO  main (cloud.simple.service.domain.UserService) - username = 2
demo中还有一些其他的例子,不过看文档大概也能明白,就不说明了.
done!
分布式配置管理--百度disconf搭建过程和详细使用的更多相关文章
- 分布式配置管理平台 Disconf
Distributed Configuration Management Platform(分布式配置管理平台) 专注于各种 分布式系统配置管理 的通用组件/通用平台, 提供统一的配置管理服务. 包括 ...
- 百度分布式配置管理平台-Disconf
Disconf介绍 全称:Distributed Configuration Management Platform,即分布式配置管理平台. Disconf专注于各种分布式系统配置管理的通用组件和通用 ...
- 分布式配置管理平台 - Disconf介绍
原博客地址:http://blog.csdn.net/zhu_tianwei/article/details/47984545 Disconf专注于各种分布式系统配置管理的通用组件/通用平台,提供统一 ...
- 统一配置管理-百度disconf
之前一直采用properties文件管理配置信息,若是集群则每个机器上都要拷贝一份,每次修改也需要依次修改.一直在寻找统一修改,实时生效,方便修改,分环境分系统的配置管理,自己也在整理设计,若找不到合 ...
- Hadoop2.2.0安装配置手册!完全分布式Hadoop集群搭建过程~(心血之作啊~~)
http://blog.csdn.net/licongcong_0224/article/details/12972889 历时一周多,终于搭建好最新版本hadoop2.2集群,期间遇到各种问题,作为 ...
- Java Web学习总结(23)——Distributed Configuration Management Platform(分布式配置管理平台)
专注于各种 分布式系统配置管理 的通用组件/通用平台, 提供统一的配置管理服务. 主要目标: 部署极其简单:同一个上线包,无须改动配置,即可在 多个环境中(RD/QA/PRODUCTION) 上线 部 ...
- ZooKeeper集群搭建过程
ZooKeeper集群搭建过程 提纲 1.ZooKeeper简介 2.ZooKeeper的下载和安装 3.部署3个节点的ZK伪分布式集群 3.1.解压ZooKeeper安装包 3.2.为每个节点建立d ...
- Disconf —— 来自百度的分布式配置管理平台
摘要 为了更好的解决分布式环境下多台服务实例的配置统一管理问题,本文提出了一套完整的分布式配置管理解决方案(简称为disconf[4],下同).首先,实现了同构系统的配置发布统一化,提供了配置服务se ...
- 分布式实时日志系统(一)环境搭建之 Jstorm 集群搭建过程/Jstorm集群一键安装部署
最近公司业务数据量越来越大,以前的基于消息队列的日志系统越来越难以满足目前的业务量,表现为消息积压,日志延迟,日志存储日期过短,所以,我们开始着手要重新设计这块,业界已经有了比较成熟的流程,即基于流式 ...
随机推荐
- HDU 2830:Matrix Swapping II(思维)
http://acm.hdu.edu.cn/showproblem.php?pid=2830 题意:-- 思路:对于每一列,它是固定的,用dp[][]处理出连续的长度.例如: 假设我们扫第四列的时候, ...
- MyEclipse 显示行标
方法一:在行的显示行标位置(行前),右键->Show Line numbers 方法二:Window->preferences->General->editor->tex ...
- Eclipse常见操作
Eclipse打开Package Explorer Window > Show View > Other Java > Package Explorer 然后可以将其拖拽到Eclip ...
- delphi TServerSocket的多线程
http://blog.sina.com.cn/s/blog_471218c2010001qc.html unit U_dxc; interface uses Windows, Messages, ...
- 【翻译】使用Visual Studio创建Asp.Net Core MVC (一)
This tutorial will teach you the basics of building an ASP.NET Core MVC web app using Visual Studio ...
- TCP实现P2P通信
Internet的迅速发展以及IPv4 地址数量的限制使得网络地址翻译(NAT,Network Address Trans2lation)设备得到广泛应用.NAT设备允许处于同一NAT后的多台主机共享 ...
- 【angularjs】【学习心得】路由实战篇
今天还是来说一下angular中的路由模块.我们实际项目中,各个页面的切换是经常会与Auth相关的.比如我网站的后台,是需要登录过的用户才能进去,那么我们用angularJS做前端路由的时候应该怎么完 ...
- #图# #dijkstra# ----- OpenJudge 726:ROADS
OpenJudge 726:ROADS 总时间限制: 1000ms内存限制: 65536kB 描述 N cities named with numbers 1 ... N are connected ...
- flex stage.width 与stage.stageWidth的区别
flex stage.width 与stage.stageWidth的区别: stage.width 是指舞台上的可视对象占据的尺寸 stage.stageWidth是指舞台设置的尺寸,与舞台上的元件 ...
- WebRTC VoiceEngine使用简单Demo
Google收购的GIPS公司的音频处理技术是很牛的,现在开源了,这么好的技术应该拿来用的,这里就简单的介绍一下怎样使用VoiceEngine,欢迎大家拍砖指导. WebRTC相关的VideoEngi ...