
使用kubeadm部署K8S v1.17.0集群
kubeadm部署K8S集群
安装前的准备
集群机器
172.22.34.34 K8S00

172.22.34.35 K8S01

172.22.34.36 K8S02
注意:
- 本文档中的 etcd 、master 节点、worker 节点均使用这三台机器;
- 需要使用 root 账号执行这些命令;
- 未做特殊说明,就表示集群的所有机器都要进行操作
查看CentOS版本
[root@localhost ~]# cat /etc/redhat-release

CentOS Linux release 7.6.1810 (Core)
设置主机名&修改hosts文件
每台服务器上设置主机名以及修改hosts文件
# 设置主机名

[root@localhost ~]# vi /etc/hostname

# 每台服务器上设置自己的主机名K8S00、K8S01、K8S02

K8S01

# 修改hosts文件

[root@localhost ~]# vi /etc/hosts

# 设定节点ip对应关系

172.22.34.34 K8S00

172.22.34.35 K8S01

172.22.34.36 K8S02
关闭防火墙&selinux
# 关闭防火墙

[root@localhost ~]# systemctl stop firewalld

[root@localhost ~]# systemctl disable firewalld

# 关闭selinux

[root@localhost ~]# setenforce 0

[root@localhost ~]# sed -i 's/^SELINUX=.*/SELINUX=disabled/' /etc/selinux/config
关闭swap
[root@K8S01 ~]# swapoff -a

[root@K8S01 ~]# sed -i '/ swap / s/^\(.*\)$/#\1/g' /etc/fstab
master免密登录其它节点
此处以K8S00作为master,K8S01和K8S02作为node,只在master上进行操作
创建密钥
[root@K8S00 ~]# ssh-keygen -t rsa

Generating public/private rsa key pair.

Enter file in which to save the key (/root/.ssh/id_rsa):

Created directory '/root/.ssh'.

Enter passphrase (empty for no passphrase):

Enter same passphrase again:

Your identification has been saved in /root/.ssh/id_rsa.

Your public key has been saved in /root/.ssh/id_rsa.pub.

The key fingerprint is:

SHA256:c9mUKafubFrLnpZGEnQflcSYu7KPc64Mz/75WPwLvJY root@K8S00

The key's randomart image is:

+---[RSA 2048]----+

|             *o. |

|        . . +oo  |

|       . ...=o   |

|        .  Bo    |

|        S.+ ..   |

|        .+o o.   |

|        .oo+ o+  |

|         XB+.Eo. |

|        .B#BBo..o|

+----[SHA256]-----+
分发密钥
设置 K8S01 的 root 账户可以无密码登录所有节点:
[root@K8S00 ~]# ssh-copy-id root@K8S00

[root@K8S00 ~]# ssh-copy-id root@K8S01

[root@K8S00 ~]# ssh-copy-id root@K8S02
安装依赖包
在每台机器上安装依赖包:
CentOS:
yum install -y epel-release

yum install -y conntrack ntpdate ntp ipvsadm ipset jq iptables curl sysstat libseccomp wget
Ubuntu:
apt-get install -y conntrack ipvsadm ntp ipset jq iptables curl sysstat libseccomp
- ipvs 依赖 ipset;
- ntp 保证各机器系统时间同步;
同步时间
在每台机器上执行同步时间:
ntpdate time1.aliyun.com
加载内核模块
modprobe ip_vs_rr

modprobe br_netfilter
优化内核参数
[root@K8S00 ~]# cat > /etc/sysctl.d/kubernetes.conf << EOF

> net.bridge.bridge-nf-call-iptables=1

> net.bridge.bridge-nf-call-ip6tables=1

> net.ipv4.ip_forward=1

> net.ipv4.tcp_tw_recycle=0

> vm.swappiness=0 # 禁止使用 swap 空间,只有当系统 OOM 时才允许使用它

> vm.overcommit_memory=1 # 不检查物理内存是否够用

> vm.panic_on_oom=0 # 开启 OOM

> fs.inotify.max_user_instances=8192

> fs.inotify.max_user_watches=1048576

> fs.file-max=52706963

> fs.nr_open=52706963

> net.ipv6.conf.all.disable_ipv6=1

> net.netfilter.nf_conntrack_max=2310720

> EOF

[root@K8S00 ~]# sysctl -p /etc/sysctl.d/kubernetes.conf
安装Kubernetes和docker
在每台机器上都需要操作
添加yum源
添加kubernetes的yum源
vi /etc/yum.repos.d/kubernetes.repo

[kubernetes]

name=Kubernetes repo

baseurl=https://mirrors.aliyun.com/kubernetes/yum/repos/kubernetes-el7-x86_64/

gpgcheck=0

gpgkey=https://mirrors.aliyun.com/kubernetes/yum/doc/yum-key.gpg

enabled=1
添加docker的yum源
wget -O /etc/yum.repos.d/docker-ce.repo https://mirrors.aliyun.com/docker-ce/linux/centos/docker-ce.repo
安装docker
yum -y install docker-ce
如果要卸载docker,一定要使用 yum -y remove docker*,否则没有卸载干净,会影响其他版本docker的安装
启动docker
systemctl enable docker

systemctl start docker

vi /etc/docker/daemon.json

{

"registry-mirrors": ["https://dlbpv56y.mirror.aliyuncs.com"]

}

systemctl restart docker
安装kubeadm,kubelet和kubectl
yum -y install kubelet kubeadm kubectl

systemctl enable kubelet
部署Kubernetes Master
此操作在master节点 K8S00上进行
[root@K8S00 ~]# kubeadm init --apiserver-advertise-address=172.22.34.34 --image-repository registry.aliyuncs.com/google_containers --kubernetes-version v1.17.0 --service-cidr=10.1.0.0/16 --pod-network-cidr=10.244.0.0/16
输出结果:
W1223 19:51:05.051907    5167 validation.go:28] Cannot validate kubelet config - no validator is available

W1223 19:51:05.051988    5167 validation.go:28] Cannot validate kube-proxy config - no validator is available

[init] Using Kubernetes version: v1.17.0

[preflight] Running pre-flight checks

	[WARNING IsDockerSystemdCheck]: detected "cgroupfs" as the Docker cgroup driver. The recommended driver is "systemd". Please follow the guide at https://kubernetes.io/docs/setup/cri/

[preflight] Pulling images required for setting up a Kubernetes cluster

[preflight] This might take a minute or two, depending on the speed of your internet connection

[preflight] You can also perform this action in beforehand using 'kubeadm config images pull'

[kubelet-start] Writing kubelet environment file with flags to file "/var/lib/kubelet/kubeadm-flags.env"

[kubelet-start] Writing kubelet configuration to file "/var/lib/kubelet/config.yaml"

[kubelet-start] Starting the kubelet

[certs] Using certificateDir folder "/etc/kubernetes/pki"

[certs] Generating "ca" certificate and key

[certs] Generating "apiserver" certificate and key

[certs] apiserver serving cert is signed for DNS names [k8s00 kubernetes kubernetes.default kubernetes.default.svc kubernetes.default.svc.cluster.local] and IPs [10.1.0.1 172.22.34.34]

[certs] Generating "apiserver-kubelet-client" certificate and key

[certs] Generating "front-proxy-ca" certificate and key

[certs] Generating "front-proxy-client" certificate and key

[certs] Generating "etcd/ca" certificate and key

[certs] Generating "etcd/server" certificate and key

[certs] etcd/server serving cert is signed for DNS names [k8s00 localhost] and IPs [172.22.34.34 127.0.0.1 ::1]

[certs] Generating "etcd/peer" certificate and key

[certs] etcd/peer serving cert is signed for DNS names [k8s00 localhost] and IPs [172.22.34.34 127.0.0.1 ::1]

[certs] Generating "etcd/healthcheck-client" certificate and key

[certs] Generating "apiserver-etcd-client" certificate and key

[certs] Generating "sa" key and public key

[kubeconfig] Using kubeconfig folder "/etc/kubernetes"

[kubeconfig] Writing "admin.conf" kubeconfig file

[kubeconfig] Writing "kubelet.conf" kubeconfig file

[kubeconfig] Writing "controller-manager.conf" kubeconfig file

[kubeconfig] Writing "scheduler.conf" kubeconfig file

[control-plane] Using manifest folder "/etc/kubernetes/manifests"

[control-plane] Creating static Pod manifest for "kube-apiserver"

[control-plane] Creating static Pod manifest for "kube-controller-manager"

W1223 19:58:54.479214    5167 manifests.go:214] the default kube-apiserver authorization-mode is "Node,RBAC"; using "Node,RBAC"

[control-plane] Creating static Pod manifest for "kube-scheduler"

W1223 19:58:54.480599    5167 manifests.go:214] the default kube-apiserver authorization-mode is "Node,RBAC"; using "Node,RBAC"

[etcd] Creating static Pod manifest for local etcd in "/etc/kubernetes/manifests"

[wait-control-plane] Waiting for the kubelet to boot up the control plane as static Pods from directory "/etc/kubernetes/manifests". This can take up to 4m0s

[apiclient] All control plane components are healthy after 36.092926 seconds

[upload-config] Storing the configuration used in ConfigMap "kubeadm-config" in the "kube-system" Namespace

[kubelet] Creating a ConfigMap "kubelet-config-1.17" in namespace kube-system with the configuration for the kubelets in the cluster

[upload-certs] Skipping phase. Please see --upload-certs

[mark-control-plane] Marking the node k8s00 as control-plane by adding the label "node-role.kubernetes.io/master=''"

[mark-control-plane] Marking the node k8s00 as control-plane by adding the taints [node-role.kubernetes.io/master:NoSchedule]

[bootstrap-token] Using token: 5w8vmp.zpuwn9chde7vq9j2

[bootstrap-token] Configuring bootstrap tokens, cluster-info ConfigMap, RBAC Roles

[bootstrap-token] configured RBAC rules to allow Node Bootstrap tokens to post CSRs in order for nodes to get long term certificate credentials

[bootstrap-token] configured RBAC rules to allow the csrapprover controller automatically approve CSRs from a Node Bootstrap Token

[bootstrap-token] configured RBAC rules to allow certificate rotation for all node client certificates in the cluster

[bootstrap-token] Creating the "cluster-info" ConfigMap in the "kube-public" namespace

[kubelet-finalize] Updating "/etc/kubernetes/kubelet.conf" to point to a rotatable kubelet client certificate and key

[addons] Applied essential addon: CoreDNS

[addons] Applied essential addon: kube-proxy

Your Kubernetes control-plane has initialized successfully!

To start using your cluster, you need to run the following as a regular user:

  mkdir -p $HOME/.kube

  sudo cp -i /etc/kubernetes/admin.conf $HOME/.kube/config

  sudo chown $(id -u):$(id -g) $HOME/.kube/config

You should now deploy a pod network to the cluster.

Run "kubectl apply -f [podnetwork].yaml" with one of the options listed at:

  https://kubernetes.io/docs/concepts/cluster-administration/addons/

Then you can join any number of worker nodes by running the following on each as root:

kubeadm join 172.22.34.34:6443 --token 5w8vmp.zpuwn9chde7vq9j2 \

    --discovery-token-ca-cert-hash sha256:b577acf7412994b84809120b5a0ba40c27ef0b950838a731964df16a62ef2dc9
根据上面的输出提示进行操作
[root@K8S01 ~]# mkdir -p $HOME/.kube

[root@K8S01 ~]# cp -i /etc/kubernetes/admin.conf $HOME/.kube/config

[root@K8S01 ~]# chown $(id -u):$(id -g) $HOME/.kube/config
node节点加入集群
使用kubeadm join 注册Node节点到Matser
kubeadm join 的内容,在上面kubeadm init (kubeadm init输出结果的最后写明了) 已经生成好了
此操作在node节点上进行操作:
kubeadm join 172.22.34.34:6443 --token 5w8vmp.zpuwn9chde7vq9j2 --discovery-token-ca-cert-hash sha256:b577acf7412994b84809120b5a0ba40c27ef0b950838a731964df16a62ef2dc9
输出结果:
W1223 07:53:58.021696    6461 join.go:346] [preflight] WARNING: JoinControlPane.controlPlane settings will be ignored when control-plane flag is not set.

[preflight] Running pre-flight checks

	[WARNING IsDockerSystemdCheck]: detected "cgroupfs" as the Docker cgroup driver. The recommended driver is "systemd". Please follow the guide at https://kubernetes.io/docs/setup/cri/

[preflight] Reading configuration from the cluster...

[preflight] FYI: You can look at this config file with 'kubectl -n kube-system get cm kubeadm-config -oyaml'

[kubelet-start] Downloading configuration for the kubelet from the "kubelet-config-1.17" ConfigMap in the kube-system namespace

[kubelet-start] Writing kubelet configuration to file "/var/lib/kubelet/config.yaml"

[kubelet-start] Writing kubelet environment file with flags to file "/var/lib/kubelet/kubeadm-flags.env"

[kubelet-start] Starting the kubelet

[kubelet-start] Waiting for the kubelet to perform the TLS Bootstrap...

This node has joined the cluster:

* Certificate signing request was sent to apiserver and a response was received.

* The Kubelet was informed of the new secure connection details.

Run 'kubectl get nodes' on the control-plane to see this node join the cluster.
默认token的有效期为24小时,当过期之后,该token就不可用了,如果后续有nodes节点加入,解决方法如下:重新生成新的token ==> kubeadm token create
# 1.查看当前的token列表

[root@K8S00 ~]# kubeadm token list

TOKEN                     TTL         EXPIRES                     USAGES                   DESCRIPTION                                                EXTRA GROUPS

7mjtn4.9kds6sabcouxaugd   23h         2019-12-24T15:44:58+08:00   authentication,signing   The default bootstrap token generated by 'kubeadm init'.   system:bootstrappers:kubeadm:default-node-token

# 2.重新生成新的token

[root@K8S00 ~]# kubeadm token create

369tcl.oe4punpoj9gaijh7

# 3.再次查看当前的token列表

[root@K8S00 ~]# kubeadm token list

TOKEN                     TTL         EXPIRES                     USAGES                   DESCRIPTION                                                EXTRA GROUPS

369tcl.oe4punpoj9gaijh7   23h         2019-12-24T16:05:18+08:00   authentication,signing   <none>                                                     system:bootstrappers:kubeadm:default-node-token

7mjtn4.9kds6sabcouxaugd   23h         2019-12-24T15:44:58+08:00   authentication,signing   The default bootstrap token generated by 'kubeadm init'.   system:bootstrappers:kubeadm:default-node-token

# 4.获取ca证书sha256编码hash值

[root@K8S00 ~]# openssl x509 -pubkey -in /etc/kubernetes/pki/ca.crt | openssl rsa -pubin -outform der 2>/dev/null | openssl dgst -sha256 -hex | sed 's/^.* //'

7ae10591aa593c2c36fb965d58964a84561e9ccd416ffe7432550a0d0b7e4f90

# 5.节点加入集群

[root@k8s-node03 ~]# kubeadm join --token 369tcl.oe4punpoj9gaijh7(新的token) --discovery-token-ca-cert-hash sha256:7ae10591aa593c2c36fb965d58964a84561e9ccd416ffe7432550a0d0b7e4f90(ca证书sha256编码hash值) 172.22.34.31:6443 --skip-preflight-chec
安装网络插件
一般的网络无法访问quay.io,可以曲线救国,找国内的镜像源,或者从docker hub上拉取flannel的镜像,此处选择第2种方式。
手动拉取flannel镜像
在集群的所有机器上操作
# 手动拉取flannel的docker镜像

docker pull easzlab/flannel:v0.11.0-amd64

# 修改镜像名称

docker tag easzlab/flannel:v0.11.0-amd64 quay.io/coreos/flannel:v0.11.0-amd64
安装flannel
此操作在master节点 K8S00上进行
下载flannel资源配置清单
[root@K8S00 ~]# wget https://raw.githubusercontent.com/coreos/flannel/master/Documentation/kube-flannel.yml
安装flannel
[root@K8S00 ~]# kubectl apply -f kube-flannel.yml

podsecuritypolicy.policy/psp.flannel.unprivileged configured

clusterrole.rbac.authorization.k8s.io/flannel created

clusterrolebinding.rbac.authorization.k8s.io/flannel created

serviceaccount/flannel created

configmap/kube-flannel-cfg created

daemonset.apps/kube-flannel-ds-amd64 created

daemonset.apps/kube-flannel-ds-arm64 created

daemonset.apps/kube-flannel-ds-arm created

daemonset.apps/kube-flannel-ds-ppc64le created

daemonset.apps/kube-flannel-ds-s390x created
查看集群的node状态,安装完网络工具之后,只有显示如下状态,所有节点全部都Ready好了之后才能继续后面的操作
[root@K8S00 ~]# kubectl get nodes

NAME    STATUS   ROLES    AGE   VERSION

k8s00   Ready    master   84m   v1.17.0

k8s01   Ready    <none>   29m   v1.17.0

k8s02   Ready    <none>   29m   v1.17.0

[root@K8S00 ~]# kubectl get pods -n kube-system

NAME                            READY   STATUS    RESTARTS   AGE

coredns-9d85f5447-fh5wb         1/1     Running   0          84m

coredns-9d85f5447-xctbx         1/1     Running   0          84m

etcd-k8s00                      1/1     Running   1          84m

kube-apiserver-k8s00            1/1     Running   1          84m

kube-controller-manager-k8s00   1/1     Running   5          84m

kube-flannel-ds-amd64-bdbf8     1/1     Running   0          2m18s

kube-flannel-ds-amd64-fdjwp     1/1     Running   0          2m18s

kube-flannel-ds-amd64-fgg9s     1/1     Running   0          2m18s

kube-proxy-5xrhq                1/1     Running   0          8m21s

kube-proxy-n56mc                1/1     Running   0          8m21s

kube-proxy-ns79s                1/1     Running   1          84m

kube-scheduler-k8s00            1/1     Running   5          84m
测试Kubernetes集群
此操作在master节点 K8S00上进行
[root@K8S00 ~]# kubectl create deployment nginx --image=nginx

deployment.apps/nginx created

[root@K8S00 ~]# kubectl expose deployment nginx --port=80 --type=NodePort

service/nginx exposed

[root@K8S00 ~]# kubectl get pods,svc

NAME                         READY   STATUS              RESTARTS   AGE

pod/nginx-86c57db685-ljzhp   0/1     ContainerCreating   0          15s

NAME                 TYPE        CLUSTER-IP     EXTERNAL-IP   PORT(S)        AGE

service/kubernetes   ClusterIP   10.1.0.1       <none>        443/TCP        91m

service/nginx        NodePort    10.1.136.233   <none>        80:32387/TCP   9s
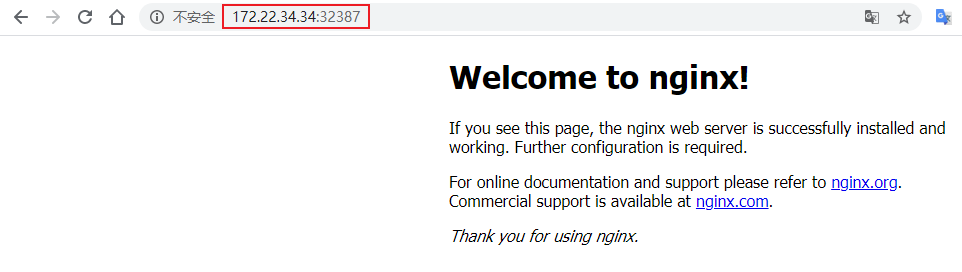
测试截图:
访问的端口号可以从上面的命令查询结果中看到
使用kubeadm部署K8S v1.17.0集群的更多相关文章
- [原创]自动化部署K8S(v1.10.11)集群
标准运维实现自动化部署K8S集群主要分两步,第一步是部署gse-agent,拱第二步执行部署. 第一步:部署gse-agent.如下: 第二步:部署k8s集群.主要通过作业平台分为5小步执 ...
- CentOS 7.4 安装 K8S v1.11.0 集群所遇到的问题
0.引言 最近打算将现有项目的 Docker 部署到阿里云上面,但是之前是单机部署,现在阿里云上面有 3 台机器,所以想做一个 Docker 集群.之前考虑是用 Docker Swarm 来做这个事情 ...
- kubeadm安装kubernetes V1.11.1 集群
之前测试了离线环境下使用二进制方法安装配置Kubernetes集群的方法,安装的过程中听说 kubeadm 安装配置集群更加方便,因此试着折腾了一下.安装过程中,也有一些坑,相对来说操作上要比二进制方 ...
- Ubuntu20.04配置 ES7.17.0集群
Ubuntu20.04配置 ES7.17.0集群 ES能做什么? elasticsearch简写es,es是一个高扩展.开源的全文检索和分析引擎,它可以准实时地快速存储.搜索.分析海量的数据. Ubu ...
- 使用kubeadm搭建高可用k8s v1.16.3集群
目录 1.部署环境说明 2.集群架构及部署准备工作 2.1.集群架构说明 2.2.修改hosts及hostname 2.3.其他准备 3.部署keepalived 3.1.安装 3.2.配置 3.3. ...
- Kubeadm搭建高可用(k8s)Kubernetes v1.24.0集群
文章转载自:https://i4t.com/5451.html 背景 Kubernetes 1.24新特性 从kubelet中移除dockershim,自1.20版本被弃用之后,dockershim组 ...
- kubeadm部署k8s v1.19.4版本集群
1. 准备2台2c4g虚机 配置地址192.168.198.144,192.168.198.146,一台作为master,一台作为node 2. 部署环境准备,每一台虚机都需要操作 # 关闭防火墙sy ...
- 二进制方式部署Kubernetes 1.6.0集群(开启TLS)
本节内容: Kubernetes简介 环境信息 创建TLS加密通信的证书和密钥 下载和配置 kubectl(kubecontrol) 命令行工具 创建 kubeconfig 文件 创建高可用 etcd ...
- kubeadm部署k8s1.9高可用集群--4部署master节点
部署master节点 kubernetes master 节点包含的组件: kube-apiserver kube-scheduler kube-controller-manager 本文档介绍部署一 ...
随机推荐
- Python爬虫:requests 库详解,cookie操作与实战
原文 第三方库 requests是基于urllib编写的.比urllib库强大,非常适合爬虫的编写. 安装: pip install requests 简单的爬百度首页的例子: response.te ...
- SQL Server查询性能
sql server常用语句总结 http://ace105.blog.51cto.com/639741/792519 SQL Server 性能调优(一)--从等待状态判断系统资源瓶颈 ...
- Qt--解析Json
一.QT5 Json简介 QT4中使用第三方库QJson解析JSON文件. QT5新增加了处理JSON的类,类均以QJson开头,包含在QtCore模块中.QT5新增加六个相关类: QJsonArra ...
- CSPS2019游(tuifei)记
%%%脸哥没脸%%% Day0,日常考前紧张,做不下题去.听各大主任送祝福(从里红(wa)到外) 然后就出发了,大巴上和云力一起坐,吃了好多东西.中午因不满火车站的不合理收费,选择了面包+火腿 下午在 ...
- yii2.0场景的简单使用
一.规则中使用场景规则场景的使用模型层public function rules(){ return [ [['name','product_id'],'required','on'=>'add ...
- grafana 的配置文件,和使用mysql数据库做持久化
grafana 配置文件 vim /etc/grafana/grafana.ini 下面有些参数在新版中6.x版本中已经过时,请参考下面官网最新帮助文档为准 https://grafana.com/d ...
- Js 之cookie插件(jquery.cookie.js)
一.代码 (function (factory) { if (typeof define === 'function' && define.amd) { // AMD define([ ...
- hdu2476(区间dp+dp)
String painter Time Limit: 5000/2000 MS (Java/Others) Memory Limit: 32768/32768 K (Java/Others) T ...
- 走进JavaWeb技术世界10:从JavaBean讲到Spring
Java 帝国之Java bean (上) 转自: 刘欣 码农翻身 2016-05-27 前言: 最近看到到spring 的bean 配置, 突然想到可能很多人不一定知道这个叫bean的东西的来龙去脉 ...
- mysql转移Data目录
本来很简单的事,为何这么复杂,转目录后经常不成功.mysql安装时就不能指定数据目录吗?老是默认在C盘 测试环境Windows10, mysql5.7,以下是测试记录: 1. 复制Data到D盘下,如 ...