
day17.json模块、时间模块、zipfile模块、tarfile模块
一、json模块
"""

所有的编程语言都能够识别的数据格式叫做json,是字符串

能够通过json序列化成字符串与如下类型: (int float bool str list tuple dict None)

"""
import json
1、json用法
#(1) dumps和loads是一对,可以序列化成字符串

dic = {"name":"高云峰","age":81,"classroom":"python31","family":["老爸","老妈","老伴"]}

# ensure_ascii=False 显示中文 sort_keys=True 对字典的键进行排序

res = json.dumps(dic,ensure_ascii=False,sort_keys=True)

print(res , type(res))

# loads反序列化原来的数据类型

dic = json.loads(res)

print(dic,type(dic))

#(2) dump 和 load 是一对,针对于文件,把数据序列化后存储文件

dic = {"name":"高云峰","age":81,"classroom":"python31","family":["老爸","老妈","老伴"]}

with open("ceshi0728.json",mode="w",encoding="utf-8") as fp:

    json.dump(dic,fp,ensure_ascii=False)

with open("ceshi0728.json",mode="r",encoding="utf-8") as fp:

    dic = json.load(fp)

    print(dic, type(dic))
2.json 和pickle 之间的区别
"""json 可以连续dump , 但是不能连续load"""

dic1 = {"a":1,"b":2}

dic2 = {"c":3,"d":4}

with open("0728_2.json",mode="w",encoding="utf-8") as fp:

    json.dump(dic1,fp)

    fp.write("\n")

    json.dump(dic2,fp)

    fp.write("\n")

"""load 在获取数据时,是一次性拿取所有内容"""

# error

"""

with open("0728_2.json",mode="r",encoding="utf-8") as fp:

    res = json.load(fp)

    print(res)

"""
解决办法:
with open("0728_2.json",mode="r",encoding="utf-8") as fp:

    for i in fp:

        dic = json.loads(i)

        print(dic,type(dic))
"""pickle 可以连续dump 也可以连续load 因为pickle在存储数据的时候会在末尾加上结束符"""

import pickle

dic1 = {"a":1,"b":2}

dic2 = {"c":3,"d":4}

with open("0728_3.pkl",mode="wb") as fp:

    pickle.dump(dic1,fp)

    pickle.dump(dic2,fp)

"""

with open("0728_3.pkl",mode="rb") as fp:

    dic1 = pickle.load(fp)

    print(dic1 , type(dic1))

    dic2 = pickle.load(fp)

    print(dic2 , type(dic2))

"""

# try ... except ... 异常处理(用来抑制错误的)

"""

try :

    可能报错的代码

except:

    如果报错执行except这个代码块;

"""

# 获取文件当中所有的数据

try:

    with open("0728_3.pkl",mode="rb") as fp:

        while True:

            res = pickle.load(fp)

            print(res)

except:

    pass
"""

# json 和 pickle 两个模块的区别:

(1)json序列化之后的数据类型是str,所有编程语言都识别,

   但是仅限于(int float bool)(str list tuple dict None)

   json不能连续load,只能一次性拿出所有数据

(2)pickle序列化之后的数据类型是bytes,

   所有数据类型都可转化,但仅限于python之间的存储传输.

   pickle可以连续load,多套数据放到同一个文件中

json使用的广泛性比pickle更强.

json   用在不同编程语言的数据交流中

pickle 用于数据的存储

"""
二、time模块
时间戳(Timestamp):时间戳表示从1970年1月1日00:00:00开始按秒计算的偏移量

Format String:格式化的事件字符串

时间元组(结构化时间)(struct_time): struct_time共有9个元素(年,月,日,时,分,秒,一年中第几周,一年中第几天,夏令时)

%a %b %d  %H:%M:%S %Y :时间字符串
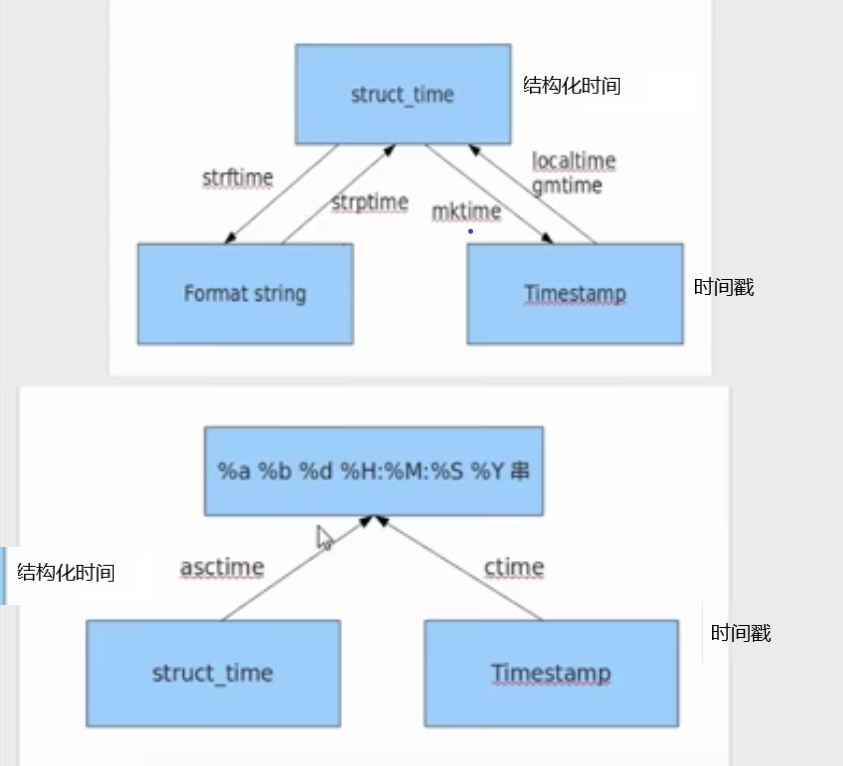
1、time 获取本地时间戳 (*)
res = time.time()

print(res)

# 1596291325.1793654
2、localtime 获取本地时间元组(*)
参数是时间戳,默认当前
res = time.localtime()

print(res)

"""

time.struct_time(

    tm_year=2020,

    tm_mon=7,

    tm_mday=28,

    tm_hour=10,

    tm_min=45,

    tm_sec=9,

    tm_wday=1,

    tm_yday=210,

    tm_isdst=0

)

"""
# 指定时间戳,返回时间元组
ttp = 1595904161

res = time.localtime(ttp)

print(res)

"""

time.struct_time(

    tm_year=2020,

    tm_mon=7,

    tm_mday=28,

    tm_hour=10,

    tm_min=42,

    tm_sec=41,

    tm_wday=1,

    tm_yday=210,

    tm_isdst=0

)

"""
3、mktime() 通过时间元组获取时间戳 (*)
参数是时间元组
ttp = (2020,7,28,10,48,30,0,0,0)

res = time.mktime(ttp)

print(res)

#
4、ctime() 获取本地时间字符串 (*)
参数是时间戳,默认当前
res = time.ctime() # 默认以当前时间戳获取时间字符串

print(res)

# Sat Aug  1 22:24:00 2020
指定时间戳
res = time.ctime(1595904161)

print(res)

# Tue Jul 28 10:42:41 2020
5、asctime() 通过时间元组获取时间字符串
参数是时间元组(不能自动识别周几.)
ttp = (2020,7,28,10,54,30,6,0,0) # 不能自动识别周几.

res = time.asctime(ttp)

print(res)

# Sun Jul 28 10:54:30 2020
改造办法
ttp = (2020,7,28,10,54,30,0,0,0)

res = time.mktime(ttp)

str_time = time.ctime(res)

print(str_time)

# Tue Jul 28 10:54:30 2020
6、sleep 程序睡眠等待
time.sleep(2)

print("我睡醒了")
7、strftime 把时间元组 -> 时间字符串
默认按照当前时间做格式化
res = time.strftime("%Y-%m-%d %H:%M:%S")

print(res)

# 2020-08-01 22:31:40
指定时间元组,对时间字符串格式化
"""strftime如果在windows当中出现中文,直接报错,不能解析,linux 可以支持"""

ttp = (2000,10,1,12,12,12,0,0,0)

res = time.strftime("%Y-%m-%d %H:%M:%S" , ttp)

print(res)

# 2000-10-01 12:12:12
8、strptime() 将时间字符串通过指定格式提取到时间元组中
"""要求字符串不能乱加符号,必须严丝合缝."""

strvar = "2020年7月28号11时12分13秒是著名歌星庾澄庆的生日"

ttp = time.strptime(strvar,"%Y年%m月%d号%H时%M分%S秒是著名歌星庾澄庆的生日")

print(ttp)

"""

time.struct_time(

    tm_year=2020,

    tm_mon=7,

    tm_mday=28,

    tm_hour=11,

    tm_min=12,

    tm_sec=13,

    tm_wday=1,

    tm_yday=210,

    tm_isdst=-1)

"""
9、perf_counter() 用于计算程序运行的时间
# 记录开始时间

startime = time.perf_counter()

# startime = time.time()

for i in range(100000000):

    pass

# 记录结束时间

endtime = time.perf_counter()

# endtime = time.time()

print(endtime - startime)

# 5.847825
三、进度条效果
# (1) 定义进度条的样式

print("[%-50s]" % ("#"))

print("[%-50s]" % ("###############"))

print("[%-50s]" % ("#########################"))

# (2) 让进度条动起来

"""

strvar = ""

for  i in range(50):

    strvar += "#"

    time.sleep(0.1)

    print("\r[%-50s]" % (strvar) , end="" )

"""

# (3) 根据文件的大小,调整进度条的位置

print("<========>")

# 假设文件的大小是 1024000

def progress(percent):

    # 如果百分比超过了1,说明数据已经接受完毕;

    if percent > 1:

        percent = 1

    # 打印对应的#号效果

    strvar = "#" * int(percent * 50)

    # %% => %

    print("\r[%-50s] %d%%" % (strvar,int(percent * 100)) , end="" )

# 初始化接受的字节数

recv_size = 0

# 文件接受总大小

total_size = 1024000

while recv_size < total_size:

    recv_size += 1024

    # 模拟延迟

    time.sleep(0.01)

    # 计算百分比

    percent = recv_size/total_size #0.001

    # 调用进度条

    progress(percent)

# [##################################################] 100%
四、zipfile 压缩模块
# 1.压缩文件

# (1) 创建压缩包

zf = zipfile.ZipFile("1424.zip","w",zipfile.ZIP_DEFLATED)

# (2) 把文件写入到压缩包中

# write(路径,别名)

zf.write("/bin/cp","cp")

zf.write("/bin/chmod","chmod")

# 可以临时创建一个文件夹tmp在压缩包中

zf.write("/bin/df","/tmp/df")

# (3) 关闭压缩包

zf.close()

# 2.解压文件

# (1)打开压缩包

zf = zipfile.ZipFile("1424.zip","r")

# (2)解压文件

# 解压单个文件

zf.extract("cp","ceshi1424_2")

# 解压所有文件

# zf.extractall("ceshi1424")

# (3) 关闭压缩包

zf.close()

# 3.追加文件 (支持with语法)

with zipfile.ZipFile("1424.zip","a",zipfile.ZIP_DEFLATED) as zf:

    zf.write("/bin/dir","dir")

# 4.查看压缩包

with zipfile.ZipFile("1424.zip","r",zipfile.ZIP_DEFLATED) as zf:

    lst = zf.namelist()

    print(lst)
五、tarfile 压缩模块 .tar | .tar.gz | .tar.bz2
import tarfile
"""最小的压缩包,后缀格式为bz2"""
1、创建tar包
# 单纯的tar包

tf = tarfile.open("ceshi0729_1.tar","w",encoding="utf-8")

tf.add("/bin/echo","echo")

tf.add("/bin/ed","ed")

tf.add("/bin/fuser","/tmp/fuser")

tf.close()
# .tar.gz

tf = tarfile.open("ceshi0729_2.tar.gz","w:gz",encoding="utf-8")

tf.add("/bin/echo","echo")

tf.add("/bin/ed","ed")

tf.add("/bin/fuser","/tmp/fuser")

tf.close()
# .tar.bz2

tf = tarfile.open("ceshi0729_3.tar.bz2","w:bz2",encoding="utf-8")

tf.add("/bin/echo","echo")

tf.add("/bin/ed","ed")

tf.add("/bin/fuser","/tmp/fuser")

tf.close()
2、对压缩包进行解压
tf = tarfile.open("ceshi0729_3.tar.bz2","r",encoding="utf-8")

# 解压单个

tf.extract("echo","ceshi0729_4")

# 解压所有

# tf.extractall("ceshi0729_3")

tf.close()
3、追加文件 (支持with语法)
# [只能为没有压缩过的tar包进行追加.]
with tarfile.open("cceshi0729_1.tar","a",encoding="utf-8") as tf:

    tf.add("/bin/cp","cp")
4、查看压缩包中的文件
with tarfile.open("ceshi0729_2.tar.gz","r",encoding="utf-8") as tf:

    lst = tf.getnames()

    print(lst)
5、如何处理tarfile不能在已经压缩过的包中追加内容的问题
# ceshi0729_3.tar.bz2

import os

path = os.getcwd()

# 找到要解压的包的路径

pathvar1 = os.path.join(path,"ceshi0729_3.tar.bz2")

print(pathvar1)

# 解压到哪里去

pathvar2 =  os.path.join(path,"ceshi0729_3")

print(pathvar2)

# (1) 先对已经压缩过的包进行解压

with tarfile.open(pathvar1,"r",encoding="utf-8") as tf:

    tf.extractall(pathvar2)

# (2) 往这个解压的文件夹中添加新的文件

mybin = "cp -a /bin/fgrep " + pathvar2

# print(mybin) # cp -a /bin/fgrep /mnt/hgfs/python31_gx/day19/ceshi0729_3

os.system(mybin)

# (3) 对这个文件进行过滤筛选,重新打包压缩 (不要echo)

lst = os.listdir(pathvar2)

print(lst)

with tarfile.open(pathvar1,"w:bz2",encoding="utf-8") as tf:

    for i in lst:

        if i != "echo":

            # 拼接完整路径

            pathnew = os.path.join(pathvar2,i)

            # add(路径,别名)

            tf.add(pathnew,i)
day17.json模块、时间模块、zipfile模块、tarfile模块的更多相关文章
- shutil,zipfile,tarfile模块
一,shutil模块 1.shutil.chown() shutil.chown('test.txt',user='mysql',group='mysql') #改变文件的属主和属组. 2.shuti ...
- python的zipfile、tarfile模块
zipfile.tarfile的用法 先占个位置,后续再实际操作和补充 参考 https://www.cnblogs.com/MnCu8261/p/5494807.html
- Python之文件与目录操作及压缩模块(os、shutil、zipfile、tarfile)
Python中可以用于对文件和目录进行操作的内置模块包括: 模块/函数名称 功能描述 open()函数 文件读取或写入 os.path模块 文件路径操作 os模块 文件和目录简单操作 zipfile模 ...
- Python第二十天 shutil 模块 zipfile tarfile 模块
Python第二十天 shutil 模块 zipfile tarfile 模块 os文件的操作还应该包含移动 复制 打包 压缩 解压等操作,这些os模块都没有提供 shutil 模块shut ...
- zipfile tarfile模块
zipfile --- 使用ZIP存档 这个模块提供了创建.读取.写入.添加及列出 ZIP 文件的工具 # 创建一个ZipFile对象, 可使用上下文管理 with class zipfile.Zip ...
- 【转】Python之文件与目录操作(os、zipfile、tarfile、shutil)
[转]Python之文件与目录操作(os.zipfile.tarfile.shutil) Python中可以用于对文件和目录进行操作的内置模块包括: 模块/函数名称 功能描述 open()函数 文件读 ...
- Python之文件与目录操作(os、zipfile、tarfile、shutil)
Python中可以用于对文件和目录进行操作的内置模块包括: 模块/函数名称 功能描述 open()函数 文件读取或写入 os.path模块 文件路径操作 os模块 文件和目录简单操作 zipfile模 ...
- s14 第5天 时间模块 随机模块 String模块 shutil模块(文件操作) 文件压缩(zipfile和tarfile)shelve模块 XML模块 ConfigParser配置文件操作模块 hashlib散列模块 Subprocess模块(调用shell) logging模块 正则表达式模块 r字符串和转译
时间模块 time datatime time.clock(2.7) time.process_time(3.3) 测量处理器运算时间,不包括sleep时间 time.altzone 返回与UTC时间 ...
- shutil模块,ZipFile 和 TarFile 两个模块
高级的文件.文件夹.压缩包处理模块 shutil.copyfileobj(fsrc, fdst[, length])将文件内容拷贝到另一个文件中,可以部分内容 shutil.copyfile(src, ...
- Python3学习之路~5.6 shutil & zipfile & tarfile模块
高级的 文件.文件夹.压缩包 处理模块 shutil.copyfileobj(fsrc, fdst[, length])#将文件内容拷贝到另一个文件中,可以部分内容 shutil.copyfile(s ...
随机推荐
- 在react中使用到的好用的插件
1)antd UI组件 蚂蚁金服出品的 挺好用的 还有个移动端的antd-moblie 2) moment 日期处理类库 3)prop-types 第三方库 对组件props变量进行类型检测 4)qs ...
- C++快速读写
1.主函数的最前面加入这个 std::ios::sync_with_stdio(0); cin.tie(0); cout.tie(0); 2.这是一个读入数字的快读 inline int read() ...
- 介绍python由来, 安装python3.8.3 及其变量的定义, 小整数池
介绍 python的创始人为吉多·范罗苏姆(Guido van Rossum).1989年的圣诞节期间,Guido开始写能够解释Python语言语法的解释器.Python这个名字,来自Guido所挚爱 ...
- python 爬虫:HTTP ERROR 406
解决方法: 设置了Accept头后解决了,但是还是不知道原因 headers:{ Accept:"text/html, application/xhtml+xml, */*" }原 ...
- 数据可视化之powerBI技巧(四)使用Power BI制作帕累托图
各种复杂现象的背后,其实都是受关键的少数因素和普通的大多数因素所影响,把主要精力放在关键的少数因素上,就能达到事半功倍的效果. 这就是大家常说的二八原则,也称为帕累托原则,最早是由意大利经济学家 V. ...
- 数据可视化之PowerQuery篇(八)利用PowerQuery,进行更加灵活的数据分列
https://zhuanlan.zhihu.com/p/66540160 常规分列 我们最常见的就是有固定分隔符的规范数据,这种直接就按照分隔符拆分就可以了, 如果没有分割符怎么办?依然是上面的数据 ...
- 深入浅出AQS源码解析
最近一直在研究AQS的源码,希望可以更深刻的理解AQS的实现原理.虽然网上有很多关于AQS的源码分析,但是看完以后感觉还是一知半解.于是,我将自己的整个理解过程记录下来了,希望对大家有所帮助. 基本原 ...
- ES6的功能简介
1. let, const, var let: 块级作用域, 不存在变量提升, 值可更改 const:块级作用域, 不能存在变量提升, 值不可更改 var: 函数级作用域, 变量提升, 值可更改 案例 ...
- DEX文件解析--4、dex类的类型解析
一.前言 前几篇系列文章链接: DEX文件解析---1.dex文件头解析 DEX文件解析---2.Dex文件checksum(校验和)解析 DEX文件解析--3.dex文件 ...
- P5198 [USACO19JAN]Icy Perimeter S (洛谷) (水搜索)
同样是因为洛谷作业不会写…… 写(水)博客啦. 直接放题目吧,感觉放在代码框里好看点 Farmer John要开始他的冰激凌生意了!他制造了一台可以生产冰激凌球的机器,然而不幸的是形状不太规则,所以他 ...