Flink处理函数实战之三:KeyedProcessFunction类
欢迎访问我的GitHub
https://github.com/zq2599/blog_demos
内容:所有原创文章分类汇总及配套源码,涉及Java、Docker、Kubernetes、DevOPS等;
Flink处理函数实战系列链接
- 深入了解ProcessFunction的状态操作(Flink-1.10);
- ProcessFunction;
- KeyedProcessFunction类;
- ProcessAllWindowFunction(窗口处理);
- CoProcessFunction(双流处理);
本篇概览
本文是《Flink处理函数实战》系列的第三篇,上一篇《Flink处理函数实战之二:ProcessFunction类》学习了最简单的ProcessFunction类,今天要了解的KeyedProcessFunction,以及该类带来的一些特性;
关于KeyedProcessFunction
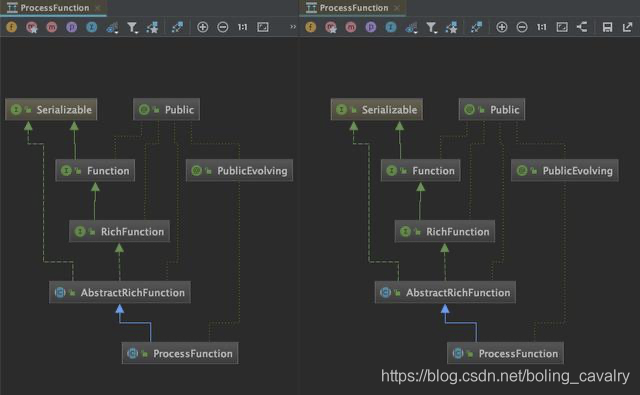
通过对比类图可以确定,KeyedProcessFunction和ProcessFunction并无直接关系:
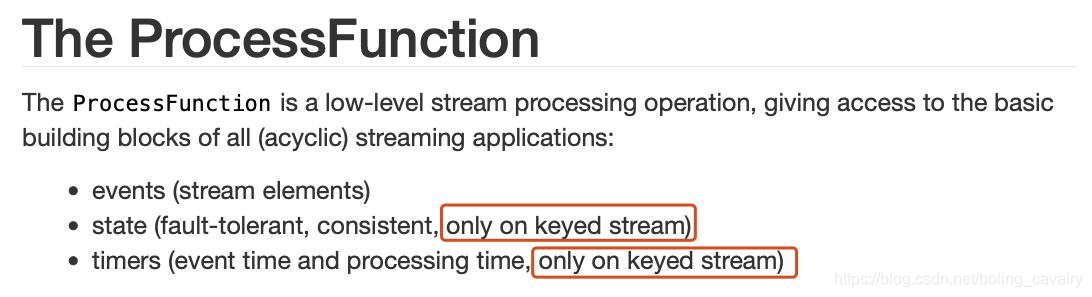
KeyedProcessFunction用于处理KeyedStream的数据集合,相比ProcessFunction类,KeyedProcessFunction拥有更多特性,官方文档如下图红框,状态处理和定时器功能都是KeyedProcessFunction才有的:
介绍完毕,接下来通过实例来学习吧;
版本信息
- 开发环境操作系统:MacBook Pro 13寸, macOS Catalina 10.15.3
- 开发工具:IDEA ULTIMATE 2018.3
- JDK:1.8.0_211
- Maven:3.6.0
- Flink:1.9.2
源码下载
如果您不想写代码,整个系列的源码可在GitHub下载到,地址和链接信息如下表所示(https://github.com/zq2599/blog_demos):
| 名称 | 链接 | 备注 |
|---|---|---|
| 项目主页 | https://github.com/zq2599/blog_demos | 该项目在GitHub上的主页 |
| git仓库地址(https) | https://github.com/zq2599/blog_demos.git | 该项目源码的仓库地址,https协议 |
| git仓库地址(ssh) | git@github.com:zq2599/blog_demos.git | 该项目源码的仓库地址,ssh协议 |
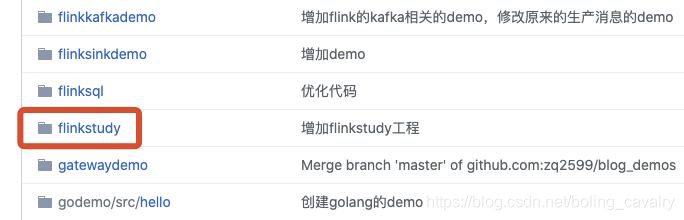
这个git项目中有多个文件夹,本章的应用在flinkstudy文件夹下,如下图红框所示:
实战简介
本次实战的目标是学习KeyedProcessFunction,内容如下:
- 监听本机9999端口,获取字符串;
- 将每个字符串用空格分隔,转成Tuple2实例,f0是分隔后的单词,f1等于1;
- 上述Tuple2实例用f0字段分区,得到KeyedStream;
- KeyedSteam转入自定义KeyedProcessFunction处理;
- 自定义KeyedProcessFunction的作用,是记录每个单词最新一次出现的时间,然后建一个十秒的定时器,十秒后如果发现这个单词没有再次出现,就把这个单词和它出现的总次数发送到下游算子;
编码
- 继续使用《Flink处理函数实战之二:ProcessFunction类》一文中创建的工程flinkstudy;
- 创建bean类CountWithTimestamp,里面有三个字段,为了方便使用直接设为public:
package com.bolingcavalry.keyedprocessfunction;

public class CountWithTimestamp {

    public String key;

    public long count;

    public long lastModified;

}
- 创建FlatMapFunction的实现类Splitter,作用是将字符串分割后生成多个Tuple2实例,f0是分隔后的单词,f1等于1:
package com.bolingcavalry;

import org.apache.flink.api.common.functions.FlatMapFunction;

import org.apache.flink.api.java.tuple.Tuple2;

import org.apache.flink.util.Collector;

import org.apache.flink.util.StringUtils;

public class Splitter implements FlatMapFunction<String, Tuple2<String, Integer>> {

    @Override

    public void flatMap(String s, Collector<Tuple2<String, Integer>> collector) throws Exception {

        if(StringUtils.isNullOrWhitespaceOnly(s)) {

            System.out.println("invalid line");

            return;

        }

        for(String word : s.split(" ")) {

            collector.collect(new Tuple2<String, Integer>(word, 1));

        }

    }

}
- 最后是整个逻辑功能的主体:ProcessTime.java,这里面有自定义的KeyedProcessFunction子类,还有程序入口的main方法,代码在下面列出来之后,还会对关键部分做介绍:
package com.bolingcavalry.keyedprocessfunction;

import com.bolingcavalry.Splitter;

import org.apache.flink.api.common.state.ValueState;

import org.apache.flink.api.common.state.ValueStateDescriptor;

import org.apache.flink.api.java.tuple.Tuple;

import org.apache.flink.api.java.tuple.Tuple2;

import org.apache.flink.configuration.Configuration;

import org.apache.flink.streaming.api.TimeCharacteristic;

import org.apache.flink.streaming.api.datastream.DataStream;

import org.apache.flink.streaming.api.environment.StreamExecutionEnvironment;

import org.apache.flink.streaming.api.functions.AssignerWithPeriodicWatermarks;

import org.apache.flink.streaming.api.functions.KeyedProcessFunction;

import org.apache.flink.streaming.api.watermark.Watermark;

import org.apache.flink.util.Collector;

import java.text.SimpleDateFormat;

import java.util.Date;

/**

 * @author will

 * @email zq2599@gmail.com

 * @date 2020-05-17 13:43

 * @description 体验KeyedProcessFunction类(时间类型是处理时间)

 */

public class ProcessTime {

    /**

     * KeyedProcessFunction的子类,作用是将每个单词最新出现时间记录到backend,并创建定时器,

     * 定时器触发的时候,检查这个单词距离上次出现是否已经达到10秒,如果是,就发射给下游算子

     */

    static class CountWithTimeoutFunction extends KeyedProcessFunction<Tuple, Tuple2<String, Integer>, Tuple2<String, Long>> {

        // 自定义状态

        private ValueState<CountWithTimestamp> state;

        @Override

        public void open(Configuration parameters) throws Exception {

            // 初始化状态,name是myState

            state = getRuntimeContext().getState(new ValueStateDescriptor<>("myState", CountWithTimestamp.class));

        }

        @Override

        public void processElement(

                Tuple2<String, Integer> value,

                Context ctx,

                Collector<Tuple2<String, Long>> out) throws Exception {

            // 取得当前是哪个单词

            Tuple currentKey = ctx.getCurrentKey();

            // 从backend取得当前单词的myState状态

            CountWithTimestamp current = state.value();

            // 如果myState还从未没有赋值过,就在此初始化

            if (current == null) {

                current = new CountWithTimestamp();

                current.key = value.f0;

            }

            // 单词数量加一

            current.count++;

            // 取当前元素的时间戳,作为该单词最后一次出现的时间

            current.lastModified = ctx.timestamp();

            // 重新保存到backend,包括该单词出现的次数,以及最后一次出现的时间

            state.update(current);

            // 为当前单词创建定时器,十秒后后触发

            long timer = current.lastModified + 10000;

            ctx.timerService().registerProcessingTimeTimer(timer);

            // 打印所有信息,用于核对数据正确性

            System.out.println(String.format("process, %s, %d, lastModified : %d (%s), timer : %d (%s)\n\n",

                    currentKey.getField(0),

                    current.count,

                    current.lastModified,

                    time(current.lastModified),

                    timer,

                    time(timer)));

        }

        /**

         * 定时器触发后执行的方法

         * @param timestamp 这个时间戳代表的是该定时器的触发时间

         * @param ctx

         * @param out

         * @throws Exception

         */

        @Override

        public void onTimer(

                long timestamp,

                OnTimerContext ctx,

                Collector<Tuple2<String, Long>> out) throws Exception {

            // 取得当前单词

            Tuple currentKey = ctx.getCurrentKey();

            // 取得该单词的myState状态

            CountWithTimestamp result = state.value();

            // 当前元素是否已经连续10秒未出现的标志

            boolean isTimeout = false;

            // timestamp是定时器触发时间,如果等于最后一次更新时间+10秒,就表示这十秒内已经收到过该单词了,

            // 这种连续十秒没有出现的元素,被发送到下游算子

            if (timestamp == result.lastModified + 10000) {

                // 发送

                out.collect(new Tuple2<String, Long>(result.key, result.count));

                isTimeout = true;

            }

            // 打印数据,用于核对是否符合预期

            System.out.println(String.format("ontimer, %s, %d, lastModified : %d (%s), stamp : %d (%s), isTimeout : %s\n\n",

                    currentKey.getField(0),

                    result.count,

                    result.lastModified,

                    time(result.lastModified),

                    timestamp,

                    time(timestamp),

                    String.valueOf(isTimeout)));

        }

    }

    public static void main(String[] args) throws Exception {

        final StreamExecutionEnvironment env = StreamExecutionEnvironment.getExecutionEnvironment();

        // 并行度1

        env.setParallelism(1);

        // 处理时间

        env.setStreamTimeCharacteristic(TimeCharacteristic.ProcessingTime);

        // 监听本地9999端口,读取字符串

        DataStream<String> socketDataStream = env.socketTextStream("localhost", 9999);

        // 所有输入的单词,如果超过10秒没有再次出现,都可以通过CountWithTimeoutFunction得到

        DataStream<Tuple2<String, Long>> timeOutWord = socketDataStream

                // 对收到的字符串用空格做分割,得到多个单词

                .flatMap(new Splitter())

                // 设置时间戳分配器,用当前时间作为时间戳

                .assignTimestampsAndWatermarks(new AssignerWithPeriodicWatermarks<Tuple2<String, Integer>>() {

                    @Override

                    public long extractTimestamp(Tuple2<String, Integer> element, long previousElementTimestamp) {

                        // 使用当前系统时间作为时间戳

                        return System.currentTimeMillis();

                    }

                    @Override

                    public Watermark getCurrentWatermark() {

                        // 本例不需要watermark,返回null

                        return null;

                    }

                })

                // 将单词作为key分区

                .keyBy(0)

                // 按单词分区后的数据,交给自定义KeyedProcessFunction处理

                .process(new CountWithTimeoutFunction());

        // 所有输入的单词,如果超过10秒没有再次出现,就在此打印出来

        timeOutWord.print();

        env.execute("ProcessFunction demo : KeyedProcessFunction");

    }

    public static String time(long timeStamp) {

        return new SimpleDateFormat("yyyy-MM-dd hh:mm:ss").format(new Date(timeStamp));

    }

}
上述代码有几处需要重点关注的:
- 通过assignTimestampsAndWatermarks设置时间戳的时候,getCurrentWatermark返回null,因为用不上watermark;
- processElement方法中,state.value()可以取得当前单词的状态,state.update(current)可以设置当前单词的状态,这个功能的详情请参考《深入了解ProcessFunction的状态操作(Flink-1.10)》;
- registerProcessingTimeTimer方法设置了定时器的触发时间,注意这里的定时器是基于processTime,和官方demo中的eventTime是不同的;
- 定时器触发后,onTimer方法被执行,里面有这个定时器的全部信息,尤其是入参timestamp,这是原本设置的该定时器的触发时间;
验证
- 在控制台执行命令nc -l 9999,这样就可以从控制台向本机的9999端口发送字符串了;
- 在IDEA上直接执行ProcessTime类的main方法,程序运行就开始监听本机的9999端口了;
- 在前面的控制台输入aaa,然后回车,等待十秒后,IEDA的控制台输出以下信息,从结果可见符合预期:

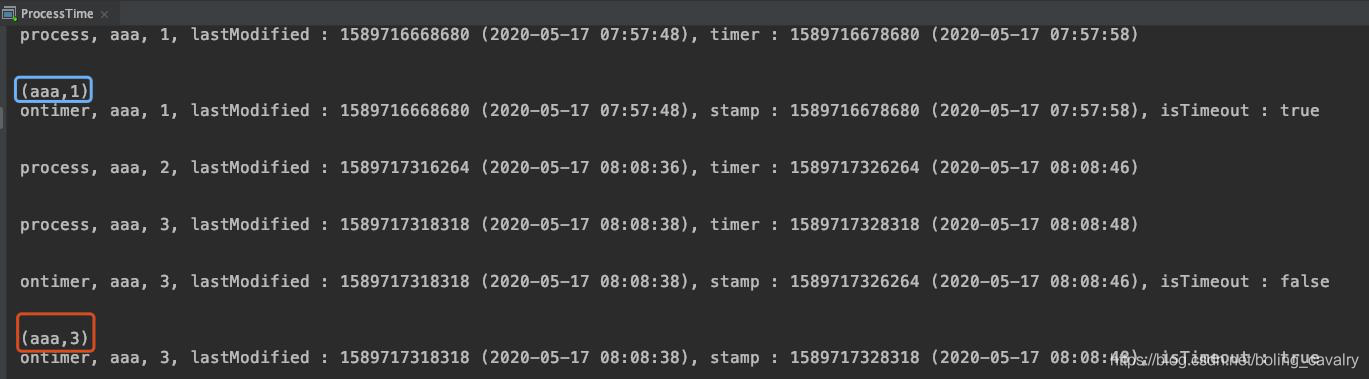
- 继续输入aaa再回车,连续两次,中间间隔不要超过10秒,结果如下图,可见每一个Tuple2元素都有一个定时器,但是第二次输入的aaa,其定时器在出发前,aaa的最新出现时间就被第三次输入的操作给更新了,于是第二次输入aaa的定时器中的对比操作发现此时距aaa的最近一次(即第三次)出现还未达到10秒,所以第二个元素不会发射到下游算子:
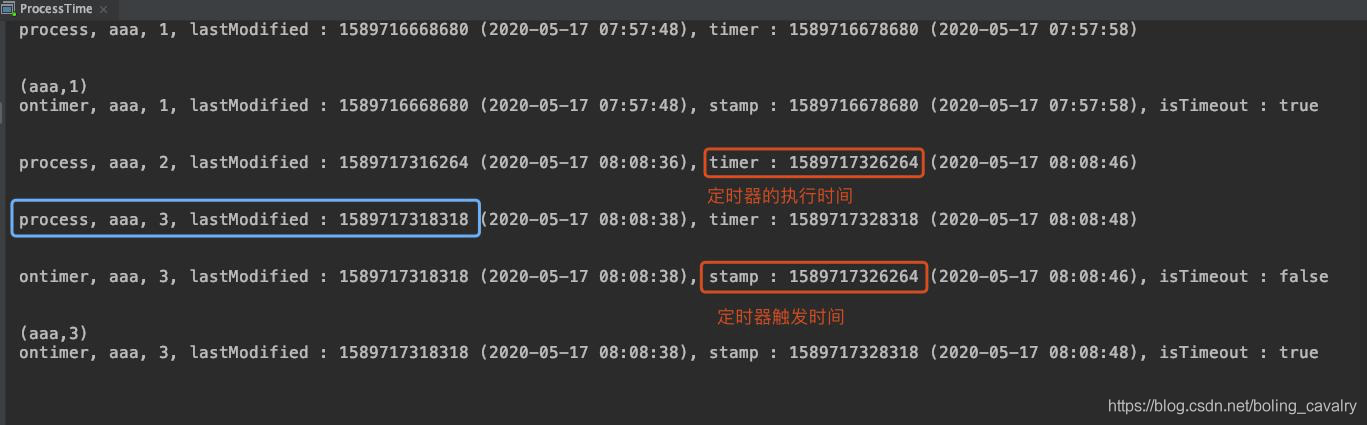
- 下游算子收到的所有超时信息会打印出来,如下图红框,只打印了数量等于1和3的记录,等于2的时候因为在10秒内再次输入了aaa,因此没有超时接收,不会在下游打印:
至此,KeyedProcessFunction处理函数的学习就完成了,其状态读写和定时器操作都是很实用能力,希望本文可以给您提供参考;
你不孤单,欣宸原创一路相伴
欢迎关注公众号:程序员欣宸
微信搜索「程序员欣宸」,我是欣宸,期待与您一同畅游Java世界...
https://github.com/zq2599/blog_demos
Flink处理函数实战之三:KeyedProcessFunction类的更多相关文章
- Flink处理函数实战之二:ProcessFunction类
欢迎访问我的GitHub https://github.com/zq2599/blog_demos 内容:所有原创文章分类汇总及配套源码,涉及Java.Docker.Kubernetes.DevOPS ...
- Flink处理函数实战之五:CoProcessFunction(双流处理)
欢迎访问我的GitHub https://github.com/zq2599/blog_demos 内容:所有原创文章分类汇总及配套源码,涉及Java.Docker.Kubernetes.DevOPS ...
- Flink处理函数实战之一:深入了解ProcessFunction的状态(Flink-1.10)
欢迎访问我的GitHub https://github.com/zq2599/blog_demos 内容:所有原创文章分类汇总及配套源码,涉及Java.Docker.Kubernetes.DevOPS ...
- Flink处理函数实战之四:窗口处理
欢迎访问我的GitHub https://github.com/zq2599/blog_demos 内容:所有原创文章分类汇总及配套源码,涉及Java.Docker.Kubernetes.DevOPS ...
- Flink的sink实战之三:cassandra3
欢迎访问我的GitHub https://github.com/zq2599/blog_demos 内容:所有原创文章分类汇总及配套源码,涉及Java.Docker.Kubernetes.DevOPS ...
- Flink的sink实战之一:初探
欢迎访问我的GitHub https://github.com/zq2599/blog_demos 内容:所有原创文章分类汇总及配套源码,涉及Java.Docker.Kubernetes.DevOPS ...
- Flink的sink实战之二:kafka
欢迎访问我的GitHub https://github.com/zq2599/blog_demos 内容:所有原创文章分类汇总及配套源码,涉及Java.Docker.Kubernetes.DevOPS ...
- Flink的sink实战之四:自定义
欢迎访问我的GitHub https://github.com/zq2599/blog_demos 内容:所有原创文章分类汇总及配套源码,涉及Java.Docker.Kubernetes.DevOPS ...
- Flink的DataSource三部曲之三:自定义
欢迎访问我的GitHub https://github.com/zq2599/blog_demos 内容:所有原创文章分类汇总及配套源码,涉及Java.Docker.Kubernetes.DevOPS ...
随机推荐
- [转] Swoft HTTP 服务
转载自Go语言中文网, https://studygolang.com/articles/20667 传统架构 PHP-FPM + Nginx 传统架构中所使用的Nginx + PHP-FPM的模型中 ...
- ps 树形显示
ps -axjf|grep swoft
- spring注解@Transactional 和乐观锁,悲观锁并发生成有序编号问题
需求:系统中有一个自增的合同编号,在满足并发情况下,生成的合同编号是自增的. 测试工具:Apache Jmeter 实现方法: 创建一个数据库表.编号最大值记录表 表结构类似 CREATE TAB ...
- <转>二十问全链路压测干货汇总(上)
本文转载自:微信公众号-数列科技<二十问全链路压测干货汇总(上)> 最近几年全链路压测无疑成为了一个热门话题,在各个技术峰会上都可以看到它的身影. 一些大型的互联网公司,比如阿里巴巴.京东 ...
- drf (学习第二部)
目录 http球球处理 请求与响应 Response 常用属性 状态码 http请求处理 drf除了在数据序列化部分简写代码之外,还在视图中提供了简写操作.所以在Django原有的Django.vie ...
- 「IDEA插件精选」安利一个IDEA骚操作:一键生成方法的序列图
在平时的学习/工作中,我们会经常面临如下场景: 阅读别人的代码 阅读框架源码 阅读自己很久之前写的代码. 千万不要觉得工作就是单纯写代码,实际工作中,你会发现你的大部分时间实际都花在了阅读和理解已有代 ...
- Java基础之字面值
概要:什么是字面值 字面值是指在程序中无需变量保存,可直接表示为一个具体的数字或字符串的值.比如在a = b * 2这个语句中,2就是一个字面值,它本身就是一个具体的值. 在Java源代码中,字面值用 ...
- 深入理解Java注解类型(@Annotation)
http://blog.csdn.net/javazejian/article/details/71860633 出自[zejian的博客] java注解是在JDK5时引入的新特性,鉴于目前大部分框 ...
- JUC---05线程间通信(一)
一.普通的线程间通信 1.synchronized实现 package com.jenne.mydemo; class ShareDataOne { private int number = 0; p ...
- 批量安装Zabbix_Agent
使用自动化部署工具Ansible批量部署zabbix_agent. 1. 安装Ansible yum –y install ansible 内网情况下,现在ansible及其依赖的rpm包,添加到yu ...