Python3网络学习案例一:Ping详解
1. 使用Ping做什么
ping用于确定本地主机是否能与另一台主机成功交换(发送与接收)数据包,再根据返回的信息,就可以推断TCP/IP参数是否设置正确,以及运行是否正常、网络是否通畅等。
2. 效果
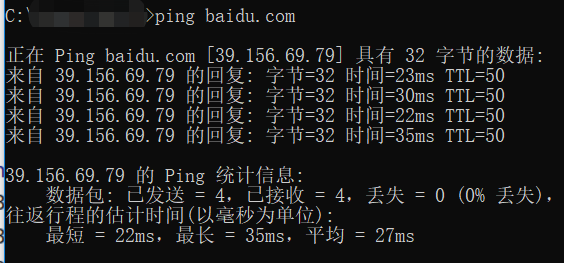
CMD命令:
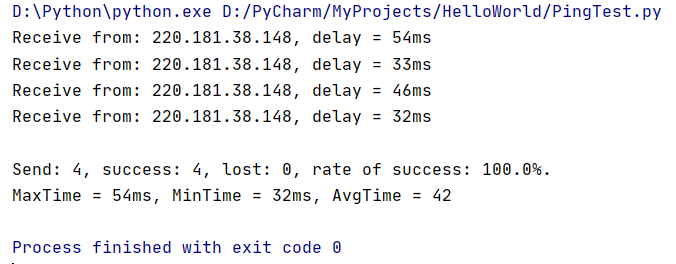
Python程序:
3. 在验证两台主机是否能正常联通时做了什么
验证的过程就像打电话一样,我们如果要知道自己能否给另一个人交流就给他打一个电话,如果你听到了对方的声音那就是打通了,否则就是失败。但是无论成功与否我们都有一个这样的过程:
通过电话线(或是无线,即手机)给对方发送一个请求通话的消息,无论对方是否接通都会返回一条应答的消息。
这里我们发送或接收的消息就是报文(IP报文),其中,发送的请求通话消息我们称为“请求回显”(Ping请求),而接收到的应答消息称为“回显应答”(Ping应答)。
我们通过“回显应答”类型报文中的内容来判断是否能够正常连接(交换数据包)。
而在Ping过程中需要进行四次(并不固定,一般默认四次)请求,这个可以看做是连续打四次电话。
4. IP报文中有什么
由于IP协议并不是一个可靠的协议,它不保证数据被成功送达,那么,如何才能保证数据的可靠送达呢? 这里就需要使用到一个重要的协议模块ICMP(网络控制报文)协议。它传递差错报文以及其他需要注意的信息,经常供IP层或更高层协议(TCP或UDP)使用。所以它经常被认为是IP层的一个组成部分。它在IP数据报文中的封装如下:
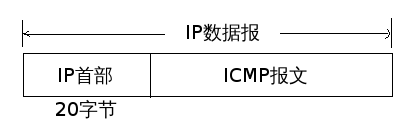
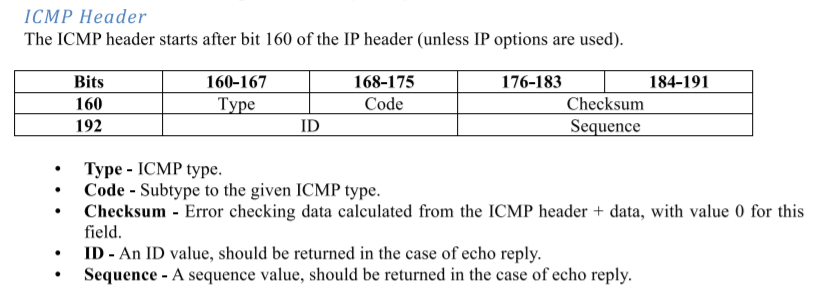
在这里我们不关心IP首部内容(只需要记住它有20bytes即可),而ICMP报文的类型正如上述所说有好多种,我们根据报文的type和code来判断ICMP报文的类型(当然这里我们也只关系回显请求和回显应答):
ICMP报文 = ICMP报头+Data(这个消息可以自定义,当然每个不同类型的报文的data都会有所不同)
(ICMP_Packet = ICMPHeader + Data)
5. ICMP报文中的各个数据是什么,有什么用
(1)type和code
type和code决定了ICMP报文是什么类型(当然这里我们也只关系回显请求和回显应答)。
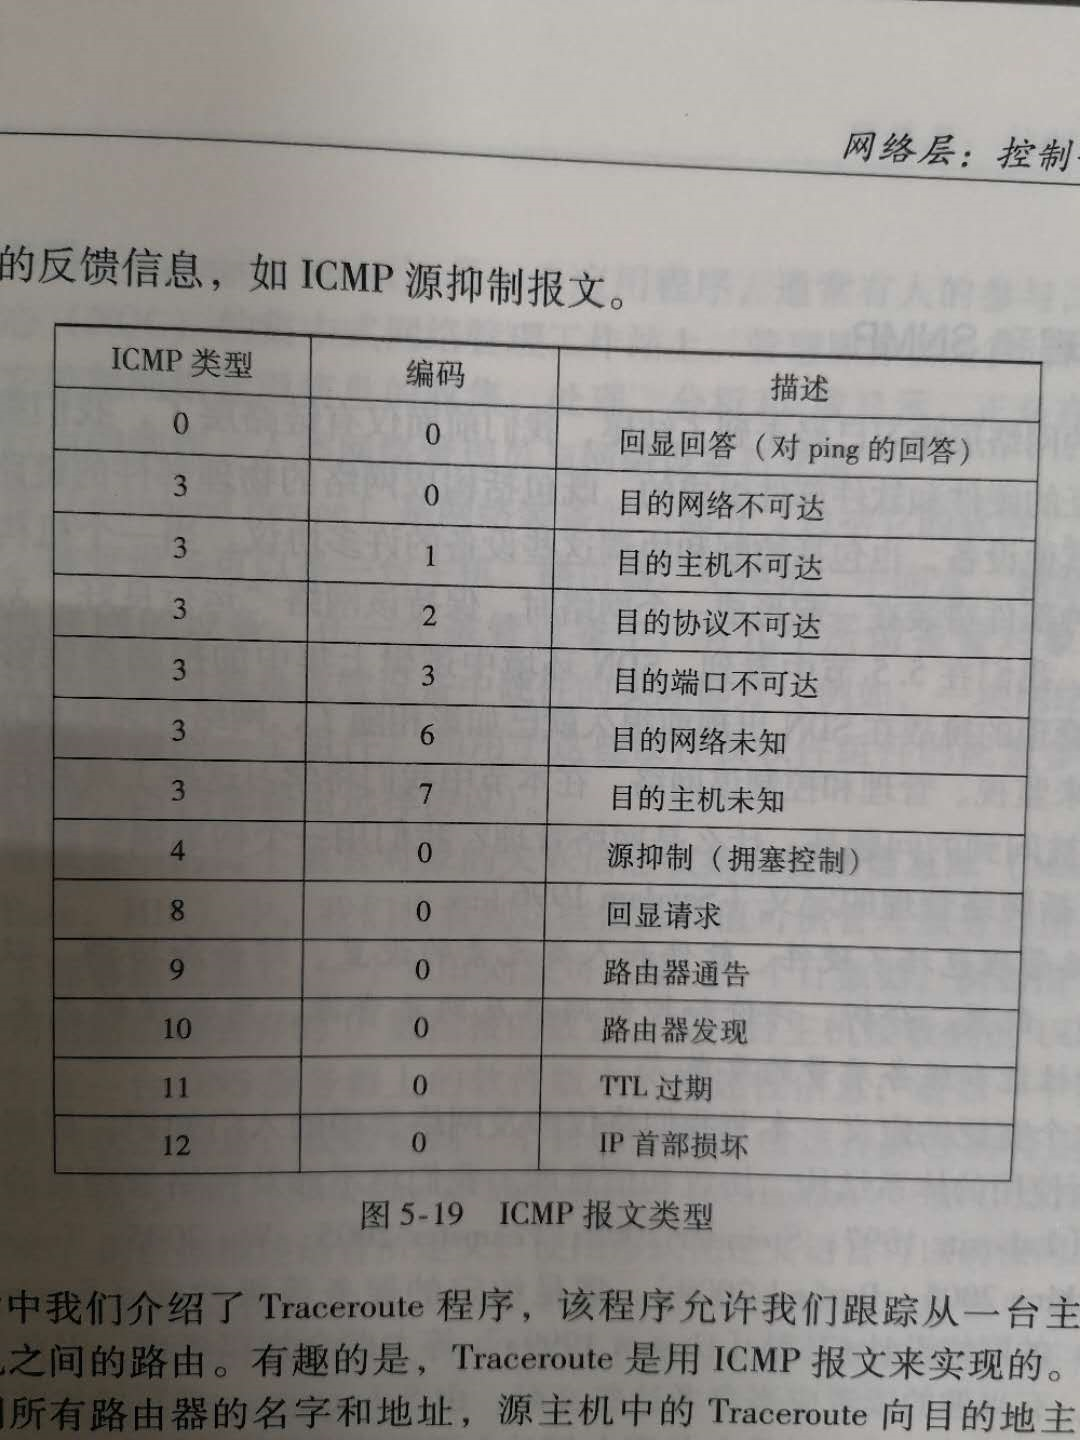
以下是不同type(ICMP类型)和code(编码)对应的不同ICMP报文类型,不用全部记住,在这里我们只要知道:
type = 8, code = 0 表示 回显请求
type = 0, code = 0 表示 回显应答
(2)Checksum(校验和)
用于检验数据包是否正确。
(3)ID(标识符)
每一个不同的进程都有一个ID作为标识,即每次运行这个Ping程序都会获得一个进程ID,我们通过这个比较发送进程ID和回显应答中的ID,如果一样则说明是同一个Ping程序
(4)sequence(序列号)
每发送一次消息,就有一个序列号,第一个就是1,第二次就是2等等(也可以从“0”开始,可以自己定义),按照收发四次来讲就是0、1、2、3
(5)Data(数据)
你可以将你自己想要的其他信息放到这里,比如发送消息的时间,这样就可以计算延迟了
6. 程序框架及具体代码
首先,我们知道要做到两台host通信需要借助socket,以下内容也是在此基础上展开的
(1)全局变量
设置了几个全局变量,包括:回显请求(8),回显应答(0),Ping标识符(ID),Ping序列号(sequence)
ICMP_ECHO_REQUEST = 8  # ICMP type code for echo request messages

ICMP_ECHO_REPLY = 0  # ICMP type code for echo reply messages

ID = 0  # ID of icmp_header

SEQUENCE = 0  # sequence of ping_request_msg
(2)main()
首先我们要有这个程序的入口,俗称“主函数”
在这里我们调用Ping(host, timeout = 1)【自定义】函数正式开始这个过程
ping("baidu.com")
(3)Ping(host, timeout = 1)
有两个参数(host,timeout):
host是要尝试连接的主机的域名或者直接写IP地址也没问题
timeout是设置的超时时间,当等待时间超过1s时我们认为连接超时,即连接失败(表示无法正常交流)
内容简介:
定义变量---在Ping函数中我们设置了几个变量用于表示发送、成功接收、丢失包的数量 和 最长时延、最短时延、总时延
调用doOnePing【自定义】函数---这个函数包括对发送和接收报文消息的函数,返回值就是时延
此外---当然,我们对doOnePing函数调用了四次
def ping(host, timeout=1):

    send = 0

    lost = 0

    receive = 0

    maxTime = 0

    minTime = 1000

    sumTime = 0

    # 1. Look up hostname, resolving it to an IP address

    desIp = socket.gethostbyname(host)

    global ID

    ID = os.getpid()

    for i in range(0, 4):

        global SEQUENCE

        SEQUENCE = i

        # 2. Call doOnePing function, approximately every second

        delay = doOnePing(desIp, timeout) * 1000

        send += 1

        if delay > 0:

            receive += 1

            if maxTime < delay:

                maxTime = delay

            if minTime > delay:

                minTime = delay

            sumTime += delay

            # 3. Print out the returned delay

            print("Receive from: " + str(desIp) + ", delay = " + str(int(delay)) + "ms")

        else:

            lost += 1

            print("Fail to connect.")

        time.sleep(1)

    # 4. Continue this process until stopped

    avgTime = sumTime / receive

    recvRate = receive / send * 100.0

    print("\nSend: " + str(send) + ", success: " + str(receive) + ", lost: " + str(lost) +

          ", rate of success: " + str(recvRate) + "%.")

    print(

        "MaxTime = " + str(int(maxTime)) + "ms, MinTime = " + str(int(minTime)) + "ms, AvgTime = " + str(int(avgTime)))
(4) doOnePing(destination, timeout)
有两个参数(destination,timeout):
destination就是获得的目标主机的IP地址
timeout就是超时时间(自定义的)
def doOnePing(destinationAddress, timeout):

    # 1. Create ICMP socket

    icmpName = socket.getprotobyname('icmp')

    icmp_Socket = socket.socket(socket.AF_INET, socket.SOCK_RAW, icmpName)

    # 2. Call sendOnePing function

    sendOnePing(icmp_Socket, destinationAddress, ID)

    # 3. Call receiveOnePing function

    totalDelay = receiveOnePing(icmp_Socket, destinationAddress, ID, timeout)

    # 4. Close ICMP socket

    icmp_Socket.close()

    # 5. Return total network delay

    return totalDelay
内容简介:
创建socket---正如上述所说,我们通过socket来做这个通信,由于是使用ICMP协议,我们需要提前获取这个协议(根据协议名)
调用sendOnePing---发送一条回显请求给目标主机
调用receiveOnePing---接收回显应答函数,返回值为时延
关闭socket
返回在调用receiveOnePing函数后获得的时延
(5)sendOnePing(icmpSocket, destination, ID)
参数有三个,用于做什么很显然了,这里不再赘述
def sendOnePing(icmpSocket, destinationAddress, ID):

    icmp_checksum = 0

    # 1. Build ICMP header

    icmp_header = struct.pack('!bbHHh', ICMP_ECHO_REQUEST, 0, icmp_checksum, ID, SEQUENCE)

    time_send = struct.pack('!d', time.time())

    # 2. Checksum ICMP packet using given function

    icmp_checksum = checksum(icmp_header + time_send)

    # 3. Insert checksum into packet

    icmp_header = struct.pack('!bbHHh', ICMP_ECHO_REQUEST, 0, icmp_checksum, ID, SEQUENCE)

    # 4. Send packet using socket

    icmp_packet = icmp_header + time_send

    icmpSocket.sendto(icmp_packet, (destinationAddress, 80))

    # 5. Record time of sending
内容简介:
这个函数的目的就在于向目标主机发送一条回显请求报文,而这个报文中应该包括:ICMP_Header+Data(这里是发送的时间,用于计算时延)
其中用到的struct.pack函数请自行百度,如果不想知道细节的话只需要记住pack的第一个参数规定了其编码格式(有各种字母符号的映射,可以自己编排),而之后的参数都是根据这个编码格式进行打包的数据
在这个函数中调用了校验和程序,这个原理也自行百度(很容易找到),不做深究的话也可以直接拿来用
函数编写步骤:
* 将ICMP_Header的那几个打包成为数据包(其中的校验和只是为了Header的完整性而随意设置的,占位用)
* 用校验和程序检测数据包的完整性
* 加入真正的校验和(这里“真正”似乎不太正确,但暂时想不出有什么其他的词汇形容了)重新打包
* 将发送的时间(time.time())编码打包,作为ICMP的Data
* ICMP_Packet = ICMP-Header + Data
* 借助socket发送报文
* 此外,sendto(msg, (IP, Port))中的Port为80是因为Web默认使用端口号80(还有许多网络应用有特定的端口号——方便访问,一般靠前的port都是分配好的,如果是自己构建的程序则可以申请使用空闲的port)
(6)receiveOnePing(icmpSocket, destination, ID, timeout)
这里参数不再介绍
def receiveOnePing(icmpSocket, destinationAddress, ID, timeout):

    # 1. Wait for the socket to receive a reply

    timeBeginReceive = time.time()

    whatReady = select.select([icmpSocket], [], [], timeout)

    timeInRecev = time.time() - timeBeginReceive

    if not whatReady[0]:

        print("none")

        return -1

    # 2. Once received, record time of receipt, otherwise, handle a timeout

    recPacket, addr = icmpSocket.recvfrom(1024)

    timeReceived = time.time()

    # 3. Compare the time of receipt to time of sending, producing the total network delay

    byte_in_double = struct.calcsize("!d")

    timeSent = struct.unpack("!d", recPacket[28: 28 + byte_in_double])[0]

    totalDelay = timeReceived - timeSent

    # 4. Unpack the packet header for useful information, including the ID

    rec_header = recPacket[20:28]

    replyType, replyCode, replyCkecksum, replyId, replySequence = struct.unpack('!bbHHh', rec_header)

    # 5. Check that the ID matches between the request and reply

    if ID == replyId and replyType == ICMP_ECHO_REPLY:

        # 6. Return total network delay

        return totalDelay

    if timeInRecev > timeout:

        print('overtime')

        return -1
内容简介:
在这里我们统一规定如果成功接收了就返回delay(时延),如果没有就返回-1(也可以是其他的自定义数值,只要能区分就可以)
select.select函数自行了解:whatReady[0] 用于判断是否接收到回显应答,返回true/false,应答不为空就是成功(继续计算时延),否则就是失败(直接返回-1跳出)
其中的timeInRecev用于判断超时
我们在一开始就说了,IPHeader为20bytes,所以ICMPHeader应该从20开始截取(str[20:28]为ICMP_Header部分)
获取发送时间的那一部分中涉及到了struct.calcsize()函数,可以看这个链接中的内容做基本了解:https://blog.51cto.com/firefish/112690:因为unpack函数解码的内容至少要是8bytes,这个函数可以考虑为占位用的
7. 完整代码
#!/usr/bin/python

# -*- coding: UTF-8 -*-

from socket import *

import os

import sys

import struct

import time

import select

import socket

import binascii

ICMP_ECHO_REQUEST = 8  # ICMP type code for echo request messages

ICMP_ECHO_REPLY = 0  # ICMP type code for echo reply messages

ID = 0  # ID of icmp_header

SEQUENCE = 0  # sequence of ping_request_msg

def checksum(str):

    csum = 0

    countTo = (len(str) / 2) * 2

    count = 0

    while count < countTo:

        thisVal = str[count + 1] * 256 + str[count]

        csum = csum + thisVal

        csum = csum & 0xffffffff

        count = count + 2

    if countTo < len(str):

        csum = csum + str[len(str) - 1].decode()

        csum = csum & 0xffffffff

    csum = (csum >> 16) + (csum & 0xffff)

    csum = csum + (csum >> 16)

    answer = ~csum

    answer = answer & 0xffff

    answer = answer >> 8 | (answer << 8 & 0xff00)

    return answer

def receiveOnePing(icmpSocket, destinationAddress, ID, timeout):

    # 1. Wait for the socket to receive a reply

    # while True:

    timeBeginReceive = time.time()

    whatReady = select.select([icmpSocket], [], [], timeout)

    timeInRecev = time.time() - timeBeginReceive

    if not whatReady[0]:

        print("none")

        return -1

    timeReceived = time.time()

    # 2. Once received, record time of receipt, otherwise, handle a timeout

    recPacket, addr = icmpSocket.recvfrom(1024)

    # 3. Compare the time of receipt to time of sending, producing the total network delay

    byte_in_double = struct.calcsize("!d")

    timeSent = struct.unpack("!d", recPacket[28: 28 + byte_in_double])[0]

    totalDelay = timeReceived - timeSent

    # 4. Unpack the packet header for useful information, including the ID

    rec_header = recPacket[20:28]

    replyType, replyCode, replyCkecksum, replyId, replySequence = struct.unpack('!bbHHh', rec_header)

    # 5. Check that the ID matches between the request and reply

    if ID == replyId and replyType == ICMP_ECHO_REPLY:

        # 6. Return total network delay

        return totalDelay

    if timeInRecev > timeout:

        print('overtime')

        return -1

def sendOnePing(icmpSocket, destinationAddress, ID):

    icmp_checksum = 0

    # 1. Build ICMP header

    icmp_header = struct.pack('!bbHHh', ICMP_ECHO_REQUEST, 0, icmp_checksum, ID, SEQUENCE)

    time_send = struct.pack('!d', time.time())

    # 2. Checksum ICMP packet using given function

    icmp_checksum = checksum(icmp_header + time_send)

    # icmp_checksum = checksumByTeacher(icmp_header + time_send)

    # 3. Insert checksum into packet

    icmp_header = struct.pack('!bbHHh', ICMP_ECHO_REQUEST, 0, icmp_checksum, ID, SEQUENCE)

    # 4. Send packet using socket

    icmp_packet = icmp_header + time_send

    icmpSocket.sendto(icmp_packet, (destinationAddress, 80))

    #  5. Record time of sending

def doOnePing(destinationAddress, timeout):

    # 1. Create ICMP socket

    icmpName = socket.getprotobyname('icmp')

    icmp_Socket = socket.socket(socket.AF_INET, socket.SOCK_RAW, icmpName)

    # 2. Call sendOnePing function

    sendOnePing(icmp_Socket, destinationAddress, ID)

    # 3. Call receiveOnePing function

    totalDelay = receiveOnePing(icmp_Socket, destinationAddress, ID, timeout)

    # 4. Close ICMP socket

    icmp_Socket.close()

    # 5. Return total network delay

    return totalDelay

def ping(host, timeout=1):

    send = 0

    lost = 0

    receive = 0

    maxTime = 0

    minTime = 1000

    sumTime = 0

    # 1. Look up hostname, resolving it to an IP address

    desIp = socket.gethostbyname(host)

    global ID

    ID = os.getpid()

    for i in range(0, 4):

        global SEQUENCE

        SEQUENCE = i

        # 2. Call doOnePing function, approximately every second

        delay = doOnePing(desIp, timeout) * 1000

        send += 1

        if delay > 0:

            receive += 1

            if maxTime < delay:

                maxTime = delay

            if minTime > delay:

                minTime = delay

            sumTime += delay

            # 3. Print out the returned delay

            print("Receive from: " + str(desIp) + ", delay = " + str(int(delay)) + "ms")

        else:

            lost += 1

            print("Fail to connect.")

        time.sleep(1)

    # 4. Continue this process until stopped

    avgTime = sumTime / receive

    recvRate = receive / send * 100.0

    print("\nSend: " + str(send) + ", success: " + str(receive) + ", lost: " + str(lost) +

          ", rate of success: " + str(recvRate) + "%.")

    print(

        "MaxTime = " + str(int(maxTime)) + "ms, MinTime = " + str(int(minTime)) + "ms, AvgTime = " + str(int(avgTime)))


ping("baidu.com")
8. 写在最后
写的时候翻了不少文章,但是都找不到了,只有这个离写这篇文章的时间最近,就贴上来
参考:https://www.cnblogs.com/JetpropelledSnake/p/9177770.html
Python3网络学习案例一:Ping详解的更多相关文章
- Python3网络学习案例二:traceroute详解
1. 写在前面 本文是基于上一篇"ping详解"写的: 不同操作系统下的命令也不同,本文仅针对windows系统,命令为"tracert xxx",效果如下 2 ...
- Python3网络学习案例三:编写web server
1. 写在前面 这里总结的并不够详细,有时间了再进行补充. 2. 设计思路 HTTP协议是建立在TCP上的1. 建立服务器端TCP套接字(绑定ip,port),等待监听连接:listen(2. 打开浏 ...
- Python3网络学习案例四:编写Web Proxy
代理服务器的定义和作用请走百度百科~ 1. Web Proxy的实现思路 这是基于上一篇"编写Web Server"写的,主要逻辑见下图: 我们要写的就是中间的Web Proxy部 ...
- 【python3+request】python3+requests接口自动化测试框架实例详解教程
转自:https://my.oschina.net/u/3041656/blog/820023 [python3+request]python3+requests接口自动化测试框架实例详解教程 前段时 ...
- [转帖]技术扫盲:新一代基于UDP的低延时网络传输层协议——QUIC详解
技术扫盲:新一代基于UDP的低延时网络传输层协议——QUIC详解 http://www.52im.net/thread-1309-1-1.html 本文来自腾讯资深研发工程师罗成的技术分享, ...
- Python网络请求urllib和urllib3详解
Python网络请求urllib和urllib3详解 urllib是Python中请求url连接的官方标准库,在Python2中主要为urllib和urllib2,在Python3中整合成了urlli ...
- [转帖]Docker学习之Dockerfile命令详解
Docker学习之Dockerfile命令详解 https://it.baiked.com/system/docker/2436.html 图挺好的 前言 之前,制作镜像的伪姿势搭建已经见过了,今天介 ...
- 简单的DOS攻击之死亡之ping详解
DOS攻击之死亡之ping详解,dos攻击,俗称拒绝服务攻击,通过发送大量的无用请求数据包给服务器,耗尽服务器资源,从而无法通过正常的访问服务器资源,导致服务器崩溃. 如果多个ip通过发起对一个服务器 ...
- [深入学习Web安全](5)详解MySQL注射
[深入学习Web安全](5)详解MySQL注射 0x00 目录 0x00 目录 0x01 MySQL注射的简单介绍 0x02 对于information_schema库的研究 0x03 注射第一步—— ...
随机推荐
- Django-发送注册、忘记密码邮件验证-send_mail
用户邮箱注册.发送验证码流程图 那,如何解决? 1. setting配置邮箱参数 # 邮箱设置,需要在邮箱中开启smtp服务 # 提供服务的主机域名 EMAIL_HOST = 'smtp.163.c ...
- Layman PHP+JavaScript 实现图片无刷新上传
html文件代码 <!-- ajax文件上传开始 --> <script type="text/javascript" src="/imageuploa ...
- Lyndon Word相关
Lyndon Word 定义 对于字符串 \(S\),若 \(S\) 的最小后缀为其本身,那么称 \(S\) 为 \(\text{Lyndon}\) 串(\(\text{Lyndon Word}\)) ...
- Linux系统编程 —共享内存之mmap
共享内存概念 共享内存是通信效率最高的IPC方式,因为进程可以直接读写内存,而无需进行数据的拷备.但是它没有自带同步机制,需要配合信号量等方式来进行同步. 共享内存被创建以后,同一块物理内存被映射到了 ...
- JavaScript查找字符串中给定字符出现的位置以及次数
要求: 给定字符串oabcoefoxyozzopp,要求输出字符o出现的位置和次数. 实现思路: 先查找第一个o出现的位置 然后只要判断indexOf返回的结果,若不是-1,则继续往后查找 因为ind ...
- php上传图片,网站代码
1.php代码 2.表设置结构 3.jquery代码 4.显示网站的数据 6.上传图片 7.上传图片的php代码
- Oracle - ascii为0的陷阱
一.概述 ascii0是个空字符,如果将这个字符插入到oracle数据库中会是什么现象,是null吗? 二.正式实验 创建一张测试表 create table test(id int, name va ...
- 【CF1428D】Bouncing Boomerangs 题解
原题链接 题意简介 毒瘤大模拟 给你一张n*n的图,在图上摆有一些物体.从每一列的底端往上扔回旋镖,每镖中一个东西,回旋镖就会向右转九十度.现在我们知道从每列i底端往上镖时撞上的物体个数ai,试构造出 ...
- 搭建分布式 Redis Cluster 集群与 Redis 入门
目录 Redis 集群搭建 Redis 是啥 集群(Cluster) Redis Cluster 说明 Redis Cluster 节点 Redis Cluster 集群模式 不能保证一致性 创建和使 ...
- swoft配置连接池
bean.php 'db' => [ 'class' => Database::class, 'dsn' => 'mysql:dbname=test;host=127.0.0.1', ...