6.Android-五大布局
Android 五大布局如下所示:
|
LinearLayout |
线性布局 |
只能指定一个方向(垂直/水平)来布局 |
|
RelativeLayout |
相对布局 |
通过某个控件为参照物,来定位其它控件的位置的布局方式(解决屏幕适配) |
|
TableLayout |
表格布局 |
如果子元素为<TableRow>,则可在一行中放各种控件 |
|
FrameLayout |
帧布局 |
子元素任意 |
|
AbsoluteLayout |
绝对布局 |
通过android:layout_x和android:layout_y来指定元素绝对位置,由于不支持适配,已过时 |
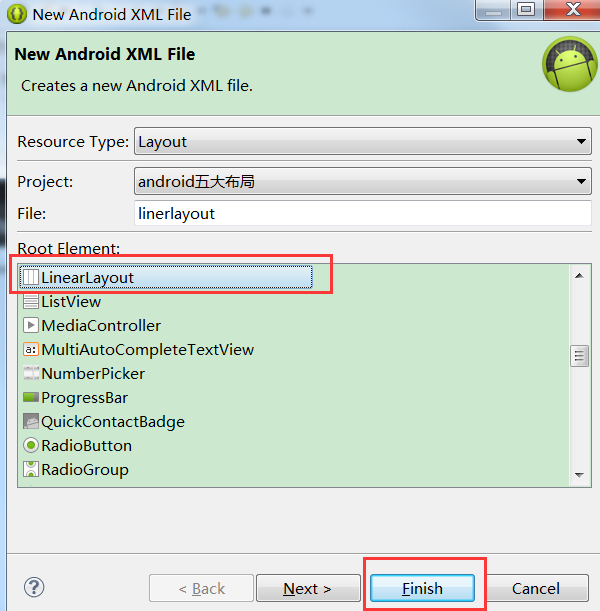
1.如何创建布局
在layout下选择New Android XML File:

然后输入名称,即可完成:
2.LinearLayout线性布局
LinearLayout特有的属性如下所示:
android:orientation= //设置布局方向,填写“horizontal”或者“vertaical”
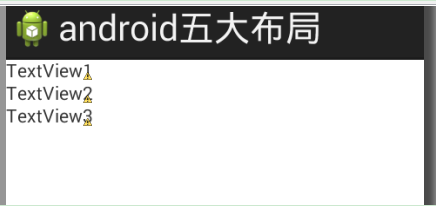
vertaical方向
xml如下所示:

对应的布局则是垂直向下的,一排只能拥有一个控件:
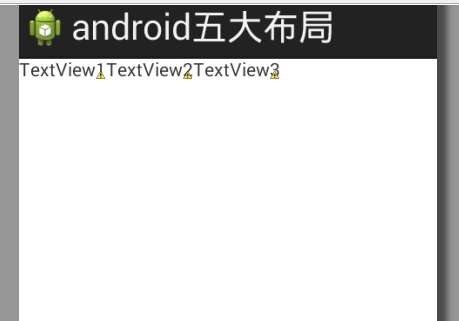
horizontal方向
xml如下所示:

对应的布局则是水平向右的,一列只能拥有一个控件:
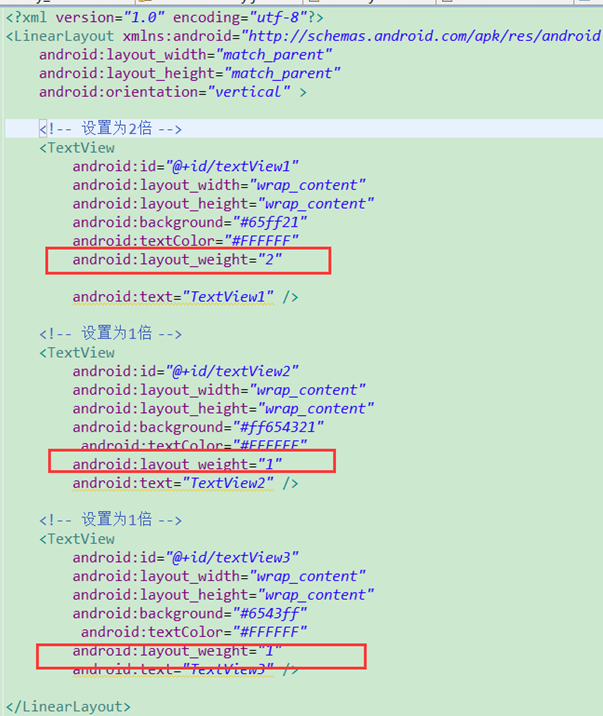
设置控件不同比例
如果要想设置两个控件的比例大小,则设置android:layout_weight(不是android:layout_width),值越大则比例越大(垂直布局则设置高度大小比例,水平布局则设置宽度大小比例)
以垂直线性布局为例,我们设置TextView1占据高度为2倍,其余为1倍
xml设置如下:
界面如下所示:

PS:在布局中也可以再次添加一个布局.
比如LinearLayout垂直布局中添加一个LinearLayout水平布局,实现登录案例
xml如下:
<LinearLayout xmlns:android="http://schemas.android.com/apk/res/android"

    xmlns:tools="http://schemas.android.com/tools"

    android:layout_width="match_parent"

    android:layout_height="match_parent"

    android:paddingBottom="@dimen/activity_vertical_margin"

    android:paddingLeft="@dimen/activity_horizontal_margin"

    android:paddingRight="@dimen/activity_horizontal_margin"

    android:paddingTop="@dimen/activity_vertical_margin"

    android:orientation="vertical"

    tools:context=".MainActivity" >

    <EditText

        android:id="@+id/et_username"

        android:layout_width="match_parent"

        android:layout_height="wrap_content"

        android:hint="请输入用户名" />

    <EditText

        android:id="@+id/et_password"

        android:layout_width="match_parent"

        android:layout_height="wrap_content"

        android:inputType="textPassword"

        android:hint="请输入密码" />

    <!-- 再添加一个水平布局.添加保存信息和登陆button -->

    <LinearLayout

        android:layout_width="match_parent"

        android:layout_height="wrap_content"

        android:orientation="horizontal">

        <CheckBox

            android:id="@+id/cb_isSave"

            android:layout_width="0dp"

            android:layout_height="wrap_content"

            android:layout_weight="1"

            android:text="勾选保存信息"/>

        <Button

            android:id="@+id/btn_login"

            android:layout_width="wrap_content"

            android:layout_height="wrap_content"

            android:text="登陆"

            />

    </LinearLayout>

</LinearLayout>
效果如下:
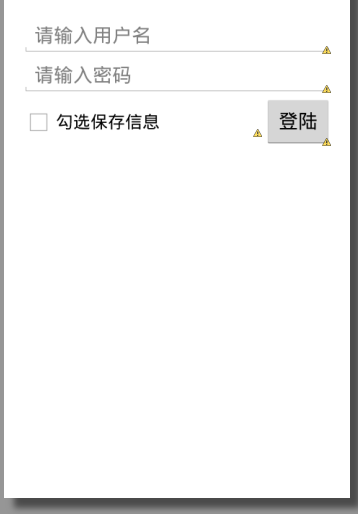
如果只有一个控件设置了android:layout_weight="1",则需要将自身的android:layout_width="0dp",并表示该控件占据剩余的所有空间,如上图的"保存信息"
3.RelativeLayout相对布局
为某一个组件为参照物,来定位下一个组件的位置的布局方式。一般为了解决屏幕分辨率不同的自适应问题(适配神器)
LinearLayout特有的属性如下所示:
|
android:layout_alignParentLeft android:layout_alignParentRight android:layout_alignParentTop android:layout_alignParentBottom |
“true” “false” |
控件在LinearLayout布局中的相对位置 |
|
android:orientation |
“horizontal” “vertaical” |
布局中子控件排布方向 |
|
android:layout_toRightOf android:layout_toLeftOf android:layout_below android:layout_above |
“@+id/***” |
控件和某个控件的位置关系(居右、左、下、上) |
|
android:layout_alignTop android:layout_alignBottom android:layout_alignLeft android:layout_alignRight android:layout_alignBaseline |
“@+id/***” |
控件与其他控件对齐(顶部对齐、底部、左、右对齐、基线(文本内容)对齐) |
|
android:layout_centerHorizontal android:layout_centerVirtical android:layout_centerInParent |
“true” “false” |
指定控件位于水平/垂直/父控件的中间位置 |
如下图所示:
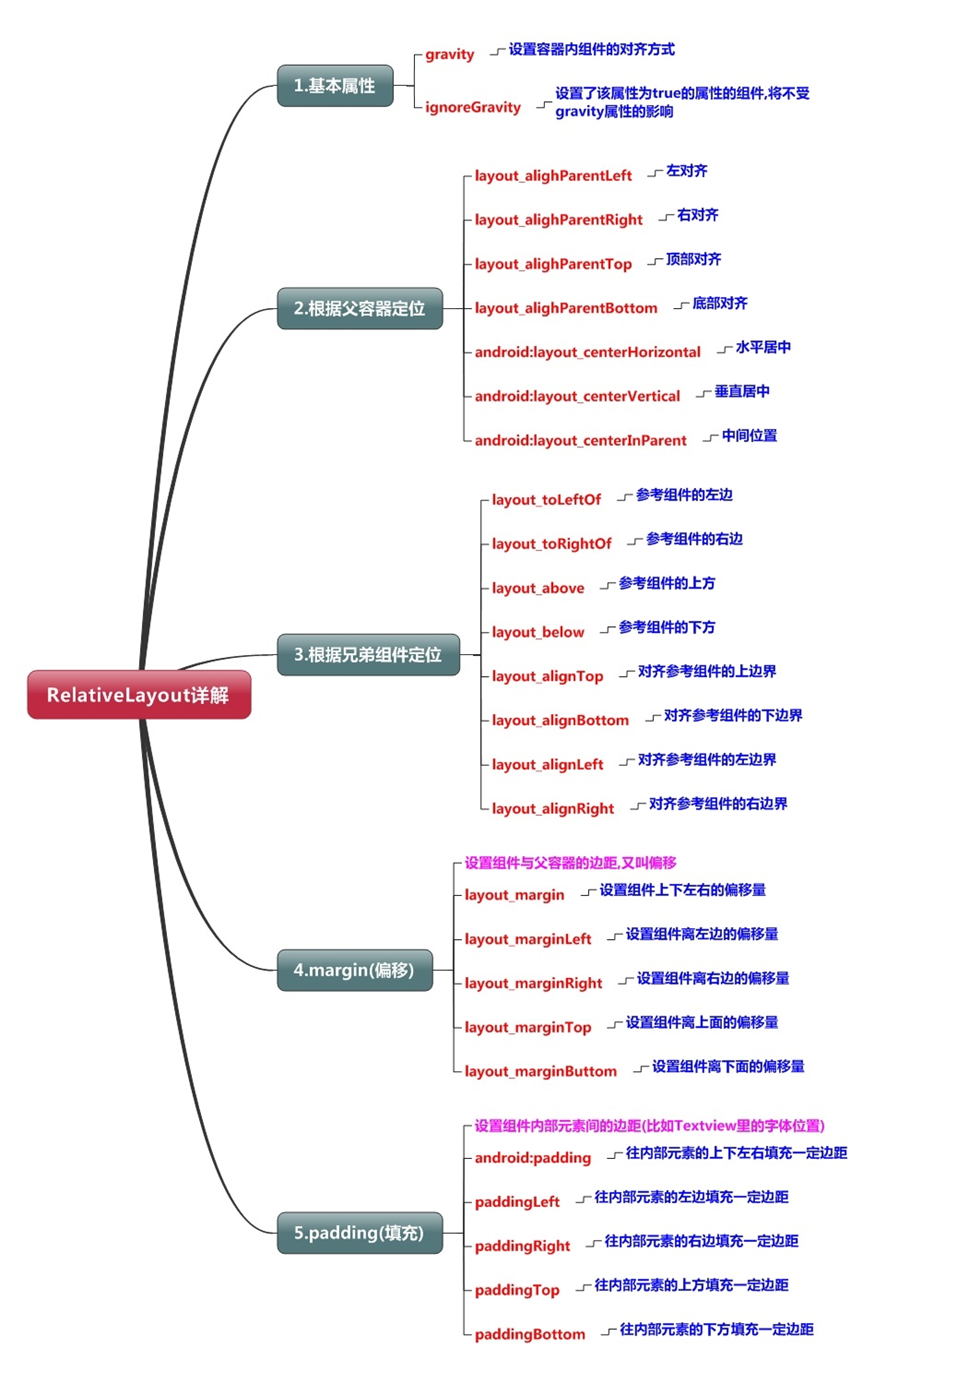
注意:在指定位置关系时,引用的ID必须在引用之前,先被定义,否则将出现异常。
示例-通过RelativeLayout实现固定九宫格(如果要动态实现增删格子,最好还是用GridLayout)
xml如下:
<?xml version="1.0" encoding="utf-8"?>

<RelativeLayout xmlns:android="http://schemas.android.com/apk/res/android"

    android:layout_width="match_parent"

    android:layout_height="match_parent" >

       <Button

        android:id="@+id/button5"

        android:layout_width="50dp"

        android:layout_height="50dp"

        android:layout_centerInParent="true"

        android:text="5" />

       <Button

        android:id="@+id/button2"

        android:layout_width="50dp"

        android:layout_height="50dp"

        android:layout_centerHorizontal="true"

        android:layout_above="@id/button5"

        android:text="2" />

       <Button

        android:id="@+id/button8"

        android:layout_width="50dp"

        android:layout_height="50dp"

        android:layout_centerHorizontal="true"

        android:layout_below="@id/button5"

        android:text="8" />

        <Button

        android:id="@+id/button1"

        android:layout_width="50dp"

        android:layout_height="50dp"

        android:layout_alignTop="@id/button2"

        android:layout_toLeftOf="@id/button2"

        android:text="1" />

       <Button

        android:id="@+id/button3"

        android:layout_width="50dp"

        android:layout_height="50dp"

        android:layout_alignTop="@id/button2"

        android:layout_toRightOf="@id/button2"

        android:text="3" />

       <Button

        android:id="@+id/button4"

        android:layout_width="50dp"

        android:layout_height="50dp"

        android:layout_alignTop="@id/button5"

        android:layout_toLeftOf="@id/button5"

        android:text="4" />

       <Button

        android:id="@+id/button6"

        android:layout_width="50dp"

        android:layout_height="50dp"

        android:layout_alignTop="@id/button5"

        android:layout_toRightOf="@id/button5"

        android:text="6" />

        <Button

          android:id="@+id/button7"

          android:layout_width="50dp"

          android:layout_height="50dp"

          android:layout_alignTop="@+id/button8"

          android:layout_toLeftOf="@+id/button8"

          android:text="7" />

        <Button

          android:id="@+id/button9"

          android:layout_width="50dp"

          android:layout_height="50dp"

          android:layout_alignTop="@+id/button8"

          android:layout_toRightOf="@+id/button8"

          android:text="9" />

</RelativeLayout>
布局如下:

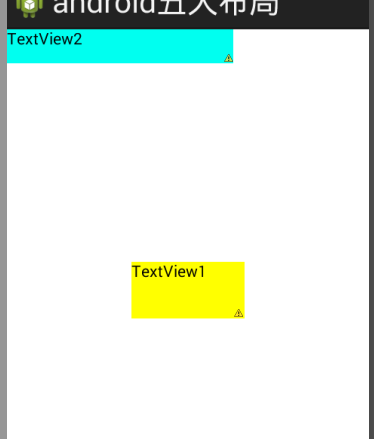
4.FrameLayout帧布局
默认所有的控件都是左上对齐(每个控件对应每个界面)。控件可以通过android:layout_gravity属性控制自己在父控件中的位置。
而android:gravity表示:设置文本位置,如设置成”center”,文本将居中显示。
比如下面xml:
<?xml version="1.0" encoding="utf-8"?>

<FrameLayout xmlns:android="http://schemas.android.com/apk/res/android"

    android:layout_width="match_parent"

    android:layout_height="match_parent" >

    <TextView

        android:id="@+id/textView1"

        android:layout_width="100dp"

        android:layout_height="50dp"

        android:textColor="#000000"

        android:background="#ffFF00"

        android:text="TextView1" />

   <TextView

        android:id="@+id/textView2"

        android:layout_width="200dp"

        android:layout_height="30dp"

        android:textColor="#000000"

        android:background="#00FFf0"

        android:text="TextView2" />


</FrameLayout>
布局如下:
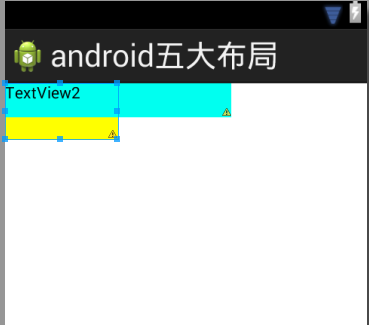
可以看到TextView1已经被覆盖了.
修改textview1,设置为居中:
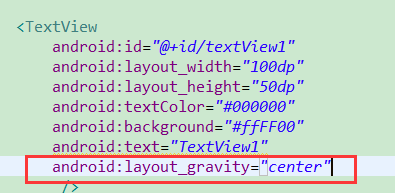
布局效果如下所示:
5.TableLayout表格布局
TableLayout特有元素TableRow
通过TableRow可以在一行中放各种控件.
示例如下:
<?xml version="1.0" encoding="utf-8"?>

<TableLayout xmlns:android="http://schemas.android.com/apk/res/android"

    android:layout_width="match_parent"

    android:layout_height="match_parent" >

   <TableRow>

    <TextView

        android:id="@+id/textView1"

        android:layout_width="wrap_content"

        android:layout_height="wrap_content"

        android:text="TextView1"

        android:background="#FF0000"/>

    <TextView

        android:id="@+id/textView2"

        android:layout_width="wrap_content"

        android:layout_height="wrap_content"

        android:text="TextView2"

       android:background="#FFF000" />

   </TableRow>

    <TextView

        android:id="@+id/textView3"

        android:layout_width="wrap_content"

        android:layout_height="wrap_content"

        android:text="TextView3" />

</TableLayout>
布局效果如下:
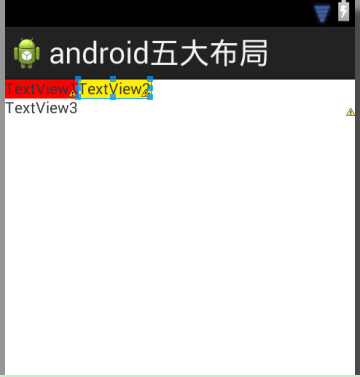
如上图所示,可以看到只有通过TableRow元素包含的控件才能占据为1行.
TableLayout特有属性如下所示:
- android:collapseColumns: 设置需要被隐藏的列的序号
- android:shrinkColumns: 设置允许被收缩的列的列序号
- android:stretchColumns: 设置运行被拉伸的列的列序号
collapseColumns和android:stretchColumns属性示例
<?xml version="1.0" encoding="utf-8"?>

<TableLayout xmlns:android="http://schemas.android.com/apk/res/android"

    android:layout_width="match_parent"

    android:layout_height="match_parent"

    android:collapseColumns="1,2"

    android:stretchColumns="3"

    >

    <TableRow>

    <TextView

        android:id="@+id/textView1"

        android:layout_width="wrap_content"

        android:layout_height="wrap_content"

        android:text="TextView0"

        android:background="#FF0000"/>

    <TextView

        android:id="@+id/textView2"

        android:layout_width="wrap_content"

        android:layout_height="wrap_content"

        android:text="TextView1"

        android:background="#FFF000" />

        <Button

        android:id="@+id/button1"

        android:layout_width="wrap_content"

        android:layout_height="wrap_content"

        android:text="2" />

        <Button

        android:id="@+id/button2"

        android:layout_width="wrap_content"

        android:layout_height="wrap_content"

        android:text="3" />

        <Button

        android:id="@+id/button3"

        android:layout_width="wrap_content"

        android:layout_height="wrap_content"

        android:text="4" />

    </TableRow>

</TableLayout>
布局效果如下:

由于设置android:collapseColumns="1,2",所以TextView1和TextView2所在的列被隐藏了.
然后android:stretchColumns="3",由于第一个button位于第3列,所以被拉伸了(列数是从0开始的)
android:shrinkColumns属性示例
<?xml version="1.0" encoding="utf-8"?>

<TableLayout xmlns:android="http://schemas.android.com/apk/res/android"

    android:layout_width="match_parent"

    android:layout_height="match_parent"

    android:shrinkColumns="1"

    >

    <TableRow>

    <TextView

        android:id="@+id/textView1"

        android:layout_width="wrap_content"

        android:layout_height="wrap_content"

        android:text="TextView0"

        android:background="#FF0000"/>

    <TextView

        android:id="@+id/textView2"

        android:layout_width="wrap_content"

        android:layout_height="wrap_content"

        android:text="TextView1"

        android:background="#FFF000" />

    <Button

        android:id="@+id/button1"

        android:layout_width="80dp"

        android:layout_height="wrap_content"

        android:text="2" />

    <Button

        android:id="@+id/button2"

        android:layout_width="80dp"

        android:layout_height="wrap_content"

        android:text="3" />

    <Button

        android:id="@+id/button3"

        android:layout_width="80dp"

        android:layout_height="wrap_content"

        android:text="4" />

    </TableRow>

</TableLayout>
布局如下所示:
由于android:shrinkColumns="1",所以第二个列支持收缩.
6.AbsoluteLayout绝对布局
已过时, 通过android:layout_x和android:layout_y来指定元素绝对位置,所以不能适配各个不同屏幕大小.
示例如下:
<?xml version="1.0" encoding="utf-8"?>

<AbsoluteLayoutxmlns:android="http://schemas.android.com/apk/res/android"

    android:layout_width="match_parent"

    android:layout_height="match_parent" >

    <TextView

        android:id="@+id/textView1"

        android:layout_width="wrap_content"

        android:layout_height="wrap_content"

        android:layout_x="91dp"

        android:layout_y="108dp"

        android:text="TextView" />

    <Button

        android:id="@+id/button1"

        android:layout_width="wrap_content"

        android:layout_height="wrap_content"

        android:layout_x="130dp"

        android:layout_y="202dp"

        android:text="Button" />

</AbsoluteLayout>
布局如下:

6.Android-五大布局的更多相关文章
- Android 五大布局
Android 五大布局: FrameLayout(框架布局),LinearLayout (线性布局),AbsoluteLayout(绝对布局),RelativeLayout(相对布局),Table ...
- Android 五大布局(LinearLayout、FrameLayout、AbsoulteLayout、RelativeLayout、TableLayout )
前言 欢迎大家我分享和推荐好用的代码段~~ 声明 欢迎转载,但请保留文章原始出处: CSDN:http://www.csdn.net ...
- 浅谈Android五大布局
Android的界面是有布局和组件协同完成的,布局好比是建筑里的框架,而组件则相当于建筑里的砖瓦.组件按照布局的要求依次排列,就组成了用户所看见的界面.Android的五大布局分别是LinearLay ...
- [转]浅谈Android五大布局(二)——RelativeLayout和TableLayout
在浅谈Android五大布局(一)中已经描述了LinearLayout(线性布局).FrameLayout(单帧布局)和AbsoulteLayout(绝对布局)三种布局结构,剩下的两种布局Relati ...
- [转]浅谈Android五大布局(一)——LinearLayout、FrameLayout和AbsoulteLayout
Android的界面是有布局和组件协同完成的,布局好比是建筑里的框架,而组件则相当于建筑里的砖瓦.组件按照布局的要求依次排列,就组成了用户所看见的界面.Android的五大布局分别是LinearLay ...
- Android五大布局介绍&属性设置大全
前言 在进行Android开发中,常常需要用到各种布局来进行UI的绘制,今天我们就来讲下Android开发中最常用的五大布局介绍和相关属性的设置. 目录 Android五大布局介绍&属性设置. ...
- Android五大布局详解——LinearLayout(线性布局)
Android五大布局 本篇开始介绍Android的五大布局的知识,一个丰富的界面显示总是要有众多的控件来组成的,那么怎样才能让这些控件能够按你的想法进行摆放,从而自定义你所想要的用户界面呢?这就牵涉 ...
- Android笔记——Android五大布局
一.五大布局 Android的界面是有布局和组件协同完成的,布局好比是建筑里的框架,而组件则相当于建筑里的砖瓦.组件按照布局的要求依次排列,就组成了用户所看见的界面.Android的五大布局分别是Li ...
- Android——五大布局
Android的五大布局分为: 线性布局 相对布局 帧布局 绝对布局 表格布局 一.线性布局 线性布局在开发中使用最多,具有垂直方向与水平方向的布局方式 通过设置属性"android:ori ...
- 浅谈Android五大布局(一)——LinearLayout、FrameLayout和AbsoulteLayout
Android的界面是有布局和组件协同完成的,布局好比是建筑里的框架,而组件则相当于建筑里的砖瓦.组件按照布局的要求依次排列,就组成了用户所看见的界面.Android的五大布局分别是LinearLay ...
随机推荐
- agumaster 出现实际股票数据
工程下载:https://files.cnblogs.com/files/xiandedanteng/agumaster20200430-3.zip --2020-04-30--
- 转贴:110个Oracle 函数
转载地址:https://bbs.csdn.net/topics/310021870 1. ASCII返回与指定的字符对应的十进制数;SQL> select ascii(A) A,ascii(a ...
- 快速启动CMD窗口的办法
在 文件管理器的 地址栏输入cmd回车,cmd会快速在此路径下打开. --END-- 2020-01-07
- 一个SQL查询连续三天的流量100以上的数据值【SQql Server】
题目 有一个商场,每日人流量信息被记录在这三列信息中:序号 (id).日期 (date). 人流量 (people).请编写一个查询语句,找出高峰期时段,要求连续三天及以上,并且每天人流量均不少于10 ...
- Python爬取NBA虎扑球员数据
虎扑是一个认真而有趣的社区,每天有众多JRs在虎扑分享自己对篮球.足球.游戏电竞.运动装备.影视.汽车.数码.情感等一切人和事的见解,热闹.真实.有温度. 受害者地址 https://nba.hupu ...
- SSH框架下页面跳转入门篇
一.完成目标,因为WEB-INF下面的界面不能通过输入地址的方式直接访问,所以需要在后台定义一个方法跳转过去. 步骤1:.创建普通类继承ActionSupport类,并定义一个方法返回需要跳转的路径 ...
- flask学习,关于4.2.2 输出HTML代码报错的问题
问题描述 今天在学习第四章表单时,创建form实例时访问实例属性时报错,即以下代码出错 form = LoginForm() print(form.username) RuntimeError: Wo ...
- pycharm写的代码提交到git上,提示需要merge失败时解决办法
当遇到pycharm代码提交需要合并报错时 原因:pycharm目录和git中目录冲突了 解决办法:1.先在git仓库中创建一个文件夹,比如day1 2.然后在pycharm中update一下,可以看 ...
- [LeetCode]617. 合并二叉树(递归)
###题目 给定两个二叉树,想象当你将它们中的一个覆盖到另一个上时,两个二叉树的一些节点便会重叠. 你需要将他们合并为一个新的二叉树.合并的规则是如果两个节点重叠,那么将他们的值相加作为节点合并后的新 ...
- MySQL安装错误Couldn't find MySQL server
Starting MySQL ERROR! Couldn't find MySQL server (/usr/local/mysql/bin/mysqld_safe) 昨天rpm安装MySQL5.7后 ...