
python标准模块(二)
本文会涉及到的模块:
- json、pickle
- urllib、Requests
- xml.etree
- configparser
- shutil、zipfile、tarfile
1. json & pickle序列化
- json,用于字符串和 python数据类型间进行转换,不同语言之间兼容性好,但是只能转换字符串字典列表等简单的数据类型。Json模块提供了四个功能:dumps、dump、loads、load。
- pickle,用于python特有的类型 和 python的数据类型间进行转换。比较强大能转换的数据类型比较多,但是只在python下支持。pickle模块提供了四个功能:dumps、dump、loads、load。
(1) json
dumps、loads用的最多
import json

s = '{"k1": "v1", "k2": "v2"}'  #json在处理这种字符串的时候,目标字典元素必须是"",否则报错

result = json.loads(s)

print(result, type(result))  # {'k1': 'v1', 'k2': 'v2'} <class 'dict'>

result = json.load(open('db', 'r')) #读取db中的内容,并把字符串转变成dict

print(result)       #{'k1': 'v1', 'k2': 'v2'}

dic = {'k1': 'v1', 'k2': 'v2'}

result = json.dumps(dic)

print(result, type(result))  # {"k2": "v2", "k1": "v1"} <class 'str'>

dic = {'k1': 'v1', 'k2': 'v2'}

result = json.dump(dic,open('db','w')) #输出后写入db文件
注意:json提供的是一种通用式的序列化,因此它适用的数据类型比较有限,如list、dict,但是tuple就不支持,以为在其他语言中没有tuple这种数据类型。
(2) pickle
dumps、loads用的最多
用法同上
2. http请求
发送http请求后,服务器一般会返回json、xml、html这几种格式的数据
(1) urllib
Python标准库中提供了:urllib等模块以供Http请求,但是,它的 API 太渣了。它是为另一个时代、另一个互联网所创建的。它需要巨量的工作,甚至包括各种方法覆盖,来完成最简单的任务。
import urllib.request

f = urllib.request.urlopen('http://www.webxml.com.cn//webservices/qqOnlineWebService.asmx/qqCheckOnline?qqCode=424662508')

result = f.read().decode('utf-8')
import urllib.request

req = urllib.request.Request('http://www.example.com/')

req.add_header('Referer', 'http://www.python.org/')

r = urllib.request.urlopen(req)

result = f.read().decode('utf-8')

发送携带请求头的GET请求
更多见Python官方文档:module-urllib
(2) Requests(第三方模块)
发起http请求,并获取请求的返回值
Requests 是使用 Apache2 Licensed 许可证的 基于Python开发的HTTP 库,其在Python内置模块的基础上进行了高度的封装,从而使得Pythoner进行网络请求时,变得美好了许多,使用Requests可以轻而易举的完成浏览器可有的任何操作。
1、安装模块
pip3 install requests
2、使用模块
# 1、无参数实例

import requests

ret = requests.get('https://github.com/timeline.json')

print(ret.url)

print(ret.text)

# 2、有参数实例

#GET请求

import requests

payload = {'key1': 'value1', 'key2': 'value2'}

ret = requests.get("http://httpbin.org/get", params=payload)

print(ret.url)

print(ret.text)
# 1、基本POST实例

import requests

payload = {'key1': 'value1', 'key2': 'value2'}

ret = requests.post("http://httpbin.org/post", data=payload)

print(ret.text)

# 2、发送请求头和数据实例

#POST请求

import requests

import json

url = 'https://api.github.com/some/endpoint'

payload = {'some': 'data'}

headers = {'content-type': 'application/json'}

ret = requests.post(url, data=json.dumps(payload), headers=headers)

print(ret.text)

print(ret.cookies)
#其他请求

requests.get(url, params=None, **kwargs)

requests.post(url, data=None, json=None, **kwargs)

requests.put(url, data=None, **kwargs)

requests.head(url, **kwargs)

requests.delete(url, **kwargs)

requests.patch(url, data=None, **kwargs)

requests.options(url, **kwargs)

# 以上方法均是在此方法的基础上构建

requests.request(method, url, **kwargs)
更多requests模块相关的文档:Requests: 让 HTTP 服务人类
3、Http请求和XML实例
#实例1:检测QQ账号是否在线

import urllib

import requests

from xml.etree import ElementTree as ET

# 使用第三方模块requests发送HTTP请求,或者XML格式内容

r = requests.get('http://www.webxml.com.cn//webservices/qqOnlineWebService.asmx/qqCheckOnline?qqCode=424662508')

result = r.text

# 解析XML格式内容

node = ET.XML(result)

# 获取内容

if node.text == "Y":

    print("在线")

else:

    print("离线")
#实例2:获取火车时刻表

import urllib

import requests

from xml.etree import ElementTree as ET

# 使用第三方模块requests发送HTTP请求,或者XML格式内容

r = requests.get('http://www.webxml.com.cn/WebServices/TrainTimeWebService.asmx/getDetailInfoByTrainCode?TrainCode=G666&UserID=')

result = r.text

# 解析XML格式内容

root = ET.XML(result)

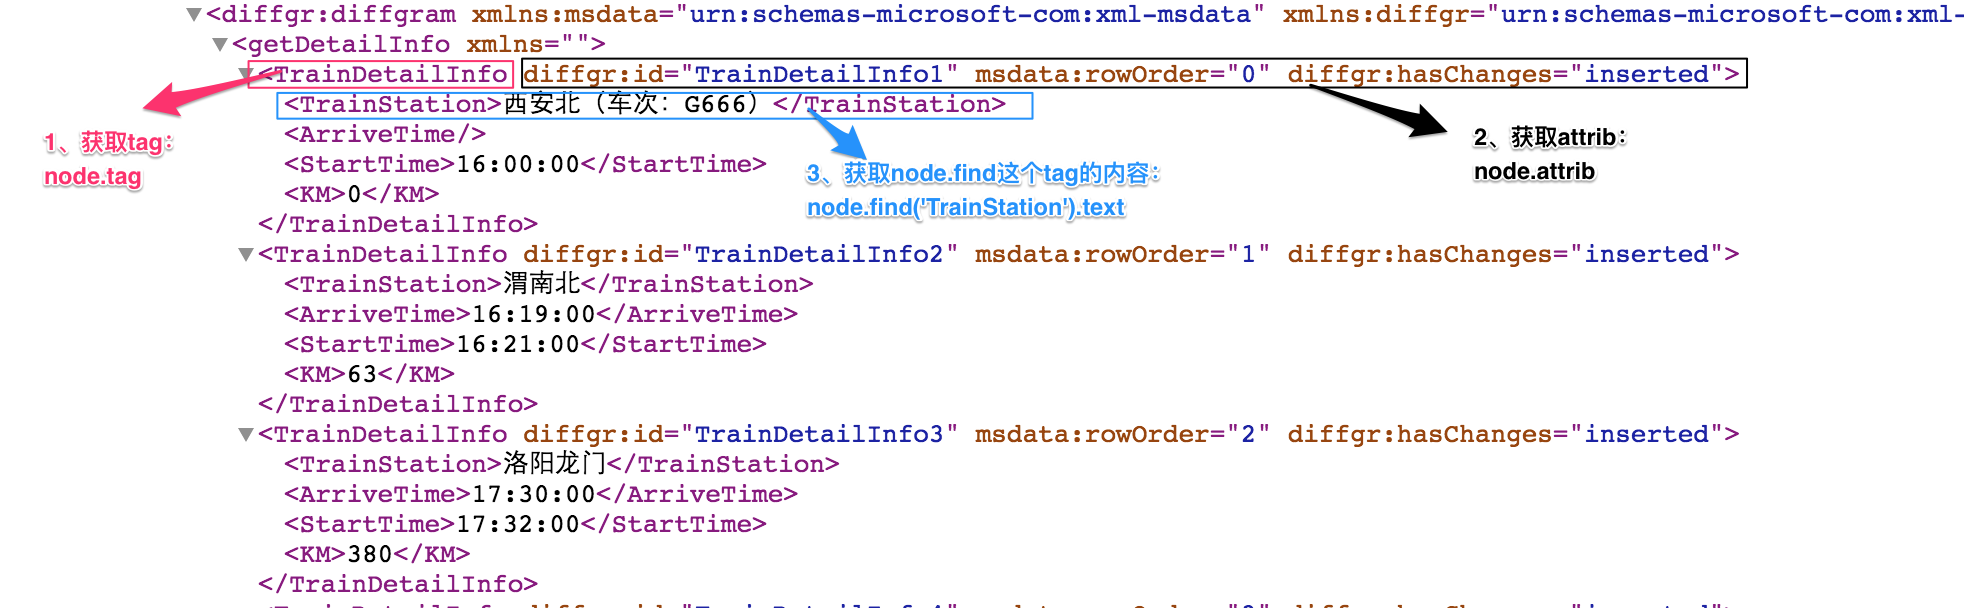
for node in root.iter('TrainDetailInfo'):

    print(node.find('TrainStation').text,node.find('StartTime').text,node.tag,node.attrib)
3. xml处理
(1) 简介
XML是实现不同语言或程序之间进行数据交换的协议,与json类似,XML文件格式如下:
<data>

    <country name="Liechtenstein">

        <rank updated="yes">2</rank>    #<tag attrib>text</tag>

        <year>2023</year>

        <gdppc>141100</gdppc>

        <neighbor direction="E" name="Austria" />  #child

        <neighbor direction="W" name="Switzerland" />

    </country>

    <country name="Singapore">

        <rank updated="yes">5</rank>

        <year>2026</year>

        <gdppc>59900</gdppc>

        <neighbor direction="N" name="Malaysia" />

    </country>

    <country name="Panama">

        <rank updated="yes">69</rank>

        <year>2026</year>

        <gdppc>13600</gdppc>

        <neighbor direction="W" name="Costa Rica" />

        <neighbor direction="E" name="Colombia" />

    </country>

</data>
如果想通过python获取一个xml里的全部类容那么
#实例:获取火车时刻表

import urllib

import requests

from xml.etree import ElementTree as ET

# 使用第三方模块requests发送HTTP请求,或者XML格式内容

r = requests.get('http://www.webxml.com.cn/WebServices/TrainTimeWebService.asmx/getDetailInfoByTrainCode?TrainCode=G666&UserID=')

result = r.text

# 解析XML格式内容

root = ET.XML(result)       #root在这里就是最外层的节点

print(root.tag)

"""

{http://WebXml.com.cn/}DataSet

"""

for node in root:

    print(node)         #输出root的两个元素

"""

<Element '{http://www.w3.org/2001/XMLSchema}schema' at 0x102319cc8>

<Element '{urn:schemas-microsoft-com:xml-diffgram-v1}diffgram' at 0x1027c71d8>

"""
ElementTree(.py) as ET

ET. Element

ET. ElementTree

#创建整个tree

tree = ET.parse("文件名")

tree = ET.ElementTree(根节点(Element对象))   #通过根节点创建一个tree

#创建根节点

ele = ET.Element('family',{"age":"18"})     #创建一个根节点
(2) 解析xml
1.利用ElementTree.XML将字符串解析成xml对象:
from xml.etree import ElementTree as ET

# 打开文件,读取内容

str_xml = open('xo.xml', 'r').read()

# 将字符串解析成xml特殊对象,root代指xml文件的根节点

root = ET.XML(str_xml)      #<Element 'data' at 0x102122278>
2.利用ElementTree.parse将文件直接解析成xml对象(不需要先open再read就可以直接解析xml文件)
from xml.etree import ElementTree as ET

# 直接解析xml文件

tree = ET.parse("xo.xml")

# 获取xml文件的根节点

root = tree.getroot()   #<Element 'data' at 0x102122278>
(3) 操作xml
print(dir(root)) #查看一个节点的所有方法
部分源码如下,详细源码请参考:[source]class Element
class Element:

    """An XML element.

    This class is the reference implementation of the Element interface.

    An element's length is its number of subelements.  That means if you want to check if an element is truly empty, you should check BOTH its length AND its text attribute.

    The element tag, attribute names, and attribute values can be either bytes or strings.

    *tag* is the element name.  *attrib* is an optional dictionary containing element attributes. *extra* are additional element attributes given as keyword arguments.

    Example form:

        <tag attrib>text<child/>...</tag>tail

    """
a、遍历XML文档的所有内容
from xml.etree import ElementTree as ET

############ 此处省略解析过程 ############

# 顶层标签

print(root.tag)

# 遍历XML文档的第二层

for child in root:

    # 第二层节点的标签名称和标签属性

    print(child.tag, child.attrib)

    # 遍历XML文档的第三层

    for i in child:

        # 第三层节点的标签名称和内容

        print(i.tag,i.text)
b、遍历XML中指定的节点
from xml.etree import ElementTree as ET

############ 此处省略解析过程 ############

### 操作

# 顶层标签

print(root.tag)

# 遍历XML中所有的year节点

for node in root.iter('year'):

    # 节点的标签名称和内容

    print(node.tag, node.text)
c、修改节点内容
由于修改的节点时,均是在内存中进行,其不会影响文件中的内容。所以,如果想要修改,则需要重新将内存中的内容写到文件。
from xml.etree import ElementTree as ET

############ 解析方式一 ############

# 打开文件,读取XML内容

str_xml = open('xo.xml', 'r').read()

# 将字符串解析成xml特殊对象,root代指xml文件的根节点

root = ET.XML(str_xml)

############ 操作 ############

# 顶层标签

print(root.tag)

# 循环所有的year节点

for node in root.iter('year'):

    # 将year节点中的内容自增一

    new_year = int(node.text) + 1

    node.text = str(new_year)

    # 设置属性

    node.set('name', 'alex')

    node.set('age', '18')

    # 删除属性

    del node.attrib['name']

############ 保存文件 ############

tree = ET.ElementTree(root)     #由于解析方式一没有创建tree,因此我们在操作完文件需要保存的时候需要额外创建一个tree

tree.write("newnew.xml", encoding='utf-8')
from xml.etree import ElementTree as ET

############ 解析方式二 ############

# 直接解析xml文件

tree = ET.parse("xo.xml")

# 获取xml文件的根节点

root = tree.getroot()

############ 操作 ############

# 顶层标签

print(root.tag)

# 循环所有的year节点

for node in root.iter('year'):

    # 将year节点中的内容自增一

    new_year = int(node.text) + 1

    node.text = str(new_year)

    # 设置属性

    node.set('name', 'alex')

    node.set('age', '18')

    # 删除属性

    del node.attrib['name']

############ 保存文件 ############

tree.write("newnew.xml", encoding='utf-8')
d、删除节点
from xml.etree import ElementTree as ET

############ 解析字符串方式打开 ############

# 打开文件,读取XML内容

str_xml = open('xo.xml', 'r').read()

# 将字符串解析成xml特殊对象,root代指xml文件的根节点

root = ET.XML(str_xml)

############ 操作 ############

# 顶层标签

print(root.tag)

# 遍历data下的所有country节点

for country in root.findall('country'):

    # 获取每一个country节点下rank节点的内容

    rank = int(country.find('rank').text)

    if rank > 50:

        # 删除指定country节点

        root.remove(country)

############ 保存文件 ############

tree = ET.ElementTree(root)

tree.write("newnew.xml", encoding='utf-8')
from xml.etree import ElementTree as ET

############ 解析文件方式 ############

# 直接解析xml文件

tree = ET.parse("xo.xml")

# 获取xml文件的根节点

root = tree.getroot()

############ 操作 ############

# 顶层标签

print(root.tag)

# 遍历data下的所有country节点

for country in root.findall('country'):

    # 获取每一个country节点下rank节点的内容

    rank = int(country.find('rank').text)

    if rank > 50:

        # 删除指定country节点

        root.remove(country)

############ 保存文件 ############

tree.write("newnew.xml", encoding='utf-8')

解析文件方式打开,删除,保存
(4) 创建xml文档
创建方式1:Element
from xml.etree import ElementTree as ET

# 创建根节点

root = ET.Element("famliy")

# 创建节点大儿子

son1 = ET.Element('son', {'name': '儿1'})

# 创建小儿子

son2 = ET.Element('son', {"name": '儿2'})

# 在大儿子中创建两个孙子

grandson1 = ET.Element('grandson', {'name': '儿11'})

grandson2 = ET.Element('grandson', {'name': '儿12'})

son1.append(grandson1)

son1.append(grandson2)

# 把儿子添加到根节点中

root.append(son1)

root.append(son2)

tree = ET.ElementTree(root)

tree.write('oooo.xml',encoding='utf-8', short_empty_elements=False)

---------------

#实例归纳:

ele = ET.Element('family',{"age":"18"})     #创建一个根节点

tree = ET.ElementTree(ele)   #通过根节点创建一个tree

tree.write("xx.xml")        #有了tree之后就可以把修改后的数据保存到xx.xml文件中

---------------
创建方式2:makeelement()
和Element()一样
from xml.etree import ElementTree as ET

# 创建根节点

root = ET.Element("famliy")

# 创建大儿子

# son1 = ET.Element('son', {'name': '儿1'})

son1 = root.makeelement('son', {'name': '儿1'})

# 创建小儿子

# son2 = ET.Element('son', {"name": '儿2'})

son2 = root.makeelement('son', {"name": '儿2'})

# 在大儿子中创建两个孙子

# grandson1 = ET.Element('grandson', {'name': '儿11'})

grandson1 = son1.makeelement('grandson', {'name': '儿11'})

# grandson2 = ET.Element('grandson', {'name': '儿12'})

grandson2 = son1.makeelement('grandson', {'name': '儿12'})

son1.append(grandson1)

son1.append(grandson2)

# 把儿子添加到根节点中

root.append(son1)

root.append(son2)

tree = ET.ElementTree(root)

tree.write('oooo.xml',encoding='utf-8', short_empty_elements=False)
创建方式3:SubElement
from xml.etree import ElementTree as ET

# 创建根节点

root = ET.Element("famliy")

# 创建节点大儿子

son1 = ET.SubElement(root, "son", attrib={'name': '儿1'})

# 创建小儿子

son2 = ET.SubElement(root, "son", attrib={"name": "儿2"})

# 在大儿子中创建一个孙子

grandson1 = ET.SubElement(son1, "age", attrib={'name': '儿11'})

grandson1.text = '孙子'

et = ET.ElementTree(root)  #生成文档对象

et.write("test.xml", encoding="utf-8", xml_declaration=True, short_empty_elements=False)     #xml_declaration,添加xml注释
由于原生保存的XML时默认无缩进,如果想要设置缩进的话, 需要修改保存方式:
from xml.etree import ElementTree as ET

from xml.dom import minidom

def prettify(elem):

    """将节点转换成字符串,并添加缩进。

    """

    rough_string = ET.tostring(elem, 'utf-8')

    reparsed = minidom.parseString(rough_string)

    return reparsed.toprettyxml(indent="\t")

# 创建根节点

root = ET.Element("famliy")

# 创建大儿子

# son1 = ET.Element('son', {'name': '儿1'})

son1 = root.makeelement('son', {'name': '儿1'})

# 创建小儿子

# son2 = ET.Element('son', {"name": '儿2'})

son2 = root.makeelement('son', {"name": '儿2'})

# 在大儿子中创建两个孙子

# grandson1 = ET.Element('grandson', {'name': '儿11'})

grandson1 = son1.makeelement('grandson', {'name': '儿11'})

# grandson2 = ET.Element('grandson', {'name': '儿12'})

grandson2 = son1.makeelement('grandson', {'name': '儿12'})

son1.append(grandson1)

son1.append(grandson2)

# 把儿子添加到根节点中

root.append(son1)

root.append(son1)

raw_str = prettify(root)

f = open("xxxoo.xml",'w',encoding='utf-8')

f.write(raw_str)

f.close()
(5)xml命名空间
详细请参考:命名空间
from xml.etree import ElementTree as ET

ET.register_namespace('com',"http://www.company.com") #some name

# build a tree structure

root = ET.Element("{http://www.company.com}STUFF")

body = ET.SubElement(root, "{http://www.company.com}MORE_STUFF", attrib={"{http://www.company.com}hhh": "123"})

body.text = "STUFF EVERYWHERE!"

# wrap it in an ElementTree instance, and save as XML

tree = ET.ElementTree(root)

tree.write("page.xml",

           xml_declaration=True,

           encoding='utf-8',

           method="xml")
4. ConfigParser模块
configparser用于处理特定格式的文件,其本质上是利用open来操作文件。
(1) 指定格式
# 注释1

;  注释2

[section1] # 节点

k1 = v1    # 值

k2:v2       # 值

[section2] # 节点

k1 = v1    # 值
(2) 获取所有节点
import configparser

config = configparser.r()    #创建一个config对象

config.read('xxxooo', encoding='utf-8')     #把文件读到内存里

ret = config.sections()     #获取所有节点

print(ret)  #['section1', 'section2']
(3) 获取指定节点下所有的键值对
import configparser

config = configparser.ConfigParser()

config.read('xxxooo', encoding='utf-8')

ret = config.items('section1')

print(ret)      #[('k1', 'v1'), ('k2', 'v2')]
(4) 获取指定节点下所有的建
import configparser

config = configparser.ConfigParser()

config.read('xxxooo', encoding='utf-8')

ret = config.options('section1')

print(ret)  #['k1', 'k2']
(5) 获取指定节点下指定key的值
import configparser

config = configparser.ConfigParser()

config.read('xxxooo', encoding='utf-8')

v = config.get('section1', 'k1')

# v = config.getint('section1', 'k1')

# v = config.getfloat('section1', 'k1')

# v = config.getboolean('section1', 'k1')

print(v)
(6) 检查、删除、添加节点
configparser的修改都是在内存里进行的,因此在改完之后需要把内存里的数据重新保存到文件中。
import configparser

config = configparser.ConfigParser()

config.read('xxxooo', encoding='utf-8')

# 检查

has_sec = config.has_section('section1')    #返回bool

print(has_sec)

# 添加节点

config.add_section("SEC_1")

config.write(open('xxxooo', 'w'))   #文件保存

# 删除节点

config.remove_section("SEC_1")

config.write(open('xxxooo', 'w'))
(7) 检查、删除、设置指定组内的键值对
import configparser

config = configparser.ConfigParser()

config.read('xxxooo', encoding='utf-8')

# 检查

has_opt = config.has_option('section1', 'k1')

print(has_opt)

# 删除

config.remove_option('section1', 'k1')

config.write(open('xxxooo', 'w'))

# 设置

config.set('section1', 'k10', "123")

config.write(open('xxxooo', 'w'))   #如果key存在则修改,如果没有则在后面追加新的items
5. shutil
高级的 文件、文件夹、压缩包 处理模块
(1) 拷贝文件内容(先读后写)
shutil.copyfileobj(fsrc, fdst[, length])
将文件内容拷贝到另一个文件中
import shutil

shutil.copyfileobj(open('old.xml','r'), open('new.xml', 'w'))
(2) 拷贝文件
shutil.copyfile(src, dst)
shutil.copyfile('f1.log', 'f2.log')
(3) 拷贝权限
shutil.copymode(src, dst)
仅拷贝权限。内容、组、用户均不变
shutil.copymode('f1.log', 'f2.log')
(4) 拷贝状态的信息
shutil.copystat(src, dst)
仅拷贝状态的信息,包括:mode bits, atime, mtime, flags
shutil.copystat('f1.log', 'f2.log')
(5) 拷贝文件和权限
shutil.copy(src, dst)
拷贝文件和权限
import shutil

shutil.copy('f1.log', 'f2.log')
(6) 拷贝文件和状态信息
shutil.copy2(src, dst)
拷贝文件和状态信息
import shutil

shutil.copy2('f1.log', 'f2.log')
(7) 递归拷贝
shutil.ignore_patterns(*patterns)
shutil.copytree(src, dst, symlinks=False, ignore=None)
递归的去拷贝文件夹
import shutil

shutil.copytree('folder1', 'folder2', ignore=shutil.ignore_patterns('*.pyc', 'tmp*'))
import shutil

shutil.copytree('f1', 'f2', symlinks=True, ignore=shutil.ignore_patterns('*.pyc', 'tmp*'))
(8) 递归删除
shutil.rmtree(path[, ignore_errors[, onerror]])
递归的去删除文件
import shutil

shutil.rmtree('folder1')
(9) 文件移动
shutil.move(src, dst)
递归的去移动文件,它类似mv命令,其实就是重命名。
import shutil

shutil.move('folder1', 'folder3')
(10)压缩
shutil.make_archive(base_name, format,...)
创建压缩包并返回文件路径,例如:zip、tar
创建压缩包并返回文件路径,例如:zip、tar
- base_name: 压缩包的文件名,也可以是压缩包的路径。只是文件名时,则保存至当前目录,否则保存至指定路径,
如:www =>保存至当前路径
如:/Users/wupeiqi/www =>保存至/Users/wupeiqi/ - format: 压缩包种类,“zip”, “tar”, “bztar”,“gztar”
- root_dir: 要压缩的文件夹路径(默认当前目录)
- owner: 用户,默认当前用户
- group: 组,默认当前组
- logger: 用于记录日志,通常是logging.Logger对象
#将 /Users/wupeiqi/Downloads/test 下的文件打包放置当前程序目录

import shutil

ret = shutil.make_archive("wwwwwwwwww", 'gztar', root_dir='/Users/wupeiqi/Downloads/test')

#将 /Users/wupeiqi/Downloads/test 下的文件打包放置 /Users/wupeiqi/目录

import shutil

ret = shutil.make_archive("/Users/wupeiqi/wwwwwwwwww", 'gztar', root_dir='/Users/wupeiqi/Downloads/test')
(11) 补充
shutil 对压缩包的处理是调用 ZipFile 和 TarFile 两个模块来进行的,详细:
zipfile模块
import zipfile

# 压缩

z = zipfile.ZipFile('laxi.zip', 'w')

z.write('a.log')

z.write('data.data')

z.close()

# 解压

z = zipfile.ZipFile('laxi.zip', 'r')

z.extractall()

z.close()
tarfile模块
import tarfile

# 压缩

tar = tarfile.open('your.tar','w')

tar.add('/Users/wupeiqi/PycharmProjects/bbs2.log', arcname='bbs2.log')     #arcname为压缩后的文件名

tar.add('/Users/wupeiqi/PycharmProjects/cmdb.log', arcname='cmdb.log')

tar.close()

# 解压

tar = tarfile.open('your.tar','r')

tar.extractall()  # 可设置解压地址

tar.close()
python标准模块(二)的更多相关文章
- Thread类的其他方法,同步锁,死锁与递归锁,信号量,事件,条件,定时器,队列,Python标准模块--concurrent.futures
参考博客: https://www.cnblogs.com/xiao987334176/p/9046028.html 线程简述 什么是线程?线程是cpu调度的最小单位进程是资源分配的最小单位 进程和线 ...
- python 全栈开发,Day42(Thread类的其他方法,同步锁,死锁与递归锁,信号量,事件,条件,定时器,队列,Python标准模块--concurrent.futures)
昨日内容回顾 线程什么是线程?线程是cpu调度的最小单位进程是资源分配的最小单位 进程和线程是什么关系? 线程是在进程中的 一个执行单位 多进程 本质上开启的这个进程里就有一个线程 多线程 单纯的在当 ...
- python全栈开发,Day42(Thread类的其他方法,同步锁,死锁与递归锁,信号量,事件,条件,定时器,队列,Python标准模块--concurrent.futures)
昨日内容回顾 线程 什么是线程? 线程是cpu调度的最小单位 进程是资源分配的最小单位 进程和线程是什么关系? 线程是在进程中的一个执行单位 多进程 本质上开启的这个进程里就有一个线程 多线程 单纯的 ...
- Python标准模块--threading
1 模块简介 threading模块在Python1.5.2中首次引入,是低级thread模块的一个增强版.threading模块让线程使用起来更加容易,允许程序同一时间运行多个操作. 不过请注意,P ...
- Python标准模块--logging
1 logging模块简介 logging模块是Python内置的标准模块,主要用于输出运行日志,可以设置输出日志的等级.日志保存路径.日志文件回滚等:相比print,具备如下优点: 可以通过设置不同 ...
- Python标准模块--importlib
作者:zhbzz2007 出处:http://www.cnblogs.com/zhbzz2007 欢迎转载,也请保留这段声明.谢谢! 1 模块简介 Python提供了importlib包作为标准库的一 ...
- 【转】Python标准模块--importlib
[转]Python标准模块--importlib 作者:zhbzz2007 出处:http://www.cnblogs.com/zhbzz2007 欢迎转载,也请保留这段声明.谢谢! 1 模块简介 P ...
- Python标准模块--logging(转载)
转载地址:http://www.cnblogs.com/zhbzz2007/p/5943685.html#undefined Python标准模块--logging 1 logging模块简介 log ...
- python标准模块(一)
本文会涉及到的模块: time datetime sys os random re hashlib 模块,用若干代码实现了某个功能的代码集合. 类似于函数式编程和面向过程编程,函数式编程则完成一个功能 ...
随机推荐
- C# StopWatch的使用
在做项目的时候,需要输出数据库操作的耗时,自己写了个方法.老大看到后,奇怪我为什么不用现成的.才知道有StopWatch这个类. 属性 名称 说明 Elapsed 获取当前实例测量得出的总 ...
- [转]Android中Xposed框架篇—利用Xposed框架实现拦截系统方法
一.前言 关于Xposed框架相信大家应该不陌生了,他是Android中Hook技术的一个著名的框架,还有一个框架是CydiaSubstrate,但是这个框架是收费的,而且个人觉得不怎么好用,而Xpo ...
- 无法将分支 master 发布到远程 origin,因为远程存储库中已存在具有同一名称的分支
无法将分支 master 发布到远程 origin,因为远程存储库中已存在具有同一名称的分支.发布此分支将导致远程存储库中的分支发生非快进更新. 第一次用oschina的git设置完远程仓库后提交出现 ...
- ajax post(copy part)
srcpage var q=new XMLHttpRequest(); var data='usr=weidiao&pwd=haha'; data=encodeURI(data); var u ...
- ipython又一方便的调试和应用工具!!!
控制台下://ipython 命令丰富 比如:ls 显示目录 ipython --pylab %run -p *.py quit关闭 示例: In []: %run -p test.py H ...
- ASP.NET 返回字符串 IE6乱码问题
项目A,所有的文件编码和内容编码都是UTF-8. 项目B,Index.aspx文件编码和页面内容编码都是GB2312. 项目A返回JSON格式数据给项目B时,其它浏览器都可以就是IE不行.后来在网上找 ...
- WPS显示无法创建对象,请确认对象已在系统注册表中注册
第一种方法:在系统的开始--所有程序找到WPS--WPS office工具--配置工具--高级--兼容设置,在这里勾选兼容第三方系统和软件. 第二种方法: xp/win7系统:拷贝packager.e ...
- Swift基础--通知,代理和block的使用抉择以及Swift中的代理
什么时候用通知,什么时候用代理,什么时候用block 通知 : 两者关系层次太深,八竿子打不着的那种最适合用通知.因为层级结构深了,用代理要一层一层往下传递,代码结构就复杂了 代理 : 父子关系,监听 ...
- 【BZOJ 2440】【中山市选 2011】完全平方数 莫比乌斯函数+容斥原理
网上PoPoQQQ的课件: •题目大意:求第k个无平方因子数 •无平方因子数(Square-Free Number),即分解之后所有质因数的次数都为1的数 •首先二分答案 问题转化为求[1,x]之间有 ...
- 利用MVC的自定义过滤器FilterAttribute、IActionFilter、IExceptionFilter实现异常处理等功能
今天在博客园上看了一篇推荐文章,还说得蛮有道理: http://www.cnblogs.com/richieyang/p/4779028.html 项目中确实有各种后台验证过程,最常见的莫过于判空,而 ...