2.15 学习总结 之 天气预报APP volley(HTTP库)之StringRequest
一、说在前面
| 昨天 |
学习了序列化的相关知识 |
| 今天 |
1、学习 volley(HTTP库)的 StringRequest请求 2、使用序列化完成相关案例 |
| 遇到问题 |
请求到的参数的出现中文乱码问题 |
问题的解决:自定义StringRequest类 修改volley编码为utf-8, 默认为Latin1 中文显示乱码。
package com.me.myvolley;

import androidx.annotation.Nullable;

import com.android.volley.NetworkResponse;

import com.android.volley.Response;

import com.android.volley.toolbox.HttpHeaderParser;

import com.android.volley.toolbox.StringRequest;

import java.io.UnsupportedEncodingException;

public class Utf8StringRequest extends StringRequest {

    public Utf8StringRequest(int method, String url, Response.Listener<String> listener, @Nullable Response.ErrorListener errorListener) {

        super(method, url, listener, errorListener);

    }

    @Override

    protected Response<String> parseNetworkResponse(NetworkResponse response) {

        String parsed = "";

        try {

            parsed = new String(response.data,"utf-8");

        } catch (UnsupportedEncodingException e) {

            e.printStackTrace();

        }

        return Response.success(parsed, HttpHeaderParser.parseCacheHeaders(response));

    }

}
二、volley 简介
1、特点
1)Volley是一个HTTP库,它使Android应用程序的网络更容易,最重要的是,更快,适合高并发的网络请求。网络请求 cancel 机制。我们可以取消单个请求,或者指定取消请求队列中的一个区域;自动调度网络请求;
2)Volley不适合大型下载或流式操作,因为Volley在解析期间将所有响应保存在内存中。对于大型下载操作,请考虑使用类似的替代方法DownloadManager。
2、组成
2)图片加载 ImageLoader
3)自定义ImageView NetworkImageView
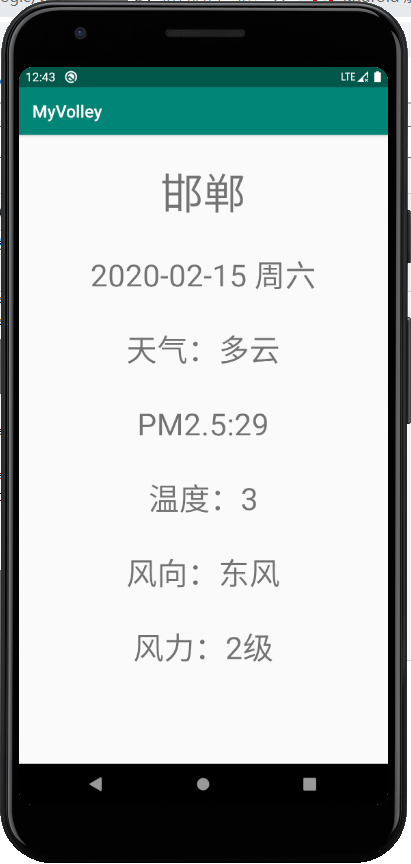
三、案例:获取邯郸市当天的天气信息
1、设计思路
2、代码:
{

    "status": "0",       //反馈代码 0成功

    "msg": "反馈信息",      //反馈信息

    "cityen": "changchun",       //城市名称英文

    "city": "长春",       //城市名称

    "citycode": "101060101",       //城市编码

    "temp": "10",       //实时温度

    "tempf": "50",       //华氏温度

    "wd": "西风",       //风向

    "wden": "W",       //风向英文

    "wdforce": "3级",       //风力

    "wdspd": "<12km/h",       //风速

    "uptime": "12:00",       //更新时间

    "weather": "晴",       //天气状况

    "weatheren": "Sunny",       //天气状况英文

    "weatherimg": "d00",       //天气状况图标

    "stp": "994",       //气压

    "wisib": "35000",       //能见度

    "humidity": "46%",       //湿度

    "prcp": "0",       //降雨

    "prcp24h": "2.2",       //24小时降雨量

    "aqi": "22",       //AQI

    "pm25": "20",       //PM2.5

    "today": "10月17日(星期一)"      //今天日期

}
2)天气实体类
package com.me.myvolley;

public class TianQi {

    private String city;

    private String today;

    private String weather;

    private int pm25;

    private int temp;

    private String wd;

    private String wdforce;

    public String getCity() {

        return city;

    }

    public void setCity(String city) {

        this.city = city;

    }

    public String getToday() {

        return today;

    }

    public void setToday(String today) {

        this.today = today;

    }

    public String getWeather() {

        return weather;

    }

    public void setWeather(String weather) {

        this.weather = weather;

    }

    public int getPm25() {

        return pm25;

    }

    public void setPm25(int pm25) {

        this.pm25 = pm25;

    }

    public int getTemp() {

        return temp;

    }

    public void setTemp(int temp) {

        this.temp = temp;

    }

    public String getWd() {

        return wd;

    }

    public void setWd(String wd) {

        this.wd = wd;

    }

    public String getWdforce() {

        return wdforce;

    }

    public void setWdforce(String wdforce) {

        this.wdforce = wdforce;

    }

}
<?xml version="1.0" encoding="utf-8"?>

<androidx.constraintlayout.widget.ConstraintLayout xmlns:android="http://schemas.android.com/apk/res/android"

    xmlns:app="http://schemas.android.com/apk/res-auto"

    xmlns:tools="http://schemas.android.com/tools"

    android:layout_width="match_parent"

    android:layout_height="match_parent"

    tools:context=".MainActivity">

    <TextView

        android:id="@+id/textViewWdforce"

        android:layout_width="wrap_content"

        android:layout_height="wrap_content"

        android:textSize="36sp"

        app:layout_constraintBottom_toTopOf="@+id/guideline"

        app:layout_constraintEnd_toEndOf="parent"

        app:layout_constraintHorizontal_bias="0.5"

        app:layout_constraintStart_toStartOf="parent"

        app:layout_constraintTop_toBottomOf="@+id/textViewWd"

        tools:text="tianqi" />

    <TextView

        android:id="@+id/textViewCity"

        android:layout_width="wrap_content"

        android:layout_height="wrap_content"

        android:textSize="@dimen/title_font_size"

        app:layout_constraintBottom_toBottomOf="parent"

        app:layout_constraintEnd_toEndOf="parent"

        app:layout_constraintStart_toStartOf="parent"

        app:layout_constraintTop_toTopOf="parent"

        app:layout_constraintVertical_bias="0.05"

        tools:text="handan1111" />

    <TextView

        android:id="@+id/textViewDate"

        android:layout_width="wrap_content"

        android:layout_height="wrap_content"

        android:textSize="36sp"

        app:layout_constraintBottom_toTopOf="@+id/textViewWeather"

        app:layout_constraintEnd_toEndOf="@+id/textViewWeather"

        app:layout_constraintStart_toStartOf="@+id/textViewWeather"

        app:layout_constraintTop_toBottomOf="@+id/textViewCity"

        tools:text="tianqi" />

    <TextView

        android:id="@+id/textViewWeather"

        android:layout_width="wrap_content"

        android:layout_height="wrap_content"

        android:textSize="36sp"

        app:layout_constraintBottom_toTopOf="@+id/textViewPm25"

        app:layout_constraintEnd_toEndOf="@+id/textViewPm25"

        app:layout_constraintStart_toStartOf="@+id/textViewPm25"

        app:layout_constraintTop_toBottomOf="@+id/textViewDate"

        tools:text="tianqi" />

    <TextView

        android:id="@+id/textViewPm25"

        android:layout_width="wrap_content"

        android:layout_height="wrap_content"

        android:textSize="36sp"

        app:layout_constraintBottom_toTopOf="@+id/textViewTemp"

        app:layout_constraintEnd_toEndOf="@+id/textViewTemp"

        app:layout_constraintStart_toStartOf="@+id/textViewTemp"

        app:layout_constraintTop_toBottomOf="@+id/textViewWeather"

        tools:text="tianqi" />

    <TextView

        android:id="@+id/textViewTemp"

        android:layout_width="wrap_content"

        android:layout_height="wrap_content"

        android:textSize="36sp"

        app:layout_constraintBottom_toTopOf="@+id/textViewWd"

        app:layout_constraintEnd_toEndOf="@+id/textViewWd"

        app:layout_constraintStart_toStartOf="@+id/textViewWd"

        app:layout_constraintTop_toBottomOf="@+id/textViewPm25"

        tools:text="tianqi" />

    <TextView

        android:id="@+id/textViewWd"

        android:layout_width="wrap_content"

        android:layout_height="wrap_content"

        android:textSize="36sp"

        app:layout_constraintBottom_toTopOf="@+id/textViewWdforce"

        app:layout_constraintEnd_toEndOf="@+id/textViewWdforce"

        app:layout_constraintStart_toStartOf="@+id/textViewWdforce"

        app:layout_constraintTop_toBottomOf="@+id/textViewTemp"

        tools:text="tianqi" />

    <androidx.constraintlayout.widget.Guideline

        android:id="@+id/guideline"

        android:layout_width="wrap_content"

        android:layout_height="wrap_content"

        android:orientation="horizontal"

        app:layout_constraintGuide_percent="0.9" />

</androidx.constraintlayout.widget.ConstraintLayout>
package com.me.myvolley;

import androidx.appcompat.app.AppCompatActivity;

import android.os.Bundle;

import android.widget.TextView;

import com.android.volley.RequestQueue;

import com.android.volley.Response;

import com.android.volley.VolleyError;

import com.android.volley.toolbox.StringRequest;

import com.android.volley.toolbox.Volley;

import com.google.gson.Gson;

public class MainActivity extends AppCompatActivity {

    @Override

    protected void onCreate(Bundle savedInstanceState) {

        super.onCreate(savedInstanceState);

        setContentView(R.layout.activity_main);

        //String url = "https://www.baidu.com";

        String url = "https://api.help.bj.cn/apis/weather/?id=101091001";

        final TextView textViewWeather = findViewById(R.id.textViewWeather);

        final TextView textViewCity = findViewById(R.id.textViewCity);

        final TextView textViewDate = findViewById(R.id.textViewDate);

        final TextView textViewPm25 = findViewById(R.id.textViewPm25);

        final TextView textViewTemp = findViewById(R.id.textViewTemp);

        final TextView textViewWd = findViewById(R.id.textViewWd);

        final TextView textViewWdforce = findViewById(R.id.textViewWdforce);

        //1、创建一个队列

        RequestQueue queue = Volley.newRequestQueue(this);

        //2、创建一个request

        final Utf8StringRequest request = new Utf8StringRequest(

                StringRequest.Method.GET,    //1、请求方式

                url,    //2、请求网址

                new Response.Listener<String>() {

                    @Override

                    public void onResponse(String response) {

                        Gson gson = new Gson();

                        TianQi tianQi = gson.fromJson(response,TianQi.class);

                        textViewCity.setText(tianQi.getCity());

                        textViewDate.setText(tianQi.getToday());

                        textViewPm25.setText("PM2.5:" + String.valueOf(tianQi.getPm25()));

                        textViewTemp.setText("温度:" + String.valueOf(tianQi.getTemp()));

                        textViewWd.setText("风向:" + tianQi.getWd());

                        textViewWdforce.setText("风力:" + tianQi.getWdforce());

                        textViewWeather.setText("天气:" + tianQi.getWeather());

                        //First first = gson.fromJson(response,First.class);

                        //textView.setText(response);

                    }

                },    //3、成功的回调函数

                new Response.ErrorListener() {

                    @Override

                    public void onErrorResponse(VolleyError error) {

                        textViewCity.setText("请求错误!");

                    }

                }    //4、失败的回调函数

        );

        queue.add(request);

    }

}
四、案例运行测试
2.15 学习总结 之 天气预报APP volley(HTTP库)之StringRequest的更多相关文章
- android入门学习-天气预报app(一)
引言 学习<android第一行代码>根据书本开发的天气预报app,主要用于熟练操作android开发(android studio3.0平台). 今天主要分享一下从服务器上获取天气信息, ...
- 毕业设计--天气预报App
9月中旬,开始动手做我的毕业设计了,之前一直在纠结做啥,后来想想,既然是做毕业设计,那就大胆地做点自己没接触过的东西吧.然后网上查找资料得知做天气预报需要用到开放的API,而且要用那种现在还在维护的, ...
- 用Swift实现一款天气预报APP(三)
这个系列的目录: 用Swift实现一款天气预报APP(一) 用Swift实现一款天气预报APP(二) 用Swift实现一款天气预报APP(三) 通过前面的学习,一个天气预报的APP已经基本可用了.至少 ...
- 用Swift实现一款天气预报APP(二)
这个系列的目录: 用Swift实现一款天气预报APP(一) 用Swift实现一款天气预报APP(二) 用Swift实现一款天气预报APP(三) 上篇中主要讲了界面的一些内容,这篇主要讨论网络请求,获得 ...
- 天气预报APP(1)
一个天气预报APP至少应该具备以下功能: *可以罗列出全国所有的省.市.县: *可以查看全国任意城市的天气信息: *可以自由的切换城市,去查看其他城市的天气: *提供手动更新以及后台自动更新天气的功能 ...
- React Native指南汇集了各类react-native学习资源、开源App和组件
来自:https://github.com/ele828/react-native-guide React Native指南汇集了各类react-native学习资源.开源App和组件 React-N ...
- 用Swift实现一款天气预报APP(一)
这个系列的目录: 用Swift实现一款天气预报APP(一) 用Swift实现一款天气预报APP(二) 用Swift实现一款天气预报APP(三) Swift作为现在苹果极力推广的语言,发展的非常快.这个 ...
- 基于Android开发的天气预报app(源码下载)
原文:基于Android开发的天气预报app(源码下载) 基于AndroidStudio环境开发的天气app -系统总体介绍:本天气app使用AndroidStudio这个IDE工具在Windows1 ...
- Python Cookbook(第3版)中文版:15.14 传递Unicode字符串给C函数库
15.14 传递Unicode字符串给C函数库¶ 问题¶ 你要写一个扩展模块,需要将一个Python字符串传递给C的某个库函数,但是这个函数不知道该怎么处理Unicode. 解决方案¶ 这里我们需要考 ...
随机推荐
- 解决centos7命令无法补全
背景 偶然发现本地虚拟机centos 7.7配置firewalld-cmd命令行无法补全,手敲命令太多,着实麻烦 解决方案 安装linux命令行补全工具,还能够补全命令参数 yum install b ...
- JSON 解析中遇到的坑😭
最近做加解密遇到一个很“奇葩的问题”,解析服务端加密后的字符串 序列化 时一直报错 "json解析失败:Error Domain=NSCocoaErrorDomain Code=3840 & ...
- device supports x86 but apk only supports armeabi-v7a问题解决
我们可以在build.gradle中有ndk这段代码,只要在后面加上“x86”,再sync now一下,就发现可以运行了. ndk { abiFilters "armeabi-v7a&quo ...
- Java通过反射实现实例化
public static void main(String[] args) throws Exception { User user= (User) test(User.class); System ...
- Django中defer和only区别
defer('id', 'name'):取出对象,字段除了id和name都有 only('id', 'name'):取出对象, 只有id和name ret=models.Author.objects. ...
- 十三 Struts2复杂类型的数据封装,List封装和Map封装
在实际开发当中,有可能遇到批量向数据库中插入记录,需要在页面中将数据封装到集合中.类似页面表达式方法 List封装: 前端JSP: <%@ page language="java&qu ...
- Pytorch本人疑问(1) torch.nn和torch.nn.functional之间的区别
在写代码时发现我们在定义Model时,有两种定义方法: torch.nn.Conv2d()和torch.nn.functional.conv2d() 那么这两种方法到底有什么区别呢,我们通过下述代码看 ...
- Python学习第十五课——类的基本思想(实例化对象,类对象)
类的基本思想 类:把一类事物的相同的特征和动作整合到一起就是类类是一个抽象的概念 对象:就是基于类而创建的一个具体的事物(具体存在的)也是特征和动作整合到一块 对象写法 # 对象写法 def scho ...
- Languages-used-on-the-Internet
Languages-used-on-the-Internet 1. 互联网上使用的语言 1.1 网站内容语言 1.2 按语言互联网用户 1.3 维基百科文章统计 2. 综合以上表格数据出图表(2019 ...
- 腾讯云服务器安装python3
一,开始安装python3 首先安装相关包,这里千万不能忽视,不然有什么不可预见的错误会很难受.其命令如下: yum install zlib-devel bzip2-devel openssl ...