【spring 国际化】springMVC、springboot国际化处理详解
在web开发中我们常常会遇到国际化语言处理问题,那么如何来做到国际化呢?
你能get的知识点?
- 使用springgmvc与thymeleaf进行国际化处理。
- 使用springgmvc与jsp进行国际化处理。
- 使用springboot与thymeleaf进行国际化处理。

你必须要知道的概念
关于i18n:
i18n(其来源是英文单词
internationalization的首末字符i和n,18为中间的字符数)是“国际化”的简称。在资讯领域,国际化(i18n)指让产品(出版物,软件,硬件等)无需做大的改变就能够适应不同的语言和地区的需要。对程序来说,在不修改内部代码的情况下,能根据不同语言及地区显示相应的界面。
在全球化的时代,国际化尤为重要,因为产品的潜在用户可能来自世界的各个角落。通常与i18n相关的还有L10n(“本地化”的简称)。
一:使用springgmvc与thymeleaf进行国际化处理。

1、在项目spring的Spring MVC配置文件springmvc.xml中,你需要配置
- 资源文件绑定器ResourceBundleMessageSource
- SessionLocaleResolver(用于将Locale对象存储于Session中供后续使用)
- LocaleChangeInterceptor(用于获取请求中的locale信息,将其转为Locale对象,获取LocaleResolver对象)。
    <!--   使用ResourceBundleMessageSource实现国际化资源-->

    <bean id="messageSource" class="org.springframework.context.support.ResourceBundleMessageSource">

        <property name="basenames" value="messages"/>

        <property name="defaultEncoding" value="UTF-8"/>

    </bean>

    <bean id="localeResolver" class="org.springframework.web.servlet.i18n.SessionLocaleResolver">

        <property name="defaultLocale" value="en_US"/>

    </bean>

    <mvc:interceptors>

        <bean class="org.springframework.web.servlet.i18n.LocaleChangeInterceptor">

            <property name="paramName" value="lang"/>

        </bean>

    </mvc:interceptors>
2、在控制器中添加方法localeChange处理国际化,并注入ResourceBundleMessageSource的Bean实例
    @Autowired

    private ResourceBundleMessageSource messageSource;

    @GetMapping("/localeChange")

    public String localeChange(Locale locale){

        String userName = messageSource.getMessage("userName",null,locale);

        String passWord = messageSource.getMessage("passWord",null,locale);

        System.out.println(userName+passWord);

        return "login";

    }
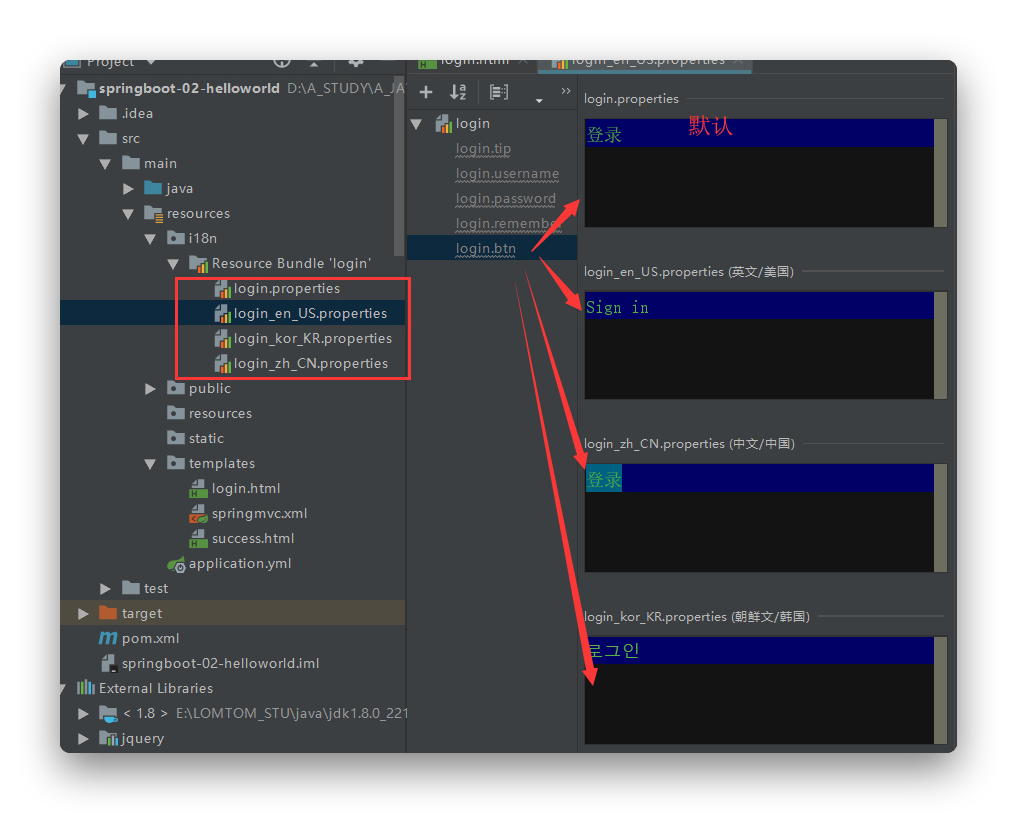
3、创建国际化资源属性文件messages_en_US.properties和messages_zh_CN.properties。
注意这两个文件的命名格式,否则解析会出错,
并且我这里的两个文件就是位于我的resources目录下,当你新建这两个文件后,他会自动给你归档,不要以为我的这两个上面还有一层,你也跟着建一个文件夹。
1、messages_en_US.properties

userName=userName

passWord=password

2、messages_zh_CN.properties

userName=用户名

passWord=密码
4、新建html,用于最终的显示,这里使用的是thymeleaf模板引擎,没有做springmvc与thymeleaf的整合可以看我的另一篇文章 springmvc与thymeleaf的整合
<!--

  @Author: lomtom

  @Date: 2020/4/19

  @Time: 16:51

  @Email: lomtom@qq.com

  -->

<!DOCTYPE html>

<html lang="en"  xmlns:th="http://www.thymeleaf.org">

<head>

    <meta charset="UTF-8">

    <title>login</title>

</head>

<body>

<h2 th:text="#{userName}+' '+#{passWord}"></h2>

<a href="localeChange?lang=en_US">英文</a>

<a href="localeChange?lang=zh_CN">中文</a>

</body>

</html>
最终的效果:

二: 使用springgmvc与jsp进行国际化处理。
这里的前三部与上面相同,唯一有区别的就是最终视图的显示,使用jsp,就要用到JSTL标签,这里需要引入JSTL的message标签。
即在头部加入<%@ taglib prefix="spring" uri="http://www.springframework.org/tags" %>
然后通过<spring:message>元素的key属性输出资源属性文件中的key所对应的值,最终的jsp是这样的。
<%@ page contentType="text/html;charset=UTF-8" language="java" %>

<%@ taglib prefix="spring" uri="http://www.springframework.org/tags" %>

<html>

<head>

    <title>login</title>

</head>

<body>

    <p><spring:message code="userName"/></p>

    <p><spring:message code="password"/></p>

    <a href="localeChange?lang=en_US">英文</a>

    <a href="localeChange?lang=zh_US">中文</a>

</body>

</html>
依次点击“中文”和“英文”链接,可以看到<spring:message>元素显示的文本能够根据所传递的语言来动态展现。
三:使用springboot与thymeleaf进行国际化处理。
没有做springmvc与thymeleaf的整合可以看我的另一篇文章 springmvc与thymeleaf的整合
1、创建配置文件,抽取页面要显示的消息
2、springboot已经配置好了组件,加入即可
spring:

#    让springboot来管理配置文件

  messages:

    basename: i18n.login
3、让页面获取即可(默认根据浏览器语言来切换),利用thymeleaf
<button type="submit" class="btn btn-default" th:text="#{login.btn}">Sign in</button>
4、根据链接来进行语言的切换
原理:国际化locale(区域信息对象),如果自定义了,就是用自己的,而不是系统的
<a class="btn btn-sm" th:href="@{/index.html(l=zh_CN)}">[[#{login.zh}]]</a>

<a class="btn btn-sm" th:href="@{/index.html(l=en_US)}">[[#{login.en}]]</a>

<a class="btn btn-sm" th:href="@{/index.html(l=kor_KR)}">[[#{login.kor}]]</a>
5、解析器,因为我们设置了自己的区域信息对象,所以我们需要书写自己的解析器。并且注入到容器中。
1、新建一个LocaleResolver

public class MyLocaleResolver implements LocaleResolver {

    @Override

    //解析区域信息

    public Locale resolveLocale(HttpServletRequest httpServletRequest) {

        String l = httpServletRequest.getParameter("l");

        Locale locale = Locale.getDefault();

        if(!StringUtils.isEmpty(l)){

            String[] split = l.split("_");

            locale = new Locale(split[0],split[1]);

        }

        return locale;

    }

    @Override

    public void setLocale(HttpServletRequest httpServletRequest, HttpServletResponse httpServletResponse, Locale locale) {

    }

}

2、在config文件中加入到容器中

@Configuration

public class MyMvcConfig implements WebMvcConfigurer {

	@Bean

	public LocaleResolver localeResolver(){

	    return new MyLocaleResolver();

	}

}
这个写的时间过于久远,所以贴出代码,感兴趣的,可以自己研究研究:

1、html
<!--

  User: 欧阳隆桐

  Date: 2019/12/22

  Time: 16:42

  -->

<!DOCTYPE html>

<html lang="ch"  xmlns:th="http://www.thymeleaf.org">

<head>

    <meta charset="UTF-8">

    <title>[[#{login.title}]]</title>

    <link rel="stylesheet" href="/webjars/bootstrap/4.4.1/css/bootstrap.css" th:href="@{/webjars/bootstrap/4.4.1/css/bootstrap.css}">

    <script src="/webjars/jquery/3.3.1/jquery.js" th:src="@{/webjars/jquery/3.3.1/jquery.js}"></script>

    <script src="/webjars/bootstrap/4.4.1/js/bootstrap.js" th:src="@{/webjars/bootstrap/4.4.1/js/bootstrap.js}"></script>

</head>

<body>

<div class="container">

    <div class="row clearfix">

        <div class="col-md-12 column">

            <form class="form-horizontal" role="form" th:action="@{/user/login}" method="post">

                <div class="form-group  text-center">

                    <h1 class="h3 mb-3 font-weight-normal" th:text="#{login.tip}">Please sign in</h1>

                    <p style="color: red" th:text="${msg}" th:if="${not #strings.isEmpty(msg)}"></p>

                </div>

                <div class="form-group">

                    <label for="username" class="col-sm-2 control-label" th:text="#{login.username}">Username</label>

                    <div class="col-sm-10">

                        <input type="text" class="form-control"  name="username" id="username" />

                    </div>

                </div>

                <div class="form-group">

                    <label for="password" class="col-sm-2 control-label" th:text="#{login.password}">Password</label>

                    <div class="col-sm-10">

                        <input type="password" class="form-control" name="password" id="password" />

                    </div>

                </div>

                <div class="form-group">

                    <div class="col-sm-offset-2 col-sm-10">

                        <div class="checkbox">

                            <label><input type="checkbox" />[[#{login.remember}]]</label>

                        </div>

                    </div>

                </div>

                <div class="form-group">

                    <div class="col-sm-offset-2 col-sm-10">

                        <button type="submit" class="btn btn-default" th:text="#{login.btn}">Sign in</button>

                    </div>

                </div>

                <div class="form-group  text-center">

                    <p class="mt-5 mb-3 text-muted">@ 2019</p>

                    <a class="btn btn-sm" th:href="@{/index.html(l=zh_CN)}">[[#{login.zh}]]</a>

                    <a class="btn btn-sm" th:href="@{/index.html(l=en_US)}">[[#{login.en}]]</a>

                    <a class="btn btn-sm" th:href="@{/index.html(l=kor_KR)}">[[#{login.kor}]]</a>

                </div>

            </form>

        </div>

    </div>

</div>

</body>

</html>
2、properties
1、默认

login.btn=登录

login.en=英文

login.kor=韩文

login.password=密码

login.remember=记住我

login.tip=请登录

login.title=登录

login.username=用户名

login.zh=中文

2、英文

login.btn=Sign in

login.en=English

login.kor=Korean

login.password=Password

login.remember=Remember me

login.tip=Please sign in

login.title=Login

login.username=Username

login.zh=Chinese

3、韩文

login.btn=로그인

login.en=영어

login.kor=한글

login.password=암호

login.remember=저를 기억하세요

login.tip=로그인하십시오.

login.title=로그인

login.username=사용자 이름

login.zh=중국어

4、中文

login.btn=登录

login.en=英文

login.kor=韩文

login.password=密码

login.remember=记住我

login.tip=请登录

login.title=登录

login.username=用户名

login.zh=中文
3、java
1、LocaleResolver

/**

 * 可以在连接上携带区域信息

 */

public class MyLocaleResolver implements LocaleResolver {

    @Override

    //解析区域信息

    public Locale resolveLocale(HttpServletRequest httpServletRequest) {

        String l = httpServletRequest.getParameter("l");

        Locale locale = Locale.getDefault();

        if(!StringUtils.isEmpty(l)){

            String[] split = l.split("_");

            locale = new Locale(split[0],split[1]);

        }

        return locale;

    }

    @Override

    public void setLocale(HttpServletRequest httpServletRequest, HttpServletResponse httpServletResponse, Locale locale) {

    }

}

2、config

@Configuration

public class MyMvcConfig implements WebMvcConfigurer {

	@Bean

	public LocaleResolver localeResolver(){

	    return new MyLocaleResolver();

	}

}
4、yml
spring:

#    让springboot来管理配置文件

  messages:

    basename: i18n.login
问题
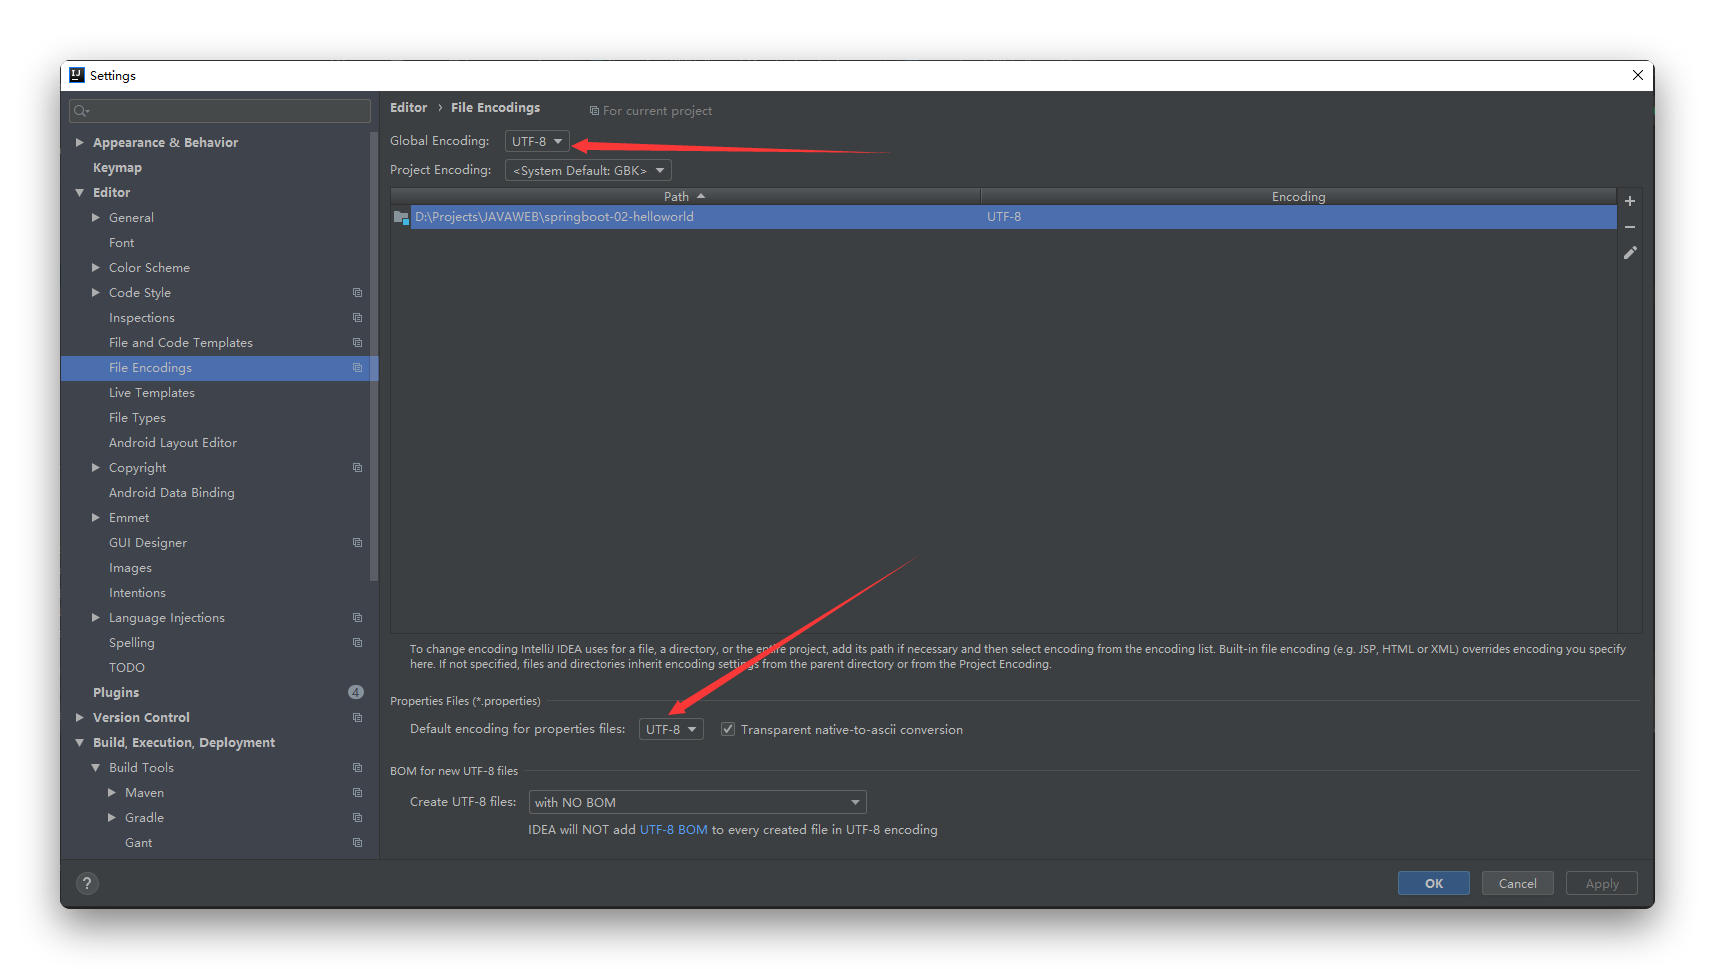
描述:显示中文时乱码
解决:将国际化资源属性文件的编码格式设置为UTF-8即可,当然也可以把整个项目编码格式都设为UTF-8
【spring 国际化】springMVC、springboot国际化处理详解的更多相关文章
- Spring全家桶——SpringBoot之AOP详解
Spring全家桶--SpringBoot之AOP详解 面向方面编程(AOP)通过提供另一种思考程序结构的方式来补充面向对象编程(OOP). OOP中模块化的关键单元是类,而在AOP中,模块化单元是方 ...
- Springboot mini - Solon详解(七)- Solon Ioc 的注解对比Spring及JSR330
Springboot min -Solon 详解系列文章: Springboot mini - Solon详解(一)- 快速入门 Springboot mini - Solon详解(二)- Solon ...
- Spring源码之九finishRefresh详解
Spring源码之九finishRefresh详解 公众号搜索[程序员田同学],专职程序员兼业余写手,生活不止于写代码 Spring IoC 的核心内容要收尾了,本文将对最后一个方法 finishRe ...
- SpringBoot之DispatcherServlet详解及源码解析
在使用SpringBoot之后,我们表面上已经无法直接看到DispatcherServlet的使用了.本篇文章,带大家从最初DispatcherServlet的使用开始到SpringBoot源码中Di ...
- 转:springmvc常用注解标签详解
Spring5:@Autowired注解.@Resource注解和@Service注解 - IT·达人 - 博客园--这篇顺序渐进,讲得超级好--此人博客很不错http://www.cnblogs.c ...
- SpringMVC 之类型转换Converter详解转载
SpringMVC之类型转换Converter详解 本文转载 http://www.tuicool.com/articles/uUjaum 1.1 目录 1.1 目录 1.2 ...
- 2017.2.13 开涛shiro教程-第十二章-与Spring集成(一)配置文件详解
原博客地址:http://jinnianshilongnian.iteye.com/blog/2018398 根据下载的pdf学习. 第十二章-与Spring集成(一)配置文件详解 1.pom.xml ...
- Spring Boot源码中模块详解
Spring Boot源码中模块详解 一.源码 spring boot2.1版本源码地址:https://github.com/spring-projects/spring-boot/tree/2.1 ...
- SpringBoot Profile使用详解及配置源码解析
在实践的过程中我们经常会遇到不同的环境需要不同配置文件的情况,如果每换一个环境重新修改配置文件或重新打包一次会比较麻烦,Spring Boot为此提供了Profile配置来解决此问题. Profile ...
- Springboot mini - Solon详解(四)- Solon的事务传播机制
Springboot min -Solon 详解系列文章: Springboot mini - Solon详解(一)- 快速入门 Springboot mini - Solon详解(二)- Solon ...
随机推荐
- Mysql5.7及以上版本 ONLY_FULL_GROUP_BY报错
近期在开发过程中,因为项目开发环境连接的mysql数据库是阿里云的数据库,而阿里云的数据库版本是5.6的.而测试环境的mysql是自己安装的5.7.因此在开发过程中有小伙伴不注意写了有关group b ...
- 零售CRM系统开发的核心功能
在零售行业中,客户关系管理系统是一个包含销售,市场营销和客户服务流程的中央枢纽.它为企业所有者提供了一种可以结合所有与销售有关的问题并管理销售流程的有效工具.零售CRM可以留住客户,提供个性化的一流客 ...
- MySQL基础知识_1
平时只会使用简单的增删改查,促使我学习这个来源于一道面试题,左思右想,依然想不出来,所以决定系统的学习一下. MySQL创建数据库 CREATE DATABASE <数据库名>; CREA ...
- drf-jwt分页器详解
drf偏移分页组件 pahenations.py from rest_framework.pagination import LimitOffsetPagination class MyLimitOf ...
- Java日期处理易踩的十个坑
前言 整理了Java日期处理的十个坑,希望对大家有帮助. 一.用Calendar设置时间的坑 反例: Calendar c = Calendar.getInstance(); c.set(Calend ...
- python 产生随机数,随机字符串
import randomimport string#随机整数:print random.randint(1,50)#随机选取0到100间的偶数:print random.randrange(0, 1 ...
- 微信公众平台 分享 关注 js功能代码
转上一篇文章 微信很火,微信推出的公众平台也吸引了一部分市场宣传推广团队,像冷笑话大全这种微博养粉大户在微信的公众平台也是异常火爆. 因工作需求,最近为我们的市场部做了几个微信公共平台下的页面,其中涉 ...
- MySQL数据库参数调优方法
怎么配置MySQL服务器,但考虑到服务器硬件配置的不同,具体应用的差别,那些文章的做法只能作为初步设置参考,我们需要根据自己的情况进行配置优化,好的做法是MySQL服务器稳定运行了一段时间后运行,根据 ...
- 让vscode支持WePY框架 *.wpy
WePY框架的.wpy 文件在微信开发者工具中无法打开,这里使用vscode 打开,并安装vetur 和vetur-wepy 插件即可
- 已知IP地址和子网掩码求出网络地址、广播地址、地址范围和主机数(转载https://blog.csdn.net/qq_39026548/article/details/78959089)
假设IP地址为128.11.67.31,子网掩码是255.255.240.0.请算出网络地址.广播地址.地址范围.主机数.方法:将IP地址和子网掩码转化成二进制形式,然后进行后续操作. IP地址和子网 ...