SpringBoot 是为了简化 Spring 应用的创建、运行、调试、部署等一系列问题而诞生的产物,自动装配的特性让我们可以更好的关注业务本身而不是外部的XML配置,我们只需遵循规范,引入相关的依赖就可以轻易的搭建出一个 WEB 工程

一起来学SpringBoot | 第十四篇:强大的 actuator 服务监控与管理 中介绍了actuator 的作用,细心的朋友可能会发现通过http restful api的方式查看信息过于繁琐也不够直观,效率低下,运维人员看到JSON数据更是一脸懵逼,当服务过多的时候查看起来就过于操蛋了,每个服务都需要调用不同的接口来查看监控信息,备受各种困扰因素的我默默翻了下全球最大男性交友平台找到了spring-boot-admin

什么是SBA

SBA 全称 Spring Boot Admin 是一个管理和监控 Spring Boot 应用程序的开源项目。分为admin-server 与 admin-client 两个组件,admin-server通过采集 actuator 端点数据,显示在 spring-boot-admin-ui 上,已知的端点几乎都有进行采集,通过 spring-boot-admin 可以动态切换日志级别、导出日志、导出heapdump、监控各项指标 等等….

Spring Boot Admin 在对单一应用服务监控的同时也提供了集群监控方案,支持通过eurekaconsulzookeeper等注册中心的方式实现多服务监控与管理…

导入依赖

在 pom.xml 中添加 spring-boot-admin 的相关依赖,这里只演示单机版本的,因此就自己监控自己了

1
2
3
4
5
6
7
8
9
10
11
12
13
14
15
16
17
18
19
20
21
22
23
24
25
26
27
28
29
30
31
32
33
34
35
36
37
38
<dependencies>
<!-- 服务端:带UI界面 -->
<dependency>
<groupId>de.codecentric</groupId>
<artifactId>spring-boot-admin-starter-server</artifactId>
<version>2.0.0</version>
</dependency>
<!-- 客户端包 -->
<dependency>
<groupId>de.codecentric</groupId>
<artifactId>spring-boot-admin-starter-client</artifactId>
<version>2.0.0</version>
</dependency>
<!-- 安全认证 -->
<dependency>
<groupId>org.springframework.boot</groupId>
<artifactId>spring-boot-starter-security</artifactId>
</dependency>
<!-- 端点 -->
<dependency>
<groupId>org.springframework.boot</groupId>
<artifactId>spring-boot-starter-actuator</artifactId>
</dependency>
<dependency>
<groupId>org.springframework.boot</groupId>
<artifactId>spring-boot-starter-web</artifactId>
</dependency>
<dependency>
<groupId>org.springframework.boot</groupId>
<artifactId>spring-boot-starter-test</artifactId>
<scope>test</scope>
</dependency>
<!-- 在管理界面中与 JMX-beans 进行交互所需要被依赖的 JAR -->
<dependency>
<groupId>org.jolokia</groupId>
<artifactId>jolokia-core</artifactId>
</dependency>
</dependencies>

注意事项

如果要访问info接口想获取maven中的属性内容请记得添加如下内容

1
2
3
4
5
6
7
8
9
10
11
12
13
14
15
<build>
<plugins>
<plugin>
<groupId>org.springframework.boot</groupId>
<artifactId>spring-boot-maven-plugin</artifactId>
<executions>
<execution>
<goals>
<goal>build-info</goal>
</goals>
</execution>
</executions>
</plugin>
</plugins>
</build>

属性配置

在 application.properties 文件中配置actuator的相关配置,其中info开头的属性,就是访问info端点中显示的相关内容,值得注意的是Spring Boot2.x中,默认只开放了info、health两个端点,剩余的需要自己通过配置management.endpoints.web.exposure.include属性来加载(有include自然就有exclude,不做详细概述了)。这个management.endpoints.web.base-path属性比较重要,因为Spring Boot2.x后每个端点默认的路径是/actuator/endpointId这样一来Spring Boot Admin是无法正常采集的

application.properties

1
2
3
4
5
6
7
8
9
10
11
12
13
14
15
16
17
18
19
20
21
# 描述信息
info.blog-url=http://blog.battcn.com
info.author=Levin
# 如果 Maven 插件没配置此处请注释掉
info.version=@project.version@
info.name=@project.artifactId@
# 选择激活对应环境的配置,如果是dev则代表不用认证就能访问监控页,prod代表需要认证
spring.profiles.active=prod # 日志文件
logging.file=./target/admin-server.log # 加载所有的端点/默认只加载了 info / health
management.endpoints.web.exposure.include=*
# 比较重要,默认 /actuator spring-boot-admin 扫描不到
management.endpoints.web.base-path=/
management.endpoint.health.show-details=always spring.boot.admin.client.url=http://localhost:8080
# 不配置老喜欢用主机名,看着不舒服....
spring.boot.admin.client.instance.prefer-ip=true

application-dev.properties - 空

application-prod.properties

为了安全起见,应采用认证的方式

1
2
3
4
5
6
7
8
9
# 登陆所需的账号密码
spring.security.user.name=battcn
spring.security.user.password=battcn
# 便于客户端可以在受保护的服务器上注册api
spring.boot.admin.client.username=battcn
spring.boot.admin.client.password=battcn
# 便服务器可以访问受保护的客户端端点
spring.boot.admin.client.instance.metadata.user.name=battcn
spring.boot.admin.client.instance.metadata.user.password=battcn

主函数

添加上 @EnableAdminServer 注解即代表是Server端,集成UI的

1
2
3
4
5
6
7
8
9
10
11
12
13
14
15
16
17
18
19
20
21
22
23
24
25
26
27
28
29
30
31
32
33
34
35
36
37
38
39
40
41
42
43
44
45
46
47
48
49
50
51
52
53
54
55
56
57
58
59
60
61
62
63
64
65
66
package com.battcn;

import de.codecentric.boot.admin.server.config.AdminServerProperties;
import de.codecentric.boot.admin.server.config.EnableAdminServer;
import org.springframework.boot.SpringApplication;
import org.springframework.boot.autoconfigure.SpringBootApplication;
import org.springframework.context.annotation.Configuration;
import org.springframework.context.annotation.Profile;
import org.springframework.security.config.annotation.web.builders.HttpSecurity;
import org.springframework.security.config.annotation.web.configuration.WebSecurityConfigurerAdapter;
import org.springframework.security.web.authentication.SavedRequestAwareAuthenticationSuccessHandler; /**
* @author Levin
*/
@SpringBootApplication
@EnableAdminServer
public class Chapter14Application { public static void main(String[] args) {
SpringApplication.run(Chapter14Application.class, args);
} /**
* dev 环境加载
*/
@Profile("dev")
@Configuration
public static class SecurityPermitAllConfig extends WebSecurityConfigurerAdapter {
@Override
protected void configure(HttpSecurity http) throws Exception {
http.authorizeRequests().anyRequest().permitAll()
.and().csrf().disable();
}
} /**
* prod 环境加载
*/
@Profile("prod")
@Configuration
public static class SecuritySecureConfig extends WebSecurityConfigurerAdapter {
private final String adminContextPath; public SecuritySecureConfig(AdminServerProperties adminServerProperties) {
this.adminContextPath = adminServerProperties.getContextPath();
} @Override
protected void configure(HttpSecurity http) throws Exception {
SavedRequestAwareAuthenticationSuccessHandler successHandler = new SavedRequestAwareAuthenticationSuccessHandler();
successHandler.setTargetUrlParameter("redirectTo"); http.authorizeRequests()
.antMatchers(adminContextPath + "/assets/**").permitAll()
.antMatchers(adminContextPath + "/login").permitAll()
.anyRequest().authenticated()
.and()
.formLogin().loginPage(adminContextPath + "/login").successHandler(successHandler).and()
.logout().logoutUrl(adminContextPath + "/logout").and()
.httpBasic().and()
.csrf().disable();
}
}
}

测试

完成准备事项后,启动Chapter14Application 访问 http://localhost:8080/login 看到登陆页面则代表一切正常,接着输入账号密码点击登陆即可…
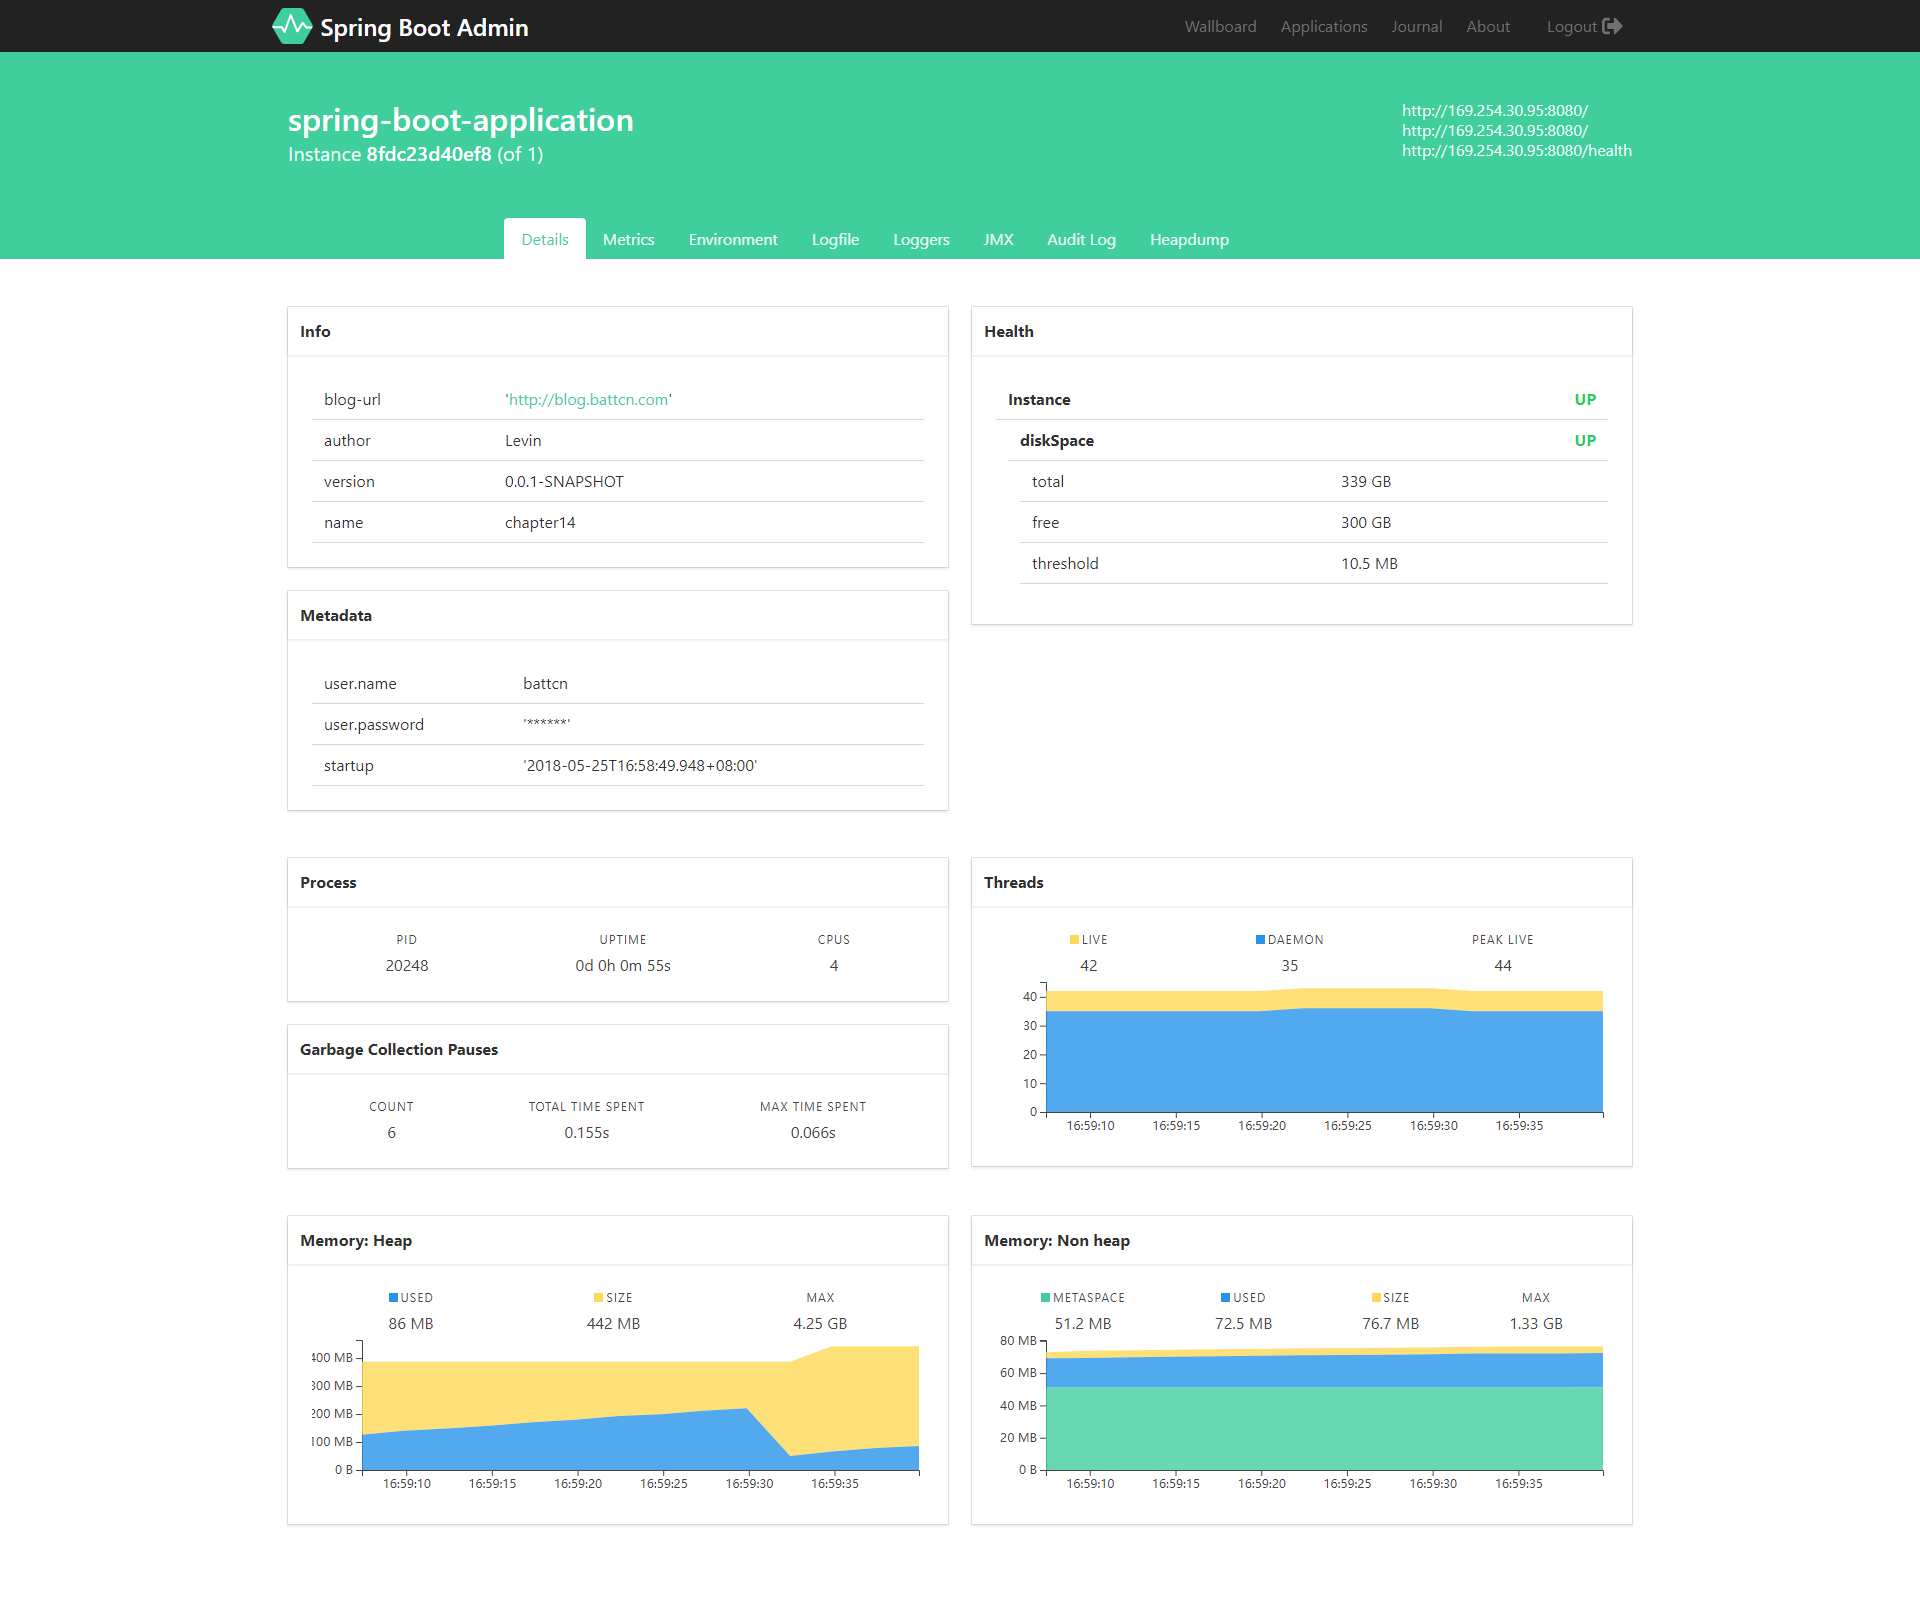
首页

由于篇幅原因大图就不放太多了,有兴趣的朋友可以直接fork代码运行即可

总结

参考文档:http://codecentric.github.io/spring-boot-admin/2.0.0/

actuator与spring-boot-admin 可以说的秘密的更多相关文章

  1. Spring Boot,Spring Cloud,Eureka,Actuator,Spring Boot Admin,Stream,Hystrix

    Spring Boot,Spring Cloud,Eureka,Actuator,Spring Boot Admin,Stream,Hystrix 一.Spring Cloud 之 Eureka. 1 ...

  2. Spring Boot 2.X(十七):应用监控之 Spring Boot Admin 使用及配置

    Admin 简介 Spring Boot Admin 是 Spring Boot 应用程序运行状态监控和管理的后台界面.最新UI使用vue.js重写里. Spring Boot Admin 为已注册的 ...

  3. spring boot admin + spring boot actuator + erueka 微服务监控

    关于spring boot actuator简单使用,请看 简单的spring boot actuator 使用,点击这里 spring boot admin 最新的正式版本是1.5.3 与 spri ...

  4. Spring Cloud Alibaba学习笔记(24) - Spring Boot Actuator 监控数据可视化:Spring Boot Admin

    我们都知道,Spring Boot Actuator 提供监控数据是Json数据,在某种程度来说并不利于分析查看,那么如何将其进行可视化呢?我们有很多种选择,但是目前在这个领域,最流行的是Spring ...

  5. SpringCloud微服务实战——搭建企业级开发框架(四十四):【微服务监控告警实现方式一】使用Actuator + Spring Boot Admin实现简单的微服务监控告警系统

      业务系统正常运行的稳定性十分重要,作为SpringBoot的四大核心之一,Actuator让你时刻探知SpringBoot服务运行状态信息,是保障系统正常运行必不可少的组件.   spring-b ...

  6. Spring Boot Admin 的使用 2

    http://blog.csdn.net/kinginblue/article/details/52132113 ******************************************* ...

  7. Spring Boot Admin的使用

    http://www.jianshu.com/p/e20a5f42a395 ******************************* 上一篇文章中了解了Spring Boot提供的监控接口,例如 ...

  8. Spring Boot Admin Reference Guide

    1. What is Spring Boot Admin? Spring Boot Admin is a simple application to manage and monitor your S ...

  9. Spring Boot admin 2.0 详解

    一.什么是Spring Boot Admin ? Spring Boot Admin是一个开源社区项目,用于管理和监控SpringBoot应用程序. 应用程序作为Spring Boot Admin C ...

  10. Spring boot admin 节点状态一直为DOWN的排查

    项目中需要监控各个微服务节点的健康状态,找到了spring boot admin这个全家桶监控工具,它其实是Vue.js美化过的Spring Boot Actuator,官方的解释是: codecen ...

随机推荐

  1. Java实现 LeetCode 697 数组的度(类似于数组的map)

    697. 数组的度 给定一个非空且只包含非负数的整数数组 nums, 数组的度的定义是指数组里任一元素出现频数的最大值. 你的任务是找到与 nums 拥有相同大小的度的最短连续子数组,返回其长度. 示 ...

  2. 面试三轮我倒在了一道sql题上——sql性能优化

    一.前言 最近小农在找工作,因为今年疫情的特殊原因,导致工作不是特别好找,所以一旦有面试电话,如果可以,都会去试一试,刚好接到一个面试邀请,感觉公司还不错,于是就确定了面试时间,准备了一下就去面试了. ...

  3. [C#.NET 拾遗补漏]04:你必须知道的反射

    阅读本文大概需要 3 分钟. 通常,反射用于动态获取对象的类型.属性和方法等信息.今天带你玩转反射,来汇总一下反射的各种常见操作,捡漏看看有没有你不知道的. 获取类型的成员 Type 类的 GetMe ...

  4. win10系统下office 2019激活

    1.新建一个文本文件,创建批处理文件office.bat @echo off (cd /d "%~dp0")&&(NET FILE||(powershell sta ...

  5. 读懂操作系统之虚拟内存TLB与缓存(cache)关系篇(四)

    前言 前面我们讲到通过TLB缓存页表加快地址翻译,通过上一节缓存原理的讲解为本节做铺垫引入TLB和缓存的关系,同时我们来完整梳理下从CPU产生虚拟地址最终映射为物理地址获取数据的整个过程是怎样的,若有 ...

  6. TensorFlow从0到1之TensorFlow损失函数(12)

    正如前面所讨论的,在回归中定义了损失函数或目标函数,其目的是找到使损失最小化的系数.本节将介绍如何在 TensorFlow 中定义损失函数,并根据问题选择合适的损失函数. 声明一个损失函数需要将系数定 ...

  7. 使用本地shadow socks代理

    1,第一种方式 import urllib2 import socks from sockshandler import SocksiPyHandler opener = urllib2.build_ ...

  8. ZWave 中的消息队列机制

    文章主题   在我们的日常编程中,对消息队列的需求非常常见,使用一个简洁.高效的消息队列编程模型,对于代码逻辑的清晰性,对于事件处理的高效率来说,是非常重要的.这篇文章就来看看 ZWave 中是通过什 ...

  9. 附015.Kubernetes其他技巧

    一 优化镜像源 1.1 国内镜像源 global proxy in China format example dockerhub (docker.io) dockerhub.azk8s.cn dock ...

  10. 【Flutter实战】图片组件及四大案例

    老孟导读:大家好,这是[Flutter实战]系列文章的第三篇,这一篇讲解图片组件,Image有很多高级用法,希望对您有所帮助. 图片组件是Flutter基础组件之一,和文本组件一样必不可少.图片组件包 ...