android 插件化框架speed-tools
项目介绍:
speed-tools 是一款基于代理模式的动态部署apk热更新框架、插件化开发框架;
speed-tools这个名字主要指的快速迭代开发工具集的意思。
功能与特性:
1、支持Android 2.3 以上版本
2、支持R文件资源直接调用
3、开发过程中无发射调用
4、apk无需安装直接调用
5、代理模式对代码侵入性少
6、使用简单,只需要继承简单的类即可
使用方法
添加依赖:
compile 'com.liyihangjson:speed_tools:1.0.3'
首先看看项目结构:
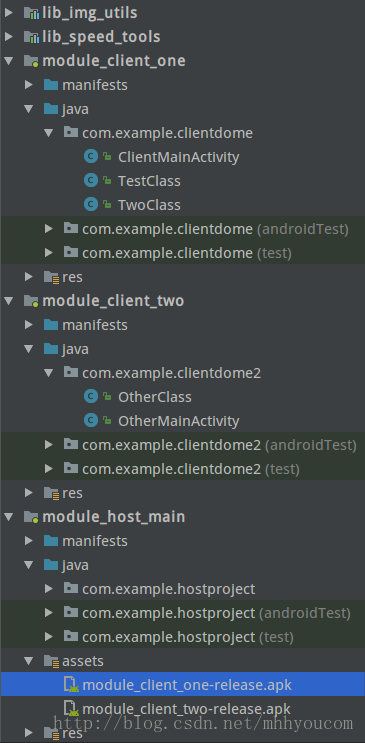
lib_speed_tools: 插件化核心功能library
module_host_main:宿主工程主工程,负责加载部署apk
module_client_one:测试业务apk 1
module_client_two:测试业务apk 2
lib_img_utils:测试imageloader图片框架
注意:需要使用speed tools 只需要依赖lib_speed_tools即可,然后开始配置插件化步骤:
首先在module_client_one中创建业务逻辑类:TestClass.java
/**

 *  by liyihang

 */

public class TestClass extends SpeedBaseInterfaceImp {

    private Activity activity;

    @Override

    public void onCreate(Bundle savedInstanceState, final Activity activity) {

        this.activity=activity;

        activity.setContentView(R.layout.activity_client_main);

        activity.findViewById(R.id.jump).setOnClickListener(new View.OnClickListener() {

            @Override

            public void onClick(View v) {

                SpeedUtils.goActivity(activity,"first_apk", "two_class");

            }

        });

        ImageView imageView= (ImageView) activity.findViewById(R.id.img_view);

        imageView.setVisibility(View.VISIBLE);

        ImgUtils.getInstance(activity).showImg("http://img.my.csdn.net/uploads/201309/01/1378037235_3453.jpg", imageView);

    }

}
SpeedBaseInterfaceImp业务组件中业务activity代理类,他是实现了主要的生命周期方法,相当于组件的activity类。
然后创建hock类每个业务组件中只创建一个:ClientMainActivity.java
public class ClientMainActivity extends SpeedClientBaseActivity {

    @Override

    public SpeedBaseInterface getProxyBase() {

        return new TestClass();

    }

}
这个类在组件中是唯一的,作用就是hock在独立测试时候使用。
接下来配置配置组件的AndroidManifest.xml
    <application

        android:allowBackup="true"

        android:icon="@mipmap/ic_launcher"

        android:label="@string/app_name"

        android:supportsRtl="true"

        android:theme="@style/SpeedTheme">

        <!--必须设置root_class-->

        <meta-data

            android:name="root_class"

            android:value="com.example.clientdome.TestClass" />

        <meta-data

            android:name="two_class"

            android:value="com.example.clientdome.TwoClass" />

        <activity

            android:name=".ClientMainActivity"

            android:theme="@style/SpeedTheme">

            <intent-filter>

                <action android:name="android.intent.action.MAIN" />

                <category android:name="android.intent.category.LAUNCHER" />

            </intent-filter>

            <!--组件意图-->

            <intent-filter>

                <data android:scheme="speed_tools" android:host="sijienet.com" android:path="/find_class"/>

                <action android:name="android.intent.action.VIEW"/>

                <category android:name="android.intent.category.DEFAULT"/>

            </intent-filter>

        </activity>

    </application>
组件意图写死保持一直,root_class 是调用死后使用对于配置的com.example.clientdome.TestClass业务类。这样业务组件配置完成。
接下来配置宿主工程module_host_main;
创建宿主工程唯一hock类:ApkActivity.java
/**

 *  by liyihang

 *  blog http://sijienet.com/

 */

public class ApkActivity extends SpeedHostBaseActivity {

    @Override

    public String getApkKeyName() {

        return HostMainActivity.FIRST_APK_KEY;

    }

    @Override

    public String getClassTag() {

        return null;

    }

}
整个宿主工程创建一个类即可,用户是hock activity;然后创建一个开屏页apk第一次加载时候需要一些时间,放入开屏等待页面是非常合适的。
HostMainActivity.java
/**

 *  by liyihang

 *  blog http://sijienet.com/

 */

public class HostMainActivity extends AppCompatActivity implements Runnable,Handler.Callback, View.OnClickListener {

    public static final String FIRST_APK_KEY="first_apk";

    public static final String TWO_APK_KEY="other_apk";

    private Handler handler;

    private TextView showFont;

    private ProgressBar progressBar;

    private Button openOneApk;

    private Button openTwoApk;

    @Override

    protected void onCreate(Bundle savedInstanceState) {

        super.onCreate(savedInstanceState);

        setContentView(R.layout.activity_host_main);

        showFont= (TextView) findViewById(R.id.show_font);

        progressBar= (ProgressBar) findViewById(R.id.progressbar);

        openOneApk= (Button) findViewById(R.id.open_one_apk);

        openTwoApk= (Button) findViewById(R.id.open_two_apk);

        handler=new Handler(this);

        new Thread(this).start();

    }

    @Override

    public void run() {

        String s = "module_client_one-release.apk";

        String dexOutPath="dex_output2";

        File nativeApkPath = SpeedUtils.getNativeApkPath(getApplicationContext(), s);

        SpeedApkManager.getInstance().loadApk(FIRST_APK_KEY, nativeApkPath.getAbsolutePath(), dexOutPath, this);

        String s2 = "module_client_two-release.apk";

        String dexOutPath2="dex_output3";

        File nativeApkPath1 = SpeedUtils.getNativeApkPath(getApplicationContext(), s2);

        SpeedApkManager.getInstance().loadApk(TWO_APK_KEY, nativeApkPath1.getAbsolutePath(), dexOutPath2, this);

        handler.sendEmptyMessage(0x78);

    }

    @Override

    public boolean handleMessage(Message message) {

        showFont.setText("当前是主宿主apk\n插件apk完毕");

        progressBar.setVisibility(View.GONE);

        openOneApk.setVisibility(View.VISIBLE);

        openTwoApk.setVisibility(View.VISIBLE);

        openOneApk.setOnClickListener(this);

        openTwoApk.setOnClickListener(this);

        return false;

    }

    @Override

    public void onClick(View v) {

        if (v.getId()==R.id.open_one_apk)

        {

            SpeedUtils.goActivity(this, FIRST_APK_KEY, null);

        }

        if (v.getId()==R.id.open_two_apk)

        {

            SpeedUtils.goActivity(this, TWO_APK_KEY, null);

        }

    }

}
加载apk核心代码是:
        String s = "module_client_one-release.apk";

        String dexOutPath="dex_output2";

        File nativeApkPath = SpeedUtils.getNativeApkPath(getApplicationContext(), s);

        SpeedApkManager.getInstance().loadApk(FIRST_APK_KEY, nativeApkPath.getAbsolutePath(), dexOutPath, this);
业务apk都是放在assets目录中。最后配置AndroidManifest.xml文件:
<?xml version="1.0" encoding="utf-8"?>

<manifest xmlns:android="http://schemas.android.com/apk/res/android"

    package="com.example.hostproject">

    <uses-permission android:name="android.permission.INTERNET"/>

    <uses-permission android:name="android.permission.WRITE_EXTERNAL_STORAGE"/>

    <application

        android:allowBackup="true"

        android:icon="@mipmap/ic_launcher"

        android:label="@string/app_name"

        android:supportsRtl="true"

        android:theme="@style/SpeedTheme">

        <!--启动activity 加载apk-->

        <activity android:name=".HostMainActivity">

            <intent-filter>

                <action android:name="android.intent.action.MAIN" />

                <category android:name="android.intent.category.LAUNCHER" />

            </intent-filter>

        </activity>

        <!--组件hack-->

        <activity

            android:name=".ApkActivity"

            android:label="@string/app_name"

            android:theme="@style/SpeedTheme" >

            <intent-filter>

                <data android:scheme="speed_tools" android:host="sijienet.com" android:path="/find_class"/>

                <action android:name="android.intent.action.VIEW"/>

                <category android:name="android.intent.category.DEFAULT"/>

            </intent-filter>

        </activity>

    </application>

</manifest>
这样所有配置结束,插件化实现。
github: https://github.com/jasonliyihang/speed_tools
作者:一航
android 插件化框架speed-tools的更多相关文章
- 自己动手写Android插件化框架
自己动手写Android插件化框架 转 http://www.imooc.com/article/details/id/252238 最近在工作中接触到了Android插件内的开发,发现自己这种技 ...
- 自己动手写Android插件化框架,让老板对你刮目相看
欢迎大家前往腾讯云+社区,获取更多腾讯海量技术实践干货哦~ 本文由达文西发表于云+社区专栏 最近在工作中接触到了Android插件内的开发,发现自己这种技术还缺乏最基本的了解,以至于在一些基本问题上浪 ...
- Android插件化框架
1. dynamic-load-apk/DL动态加载框架 是基于代理的方式实现插件框架,对 App 的表层做了处理,通过在 Manifest 中注册代理组件,当启动插件组件时,首先启动一个代理组件 ...
- android 插件化框架VitualAPK
推荐阅读: 滴滴Booster移动App质量优化框架-学习之旅 一 Android 模块Api化演练 不一样视角的Glide剖析(一) LeakCanary 与 鹅场Matrix ResourceCa ...
- Android插件化框架研究-DroidPlugin
直接贴上我做的ppt.
- android 插件化 模块化开发
http://blog.csdn.net/o1587790525/article/details/11891997 Android 插件化架构设计 http://www.iqiyi.com/w_19 ...
- 包建强的培训课程(10):Android插件化从入门到精通
@import url(http://i.cnblogs.com/Load.ashx?type=style&file=SyntaxHighlighter.css);@import url(/c ...
- Android插件化(三)载入插件apk中的Resource资源
Android载入插件apk中的Resource资源 简单介绍 怎样载入未安装apk中的资源文件呢?我们从android.content.res.AssetManager.java的源代码中发现,它有 ...
- Android 插件化开发(四):插件化实现方案
在经过上面铺垫后,我们可以尝试整体实现一下插件化了.这里我们先介绍一下最简单的实现插件化的方案. 一.最简单的插件化实现方案 最简单的插件化实现方案,对四大组件都是适用的,技术面涉及如下: 1). 合 ...
随机推荐
- Java使用Jacob转换Word为HTML
从今天开始,我也要养成记录开发中遇到的问题和解决方法的好习惯! 最近开发一个Android项目,需要用到查看Word和Pdf文档的功能,由于Android没有直接显示Word和PDF文档的组件,只有一 ...
- PHP多种序列化/反序列化的方法 json_encode json_decode
序列化是将变量转换为可保存或传输的字符串的过程:反序列化就是在适当的时候把这个字符串再转化成原来的变量使用.这两个过程结合起来,可以轻松地存储和传输数据,使程序更具维护性. 1. serialize和 ...
- why ftp服务器采用多进程模式
为什么没有采用多线程或者IO复用,原因是在多线程或IO复用的情况下,当前目录是共享的,无法根据每一个连接来拥有自己的当前目录. 多进程模式下,一个连接拥有2个进程,一个是nobody进程,一个是服务进 ...
- 开发板启动时,内核打印出"can't access tty,job control turned off"
启动后的最后一行提示can't access tty,job control turned off, 这说明没有进入到控制台,原因就在于文件系统的/etc/inittab 这个文件里有问题 vi /e ...
- Windows下安装zip包解压版mysql
Windows下安装zip包解压版mysql 虽然官方提供了非常好的安装文件,但是有的时候不想每次再重装系统之后都要安装一遍MySQL,需要使用zip包版本的MySQL.在安装时需如下三步: 1. 新 ...
- springmvc源码分析----入门看springmvc的加载过程
接上一篇我们写的入门---http://www.cnblogs.com/duanxiaojun/p/6591448.html 今天从这个门里进去我们看springmvc是如何在容器启动的时候将各个模块 ...
- C++ windows 多线程 互斥锁
#include <opencv2/core/version.hpp> #include <opencv2/calib3d/calib3d.hpp> #include < ...
- 搭建Linux的VMware Workstation Pro
搭建准备环境: 1.win10操作系统: 2.VMware Workstation Pro12: 下载地址 http://www.vmware.com/products/workstation/w ...
- 洛谷 - P2283 - 多边形 - 半平面交
https://www.luogu.org/problemnew/show/P2283 需要注意max是求解顺序是从右到左,最好保证安全每次都清空就没问题了. #include<bits/std ...
- Swift 数组,字典,结构体,枚举
1.数组 let types = ["none","warning","error"]//省略类型的数组声明 var menbers = [ ...